
Using RDP To Connect to Servers
The outbreak of COVID-19 shuttered offices around the world. Even now, the path to reopening and returning to break rooms, desks, and boardrooms is clouded in uncertainty. According to JLL, business leasing in the United States dropped by an astounding 43.4% in early 2020. The report states that the office market lost nearly 14.2 million square feet of occupancy.

While the office environment is a change we can visibly see, businesses also experienced massive change in another area this year: digital disruption. Typically, disruption is led by other companies. This year, it’s led by a global pandemic. COVID-19 has forced organizations to either rapidly adapt or fall out of the race entirely. Part of this adaptation requires providing remote access. Employees may need remote access to their desktops. IT departments will likely need remote access to their server resources. One way to provide that is through the Remote Desktop Protocol to servers.
RDP Can Connect to More Than Your Desktop
Many people know of RDP for accessing the desktop of their workstation. But the capability doesn’t end there. Another option is to use RDP to access servers and resources hosted in a data center, whether in the cloud like AWS or one hosted on-site. System administrators are very familiar with using RDP for managing and maintaining their windows servers. With RDP, they can access servers from any location, at any time, and under any circumstances. For instance, if you have a windows server set up in AWS, you can connect to it through RDP. If there is a particular Windows server you use for cloud testing (like installing the Windows Server 2012 connector), you can connect through RDP.
One thing to keep in mind is that RDPs can be vulnerable to attacks. One of the attacks RDPs see often is the Man-in-the-Middle attack, which is when hackers gain unauthorized access to the RDP session to “eavesdrop” on the network. On top of that, RDPs can be targeted by keyloggers and ransomware, among other things. The best way to protect your RDP from these types of attacks is to utilize a security solution like CloudConnexa. CloudConnexa secures data through encryption and ensures that no unauthorized parties are intercepting data while in transit.
CloudConnexa In Action
A great example of setting this up is to discuss a Windows instance with AWS. Amazon EC2 Windows are great choices for businesses that need scalable, flexible computing infrastructure to support Microsoft applications.

Biz is a small business that had on-site Windows Server but migrated it to AWS when stay-at-home ordinances went in place in their county. Using AWS meant they could use their current Windows Server License there, and they were already using AWS for other resources. They had already provided their employees with Remote Desktop access to their workstations and secured it using CloudConnexa.
They wanted to set up something similar to encrypt their connection to their server. To do this, one of the steps they needed to take was to open Port 3389 for incoming RDP traffic. While RDP does provide some security, such as using a password, they wanted to add an important security layer and send the data over their CloudConnexa network.
Connecting a Windows Server to a Network
Here’s an overview of the steps Biz should take to connect their Windows server to their network, using a Windows system service to automatically connect on system start-up:
- Log in to the CloudConnexa Admin panel.
- Create a new Host, named “Windows Server.”
- Download the Connector onto the Windows Server instance.
- Install the Connector on the Windows Server instance.
- Launch a command prompt window (run as administrator).
- Enter
cd/and hit enter (to go to the top of the directory tree). - Navigate to the OpenVPN Connect folder by entering
cd %ProgramFiles%/OpenVPN Connect. - Install the system service with the command:
ovpnconnector.exe install. - Start the service and connect the Host to their Cloud with the command:
ovpnconnector.exe start - Add Remote Access Role and Features to Windows Server application.
- Configure LAN routing on their server.
- Set up routing as needed.
Below are details of the commands for the ovpnconnector.exe app you can run from command prompt:
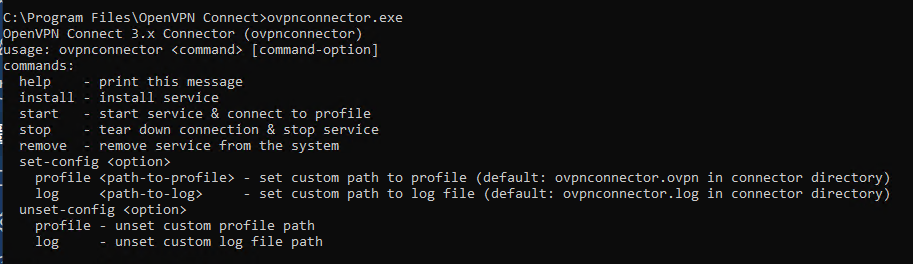
For more detailed information on setting up the Windows service as well as optional steps for setting specific profile and log files rather than using the defaults, these are outlined here: OpenVPN as a system service on Windows.
Click this link for more details on using an CloudConnexa Host.
Once Biz connects their server to their CloudConnexa network, they won’t need to worry about using remote desktop identity verification certificates. Using Remote Desktop is familiar for most Windows users, but it’s a tug of war between good security and keeping that ease of use. With the security of CloudConnexa, Biz could keep the ease of use for their system administrators to access the Windows Server. They safely encrypt their RDP traffic over an CloudConnexa tunnel.


