How to Create ZTNA with CloudConnexa
Enforcing Zero Trust Network Access (ZTNA) is a critical layer of a reliable security program. Is your business protected? If not, CloudConnexa offers an ideal security solution.
CloudConnexa gives businesses of all sizes the ability to create a secure virtualized network. This network expands secure access that protects workers using home and public WiFi networks, and SaaS apps, outside your network perimeter. We also provide all the tools and capabilities necessary for building a strong zero trust network to block or significantly mitigate cyber attacks. (Note that with zero trust, for the solution to be effective, it needs to be used at all times, since when it comes to zero trust architecture, there is not a trusted vs. untrusted network perimeter.)
ZTNA is more than the latest trendy acronym. Much more. Get the details you need most with the CloudConnexa datasheet.
ZTNA is more than the latest trendy acronym. Much more. Get the details you need most with the CloudConnexa datasheet.
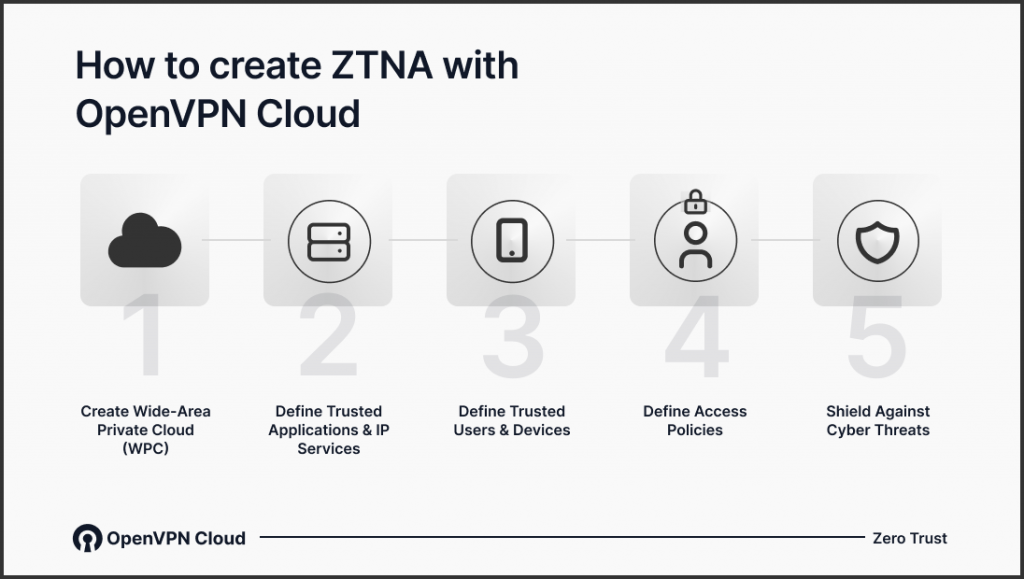
Creating ZTNA with CloudConnexa is a straightforward, hassle-free process that can be broken down into just five easy steps.
Our recent webinar, ZTNA is the New VPN, walks you through these exact steps so you can implement ZTNA with CloudConnexa for your business. Here’s a brief overview of those five steps:
1. Create a Wide-Area Private Cloud (WPC)
This secure private overlay network is ready for immediate use.
First, create an account with your preferred email and password. You’ll receive an email with a six-digit identity verification code. Enter that code when prompted.
The next step is to create a Cloud ID. The WPC is created once the Cloud ID is provided; it uniquely identifies your WPC. (You’ll see your Cloud ID in the upper right hand corner of the Admin Portal). You now have access to the Admin Portal where, if you like, you can create multiple WPCs within a single user account. Simply click the arrow beside your Cloud ID to open the drop-down menu, then click Add Cloud ID.
2. Define Trusted Applications and IP Services
From the Status page of your Admin Portal, you’ll be able to see how many active networks, hosts, and users you have within a given WPC/Cloud ID.
To create your first network, click Networks. Click Create a Network. From here, a step-by-step configuration wizard will walk you through your network setup; simply follow the steps (or feel free to skip the wizard altogether if you prefer).
The wizard will walk you through the following steps:
- Define Network - This is where you’ll name your network(s) and define connector(s).
- Add Connector - A Connector is an unattended device that provides constant connectivity to CloudConnexa.
- Deploy Network Connector [your connector name] - Select where to deploy, and we’ll provide the instructions for successful deployment.
- Configure Internet Access (Secure Internet Access scenario).
- Configure Routing.
- (Optional) Add a Network Application.
- (Optional) Add Route and Network IP Services.
- Add IP Service.
- Configure Access Group (Optional).
- Create a new Access Group.
This process is also documented here, for reference: Adding a Network | CloudConnexa.
To create a new host, click Hosts. Here, you’ll find a configuration wizard similar to the one for Networks; the difference here, however, is that the Connector is installed on the application server, thus providing direct access to the application instead of to the Network.
As noted in the steps above, once you’ve created your network, you can navigate to Network Details to modify your Internet Access according to the needs of your particular environment. Your three options are:
- Split Tunnel On (Level-1 Security)
- Split Tunnel Off (Level-2 Security)
- Restricted Internet (Level-3 Security)
For admins who want to streamline the process of accessing distributed applications, CloudConnexa Application-based Domain routing is both faster and easier than configuring and managing IP Services.
For admins who want to streamline the process of accessing distributed applications, CloudConnexa Application-based Domain routing is both faster and easier than configuring and managing IP Services.
To create your Applications just navigate to a Network or Host.
- Navigate to Networks > Applications or Networks > IP Services to view or configure domain name applications and IP services that are being served from a connected Network.
- Navigate to Hosts > Applications or Hosts > IP Services to view or configure domain name applications and IP services that are being served from a connected Host.
3. Define Trusted Users & Devices
In the Admin Portal, select Users. Here, you can create user groups (if appropriate to your environment), add individual users, and assign users to groups.
Note: While you’re here, we recommend that you enable two-factor authentication (2FA) for your users (in the Admin Portal, see Settings > User Authentication).
Within the Users section of the Admin Portal, you can also create and manage trusted user devices.
As the admin, you may choose to manually create devices and download the connection profile for those devices (which contain a unique digital certificate for device authentication). You can then push these profiles to trusted devices using a device management tool or by distributing these profiles to trusted users (via email or other means) to use with their trusted devices.
Alternatively, you (the admin) can allow users to download the profile to their trusted devices after authentication. Once the profile is downloaded to a device by the user, the device is automatically created and shown in your Admin portal.
4. Define Access Policies
Next up is access management. In the Admin Portal, select Access > Groups. To create a new access group, select the appropriate user group and network. For example, you may create an Access Group for your sales team. Under User Groups, you’d select “Sales Team,” and under Network, you could select “Salesforce” and “whatismyipaddress.”
5. Shield Against Cyber Threats
In the Admin Portal, click on Shield. The first time you access this section, you’ll be prompted to Configure Cyber Shield Domain Filtering. Select your protection level from our preset options, and click Enable.
After initial setup, when navigating to Shield, you’ll be presented with your Cyber Shield dashboard. Here you can toggle Domain Filtering and Traffic Filtering on or off. You can also edit the configuration of each by clicking on the pencil icon in the bottom left corner of each section in your Cyber Shield dashboard. Note that the Domain Filtering features an Allow List and a Block List for further customization of your Cyber Shield configuration.
By following the five steps we’ve outlined above, you can create zero trust network access that protects your users and your business from an ever-evolving variety of threats.
By following the five steps we’ve outlined above, you can create zero trust network access that protects your users and your business from an ever-evolving variety of threats.
If you have any questions about your particular use case or certain requirements unique to your business, do not hesitate to reach out to our sales engineers and request a demo. They’ll be happy to walk you through configuration, step by step, to help you achieve granular control and ensure setup is optimized to your business’s individual needs.
Why ZTNA Can’t Wait
Cybercriminals are constantly on the hunt for vulnerabilities in your network, and their methods and tactics are rapidly evolving all the time. Malware, data breaches, and ransomware are real threats for businesses of all sizes, and remote work and hybrid work environments are prime targets. In this current landscape, ZTNA has become the gold standard for secure network access. And CloudConnexa has the access controls modern businesses need to reduce the attack surface and enable identity-aware, role-based, zero trust access to applications.
With CloudConnexa, businesses no longer have to settle for the either/or application of VPNs and ZTNA strategies.
With CloudConnexa, businesses no longer have to settle for the either/or application of virtual private networks (VPNs) and ZTNA strategies. OpenVPN lets you provide remote users with secure user access with a best-in-class user experience for both users and admins. Plus, the functionality, scalability, and built-in cybersecurity benefits simply can’t be beat.
Our tools allow your business to extend security beyond your perimeter, unify access authentication, manage lateral movement, and prevent social engineering hacks, giving you the control and added network security your business deserves.
Recommended Reading: Remote workers and contractors are accessing cloud-based apps and assets more than ever. That makes protecting every endpoint critical. Check out the OpenVPN blog to learn more about crafting a zero trust security model for your corporate network.
Get Started Today
OpenVPN takes the cost and complexity out of building and managing a secure private network while delivering customers a streamlined cloud-based solution designed for modern business.
Our solution vertically integrates technologies from advanced IP routing and secure access, threat detection and prevention (IDS/IPS), and firewall into our virtualized, mesh-connected, high-speed network platform with worldwide points of presence (PoPs). We enhance the platform with additional capabilities including application-based domain routing, DNS-based content filtering, and unique resource publishing and sharing. The result is a secure platform that can scale to the largest global networks at a fraction of the cost and hassle of other approaches.
Ready to take your business to the next level with CloudConnexa and its built-in ZTNA solution? Subscribe now to get the network connectivity and security your business needs. Get started today.