Set the Device Identity Verification & Enforcement (DIVE) policy for Users
CloudConnexa's Device Identity Verification & Enforcement (DIVE) reduces your attack surface by locking the device profile containing the digital certificate to the device's identity – allowing only authorized devices to connect to your WPC.
CloudConnexa's Device Identity Verification & Enforcement (DIVE) reduces your attack surface by locking the device profile containing the digital certificate to the device's identity – allowing only authorized devices to connect to your WPC.
With DIVE, you can ensure that your users use only trusted devices to connect to your WPC. These devices could be company-owned or other devices approved by your company policy.
Minimum Client versions for DIVE
The functionality that is needed for DIVE to work is supported by the OpenVPN client with the minimum versions as shown in the table below.
Note
When using clients that meet the minimum client version requirement, the UUID will show in the connection details regardless of the DIVE setting.
Device OS | Minimum Client Version |
|---|---|
Windows | |
Mac OS | |
Linux | |
Android | |
iOS |
Options for DIVE policy
The device's identity is important to consider while providing access to applications. DIVE allows you to build a security policy around device identity.
If device identity is not part of your security policy, it is possible for an authorized user to transfer the connection profile from a company-owned laptop to a personal smartphone and continue to access applications. Worse yet, a bad actor can obtain the connection profile from a compromised device and try and access the applications with their device.
When enabled, the Device Identity Verification and Enforcement (DIVE) feature creates a mapping of the connection profile and the device that stores it. It checks device identity (UUID of the device) during requests to connect and import profile operations, ensuring that only authorized devices can connect and obtain configuration profiles.
The DIVE setting is turned OFF by default. It has two other settings: Learn and Enforce, and Enforce.
This mode allows you the option to create a Device with or without its Device ID (UUID). If a Device is created without the ID, the Device ID will propagate in the administration portal on the next successful connection, and the User will only be able to connect from that Device on future connections (i.e., the profile from that device cannot be used to connect with any other device).
DIVE learns the identity ( UUID) of an unknown device on that device's first successful connection and locks the connection profile (digital certificate) used to authenticate that connection with that device. On future connections using that connection profile, DIVE enforces that the same device made those connections.
When the Enforce mode is enabled, you must configure the UUID of the Device when it is created. Only users with trusted Devices (i.e., configured devices with their UUID) can download profiles and connect successfully.You must enter the UUID in existing Devices and when creating new Devices using the Users > Devices menu.
Finding the UUID of a device
To discover the UUID for Linux clients, run the following command in the terminal: openvpn3-admin variables --machine-id.
For Windows OS the command is wmic path win32_computersystemproduct get UUID.
For macOS you can find the UUID from the About this Mac (Apple icon) > System Report.
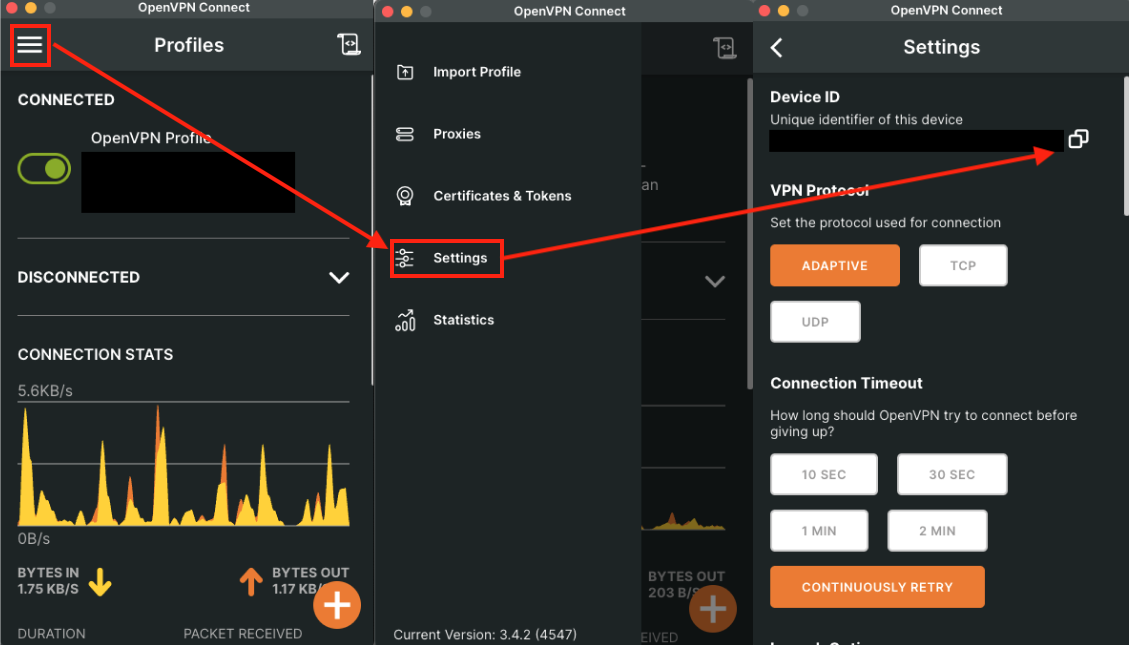
The UUID can also be found directly from the installed Connect app by going to the Settings screen, as shown in the figure below.
Setting the value for the DIVE policy
The default value is set to OFF. If you want to change this value, follow the steps below:
Navigate to Settings > Users.
Click Edit, which is located in the top right corner.
Select one of the available options for DIVE.
Click Update.
Check that the details shown in the confirmation dialog box are correct, and click Confirm.