
Introduction
This guide is for existing OpenVPN Access Server users on Amazon AWS who want to migrate their existing configuration to the latest version. We recommend migrating to stay up-to-date with software and security updates and ensure that the product functions properly.
We recommend reading the Amazon AWS update security advisory.
Consider switching to a subscription
If your instance uses a tiered appliance (billed through Amazon AWS), but you wish for more flexibility in the license model, we recommend switching to an OpenVPN Subscription.
Before you begin
Hostname or Elastic IP
If users connect to your server using a custom domain (DNS hostname) or the instance's public Elastic IP address, the migration won't affect their user experience. You'll get your new VPN server up and running, then point the domain or Elastic IP address to the new server, and clients connect automatically.
However, your clients must update client connections if your migration results in a new IP address and you don't use a DNS record.
Using a cluster of OpenVPN Access Servers
If you have a separate database to support a cluster of Access Servers, you won't need to follow the steps below to back up and migrate your database. Instead, you can set up a new instance, add it to the cluster, and remove the old node. With the configuration stored in the central database, this migration is the easiest to implement.
Back up your OpenVPN Access Server configuration
Start by backing up your Access Server configuration databases: Configuration Database Management And Backups.
Use these commands, with root privileges, to make a backup on your existing (old) instance:
which apt > /dev/null 2>&1 && apt -y install sqlite3
which yum > /dev/null 2>&1 && yum -y install sqlite
cd /usr/local/openvpn_as/etc/db
[ -e config.db ]&&sqlite3 config.db .dump>../../config.db.bak
[ -e certs.db ]&&sqlite3 certs.db .dump>../../certs.db.bak
[ -e userprop.db ]&&sqlite3 userprop.db .dump>../../userprop.db.bak
[ -e log.db ]&&sqlite3 log.db .dump>../../log.db.bak
[ -e config_local.db ]&&sqlite3 config_local.db .dump>../../config_local.db.bak
[ -e cluster.db ]&&sqlite3 cluster.db .dump>../../cluster.db.bak
[ -e clusterdb.db ]&&sqlite3 clusterdb.db .dump>../../clusterdb.db.bak
[ -e notification.db ]&&sqlite3 notification.db .dump>../../notification.db.bak
cp ../as.conf ../../as.conf.bak
Launch a new instance
If you wish to use an AWS tiered instance billed and licensed through Amazon AWS directly, use our Amazon tiered quick start guide to launch a new instance of OpenVPN Access Server. The tiered instances are licensed automatically.
If you wish to use the more flexible subscription model, use our Amazon BYOL quick start guide instance. These instances require you to input the subscription key, which you can purchase from our site. Once you've activated your subscription, your Access Server allows more than two VPN connections.
Restore Access Server Data
Now you can move your configuration over to the new instance.
- Connect with a file transfer application such as WinSCP and connect with key pairs from your old and new instances using SSH to run commands. Note: The default username on our images is openvpnas.
- Transfer the backup files from the /usr/local/openvpn_as/ folder of your old instance to your new one, placing them under the same folder.
- Stop the Access Server service on your new installation, then restore the backup and restart the service using the commands below with root privileges:
service openvpnas stop
which apt > /dev/null 2>&1 && apt -y install sqlite3
which yum > /dev/null 2>&1 && yum -y install sqlite
cd /usr/local/openvpn_as/etc/db
[ -e ../../config.db.bak ]&&rm config.db;sqlite3<../../config.db.bak config.db
[ -e ../../certs.db.bak ]&&rm certs.db;sqlite3 <../../certs.db.bak certs.db
[ -e ../../userprop.db.bak ]&&rm userprop.db;sqlite3 <../../userprop.db.bak userprop.db
[ -e ../../log.db.bak ]&&rm log.db;sqlite3 <../../log.db.bak log.db
[ -e ../../config_local.db.bak ]&&rm config_local.db;sqlite3 <../../config_local.db.bak config_local.db
[ -e ../../cluster.db.bak ]&&rm cluster.db;sqlite3 <../../cluster.db.bak cluster.db
[ -e ../../clusterdb.db.bak ]&&rm clusterdb.db;sqlite3 <../../clusterdb.db.bak clusterdb.db
[ -e ../../notification.db.bak ]&&rm notification.db;sqlite3 <../../notification.db.bak notification.db
[ -e ../../as.conf.bak ]&&cp ../../as.conf.bak ../as.conf
chmod 0600 /usr/local/openvpn_as/etc/db/*.db
chmod 0600 /usr/local/openvpn_as/etc/as.conf
service openvpnas start - Sign in to the Admin Web UI of your new instance.
If you have problems logging in with the administrative account that worked on your old instance, you may need to reset the password. Refer to the reset default openvpn account administrative access instructions.
Check license activation
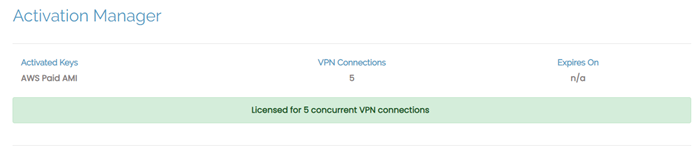
If you're running the AWS tiered instance type, you can see the number of licensed connections in the Admin Web UI under Configuration > Activation. This activation key displays as an AWS paid AMI.
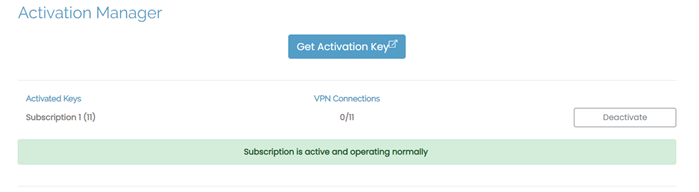
If you're running the BYOL instance type, you have a subscription you activated in the Admin Web UI under Configuration > Activation. You obtain a subscription license key from the Access Server Portal on our website. This activation key displays as a Subscription.
Change your DNS A record or IP address
You can now update your hostname or Elastic IP address and automatically move your clients to your new subscription server.
To update your hostname, update your DNS A record to point to the public IP address of your new server.
To move the Elastic (or static) IP address in Amazon from the old instance to the new one, release it first from the old instance and then associate it with the new instance.
Your users should now be able to connect to the new server.
Cancel your old instance
Refer to the AWS website for documentation on how to terminate your old EC2 instance.


