Using Marketplace To Launch Access Server Stack
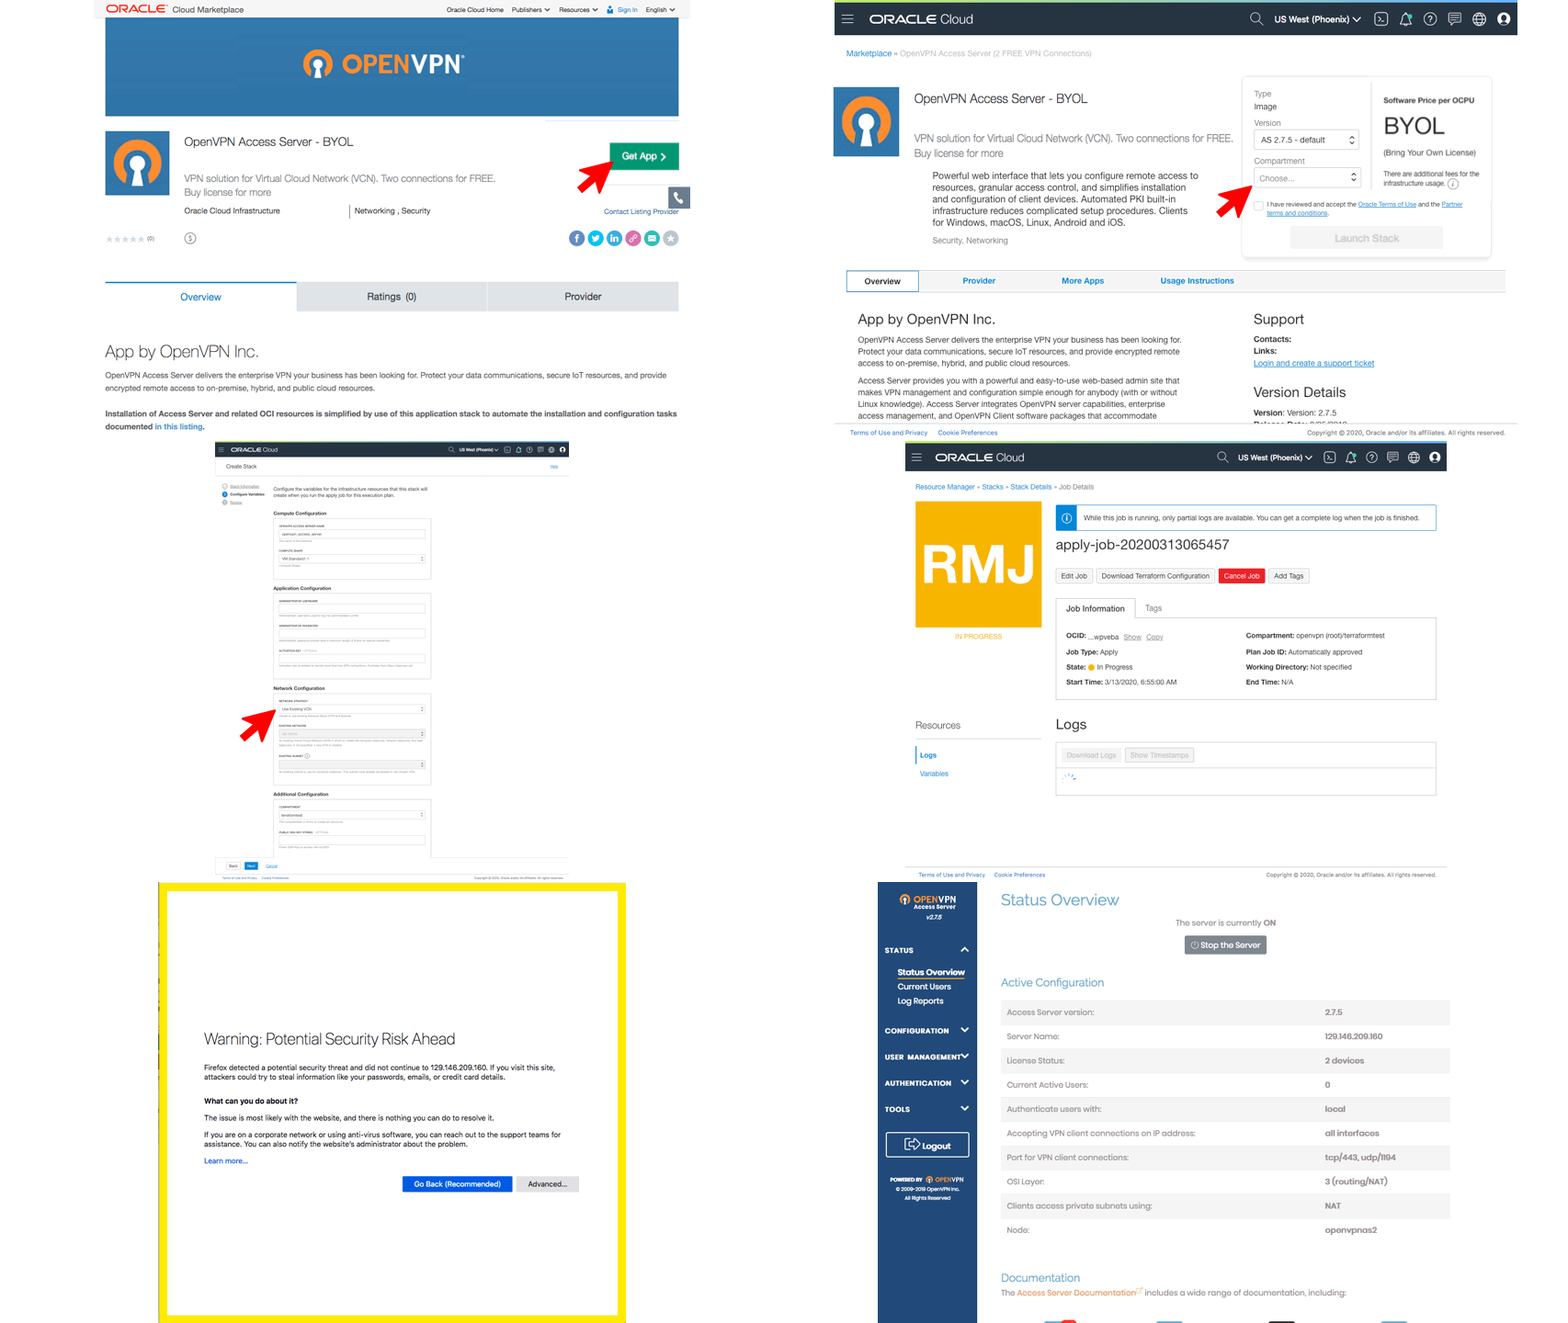
To install OpenVPN Access Server in your OCI tenancy, follow these steps:
- Find the BYOL listing of OpenVPN Access Server in the Oracle Marketplace
- Click on the Get App button
- Select an OCI Region from the drop-down list and click on the Sign In button
- Provide your Cloud Tenant identifier and Click on Continue button
- Sign In to your OCI account
- Choose a Compartment from the drop-down list
- Accept the terms and click on the Launch Stack button
- Click on the Next button on Step-1 of the Stack Creation workflow
- Review, fill or change the values of the variables that appear in the sections below. Variables in bold deserve special attention
- Compute Configuration
- OpenVPN Access Server Name: Change the name of the Instance if desired
- Compute Shape: Select one of the compatible compute shapes from the drop-down
- Application Configuration
- Administrator Username: type in a username for the Administrator to log into the administration portal. It needs to start with a letter and can only contain alphanumeric values. Do NOT use openvpn as the administrator's username.
- Administrator Password: type in a password for the Administrator to log in. It should have a minimum length of 8 and no special characters
- Activation Key: Activation key is needed to handle more than two VPN connections. Purchase from https://openvpn.net
- Network Configuration
- Network Strategy: Choice of Create New VCN or Use Existing VCN
- If Create New VCN is chosen, you can change the value of these variables:
- Virtual Cloud Network (VCN): The name of the new Virtual Cloud Network (VCN)
- VCN CIDR BLOCK: The CIDR of the new Virtual Cloud Network (VCN). If you plan to peer this VCN with another VCN, the VCNs must not have overlapping CIDRs.
- VCN DNS Label: Only letters and numbers, starting with a letter. 15 characters max.
- Subnet Span: Choose between regional and AD specific subnets
- Subnet: The name of the new Subnet
- Subnet CIDR: The CIDR of the new Subnet. The new subnet's CIDR should not overlap with any other subnet CIDRs.
- Subnet DNS Label: Subnet DNS Label. Only letters and numbers, starting with a letter. 15 characters max.
- If Use Existing VCN is chosen:
- Existing Network: Choose an existing Virtual Cloud Network (VCN) in which to create the compute instances, network resources, and load balancers. If not specified, a new VCN is created.
- Existing Subnet: Choose an existing subnet to use for compute instances. This subnet must already be present in the chosen VCN.
- If Create New VCN is chosen, you can change the value of these variables:
- Network Strategy: Choice of Create New VCN or Use Existing VCN
- Additional Configuration
- Compartment: Change or choose the compartment in which to create all resources
- Public SSH Key: paste your public SSH Key to access VM via SSH
- Compute Configuration
- Click on the Next button to proceed to Step-3
- Review and click on the Create button
- The job will start to run and you will see the job is In Progress
- Once the job has succeeded, click on the Application Information tab
- Wait for a few minutes for the configuration to take and then click on the Login to Administer button
- Refresh the browser as needed till you see the Security warning
- The security warning is generated due to the use of self-signed web certificate, please take steps to bypass this warning and proceed
- Login using the username and password you had provided during the Stack configuration. This information is also shown on the Application Information tab
- Review and click Agree on the terms web page
You have now successfully installed OpenVPN Access Server in your OCI tenancy.
