Tutorial: Use CloudConnexa for Secure Internet Access
Route internet traffic securely through CloudConnexa — covers creating a Secure Internet Access Network, deploying a Connector, configuring Split Tunnel Off, setting up Tunnel Bypass, and controlling access with Applications, IP Services, and Access Groups.
Overview
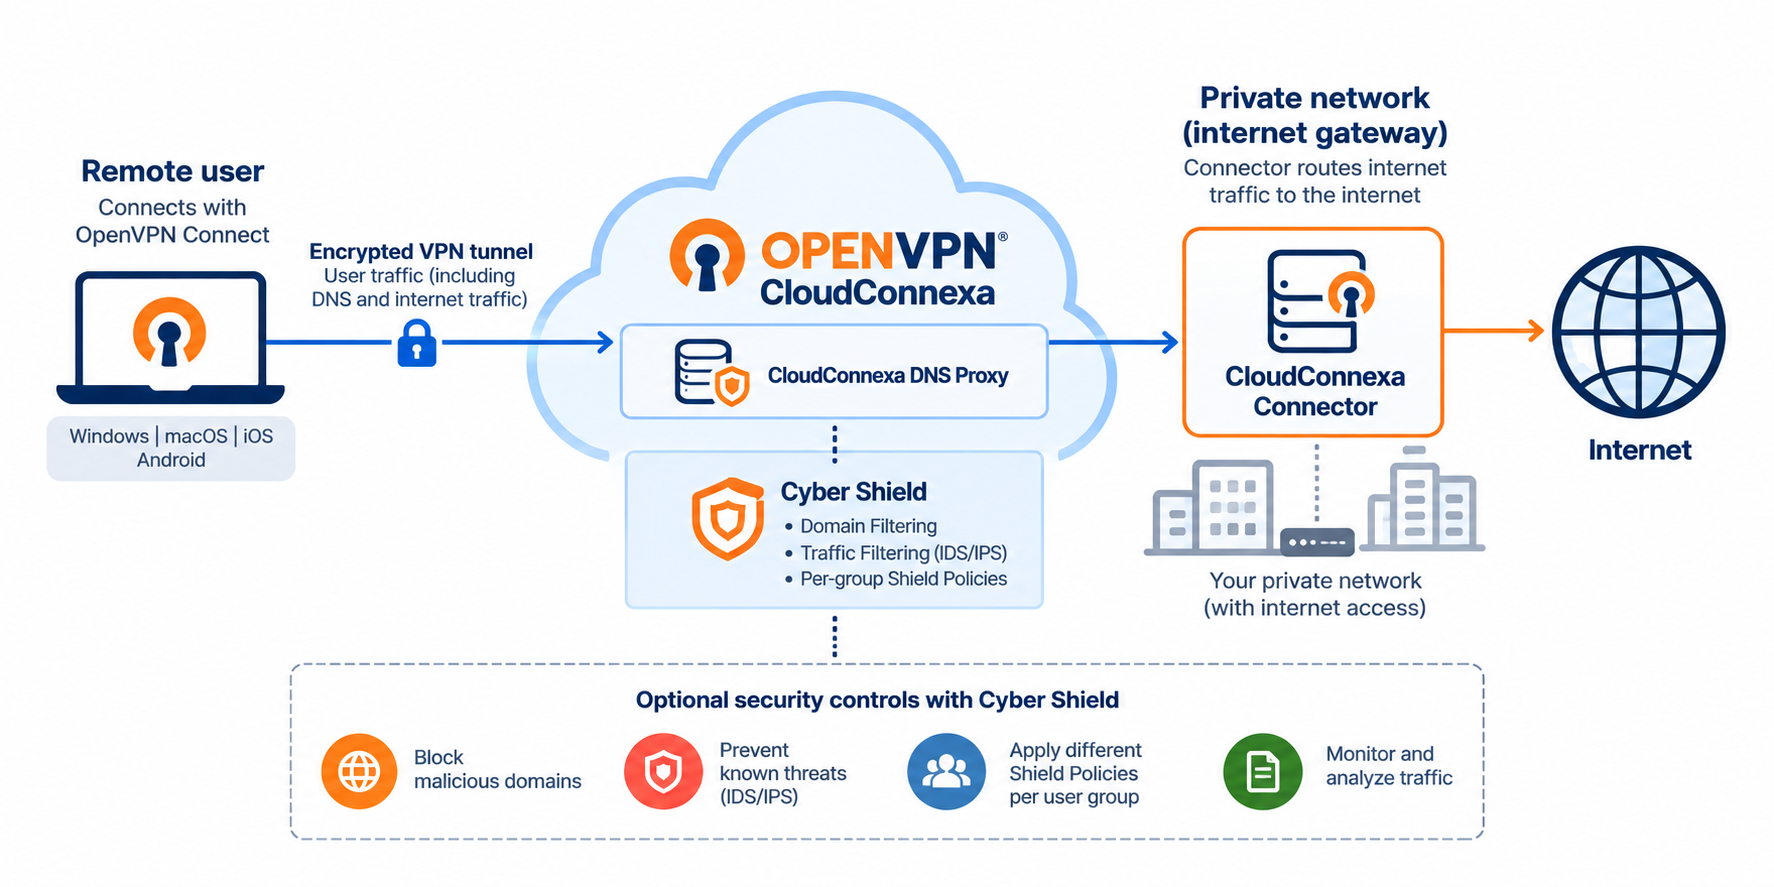
This tutorial shows you how to securely route internet traffic through CloudConnexa using a private network configured as an internet gateway.
With this setup:
Users securely connect to CloudConnexa using OpenVPN Connect. This setup can also provide the foundation for secure remote access for distributed teams.
Internet traffic is routed through trusted private networks.
Organizations can centrally control internet-bound traffic.
Cyber Shield can provide additional protection with Domain Filtering and Traffic Filtering (IDS/IPS). You can apply different filtering protection to User Groups with Shield Policies.
You can apply additional third-party security controls, such as CASB solutions, as needed.
You can configure CloudConnexa to:
Route all internet traffic through a private network.
Route only specific public domains or IP destinations through CloudConnexa.
Route all traffic through CloudConnexa while allowing specific destinations to bypass the tunnel and route locally.
Configure internet access per User Group, Network, or Host.
Before you begin
Before starting this tutorial, ensure you have:
A private network that can provide internet access.
A system or compatible router available for Connector deployment.
Administrative access to CloudConnexa.
This tutorial covers:
Creating a Network.
Configuring internet gateway behavior.
Deploying a Connector.
Configuring Internet Access settings.
Configuring optional Applications, IP Services, and Access Groups.
Connecting users to CloudConnexa.
Step 1: Create your CloudConnexa account
Follow the steps here to create your CloudConnexa account:
Tip
When you create your account, you'll define a Cloud ID (for example, mycompany.openvpn.com). Once set, you can't change it. Your Cloud ID is used to:
Access the Administration portal.
Download OpenVPN Connect.
Import connection profiles.
Connect devices to CloudConnexa.
Step 2: Create a Network for secure internet access
Create a secure internet access Network to provide an internet gateway for traffic routed through CloudConnexa.
Navigate to Networks → Networks.
Select Add Network.
Select Secure Internet Access, then select Continue.
Configure the Network settings:
Name — Enter a name (for example,
secure_internet_network).Description (optional) — Enter a description.
Configure the Connector settings:
Connector Tunneling Protocol — Leave the default value of OpenVPN selected unless you specifically require IPsec.
Connector Name — Enter a name for the Connector.
Connector Description (optional) — Enter a description for the Connector.
Region — Select the Region closest to you.
Select Next.
Step 3: Deploy the Connector
Deploy a Connector on the private network that will provide internet access.
On the Connector Details page, select Provider Type, then select where you'll deploy the Connector.
Follow the guided deployment steps provided in the network configuration wizard.
Complete the Connector installation.
Select Next to verify that the Connector is online.
For more information, refer to:
Step 4: Configure Internet Access settings
Configure internet access per User Group, Network, or Host from the Configure Internet Access step of the network configuration wizard.
From the Configure Internet Access step, select the User Groups, Networks, and Hosts that should route through CloudConnexa and the configured internet gateway.
Internet Access will be set to Split Tunnel Off for each selection.
For those not selected, Internet Access will be set to Split Tunnel On.
Select Next.
With Split Tunnel Off, all internet traffic is routed through CloudConnexa and exits through the configured internet gateway.
Internet Access determines how internet traffic is routed. If you also want to filter or monitor that traffic, you can use Cyber Shield. Shield Policies let you apply different Domain Filtering and Traffic Filtering protection to different User Groups.
For an example, refer to Tutorial: Protect Your Users From Malware and Other Cyber Threats.
Tip
With Internet Access set to Split Tunnel Off, you can use Tunnel Bypass to route traffic to specific destinations through the local network gateway instead of through CloudConnexa.
This is useful for locally reachable resources, such as on-premises systems, intranet services, or performance-sensitive applications that don't require secure tunneling.
Tunnel Bypass is configured per user group from Access → Internet. Refer to About Tunnel Bypass.
For more information, refer to:
Step 5: Configure Applications, IP Services, and Access Groups (optional)
If users also need access to specific public or private resources through the Network, configure Applications, IP Services, and Access Groups.
After configuring internet access, the wizard steps you through configuring:
Applications for domain-based access control and routing.
IP Services for protocol- and subnet-based access control.
Access Groups to define which user groups can access resources.
To configure these resources:
On the Applications step, add any domains or applications users should be allowed to access through CloudConnexa.
Configure optional Application settings such as:
Allowed protocols.
Embedded IP support.
Exact Match domain behavior.
Continue to the IP Services step.
Add any IP-based services, protocols, or subnet ranges that should be accessible through the Network.
Continue to the Access Groups step.
Select an existing Access Group or create a new one.
Configure the appropriate sources and destinations for the Access Group.
Complete the Network Configuration Wizard and save the Network.
Applications, IP Services, and Access Groups let you define access to specific resources separately from the Internet Access configuration established in Step 4.
Step 6: Connect your users
Add users and connect their devices to CloudConnexa.
Navigate to Users → Users.
Add users manually or configure SAML or LDAP authentication.
If you include an invitation email to users:
Users automatically receive onboarding instructions.
Users can download OpenVPN Connect and import connection profiles.
If you don't include an invitation email to users, provide your users with:
The User portal URL.
Their username.
A temporary password.
Tutorial: Block All Internet Traffic Except To Trusted Internet Destinations
Tutorial: Learn About the Levels of Security Afforded by the Use of Various Internet Access Options
Tutorial: Protect Your Users From Malware and Other Cyber Threats
Tutorial: Secure All Internet Traffic by Configuring a Private Network as an Internet Gateway
Tutorial: Use Multiple Geographically Distributed Internet Gateways to Improve Internet Performance
Tutorial: Steer Traffic To Specific Internet Destinations Through CloudConnexa