Tutorial: Secure All Internet Traffic by Configuring a Private Network as an Internet Gateway
Learn how to securely route all internet traffic through CloudConnexa by configuring a private network as an internet gateway for centralized internet security and traffic control.
Overview
Learn how to set up secure internet access for your CloudConnexa users with an egress network that acts as an internet gateway.
This tutorial shows how to securely route all internet traffic through CloudConnexa by configuring a private network as an internet gateway.
With this setup:
User internet traffic is tunneled through CloudConnexa.
Traffic exits to the internet from a trusted private network.
Users can securely access the internet from untrusted locations such as hotels, airports, cafés, and public Wi-Fi networks.
Organizations can apply additional security controls such as DNS filtering, monitoring, CASB, or IDS/IPS inspection.
This configuration is useful for organizations that want centralized control over internet-bound traffic without managing traditional VPN infrastructure.
Before you begin
Before starting this tutorial, ensure you have:
A private network that can act as an internet gateway.
A Linux system available for Connector deployment within the private network.
Permission to install and configure a Connector on the server.
OpenVPN Connect available for testing connectivity.
You should also be familiar with:
Adding Networks in CloudConnexa.
Installing Connectors.
Configuring internet access settings for User Groups.
Step 1: Create a Network to act as an internet gateway
Create a Network in CloudConnexa to serve as the internet gateway for outbound traffic.
To create the Network, follow these steps:
Create a new Network. For reference: Add a Network for secure internet access
Ensure the Internet Gateway option is turned on during network creation.
Don't configure subnets if the network will only be used as an internet gateway.
Complete the setup.
Refer to:
Step 2: Deploy a Connector on the internet gateway network
Deploy a Connector on a server within the private network to route internet traffic from CloudConnexa to the internet.
We recommend using Linux for the Connector host.
To deploy the Connector, follow the steps below:
Prepare a server or virtual machine with:
Internet access.
A public IP address.
Routing enabled.
Install the Connector using the deployment instructions provided in the CloudConnexa Administration portal. Details found here: Add a Connector to a Network.
Verify that the Connector successfully connects to CloudConnexa.
Confirm the Network status changes to online.
Refer to:
Step 3: Configure internet access for user groups
Configure User Groups to route all internet traffic through CloudConnexa and the configured internet gateway.
To change the Internet Access setting, follow the steps below:
Navigate to Access → Internet.
On the User Groups tab, locate the user group you want to modify.
Click the edit (
 ) icon.
Set Internet Access to Split Tunnel Off.
Select the new network from the Interne Gaeway (Egress) drop-down.
Click Update Internet Access.
When Split Tunnel Off is enabled:
All internet traffic is tunneled through CloudConnexa.
Traffic exists through configured internet gateways instead of the user's local internet connection.
Refer to:
Tip
With Split Tunnel Off configured, you can use Tunnel Bypass to route specific destinations directly to the local network gateway rather than through CloudConnexa. This is useful when users need access to locally reachable resources such as on-premises systems or intranet services while all other traffic remains securely tunneled. Tunnel Bypass is configured per User Group. Refer to About Tunnel Bypass.
Step 4: Verify internet traffic routing
Verify that internet traffic is securly routed through the configured internet gaetway.
To verify the configuration, follow the steps below:
Connect a device to CloudConnexa using OpenVPN Connect.
Open a browser and visit a public IP lookup website.
Verify that the displayed public IP address matches the public IP address of the Connector host or internet gateway network.
If the displayed public IP address matches the internet gateway network, the configuration is working correctly.
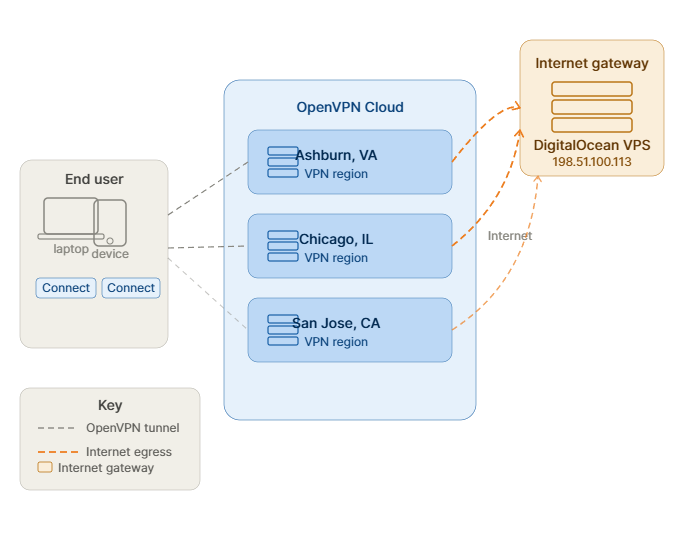
Illustration of successful routing:

Step 5: Add users and begin secure internet access
After verifying the configuration, add users to CloudConnexa and provide access.
To add users, follow these steps:
Navigate to Users → Users in the Administration portal.
Add users using their email address or your preferred authentication method.
Instruct users to connect using OpenVPN Connect.
Once connected:
All internet traffic is securely routed through CloudConnexa.
Traffic exits through the configured internet gateway.
Additional security controls can be applied centrally.
Refer to: