Tutorial: Use CloudConnexa to Secure DNS Traffic
Learn how CloudConnexa secures DNS traffic by routing encrypted DNS queries through the WPC tunnel, bypassing rogue DNS servers and DNS hijacking attacks — with verification steps using nslookup to confirm DNS protection is active.
Overview
Use CloudConnexa to protect DNS traffic when users connect from trusted or untrusted networks, including public Wi-Fi and public hotspots.
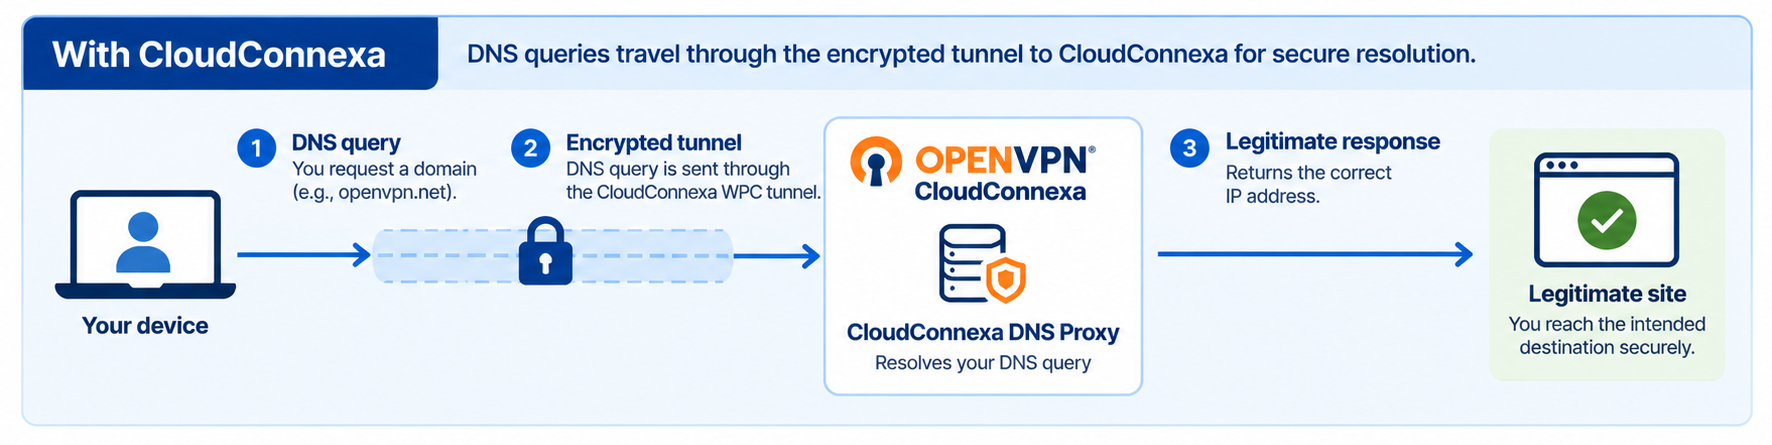
When a device connects to CloudConnexa, its DNS queries travel through the encrypted WPC tunnel and are resolved through CloudConnexa instead of the local network's DNS server. This DNS encryption helps protect users from DNS hijacking and rogue DNS servers.
This tutorial shows you how to:
Connect a device to CloudConnexa.
Use
nslookupto verify that DNS resolves through CloudConnexa.Add users and connect their devices.
This protection is useful for remote users accessing corporate resources, SaaS applications, and other internet services from networks your organization doesn't control.
For information about configuring DNS for your WPC, refer to About DNS Settings.
How CloudConnexa protects against DNS hijacking
DNS hijacking, also called DNS poisoning or DNS redirection, manipulates DNS resolution so a domain resolves to an unintended destination.
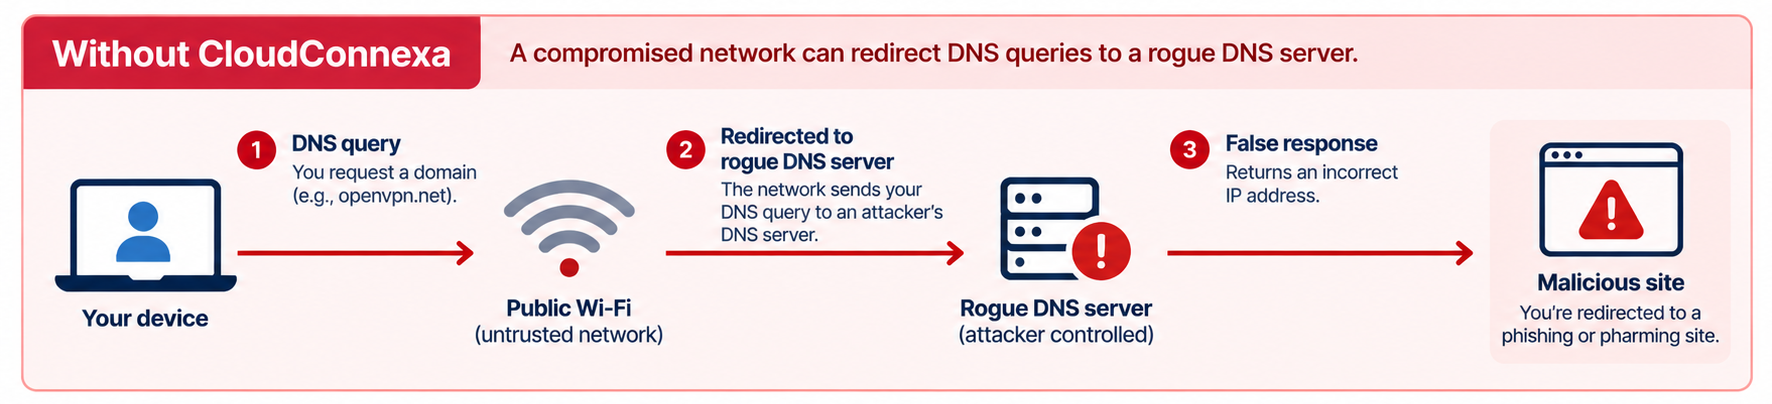
For example, a compromised public Wi-Fi network can direct a device to a rogue DNS server. The attacker can then return a fraudulent IP address for a legitimate domain, potentially redirecting users to phishing or pharming sites.
The figure shows that a compromised public hotspot can redirect DNS queries to a rogue DNS server.
When connected to CloudConnexa, the device sends its DNS queries through the encrypted WPC tunnel for resolution. The local public Wi-Fi network doesn't resolve those queries.
The figure below shows CloudConnexa sending DNS queries through the encrypted WPC tunnel, bypassing the local network's DNS servers.
Want to filter DNS traffic too?
Secure DNS resolution protects DNS traffic in transit. Cyber Shield Domain Filtering provides an additional layer of protection by monitoring or blocking domains based on content categories and domain lists.
With Shield Policies, you can apply different Domain Filtering protection to different User Groups. Refer to About Cyber Shield or Tutorial: Secure DNS Traffic and Use DNS-Based Content Filtering.
Before you begin
Before starting this tutorial:
Install OpenVPN Connect on a test device.
Import a CloudConnexa connection profile.
Step 1: Connect to CloudConnexa
Launch OpenVPN Connect.
Connect using your CloudConnexa connection profile.
Verify that OpenVPN Connect displays Connected.
Step 2: Verify DNS resolution through CloudConnexa
Use nslookup to verify that your device is using CloudConnexa for DNS resolution.
While connected to CloudConnexa, open a command prompt or terminal.
Run an nslookup command for a domain. For example:
nslookup openvpn.net
Review the DNS server address in the response.
When DNS resolves through CloudConnexa, the DNS server address is within the
100.96.0.0/11range. For example:Server: UnKnown Address: 100.96.2.65
Tip
Servermay displayUnKnownif the DNS server IP address doesn't resolve to a hostname. This doesn't indicate a DNS resolution problem.
Note
The specific DNS server IP can vary. Verify that the address belongs to
100.96.0.0/11rather than looking for a specific IP address.
Step 3: Add and connect your users
After verifying DNS resolution, add the users whose devices should connect to CloudConnexa.
Navigate to Users → Users.
Select Add User.
Enter the user information and select a Primary User Group.
Select Add User.
Note
To send an invitation email with onboarding instructions to the user, select that option during User creation and provide the email address.
For the complete procedure, refer to Add a User.
After users connect with OpenVPN Connect, their DNS queries are sent through the encrypted WPC tunnel for resolution through CloudConnexa.
What happens next
CloudConnexa now provides secure DNS resolution for connected users, including when they connect from untrusted networks such as public Wi-Fi.
To add DNS-based threat and content protection, configure Cyber Shield Domain Filtering. Shield Policies let you apply different filtering protection to different User Groups.
Continue with Tutorial: Secure DNS Traffic and Use DNS-Based Content Filtering.