Tutorial: Secure DNS Traffic and Use DNS-Based Content Filtering
Learn how to set up CloudConnexa DNS security and DNS-based content filtering with Cyber Shield — verify DNS traffic is routed through the WPC tunnel, configure Domain Filtering categories in a Shield Policy, and confirm malicious domains are blocked.
Overview
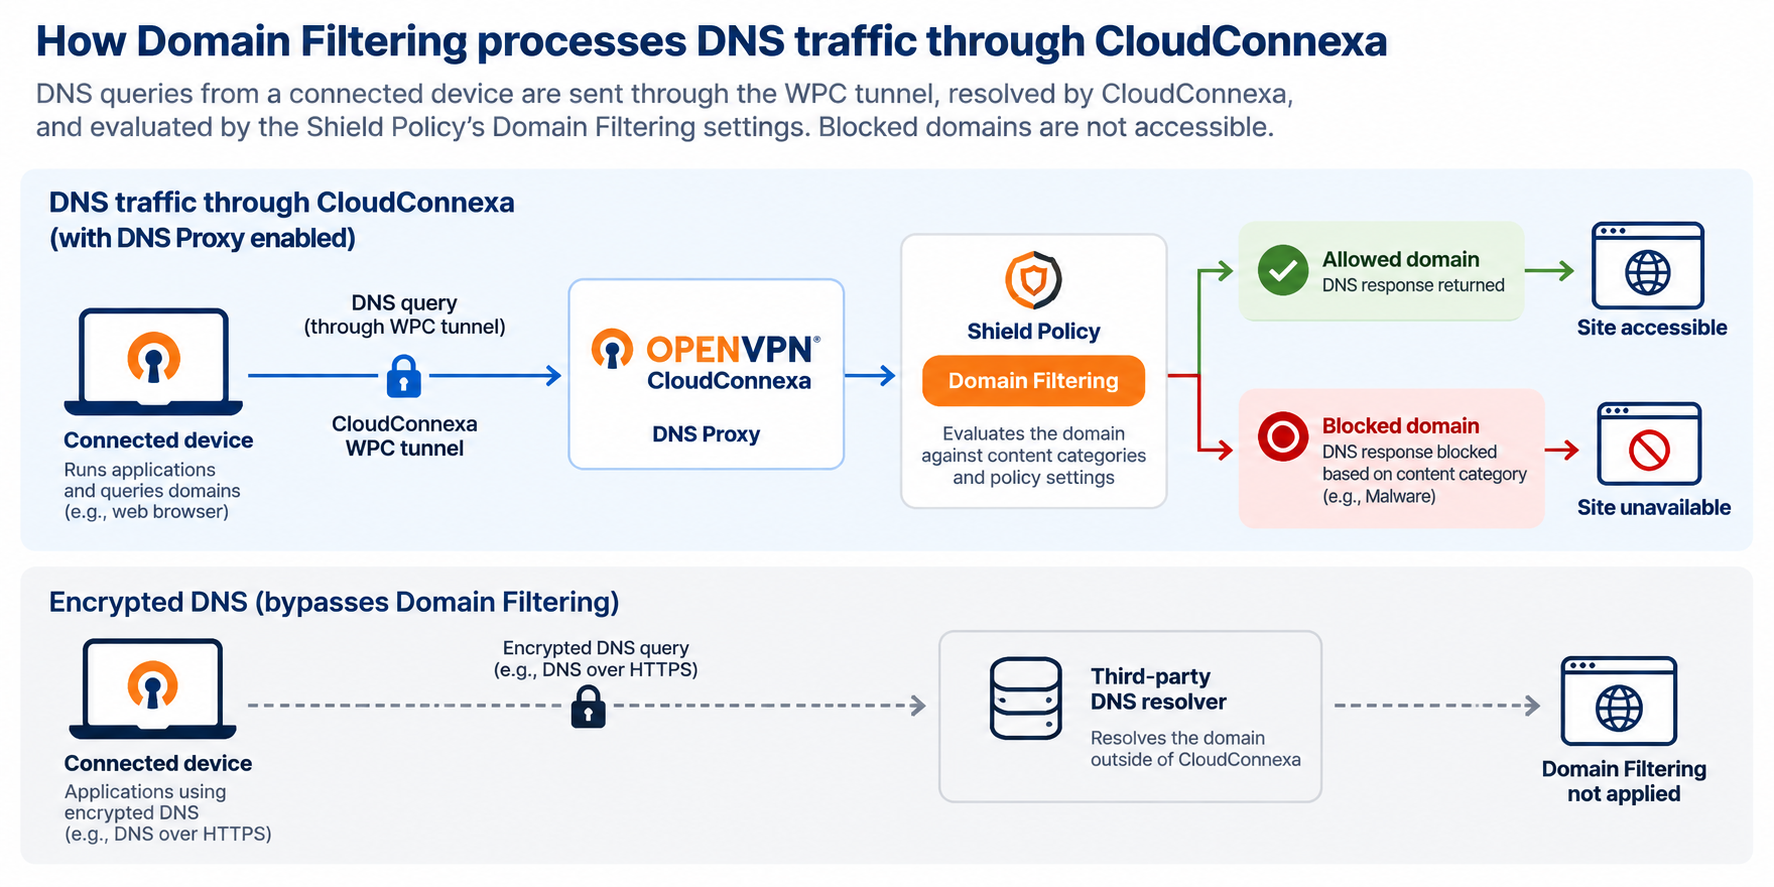
Use CloudConnexa to improve DNS security by sending DNS queries through the WPC tunnel and applying DNS-based content filtering with Cyber Shield Domain Filtering.
In this tutorial, you will:
Verify that a connected device sends DNS queries through CloudConnexa.
Configure Domain Filtering in a Shield Policy.
Test that CloudConnexa blocks a domain based on its content category.
You'll use nslookup to verify DNS resolution and malware-test-domain.openvpn.com to confirm that Domain Filtering blocks a malicious domain.
For an introduction to Domain Filtering and other Cyber Shield features, refer to About Cyber Shield.
Before you begin
You need:
A configured CloudConnexa WPC.
OpenVPN Connect installed on the test device.
DNS Proxy turned on for Domain Filtering.
Tip
Domain Filtering applies only to DNS queries resolved through CloudConnexa. If DNS Proxy is off, your Domain Filtering rules remain configured but aren't applied.
Encrypted DNS, such as DNS over HTTPS (DoH), can send queries to a third-party resolver and bypass Domain Filtering. Turn off secure or encrypted DNS on the test device before testing Domain Filtering.
If you need to configure a User first, refer to Add a User.
Step 1: Verify DNS resolution through CloudConnexa
First, connect the test device and verify that DNS queries are resolved through CloudConnexa.
Launch OpenVPN Connect.
Connect to your CloudConnexa WPC.
Open a command prompt or terminal.
Run an nslookup command for a domain. For example:
nslookup openvpn.net
Review the DNS server address in the response.
When DNS resolves through CloudConnexa, the DNS server address is within the
100.96.0.0/11range. For example:Server: UnKnown Address: 100.96.2.65
Tip
Servermay displayUnKnownif the DNS server IP address doesn't resolve to a hostname. This doesn't indicate a DNS resolution problem.
Note
The specific DNS server IP can vary. Verify that the address belongs to
100.96.0.0/11rather than looking for a specific IP address.
If the DNS server isn't in the CloudConnexa range, verify the device's DNS configuration and that DNS Proxy is on before continuing.
For a more detailed DNS-only workflow, refer to Tutorial: Use CloudConnexa to Secure DNS Traffic.
Step 2: Configure DNS-based content filtering
Cyber Shield Domain Filtering lets you monitor or block DNS requests based on content categories.
Domain Filtering is configured per Shield Policy. The policy assigned to a User Group determines which Domain Filtering settings apply to its users.
If you haven't created custom Shield Policies, configure the Default Policy to apply filtering to User Groups that aren't assigned another policy.
Select Shield → Policies.
Select the edit icon for the Shield Policy you want to configure.
Select the Domain Filtering tab.
Turn on Domain Filtering.
Select a protection level or configure individual content categories.
Ensure the Malware category is set to Blocked in your selected protection level or custom category configuration.
If appropriate for your filtering requirements, configure other categories such as Hacking.
Save your changes.
The Domain Filtering settings now apply to User Groups covered by that Shield Policy.
For information about assigning different filtering settings to different User Groups, refer to About Shield Policies and Create or Edit a Shield Policy.
For the available protection levels and content categories, refer to Domain Filtering Protection Levels and Content Categories.
Step 3: Verify that Domain Filtering blocks a malicious domain
Use the OpenVPN test domain to verify that the policy blocks a domain categorized as Malware.
Verify that the test device is connected to CloudConnexa.
Verify that the User Group for your test user uses the Shield Policy you configured.
Open a web browser on the test device.
Navigate to:
malware-test-domain.openvpn.com.Verify that access is blocked.
Tip
Depending on the browser, you may see an error such as: "This site can't be reached."
The blocked test confirms that the device's DNS query was evaluated by the Shield Policy's Domain Filtering configuration.
If the domain isn't blocked:
Verify that Malware is blocked in the policy's Domain Filtering tab.
Verify that the test user's User Group uses the expected Shield Policy.
Verify that DNS Proxy is on.
Use
nslookupagain to verify that DNS resolves through the CloudConnexa100.96.0.0/11range.Verify that secure or encrypted DNS, including DoH, isn't enabled on the test device or browser.
What happens next
Your connected users can now send DNS queries through CloudConnexa and receive DNS-based content filtering according to their Shield Policy.
You can create additional Shield Policies when different User Groups require different filtering. You can also:
Use the Domain Allow List to allow specific domains that would otherwise be blocked.
Use the Domain Block List to block specific domains regardless of their content category.
Review Domain Filtering events from Shield → Overview and Shield → Metrics.