Operating Systems
Windows
Tutorial: Enable routing and NAT on Windows Server 2016
This configuration tutorial provides the steps to enable routing and NAT on a Windows Server 2016.
This configuration tutorial provides the steps to enable routing and NAT on a Windows Server 2016.
You must first deploy the Routing and Remote Access Service on Windows Server.
We strongly recommend that you refer to the specific documentation for the Windows Server version that you are using.
This document provides information on deploying Routing and Remote Access Service for Windows Server 2016. You can refer to Microsoft’s own documentation here: https://docs.microsoft.com/en-us/windows-server/remote/remote-access/ras/remote-access-server-role-documentation
Open Server Manager, click Tools and select Routing and Remote Access.

Right-click the server, and select Configure and Enable Routing and Remote Access.

When the setup wizard opens, click Next.
If Routing is needed:
Select Custom configuration and click Next
Select LAN routing
If NAT is needed:
Select Custom configuration and click Next.
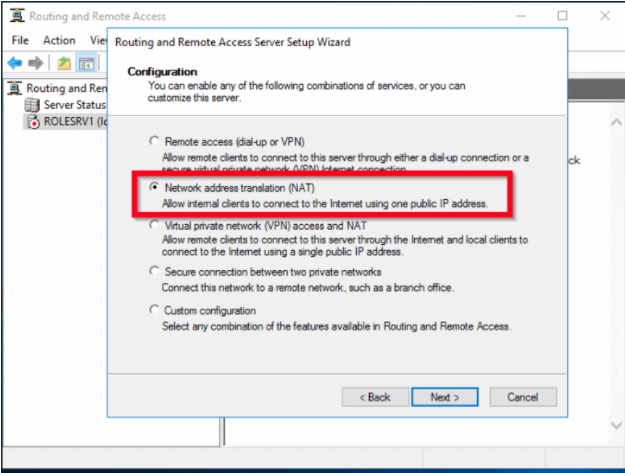
Select Lan routing.
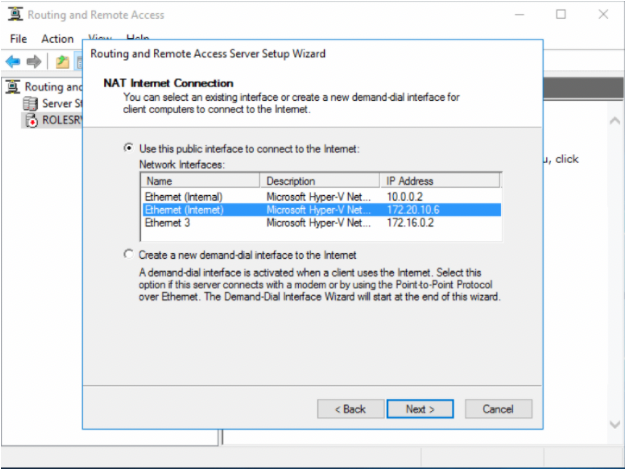
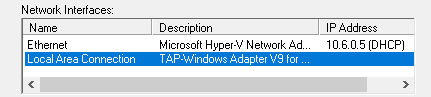
Select the network adapter that shares the internet connection (in this case Local Area Connection - TAPv9 adapter), and then click Next.
On the summary page, click Finish.
The wizard initializes and starts the RRAS service. Once the initialization completes, the server status icon changes to green.
Re-start the service/server.
Tutorial: Use OpenVPN Service Binary on Windows to Automatically Connect to CloudConnexa on Startup
This tutorial shows you how to use the OpenVPN Service binary to run as a system service. This means that if the service is properly installed and configured, it will establish an OpenVPN connection automatically on system start-up, regardless of whether it was explicitly started or not.
Introduction
Starting from the OpenVPN Connect app version 3.2, the application includes the OpenVPN Service binary that allows running an OpenVPN connection as a system service. This means that if the service is properly installed and configured it will establish an OpenVPN connection automatically on system start-up, regardless of whether it was explicitly started or not.
Follow these steps in order to do that on Windows:
Connect App Installation
Go to https://openvpn.net/client-connect-vpn-for-windows/ and click Download OpenVPN Connect V3.
Note
If you are using CloudConnexa or Access Server, you may also download OpenVPN Connect with an already existing OpenVPN Profile from the portal.
After the download has been completed, click on the set up in the Downloads pop-up bar in your browser.
In the OpenVPN Connect setup Wizard that has just opened, click Next.
Read the License Agreement and click on the I accept the terms in the License Agreement checkmark (in case you accept the terms).
Click Next.
In the Driver Selection window, choose a driver and click Next.
Click the Install button in order to begin the installation process.
Finally, click Finish in order to finish the setup process after the installation has been completed.
Starting System Service
Press Win+S on your keyboard in order to open the Search window, then type
cmdin order to find the Command Prompt.Now, click Run as Administrator in the panel on the right.
Type
cd/in the Command Prompt Window in order to go to the top of the directory tree.Next, type
cd %ProgramFiles%/OpenVPN Connect(if you are using the x64 version) orcd %ProgramFiles(x86)%>/OpenVPN Connect(if you are using the x86 version) in the Command Prompt Window in order to navigate to the default directory where OpenVPN Connect is located.Install the system service by typing the following command into the Command Prompt:
ovpnconnector.exe install.Note
The system service will not be automatically installed when you install the OpenVPN Connect app. You will still have to install the service in the Command Prompt after you have installed the app.
Optional Now, configure the OpenVPN Profile that will be running automatically with system service by typing the following command into the Command Prompt:
ovpnconnector.exe set-config Profile <path-to-Profile.ovpn>Important
Only autologin profiles are supported at the current moment. Even if the downloaded Profile has been moved to
%ProgramFiles%/OpenVPN Connect, you still have to enter the full path to the OpenVPN Profile.Note
If this step was skipped, the service will try to connect via Profile located at the service directory
namedovpnconnector.ovpn. If Connect client was downloaded from Access Server or CloudConnexa and has a bundled Profile,ovpnconnector.ovpnis a copy of a bundled Profile.Optional Specify the path to a log file by typing the following command into the Command Prompt:
ovpnconnector.exe set-config log <path-to-log>.Important
The log file will only appear in the intended directory only after the connection has been established. If there is no log file in the directory, then the connection has not been established.
Note
If not specified, the service will write logs to the file located at the same directory named
ovpnconnector.log. Apart from writing regular OpenVPN logs to the configured log file service will also report any critical errors to the system Event Viewer → Windows Logs → Applications. (Event source:OVPNConnectorService).Start the service by typing the following command into the Command Prompt:
ovpnconnector.exe start. This command will try to establish a connection via a configured Profile using system service.Important
OpenVPN Connect client should not be running, otherwise, service startup will abort.
Open the log file you specified in Step 7 or the default
%ProgramFiles%/OpenVPN Connect/ovpnconnector.login order to verify that the OpenVPN connection was successfully established. Scroll to the very end, and find the line<timestamp> EVENT: CONNECTED <OpenVPN Profile name>, which will confirm the connection's success.Important
The log file will only appear in the intended directory if the connection was successful. If there is no log file, then the connection has not been established
Notice that you can’t use OpenVPN Connect when the service is running, the application UI will be blocked by the corresponding modal window. It will disappear if you stop the service.
Notice how now, if you restart your machine, the OpenVPN connection will be established automatically on system start-up thanks to this system service, regardless of whether it was explicitly started or not.
Using System Service
You can check service status in Windows Services utility by pressing Win+S and typing Services into the Windows search bar and clicking Services in the search results.
Here, find the OpenVPN Connect 3.x Connector service in the Windows Services tab. Notice how now, if you restart your machine, the OpenVPN connection will be established automatically on system start-up thanks to this system service, regardless of whether it was explicitly stated or not.
Notice that you can stop or restart the service from this tab. If you click Stop, the OpenVPN connection will be terminated.
Important
Connection will restart automatically after the system reboot unless you remove the service.
You will also be able to start the service in case it was stopped from the Windows Services tab.
Stop and Remove System Service
You can stop the service by entering the following command into the Command Prompt:
ovpnconnector.exe stop. A OpenVPN connection will be terminated.Important
Connection will restart automatically after the system reboot unless you remove the service.
Configured paths to the connection Profile and the log file can be rolled back to default values using the following commands in the Command Prompt:
ovpnconnector .exe unset-config Profileandovpnconnector.exe unset-config log.Important
The service needs to be stopped first to change the configuration. You will be able to use a different CloudConnexa session as a system service only after running
ovpnconnector.exe unset-configProfile, as a System Service will still be present, but it won’t have the Running status in Windows Services since it will have no OpenVPN Profile associated with it. Afterward, to change the OpenVPN Profile of the system service, simply go through the steps in the section Starting System Service with a new OpenVPN Profile.If you want to remove system service run the command:
ovpnconnector.exe remove
Default Connect App settings for connection
Connection Timeout: Continuously retry (try to connect indefinitely)
Seamless Tunnel: Enabled (Block traffic while OpenVPN connection is paused or reconnecting)
The rest of the settings can be configured in the Profile itself
Tutorial: Install a Connector on Windows
This tutorial shows you how to install the OpenVPN Connect app with the bundled Connector profile on your Windows computer. The Windows computer can then be used as a Host without connecting the rest of the network to CloudConnexa or as a Network Connector making the applications on the entire network accessible.
Installing a Connector for Windows
In order to use a computer on a private Network, running Windows operating system, as a CloudConnexa Host so that CloudConnexa Users can access services running on it, follow the steps below:
Sign in to the CloudConnexa Administration portal at https://cloud.openvpn.com
Navigate to Hosts and click (+) to add a new Host.
Give the Host and Connector a name, select a Region for the Connector, and click on the checkmark icon to complete configuration.
Note
The Connector has been assigned a WPC IP Address
100.96.1.66Click on the download icon next to the Connector to show the various download options.
Click on Download Connector App for Windows option.
You can click on the Download if you want to download and install the Connector on the computer that you are working on or you can click on Copy URL button to open the URL in the browser of the target Windows computer so that the software gets downloaded directly on that computer.
Go to the Windows computer and paste the URL in the browser to start downloading the OpenVPN Connect Client and its bundled Profile. This has to be done within 15 minutes of URL generation.
Click on the downloaded installer to start the installation process.
Click on the Run button of the security warning. Note that some versions of Windows may also display a warning that the driver is not signed. Continue the installation in spite of the warning.
Click on the Next button to start the OpenVPN Connect set up Wizard.
Accept the terms in the License Agreement by clicking on the checkbox and click on the Next button.
Click on the Install button to begin the installation.
Installation progress will be shown, click on the Finish button to exit the set up Wizard.
You will see the OpenVPN Connect icon in the system tray. Launch OpenVPN Connect from your application menu.
Click on the Profile that is already present to connect to your CloudConnexa.
Optional: Windows firewall settings
If you are running any other application or service on the Host, the windows firewall needs to be configured to allow access to the service.
The example below shows how to allow access to a web server running on port 8080 by using netsh
netsh advfirewall firewall add rule name="TCP Port 8080" dir=in action=allow protocol=TCP localport=8080
For more on firewall configuration, see https://support.microsoft.com/en-us/help/947709/how-to-use-the-netsh-advfirewall-firewall-context-instead-of-the-netsh

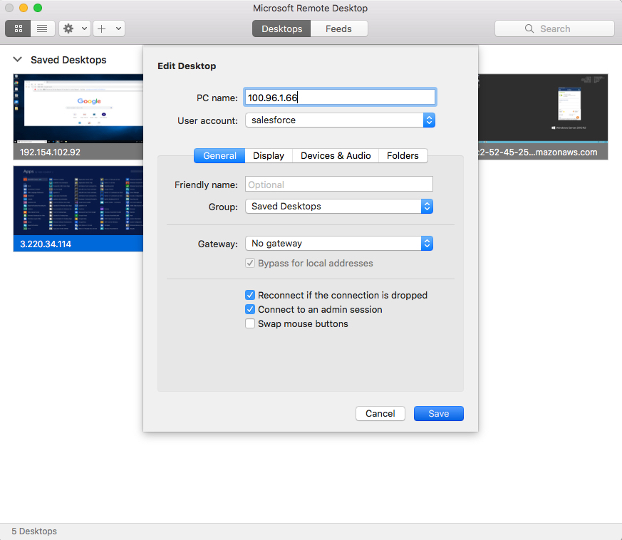
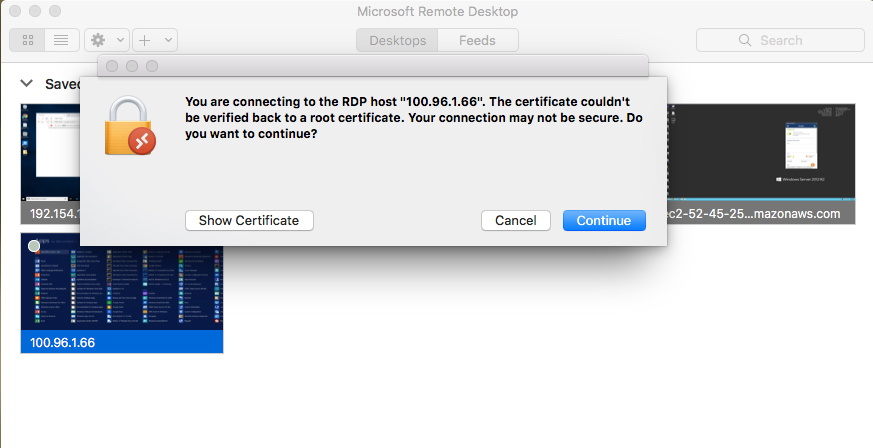
Optional: Remote desktop connection
If the Windows computer you installed the Connector on is running Remote Desktop Service, you can configure an RDP connection by using the WPC IP Address of the Connector (in this example, 100.96.1.66). The screenshots below show a macOS computer, that is connected to CloudConnexa, configuring an RDP connection and connecting to the Windows Host.
Optional: If the Connector is for a Network instead of a Host
Please see Connecting Networks to CloudConnexa Using Connectors for information on actions needed to be taken outside the scope of CloudConnexa to enable proper routing of traffic between your private Networks and WPC clients
Tutorial: Enable DCO for a Windows Connector
Data Channel Offload (DCO) improves the OpenVPN tunnel's performance by moving data packet processing from the OpenVPN userspace program to the kernel. You can enable DCO for your Windows Connector by following the steps below.
Data Channel Offload (DCO) improves the OpenVPN tunnel's performance by moving data packet processing from the OpenVPN userspace program to the kernel. You can enable DCO for your Windows Connector by following the steps below:
Note
OpenVPN Connect 3.4 and newer on Windows supports OpenVPN Data Channel Offload (DCO).
Disconnect the connection.
Navigate to Menu > Settings.
Expand Advanced Settings.
Click on the Enable DCO checkbox.
Figure 33. Screenshot of OpenVPN Connect 3.4.3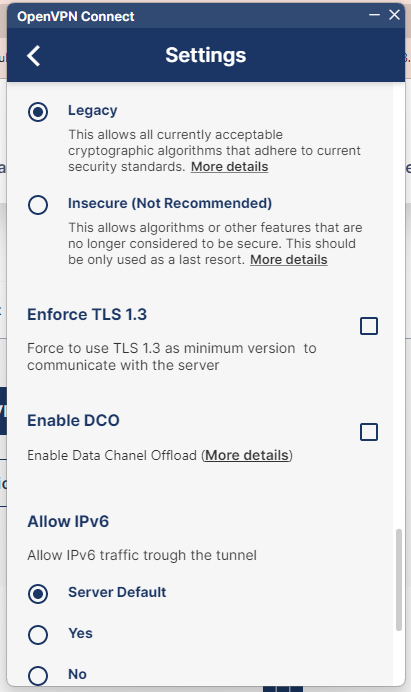
Reconnect.
macOS
Tutorial: Install a Connector on macOS
This tutorial shows you the steps to take to install a CloudConnexa Connector on macOS. You can then use the computer as a router to connect your network to CloudConnexa or as a Host to just make the services available on that computer to CloudConnexa.
To install a Connector on a private Network running macOS for a CloudConnexa Host, follow these steps:
Sign in to the CloudConnexa Administration portal at https://cloud.openvpn.com.
Access Hosts and click to add a new Host.
Give the Host and Connector a name, select a Region for the Connector, and click the checkmark to save.
Note
The Connector has been assigned a WPC IP Address
100.96.1.82Click on the download icon next to the Connector to show the various download options.
Click on Download Connector App for Mac option.
You can click on the Download button if you want to download and install the Connector on the computer that you are working on or you can click on Copy URL button to open the URL in the browser of the target macOS computer so that the software gets downloaded directly on that computer.
Go to the macOS computer and paste the URL in the browser to start downloading the OpenVPN Connect Client and its bundled Profile. This has to be done within 15 minutes of URL generation.
Click on the downloaded installer to start the installation process.
Double-click on the installer to start the installation.
Click on the Continue button.
Click on the Agree button.
Click on the Install button to begin the installation.
Installation progress will be shown.
Click on the Close button to exit the installer.
Launch the OpenVPN Connect application using Launchpad.
Click on the profile that is already present to connect to your CloudConnexa.
Optional: If the Connector is a Connector for a Network instead of for a Host
Please see Connecting Networks to CloudConnexa Using Connectors for information on actions needed to be taken outside the scope of CloudConnexa to enable proper routing of traffic between your private Networks and WPC clients
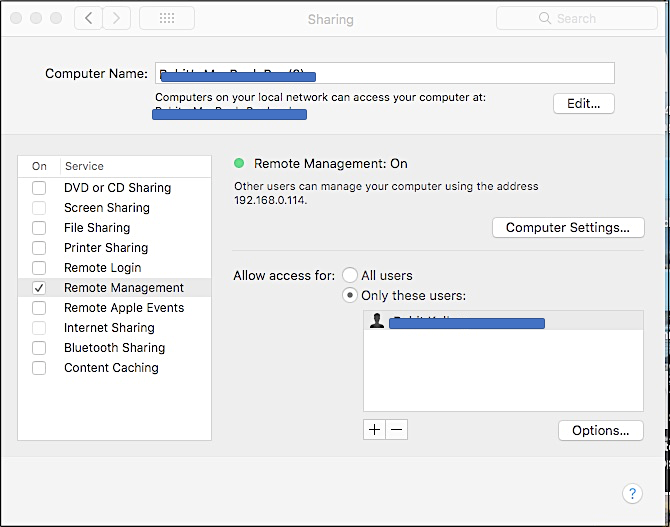
Optional: Remote Management using VNC
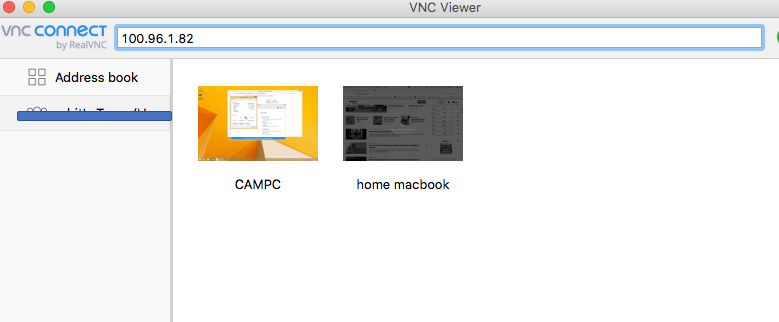
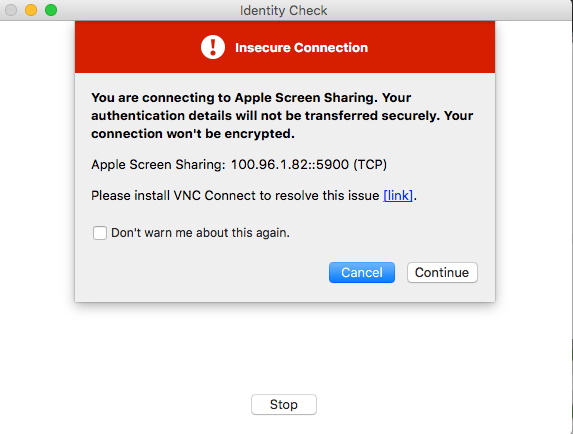
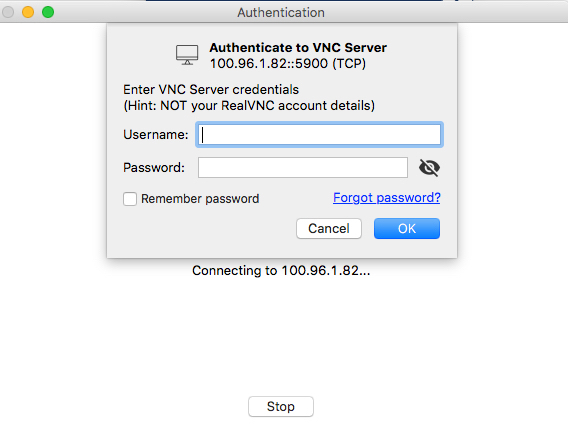
If the macOS computer you installed the Connector on has Remote Management turned ON, you can securely connect to it via CloudConnexa and VNC viewer by using the WPC IP Address of the Connector (in this example, 100.96.1.82). The screenshots below show the macOS Host being connected to using VNC Viewer
Turning Remote Management ON on the Host
CloudConnexa User remotely managing the Host by connecting to it with the Host’s WPC IP address
Note: While the warning is accurate about the Apple Screen Sharing connection not being secure or encrypted by the application, it can be ignored because the connection is being secured and encrypted by the use of CloudConnexa.
Tutorial: Enable routing and NAT on macOS
Follow the steps in this guide to enable routing and NAT on macOS.
Follow the steps in these two tutorials to enable routing and NAT on macOS.
Tutorial: Configure macOS Computer to be a Router
Tutorial: Configure Network Address Translation (NAT) on macOS
Tutorial: Configure Network Address Translation (NAT) on macOS
This tutorial shows you the steps to take to enable NAT on your macOS computer.
Steps: Enable NAT on macOS
Create a file titled “
pf-nat.conf” and add this rule:nat on enX from 100.96.0.0/11 to any -> enXNote
Where
enXis the main network interface of the host and100.96.0.0/11is the default WPC subnet. If the WPC subnet was changed in the CloudConnexa Portal - Settings > WPC, "please replace 100.96.0.0/11, in the command above, with the updated IPv4 WPC subnet: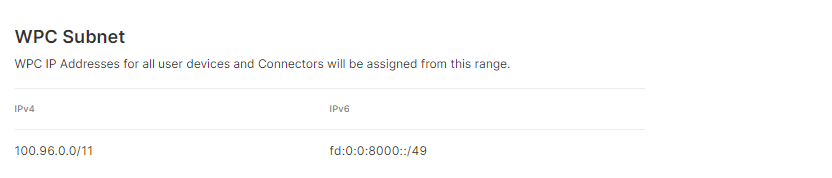
Save the pf-nat.conf file.
Start pfctl using the rule from the pf-nat.conf file.
sudo pfctl -d#disablespfctlsudo pfctl -F all#flushes allpfctlrulessudo pfctl -f /Path/to/file/pf-nat.conf -e#starts pfctl and loads the rules from thepf-nat.conffile
If you want the NAT rule to be permanent:
Create a backup of the default
pf.conffile (sudo cp -p /etc/pf.conf /etc/pf.conf.bak)Add your own rules to
/etc/pf.conf(appending them after the default Apple anchors):natonenXfrom100.96.0.0/11to any ->enXLoad your custom rules (
sudo pfctl -f /etc/pf.conf)(Re)Enable the packet filter firewall (
sudo pfctl -E)
Tutorial: Configure macOS Computer to be a Router
This tutorial shows the steps needed to configure your macOS computer to carry out routing.
Open the Terminal application and enter this command:
sysctl -w net.inet.ip.forwarding=1
Tutorial: Configure automatic login on macOS
This tutorial describes configuring your macOS computer to login automatically on restart. This will allow the OpenVPN Connect application to reconnect the OpenVPN tunnel on unscheduled restarts without requiring human intervention.
This tutorial describes configuring your macOS computer to login automatically on restart. This will allow the OpenVPN Connect application to reconnect the OpenVPN tunnel on unscheduled restarts without requiring human intervention.
It is highly recommended to setup automatic login if you have a Connector installed on your macOS computer.
Steps: Configure automatic login on macOS
Click the Apple logo.
Select System Preferences from the menu.
Click Users & Groups. In earlier versions of OS X, this is called Accounts.
Click the lock to make changes, and enter your Administrator password when prompted.
Click Login Options.
Select the Automatic login username that you want to configure.
To disable automatic login, select Off.
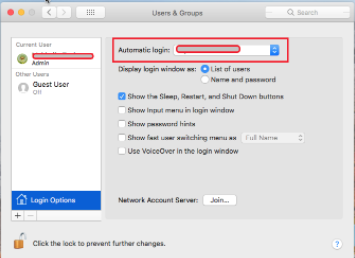
Note: If the username is grayed out, your computer requires manual login and you are unable to set up automatic login without making additional changes. Here are some possible workarounds:
If FileVault is turned on, manual login is required for all accounts. You can choose to turn FileVault off.
If an account uses an iCloud password to log in, manual login is required for that account. When changing the account password, you can choose not to use the iCloud password.
Click the lock to prevent further changes, and close System Preferences.
Linux
Tutorial: Install a Connector on Linux
Install a CloudConnexa Network Connector on a Linux system using the openvpn-connector-setup tool. This tutorial covers the Linux-specific installation steps, whether you're configuring a new network or adding a Connector to an existing one.
Overview
Important
If you're an end user connecting an individual Linux device to CloudConnexa rather than deploying a network Connector, see Tutorial: Learn to Install and Control the OpenVPN 3 Client instead.
A CloudConnexa Network Connector installed on a Linux server creates an always-on tunnel between your private network and CloudConnexa. This makes your configured Applications and IP Services accessible to authorized users. The Connector is installed using the openvpn-connector-setup tool, which is provided as a distribution-specific shell script generated by the CloudConnexa portal for your Connector.
This tutorial walks you through the Linux installation steps. How you arrive at those steps depends on whether you are setting up a new network using the Network Wizard, using the form-based setup after skipping the wizard, or adding a Connector to an existing network. All three paths converge at the same Linux installation steps covered in Steps 1–4 below.
Before you begin
This tutorial covers the Linux Connector installation steps specifically. How you arrive at those steps depends on your starting point:
Starting point | How to get to the Linux install steps |
|---|---|
Setting up a new network using the Network Wizard | Follow the wizard to the Deploy OpenVPN Network Connector step, then continue with Step 1 below. |
Setting up a new network using Skip Wizard | Complete the Network form and select Add Network. Then navigate to Networks → Connectors, select Deploy for your Connector, and select Deploy Connector. Then continue with Step 1 below. |
Adding a Connector to an existing Network | Navigate to Networks → Connectors, select Deploy for the Connector you want to deploy, and select Deploy Connector. Then continue with Step 1 below. |
Step 1: Select your Linux distribution
In the Deploy Connector panel in the CloudConnexa portal:
Select Linux from the Provider Type drop-down under Operating Systems.
Select the distribution that matches your Linux system from the drop-down. Supported distributions include:
AlmaLinux 8, AlmaLinux 9
Debian
Fedora
Raspberry Pi OS
Red Hat Enterprise Linux 8, Red Hat Enterprise Linux 9
Rocky Linux 8, Rocky Linux 9
Ubuntu 20.04, Ubuntu 22.04, Ubuntu 24.04
The installation commands for your selected distribution are displayed.
Step 2: Run the installation script
Open a terminal on your Linux system or connect via SSH.
Copy the commands displayed in the CloudConnexa portal and run them in your terminal.
Important
The exact commands differ per distribution. Ensure you always use the commands displayed in the portal for your selected distribution. The script handles all installation steps automatically, including installing the
openvpn-connector-setuptool, enabling IP forwarding, and configuring NAT.The script runs automatically.
When it completes, you're prompted to enter a setup token. Leave the terminal open and continue to Step 3.
Step 3: Generate and enter the setup token
In the CloudConnexa portal, select Generate Token.
Select the Copy icon to copy the token to your clipboard.
Return to your Linux terminal and paste the token when prompted, then press Enter.
The openvpn-connector-setup tool imports the Connector profile and establishes a connection to CloudConnexa.
Step 4: Confirm the Connector is online
Return to the CloudConnexa portal and select Next.
CloudConnexa tests whether the Connector is online.
If the test passes, select Finish.
If the test fails, select Back to Instructions to review the installation steps or select Proceed Without Testing to continue without confirmation.
Install a Linux Connector tutorial
Tutorial: Learn to Install and Control the OpenVPN 3 Client
Install the OpenVPN 3 Linux client on your distribution, import your CloudConnexa connection profile, and connect — either as a one-time session or as a persistent autostarting service.
Overview
Important
This tutorial is for end users connecting an individual Linux device to CloudConnexa. If you're setting up a CloudConnexa Connector on a headless Linux server to connect an entire network, use the openvpn-connector-setup tool instead. Refer to Tutorial: Install a Connector on Linux.
This tutorial shows you how to install the OpenVPN 3 Linux client, import your CloudConnexa connection profile, and establish a VPN connection — either as a manual session or as a persistent service that starts automatically at boot.
Before you begin
Ensure you have the following to start this tutorial:
A CloudConnexa account with an active subscription.
A downloaded
.ovpnconnection profile for your CloudConnexa network. See Download a Connection Profile for instructions.A supported Linux distribution. See the table below.
Terminal access.
Which setup is right for you?
I want to... | Go to... |
|---|---|
Connect my device to CloudConnexa manually or occasionally | Steps 1-3, then Option A |
Set up an always-on connection that starts automatically at boot | Steps 1-3, then Option B |
Step 1: Install the OpenVPN 3 client
Select the instructions for your Linux distribution.
Open a terminal or connect to your server via SSH.
Install the OpenVPN repository key:
sudo mkdir -p /etc/apt/keyrings && curl -fsSL https://packages.openvpn.net/packages-repo.gpg
sudo tee /etc/apt/keyrings/openvpn.asc
Detect your distribution and assign it to a variable:
DISTRO=$(lsb_release -c -s)
Important
Verify your distribution and release before proceeding. We recommend using
hostnamectlto confirm your OS details and cross-reference with the supported distributions table above.Add the OpenVPN repository:
echo "deb [signed-by=/etc/apt/keyrings/openvpn.asc] https://packages.openvpn.net/openvpn3/debian $DISTRO main" | sudo tee /etc/apt/sources.list.d/openvpn-packages.list
Update the package list:
sudo apt update
Install the OpenVPN 3 client:
sudo apt install openvpn3
Open a terminal or connect to your server via SSH.
For Red Hat Enterprise Linux only, install the Fedora EPEL repository:
RHEL 8:
sudo yum localinstall https://dl.fedoraproject.org/pub/epel/epel-release-latest-8.noarch.rpm
   sudo subscription-manager repos --enable "codeready-builder-for-rhel-8-$(/bin/arch)-rpms"
RHEL 9:
sudo dnf install https://dl.fedoraproject.org/pub/epel/epel-release-latest-9.noarch.rpm
Rocky Linux or AlmaLinux:
sudo dnf install epel-release
Rocky 8 or AlmaLinux 8 only — also enable the PowerTools repository:
sudo dnf config-manager --set-enabled powertools
Install the OpenVPN 3 repository:
RHEL 8:
sudo yum install -y https://packages.openvpn.net/openvpn-openvpn3-epel-repo-1-1.noarch.rpm
RHEL 9, AlmaLinux, and Rocky Linux:
sudo dnf install -y https://packages.openvpn.net/openvpn-openvpn3-epel-repo-1-1.noarch.rpm
Fedora:
sudo dnf copr enable dsommers/openvpn3
Install the OpenVPN 3 client:
RHEL 8:
sudo yum install openvpn3-client
RHEL 9+, Fedora:
sudo dnf install openvpn3-client
Step 2: Import your connection profile
Import your
.ovpnconnection profile into the OpenVPN 3 configuration manager, replacing/file/to/profile.ovpnwith the path to your profile file:openvpn3 config-import --config /file/to/profile.ovpn --name CloudConnexa1 --persistent2
--name CloudConnexaassigns a name to the profile so you can reference it in later commands.--persistentsaves the profile to disk so it's available after a reboot. Without this flag, the profile is stored in memory only and is lost when the system restarts.Tip
This command can be run as an ordinary, unprivileged user. The user who runs this command becomes the owner of the connection profile. By default, the profile is only accessible to that user. To grant other users access, including root for autostart setups, use
openvpn3 config-acl. See Step 3, Option B for details.Verify the profile was imported successfully:
openvpn3 configs-list
Your profile should appear in the list.
Step 3: Connect to CloudConnexa
Choose the option that fits your needs.
Use this option if you want to manually start and stop the VPN connection.
Start a VPN session using your imported profile:
openvpn3 session-start --config CloudConnexa
Verify the session is running:
openvpn3 sessions-list
To disconnect when you're done:
openvpn3 session-manage --config CloudConnexa --disconnect
Note
Once disconnected, the session is removed from
openvpn3 session-list. You can start a new session at any time by repeating step 1.
Use this option to set up an always-on connection that starts automatically when the system boots. This requires root access.
Grant the root user access to the imported profile:
openvpn3 config-acl --show --lock-down true1 --grant root2 --config CloudConnexa
--lock-down trueis optional but recommended. It prevents the root user from extracting the profile contents viaopenvpn3commands or D-Bus APIs.--grant rootgives the root user access to the profile, which is required for the systemd service to start it at boot.Tip
To allow the current user to manage the VPN session even when root starts it, add
--transfer-owner-session trueto the command above.Enable and start the systemd session service:
sudo systemctl enable1 --now2 openvpn3-session@CloudConnexa.service
enableconfigures the service to start automatically at every boot.--nowstarts the service immediately without requiring a reboot.Important
Don't use
--nowif you've already started the session manually usingopenvpn3 session-start. In that case, usesudo systemctl enable openvpn3-session@CloudConnexa.servicewithout--nowto configure autostart without attempting to start a duplicate session.Verify the connection is active:
sudo systemctl status openvpn3-session@CloudConnexa.service
The VPN connection is now active and will restart automatically whenever the system boots.
Managing the autostart service
After setup, use the following commands to manage the connection:
Task | Command |
|---|---|
Check service status |
|
Stop the connection |
|
Restart the connection |
|
Disable autostart |
|
Migrate from openvpn3-autoload to systemd unit files
Note
The openvpn3-autoload utility was deprecated in v20 and is planned for removal in a future release. If you're currently using openvpn3-autoload to start your VPN session at boot, follow these steps to migrate to the recommended openvpn3-session@.service approach used in Option B of this tutorial. After completing these steps, your session will be managed directly by systemd, and you'll no longer depend on openvpn3-autoload.
Use these steps if your VPN session is currently configured to start automatically at boot via openvpn3-autoload and you want to migrate to the recommended systemd approach.
Check your active sessions and note the Path value:
sudo openvpn3 sessions-list
Disconnect the active session using the path from step 1:
sudo openvpn3 session-manage --session-path YOUR_PATH --disconnect
Confirm no sessions are active:
sudo openvpn3 sessions-list
Disable the
openvpn3-autoloadservice so it no longer starts at boot:sudo systemctl disable --now openvpn3-autoload.service
Check your active configurations and note the configuration name:
sudo openvpn3 configs-list
Remove the existing configuration, replacing
YOUR_CONFIG_NAMEwith the name from step 5:sudo openvpn3 config-remove --config "YOUR_CONFIG_NAME"
You'll be prompted to confirm. Type
YESin uppercase to confirm removal.
Confirm no configurations are active:
sudo openvpn3 configs-list
Import the profile from the
openvpn3-autoloaddirectory as a persistent configuration, replacingYOUR_CONFIG_NAMEwith the name you want to assign in the configuration manager:sudo openvpn3 config-import --config /etc/openvpn3/autoload/connector.conf --name "YOUR_CONFIG_NAME" --persistent
Tip
connector.confis the default configuration filename used byopenvpn3-autoload. When you import it, OpenVPN 3's Configuration Manager registers it under the--nameyou specify. After that, you work with the name, not the file. Use the name you noted in step 5 to keep things consistent.Enable and start the session using the configuration name from step 8:
sudo systemctl enable --now openvpn3-session@YOUR_CONFIG_NAME.service
Confirm the new session is active and connected:
sudo openvpn3 sessions-list
Restart your system and run
sudo openvpn3 sessions-listagain to confirm the new profile loads automatically at boot.
Step 4: Manage your VPN session
The following commands are useful for monitoring and troubleshooting a running session:
Check active sessions:
openvpn3 sessions-list
Restart the connection:
openvpn3 session-manage --config CloudConnexa --restart
View real-time tunnel statistics:
openvpn3 session-stats --config CloudConnexa
View real-time log events:
openvpn3 log --config CloudConnexa
Tip
Log output may appear quiet at first since it only shows events as they occur. To see activity, run
openvpn3 session-manage --restartfrom a second terminal window while this command is running. For more detail, add--log-level 6to the command. Valid log levels are 0 (minimal) to 6 (most verbose).To disconnect a session using its D-Bus path instead of the profile name:
openvpn3 session-manage --session-path /net/openvpn/v3/sessions/..... --disconnect
Important
You need to disconnect from the current session before starting a new one with a different profile.
Tip — Connect more than just this device
The OpenVPN 3 Linux client you just installed can also be used to connect an entire private network to CloudConnexa — not just this machine. A CloudConnexa Network Connector lets any device on your network reach CloudConnexa resources without installing a client on each one. See Tutorial: Install a Connector on Linux to get started, or CloudConnexa Connectors to understand which deployment fits your needs.
Tutorial: Enable DCO for a Linux Connector
Data Channel Offload (DCO) improves the OpenVPN tunnel's performance by moving data packet processing from the OpenVPN userspace program to the kernel. You can enable DCO for your Linux Connector by following the steps below.
Data Channel Offload (DCO) improves the OpenVPN tunnel's performance by moving data packet processing from the OpenVPN userspace program to the kernel. You can enable DCO for your Linux Connector by following the steps below:
Note
${CONFIGURATION_PROFILE_NAME} needs to be substituted with the configuration profile name (typically the filename used during the configuration profile import) in use. Use openvpn3 configs-list to display the list of configuration profiles. For more information on OpenVPN 3 commands, refer to Tutorial: Learn to Install and Control the OpenVPN 3 Client and the Community Wiki.
Install the DCO kernel module for Ubuntu.
sudo apt install kmod-ovpn-dco
Disconnect the running OpenVPN tunnel.
sudo openvpn3 session-manage -c ${CONFIGURATION_PROFILE_NAME} --disconnectAdd DCO to the configuration profile.
sudo openvpn3 config-manage --show --config ${CONFIGURATION_PROFILE_NAME} --dco trueStart the tunnel with the DCO option.
sudo openvpn3 session-start -c ${CONFIGURATION_PROFILE_NAME} --dco true
Tutorial: Use the Linux OpenVPN 3 Connector integrated with Cockpit
We have extended Cockpit with an add-on to provide a web-based graphical frontend to the Linux OpenVPN 3 client that acts as the CloudConnexa Connector
Cockpit is a web-based graphical interface for servers that facilitates system administration. It lets you see your Linux server in a web browser and perform system tasks with a mouse.
We have extended Cockpit with an add-on to provide a web-based graphical frontend to the Linux OpenVPN 3 client that acts as the CloudConnexa Connector. Refer toGitHub.
Installation
On some IaaS Marketplaces, there are CloudConnexa Connector listings that have a readymade image to use to spin up an instance. For example, Google Cloud Platform.
Or, you can install it manually on a Linux computer using the instructions shown on GitHub.
Import Profile and Connect
Open your web browser to
https://IP_ADDRESS_OF_MACHINE:9090and login with the username and password of any local account on the system.Click OpenVPN Connector from the Navigation.
From the CloudConnexa Administration Portal, click Copy .ovpn Profile Token from the Deploy drop-down menu for the Host or Network Connector that will be deployed on this Linux machine.
Paste the token in the Cockpit Token field.
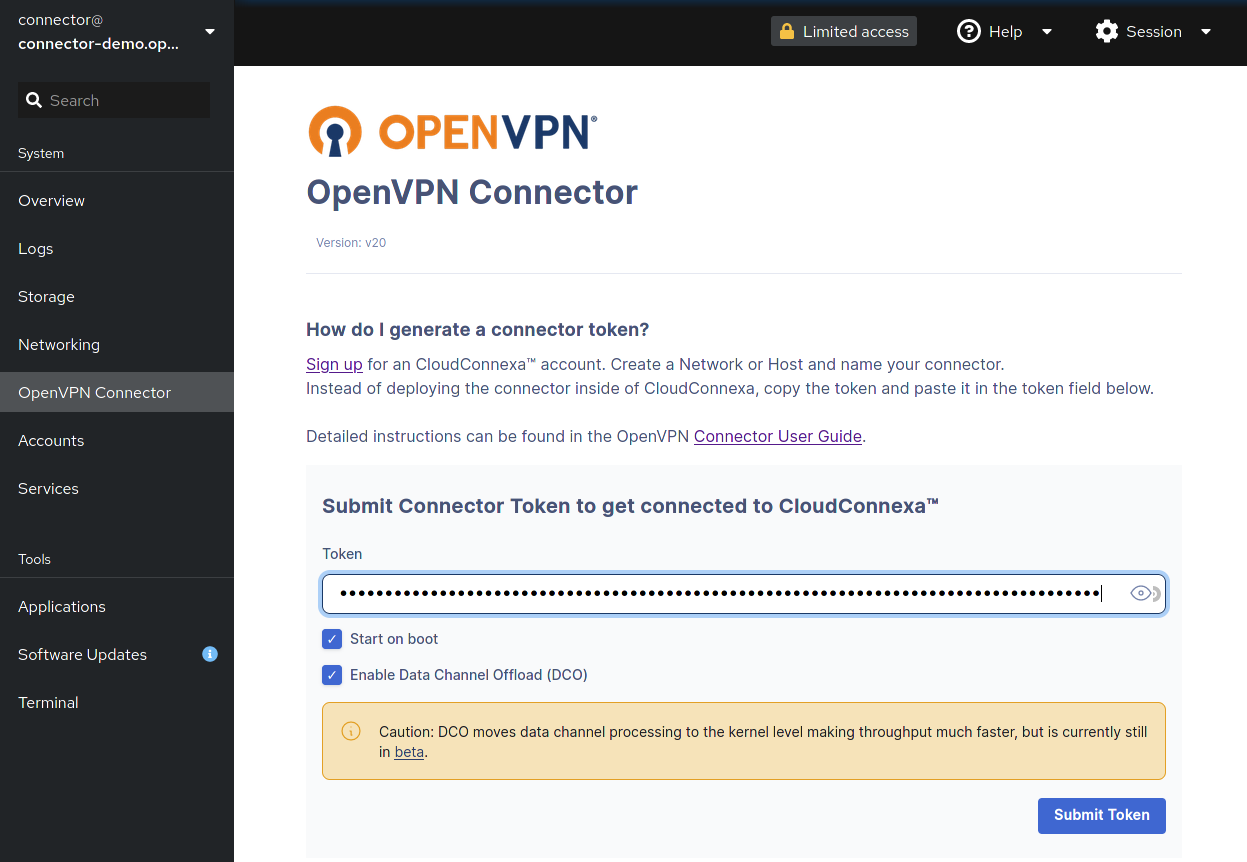
When checked, Enable Data Channel Offload (DCO) improves Connector performance by moving the data channel process to the kernel.
Click Submit Token.
Click Connect.
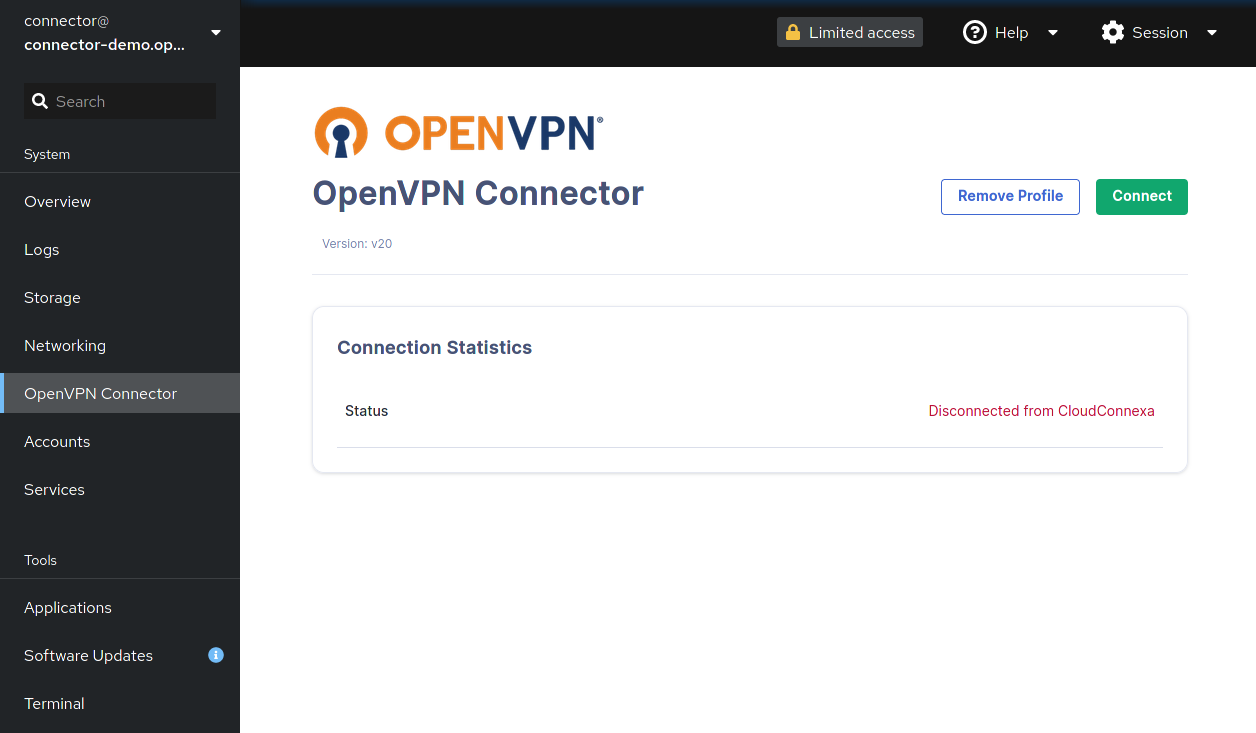
Connection Statistics
On successful connection, the connection statistics will be shown.
Connection Statistics | Definition |
|---|---|
Bytes IN | encrypted bytes since the session started received outside the OpenVPN tunnel by the client from the server |
Bytes OUT | encrypted bytes since the session started sent outside the OpenVPN tunnel by the client to the server |
Packets IN | encrypted packets since the session started received outside the OpenVPN tunnel by the client from the server |
Packets OUT | encrypted packets since the session started sent outside the OpenVPN tunnel from the client to the server |
TUN bytes IN | unencrypted bytes since the session started received within the OpenVPN tunnel by all hosts connected to the same WPC |
TUN packets IN | unencrypted bytes since the session started sent within the OpenVPN tunnel by all hosts connected to the same WPC |

The statistics page also has action buttons:
Button | Action |
|---|---|
 | Refreshes current session |
 | Disconnects current session NoteTo restart the Connector session, you must regenerate a Connector profile token. |
 | Reconnects session NoteUsed in case of timeout or other issues during the current session. Reconnects with current profile token. |
Remove Profile
Disconnect the session if ongoing.
Click Remove Profile.
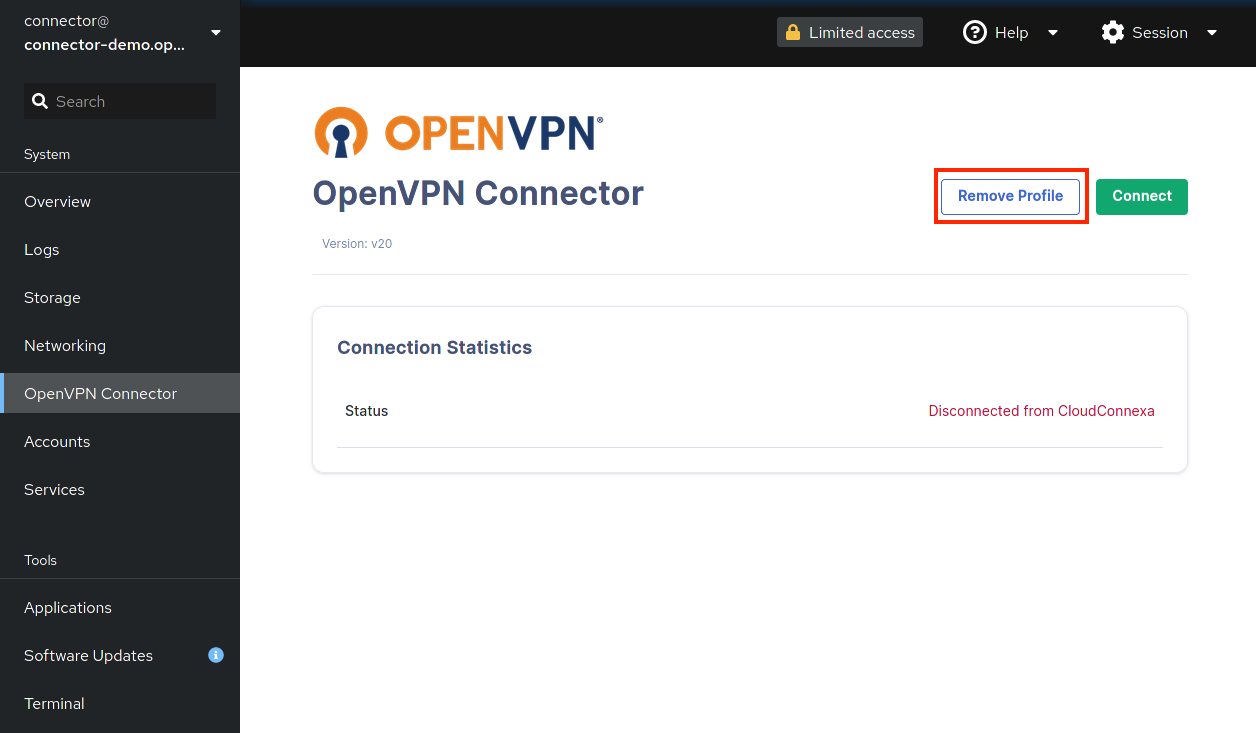
In the confirmation dialog, click Delete Profile.
Tutorial: Enable routing and NAT on Linux
The scripts generated for the various Linux distributions for Network Connectors already have the commands included for enabling NAT and routing. These instructions are mainly for informational purposes.
The scripts generated for the various Linux distributions for Network Connectors already have the commands included for enabling NAT and routing. These instructions are mainly for informational purposes.
Routing on Linux
Note
The templates and scripts used for deploying Connectors on Linux, IaaS, and Virtual Private Servers from the Administration Portal include the needed commands for NAT and IP forwarding by default.
To enable IPv4 forwarding, use the following commands on the command line:
sudo sed -i 's/#net.ipv4.ip_forward=1/net.ipv4.ip_forward=1/g' /etc/sysctl.conf
sudo sysctl -p
To enable IPv6 forwarding
sudo sed -i 's/#net.ipv6.conf.all.forwarding=1/net.ipv6.conf.all.forwarding=1/g' /etc/sysctl.conf
sudo sysctl -p
This will enable forwarding in the Linux kernel.
NAT on Linux
Note
The templates and scripts used for deploying Connectors on Linux, IaaS, and Virtual Private Servers from the Administration Portal include the needed commands for NAT and IP forwarding by default.
Use the following commands on the command line:
sudo apt install iptables-persistent
IF=`ip route | grep default | awk '{print $5}'`
sudo iptables -t nat -A POSTROUTING -o $IF -j MASQUERADE
sudo iptables-save | sudo tee /etc/iptables/rules.v4
sudo ip6tables -t nat -A POSTROUTING -o $IF -j MASQUERADE
sudo iptables-save | sudo tee /etc/iptables/rules.v6
The iptables rule uses the NAT packet matching table (-t nat) and specifies the built-in POSTROUTING chain for NAT (-A POSTROUTING) on the external networking Device (-o $IF). The variable ‘IF’ stores the default interface. POSTROUTING allows packets to be altered as they are leaving the Connector instance. The -j MASQUERADE target is specified to mask the private IP address of a node with the IP address assigned to the default interface.
The above is sufficient if you are fine with all traffic being NATted. However, if you need Hosts on the Network to distinguish between different WPC clients or Connectors, you need to use “! -d xx.xx.xx.xx/xx” in the NAT rule where xx.xx.xx.xx/xx is the subnet of the target LAN subnet, otherwise traffic to that subnet will also be NATted. The example below shows how to use the iptables command so that NAT is not used if the destination is in the 10.10.0.0/16 subnet.
sudo iptables -t nat -A POSTROUTING -o $IF ! -d 10.10.0.0/16 -j MASQUERADE