IaaS
Tutorial: Connect AWS to CloudConnexa with IPsec using VPG
Configure an AWS site-to-site VPN between your VPC and CloudConnexa using a Virtual Private Gateway (VPG), including connector setup, AWS configuration, and connectivity verification.
This tutorial walks you through connecting your AWS VPC to CloudConnexa using an IPsec tunnel with a Virtual Private Gateway.
You'll complete steps in both the AWS Console and the Cloud Connexa Administration Portal. To make this easier to follow, each step is labeled with an icon:
☁️ AWS Console steps — performed in AWS
🔐 CloudConnexa steps — performed in CloudConnexa
To complete this setup, you'll configure:
A Customer Gateway to represent the CloudConnexa endpoint.
A Virtual Private Gateway attached to your VPC.
A site-to-site VPN connection between AWS and CloudConnexa.
Tunnel configuration using an AWS-generated configuration file.
Once configured, users and networks connected to CloudConnexa can securely access resources in your AWS VPC.
When to use this setup
Use this configuration when you want to connect a single VPC to CloudConnexa via a virtual private gateway, which only provides access to resources within that VPC. If you need broader connectivity (for example, access to multiple VPCs or public resources), use a Transit Gateway instead. Refer to Tutorial: Connect AWS VPC to CloudConnexa with IPsec using Transit Gateway.
Before you begin
Ensure you have a CloudConnexa account and Cloud ID.
Ensure you have access to your AWS account and VPC.
Ensure your VPC is created and properly configured, including routing and subnets.
🔐 Step 1: Create a Network (CloudConnexa)
Navigate to Networks → Networks.
Click Add Network.
Select at least one Network Scenario. Refer to these tutorials for details:
Click Continue.
For the Network Configuration, enter a name and description (optional).
Select IPsec as the Connector Tunneling Protocol.
For the Connector, enter a name and description (optional).
Click Next.
🔐 Step 2: Select AWS as the platform (CloudConnexa)
In the Network Configuration Wizard, you'll begin configuring your AWS VPC.
2.1 Select the AWS platform
In Platform to Connect, select AWS. Refer to CloudConnexa Connectors and About Network Connectors.
Instructions will appear on how to configure IPsec connectivity with CloudConnexa.
Review the step-by-step guide.
Click Next.
2.2 Review AWS configuration details
CloudConnexa displays the values required for AWS configuration.
Note the following values from AWS Configuration Details:
Target Gateway
Virtual Private Gateway / Transit Gateway
Customer Gateway
Remote Gateway IP Address
Certificate ARN
Routing Options
Static IP Prefixes
You will use these values when configuring AWS resources.
☁️ Step 3: Configure AWS resources (AWS Console)
Set up the required AWS components to establish the IPsec tunnel.
3.1 Create a Customer Gateway
Create an AWS customer gateway as the IPsec endpoint for the CloudConnexa Region.
Note
You can also create the customer gateway while configuring the VPN connection.
Open the Amazon VPC console at https://console.aws.amazon.com/vpc/.
Navigate to Customer gateways.
Click Create customer gateway.
Enter:
Name tag (optional): This creates a tag with a Name key and the value that you specify.
BGP ASN: Enter a Border Gateway Protocol Autonomous System Number (ASN) for your customer gateway.
Note
The IPsec VPN is going to use static routing. Therefore, the BGP ASN doesn't matter here. You can enter any number here.
IP address: Use the CloudConnexa Public IP Address displayed for your network connector configuration.
(Optional) Configure certificate authentication if you'll be using certificate-based authentication. Refer to Creating and managing a private CA.
(Optional) For Device, enter a name for the customer gateway device associated with this customer gateway.
Click Create customer gateway.
3.2 Create a Virtual Private Gateway
To establish an IPsec VPN connection between your VPC and CloudConnexa, create an AWS target gateway. This target gateway will be a virtual private gateway.
Navigate to Virtual private gateways.
Click Create virtual private gateway.
(Optional) Enter a name.
Keep the default ASN.
Click Create.
Select the VPC, then click Actions → Attach to VPC.
Select your VPC and confirm.
3.3 (Optional) Enable route propagation
Turn on route propagation on your AWS VPC route table if you want site-to-site connectivity between your VPC and other private networks connected to CloudConnexa.
Navigate to Route tables.
Select your route table associated with the subnet.
On the Route propagation tab, click Edit route propagation.
Select your new virtual private gateway.
Save changes.
Routes from your VPN connection are automatically added to the route table and directed to the virtual private gateway when the connection is active.
3.4 Create the VPN connection
Navigate to Site-to-Site VPN connections.
Click Create VPN connection.
Configure:
Target gateway type: Select Virtual private gateway, and select the new virtual private gateway.
Customer gateway: Select the newly created customer gateway.
Routing options: Select Static.
For Static IP Prefixes, copy and paste the Static IP Prefixes displayed on the CloudConnexa Administration Portal's Connector Configuration page, as shown in AWS Configuration Details.
Note
The Static IP Prefixes include the Routes of all CloudConnexa Networks configured so far. If you add new Networks or Routes and want site-to-site networking with your VPC, you must update the Static IP Prefixes.
Click Create VPN connection.
3.5 Download the AWS configuration file
Navigate to Site-to-Site VPN connections.
Select your new VPN connection.
Click Download configuration.
Select Generic for the customer gateway device.
Download the file.
Important
To properly load the download configuration screen from the AWS Management Console, ensure that your IAM role or user has permission for the following Amazon EC2 APIs:
GetVpnConnectionDeviceTypesandGetVpnConnectionDeviceSampleConfiguration.
🔐 Step 4: Configure the Network Connector (CloudConnexa)
In this step, configure the IPsec tunnels on the CloudConnexa side using the AWS configuration.
CloudConnexa supports two tunnels for high availability. You can configure them manually or upload the AWS configuration file.
4.1 Configure CloudConnexa tunnel
Return to the CloudConnexa network wizard configuration.
Select the Authentication Method:
Shared Secret: Specify the pre-shared keys (PSK) in each tunnel configuration in the next step.
Certificate-based: Upload certificates to apply to all tunnel connectors, and enter the passphrase.
If you select Shared Secret, you can proceed to option 1 and upload an AWS configuration file. For Certificate-based, proceed to option 2 to configure tunnels manually.
Click Upload Generic Configuration File.
Select the configuration file downloaded from AWS.
CloudConnexa automatically populates the tunnel settings.
Note
AWS creates two tunnels by default. CloudConnexa creates two corresponding Connectors.
If you prefer, you can configure each tunnel manually using the values provided by AWS.
Expand Tunnel 1.
Enter the following:
Remote Site Public IPv4 Address: Enter the AWS tunnel endpoint IP address (from AWS configuration, Tunnel 1).
Pre-shared Key (PSK): Enter the pre-shared key provided by AWS.
Important
You must specify a pre-shared key for each tunnel configuration.
(Optional) Configure advanced settings: Expand Advanced Configuration to customize IPsec parameters:
IKE Version: Select the version: IKEv1 or IKEv2.
Tip
If using IKEv2 and only GCM encryption algorithms (AES-128-GCM-16 and/or AES-256-GCM-16), the integrity algorithm and a DH group are optional in phase 2.
For non-GCM encryption algorithms, an integrity algorithm and a DH group are required. The default values are applied automatically.
Phase 1 settings:
Setting
Description
Encryption Algorithm
Select one or more supported encryption algorithms.
Integrity Algorithm
Select a supported integrity algorithm.
Diffie-Hellman Group
Select a DH group supported by your device.
Lifetime (sec)
Enter a value between 901 and 86400.
Phase 2 settings:
Setting
Description
Encryption Algorithm
Select one or more supported encryption algorithms.
Integrity Algorithm
Select a supported integrity algorithm.
Diffie-Hellman Group
Select a DH group supported by your device.
Lifetime (sec)
Enter a value between 900 and 28800.
IKE rekey settings:
Setting
Description
Rekey Margin Time (sec)
Value between 60 and half of Phase 2 lifetime.
Rekey Fuzz (%)
Value between 0 and 100.
Replay Window Size (packets)
Value between 64 and 2048.
Connection behavior:
Setting
Description
Startup Action
Defines how the tunnel is initiated.
CloudConnexa Connection Restoration
Controls whether the tunnel automatically reconnects if interrupted:
Defaults to Yes when Startup Action = Start.
Automatically set to No when Startup Action = Attach and can't be changed.
AWS-specific note
When you set AWS connectors to Attach for the Startup Action, CloudConnexa doesn't initiate the tunnel.
(Optional but recommended) Expand Tunnel 2 and repeat the same configuration steps using AWS Tunnel 2 values.
Tip
Using both tunnels provides high availability and failover.
4.2 Verify connectivity
Click Test Connection 1.
CloudConnexa attempts to establish a connection to your AWS network.
Check the connection status:
Connected — The tunnel is successfully established.
Offline — The connection failed or hasn't been established yet.
Tip
If the connection status is Offline:
Click View Logs to review connection details.
Verify the following:
PSK or certificates match on both sides.
IPsec parameters (encryption, DH group, lifetimes) are aligned.
Firewall rules allow IPsec traffic.
The correct public IP address is configured.
Click Test Connection 2 (if configured).
Check the connection status:
Connected — The tunnel is successfully established.
Offline — The connection failed or hasn't been established yet.
Tip
If the connection status is Offline:
Click View Logs to review connection details.
Verify the following:
PSK or certificates match on both sides.
IPsec parameters (encryption, DH group, lifetimes) are aligned.
Firewall rules allow IPsec traffic.
The correct public IP address is configured.
CloudConnexa attempts to establish a connection to your AWS network.
🔐 Step 5: Complete the Setup (CloudConnexa)
Click Finish to complete the Network configuration.
Confirm that:
The Network is created.
The Connectors shows a Connected status.
Tutorial: Connect AWS VPC to CloudConnexa with IPsec using Transit Gateway
Configure an AWS Transit Gateway VPN between your VPC and CloudConnexa to enable scalable connectivity across multiple VPCs, including routing setup and tunnel configuration.
This tutorial walks you through setting up an IPsec tunnel between your AWS environment and CloudConnexa using a Transit Gateway.
You'll complete steps in both the AWS Console and the Cloud Connexa Administration Portal. To make this easier to follow, each step is labeled with an icon:
☁️ AWS Console steps — performed in AWS
🔐 CloudConnexa steps — performed in CloudConnexa
Use this configuration when you need connectivity across multiple VPCs, shared services, or internet-bound traffic through CloudConnexa.
To complete this setup, you'll configure:
A Transit Gateway to act as a central routing hub.
A Transit Gateway attachment to connect your VPC.
A site-to-site VPN connection between AWS and CloudConnexa.
Routing tables for:
Your VPC subnets.
The Transit Gateway.
(Optional) A NAT Gateway for internet-bound traffic from private subnets.
Tunnel configuration using an AWS-generated configuration file.
Once configured, users and networks connected to CloudConnexa can securely access resources in your AWS environment.
Overview
In this setup, AWS Transit Gateway acts as a central routing hub that connects:
One or more VPCs.
Additional network resources.
Compared to a virtual private gateway, a Transit Gateway supports broader and more flexible connectivity.
When to use this setup
Use this configuration when you need connectivity across multiple VPCs or more advanced routing scenarios. If you only need a connection to a single VPC, refer to ???.
Before you begin
Ensure you have a CloudConnexa account and Cloud ID.
Ensure your AWS VPC and subnets are configured.
Ensure you have permissions to create AWS networking resources.
🔐 Step 1: Create a Network (CloudConnexa)
Navigate to Networks → Networks.
Click Add Network.
Select at least one Network Scenario. Refer to these tutorials for details:
Click Continue.
For the Network Configuration, enter a name and description (optional).
Select IPsec as the Connector Tunneling Protocol.
For the Connector, enter a name and description (optional).
Click Next.
🔐 Step 2: Select AWS as the platform (CloudConnexa)
In the Network Configuration Wizard, you'll begin configuring your AWS VPC.
2.1 Select the AWS platform
In Platform to Connect, select AWS. Refer to CloudConnexa Connectors and About Network Connectors.
Instructions will appear on how to configure IPsec connectivity with CloudConnexa.
Review the step-by-step guide.
Click Next.
2.2 Review AWS configuration details
CloudConnexa displays the values required for AWS configuration.
Note the following values from AWS Configuration Details:
Target Gateway
Virtual Private Gateway / Transit Gateway
Customer Gateway
Remote Gateway IP Address
Certificate ARN
Routing Options
Static IP Prefixes
You will use these values when configuring AWS resources.
☁️ Step 3: Configure AWS resources (AWS Console)
Set up the AWS components required for Transit Gateway-based VPN connectivity.
3.1 Create a Transit Gateway
Open the Amazon VPC console at https://console.aws.amazon.com/vpc/.
Navigate to Transit Gateways.
Click Create transit gateway.
Configure settings as needed.
Click Create transit gateway.
3.2 Create a site-to-site VPN connection
Navigate to Site-to-Site VPN connections.
Click Create VPN connection.
Configure:
Target gateway type: Select Transit gateway, and select the new transit gateway.
Customer gateway: Select New, and enter CloudConnexa values.
Routing options: Select Static.
For Static IP Prefixes, copy and paste the Static IP Prefixes displayed on the CloudConnexa Administration Portal's Connector Configuration page, as shown in AWS Configuration Details.
Note
The Static IP Prefixes include the Routes of all CloudConnexa Networks configured so far. If you add new Networks or Routes and want site-to-site networking with your VPC, you must update the Static IP Prefixes.
Click Create VPN connection.
3.3 Attach your VPC to the Transit Gateway
Navigate to Transit Gateway attachments.
Click Create transit gateway attachment.
Select the new transit gateway for the Transit gateway ID.
Configure your transit gateway attachment as needed for your VPC and subnets.
Click Create transit gateway attachment.
3.4 Create a NAT Gateway (for internet-bound traffic)
Navigate to NAT gateways.
Click Create NAT gateway.
Configure the NAT gateway for your VPC and associate it with an Elastic IP.
Click Create NAT gateway.
3.5 Configure VPC route tables
Configure the private subnet route table
This route table is used by resources that don't have direct internet access.
Navigate to Route tables.
Select the route table associated with your private subnet.
Click Edit routes.
Add the following routes:
Destination:
0.0.0.0/0→ Target: NAT GatewayDestination:
100.96.0.0/11→ WPC Subnet Target: Transit GatewayNote
This is the default WPC Subnet value. You can configure this under Settings → WPC in the CloudConnexa admin portal.
Destination:
100.80.0.0/12→ Domain Routing Subnet Target: Transit GatewayNote
This is the default Domain Routing Subnet value. You can configure this under Settings → WPC in the CloudConnexa admin portal.
Click Save changes.
Configure the public subnet route table
This route table is used by resources that can access the internet directly.
Navigate to Route tables.
Select the route table associated with your public subnet.
Click Edit routes.
Ensure the following routes are present:
Destination:
100.96.0.0/11→ WPC Subnet Target: Transit GatewayNote
This is the default WPC Subnet value. You can configure this under Settings → WPC in the CloudConnexa admin portal.
Destination:
100.80.0.0/12→ Domain Routing Subnet Target: Transit GatewayNote
This is the default Domain Routing Subnet value. You can configure this under Settings → WPC in the CloudConnexa admin portal.
Click Save changes.
Tip
The public subnet typically has a route to an Internet Gateway for internet access. You don't need to modify this configuration for CloudConnexa connectivity.
3.6 Configure Transit Gateway route table
Navigate to Transit gateway route tables.
Click on the route table for your new transit gateway.
Click the Routes tab.
Create the following static routes:
0.0.0.0/0(default route, points to the VPC resource)100.96.0.0/11(WPC subnet, points to the VPN resource)100.80.0.0/12(Domain routing subnet, points to the VPN resource)
3.7 Download the AWS configuration file
Navigate to Site-to-Site VPN connections.
Select your new VPN connection.
Click Download configuration.
Select Generic for the customer gateway device.
Download the file.
Important
To properly load the download configuration screen from the AWS Management Console, ensure that your IAM role or user has permission for the following Amazon EC2 APIs:
GetVpnConnectionDeviceTypesandGetVpnConnectionDeviceSampleConfiguration.
🔐 Step 4: Configure the Network Connector (CloudConnexa)
In this step, configure the IPsec tunnels on the CloudConnexa side using the AWS configuration.
CloudConnexa supports two tunnels for high availability. You can configure them manually or upload the AWS configuration file.
4.1 Configure CloudConnexa tunnel
Return to the CloudConnexa network wizard configuration.
Select the Authentication Method:
Shared Secret: Specify the pre-shared keys (PSK) in each tunnel configuration in the next step.
Certificate-based: Upload certificates to apply to all tunnel connectors, and enter the passphrase.
If you select Shared Secret, you can proceed to option 1 and upload an AWS configuration file. For Certificate-based, proceed to option 2 to configure tunnels manually.
Click Upload Generic Configuration File.
Select the configuration file downloaded from AWS.
CloudConnexa automatically populates the tunnel settings.
Note
AWS creates two tunnels by default. CloudConnexa creates two corresponding Connectors.
If you prefer, you can configure each tunnel manually using the values provided by AWS.
Expand Tunnel 1.
Enter the following:
Remote Site Public IPv4 Address: Enter the AWS tunnel endpoint IP address (from AWS configuration, Tunnel 1).
Pre-shared Key (PSK): Enter the pre-shared key provided by AWS.
Important
You must specify a pre-shared key for each tunnel configuration.
(Optional) Configure advanced settings: Expand Advanced Configuration to customize IPsec parameters:
IKE Version: Select the version: IKEv1 or IKEv2.
Tip
If using IKEv2 and only GCM encryption algorithms (AES-128-GCM-16 and/or AES-256-GCM-16), the integrity algorithm and a DH group are optional in phase 2.
For non-GCM encryption algorithms, an integrity algorithm and a DH group are required. The default values are applied automatically.
Phase 1 settings:
Setting
Description
Encryption Algorithm
Select one or more supported encryption algorithms.
Integrity Algorithm
Select a supported integrity algorithm.
Diffie-Hellman Group
Select a DH group supported by your device.
Lifetime (sec)
Enter a value between 901 and 86400.
Phase 2 settings:
Setting
Description
Encryption Algorithm
Select one or more supported encryption algorithms.
Integrity Algorithm
Select a supported integrity algorithm.
Diffie-Hellman Group
Select a DH group supported by your device.
Lifetime (sec)
Enter a value between 900 and 28800.
IKE rekey settings:
Setting
Description
Rekey Margin Time (sec)
Value between 60 and half of Phase 2 lifetime.
Rekey Fuzz (%)
Value between 0 and 100.
Replay Window Size (packets)
Value between 64 and 2048.
Connection behavior:
Setting
Description
Startup Action
Defines how the tunnel is initiated.
CloudConnexa Connection Restoration
Controls whether the tunnel automatically reconnects if interrupted:
Defaults to Yes when Startup Action = Start.
Automatically set to No when Startup Action = Attach and can't be changed.
AWS-specific note
When you set AWS connectors to Attach for the Startup Action, CloudConnexa doesn't initiate the tunnel.
(Optional but recommended) Expand Tunnel 2 and repeat the same configuration steps using AWS Tunnel 2 values.
Tip
Using both tunnels provides high availability and failover.
4.2 Verify connectivity
Click Test Connection 1.
CloudConnexa attempts to establish a connection to your AWS network.
Check the connection status:
Connected — The tunnel is successfully established.
Offline — The connection failed or hasn't been established yet.
Tip
If the connection status is Offline:
Click View Logs to review connection details.
Verify the following:
PSK or certificates match on both sides.
IPsec parameters (encryption, DH group, lifetimes) are aligned.
Firewall rules allow IPsec traffic.
The correct public IP address is configured.
Click Test Connection 2 (if configured).
Check the connection status:
Connected — The tunnel is successfully established.
Offline — The connection failed or hasn't been established yet.
Tip
If the connection status is Offline:
Click View Logs to review connection details.
Verify the following:
PSK or certificates match on both sides.
IPsec parameters (encryption, DH group, lifetimes) are aligned.
Firewall rules allow IPsec traffic.
The correct public IP address is configured.
CloudConnexa attempts to establish a connection to your AWS network.
🔐 Step 5: Complete the Setup (CloudConnexa)
Click Finish to complete the Network configuration.
Confirm that:
The Network is created.
The Connectors shows a Connected status.
Tutorial: Assign DNS servers using DHCP for AWS VPC
This tutorial shows how to configure a DHCP option set on your AWS VPC to set the DNS servers for all the resources in your VPC.
This tutorial shows how to configure a DHCP option set on your AWS VPC to set the DNS servers for all the resources in your VPC. Using the DNS server associated with the Connector's tunnel IP address subnet lets your VPC resources access Applications on the WPC using Application Domain-Based Routing.
Create a DHCP option set and configure the Domain name server as the IP address that is one before the tunnel IP address of the Connector. For example, if the tunnel IP address of the Connector is 100.96.1.18, then the DNS server IP address is 100.96.1.17.
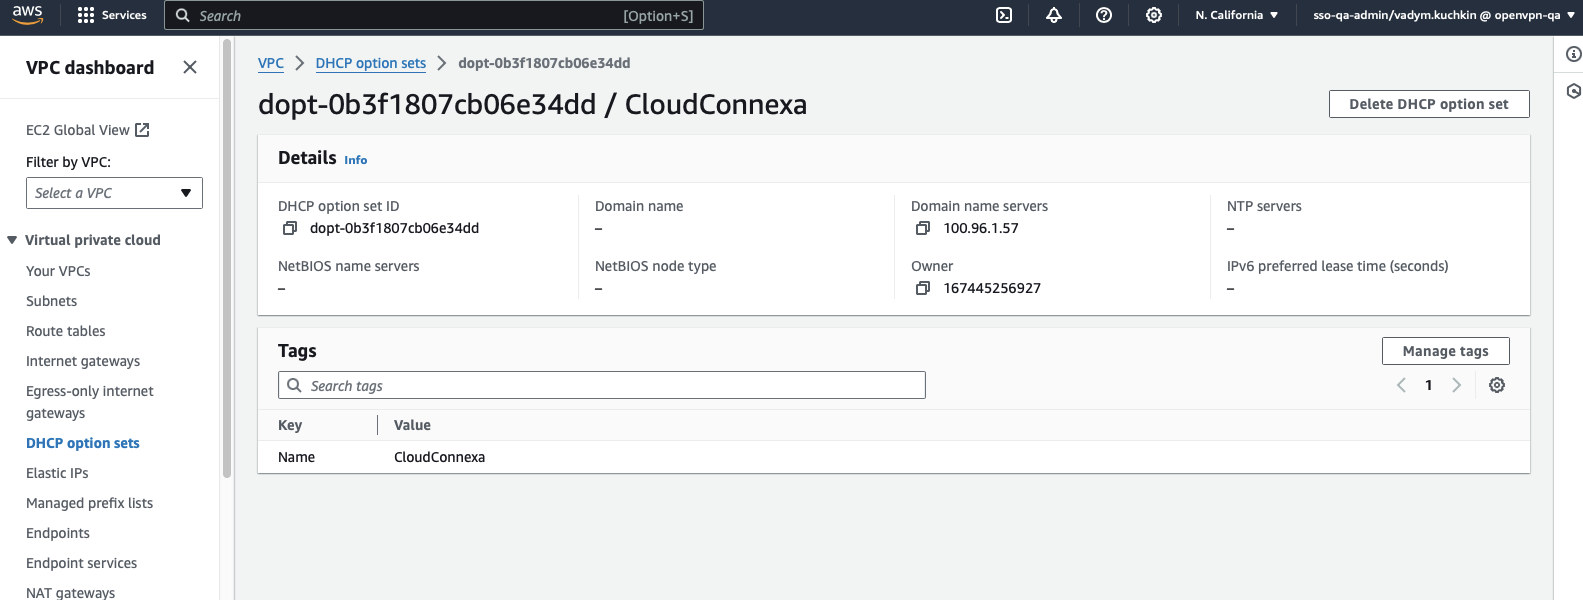
Assign DHCP option set to your VPC.
Tutorial: Find the AWS IPsec tunnel's outside IP address
Follow these steps to find the AWS IPsec tunnel's public IP address (Outside IP Address).
To find the AWS IPsec tunnel's public IP address (Outside IP Address), follow the steps below:
Open the Amazon VPC console at https://console.aws.amazon.com/vpc/.
Click Site-to-Site VPN connections.
Click the hyperlinked Name of the desired VPN connection.
Click the Tunnel details tab.
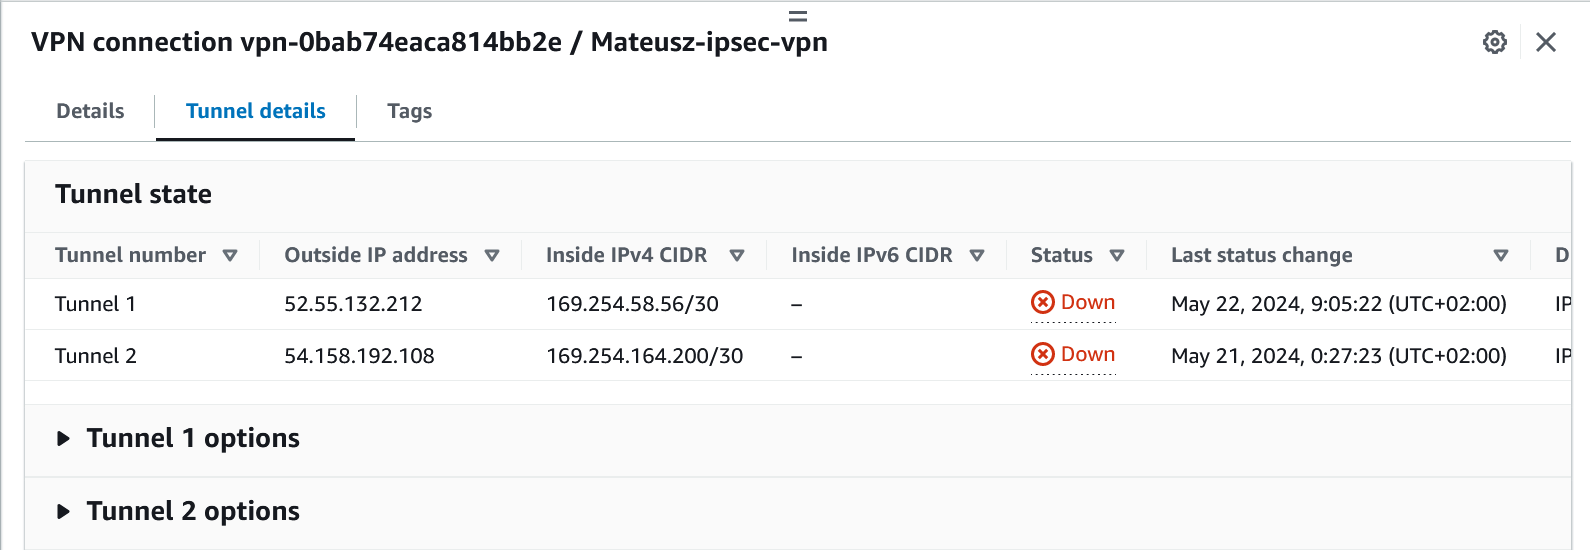
The Outside IP address will be listed in the Tunnel state section.
Tutorial: Connect Your AWS VPC to CloudConnexa by Deploying a Connector
This tutorial shows you the steps to take to deploy a Connector on your AWS VPC. Once deployed, the Connector attempts to establish an outbound OpenVPN tunnel to the configured CloudConnexa Region. On a successful connection, the AWS VPC can be accessed by your CloudConnexa Users.
Launch Connector on AWS
To configure a Network that represents your AWS Virtual Private Cloud (VPC) and install an AWS instance with a Connector that uses AWS CloudFormation, follow these steps:
Sign in to the CloudConnexa Administration portal at https://cloud.openvpn.com
Navigate to Networks and click Networks.
Select the Scenario(s) that apply to your use case.
Provide a Network Name and enter an optional Description.
Provide a Connector name, select a Region, and click Next.
Select an AWS Region.
Click Launch ad log into AWS.
On the Quick create stack web page, specify the stack details:
Stack name,KeyName,SubnetId,VpcId, and then click Next.Note
Use the existing VPC and IP subnet.
Click the I acknowledge that AWS CloudFormation might create IAM resources checkbox to allow CloudFormation to create
RouteManagerRole IAM::Roleresources. This role configures routes in the VPC Route table to use the Connector. Click Create stack.Monitor the stack creation as it goes from
CREATE_IN_PROGRESSstate toCREATE_COMPLETE.On completion, open the Resources tab to view the created resources. Check that the
RouteManagerRolewas created along with anInstancSecurityGroup,InstanceProfile, and theEC2Instance.Click on the Physical ID of the EC2 instance to check its details.
Note
The EC2 instance uses Ubuntu. If you want to connect to it with SSH, use
ubuntuas the username.The Connector EC2 automatically connects to the Region and the Network will show up as
Onlineon the Status page of CloudConnexa Admin portal.
A new EC2 instance Security Group is automatically created after the Network Connector deployment through CloudFormation. This Security Group contains only one Inbound Rule to allow SSH connections (Protocol: TCP; Port: 22; Source: 0.0.0.0/0).
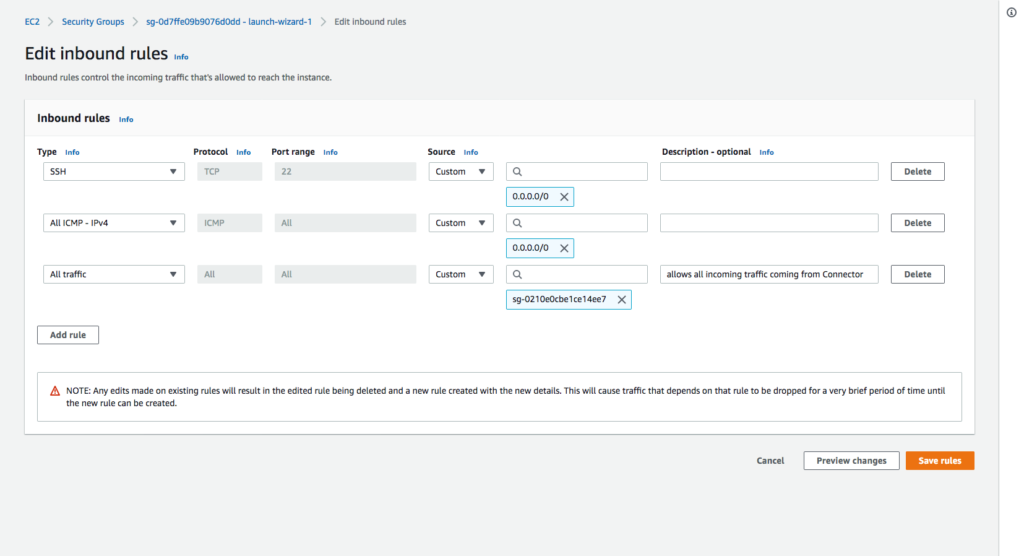
Modify existing Security Groups
If you are using Security Groups to protect any instances that need their traffic to be routed through the Connector instance, you need to add the Security Group of the Connector instance to their inbound rules.
This screenshot shows the inbound rules of sg-0d7ffe09b9076d0dd – launch-wizard-1 Security Group are being edited to add the last rule, which accepts all incoming traffic coming from the Security Group sg-0210e0cbe1ce14ee7 that is associated with the Connector instance.
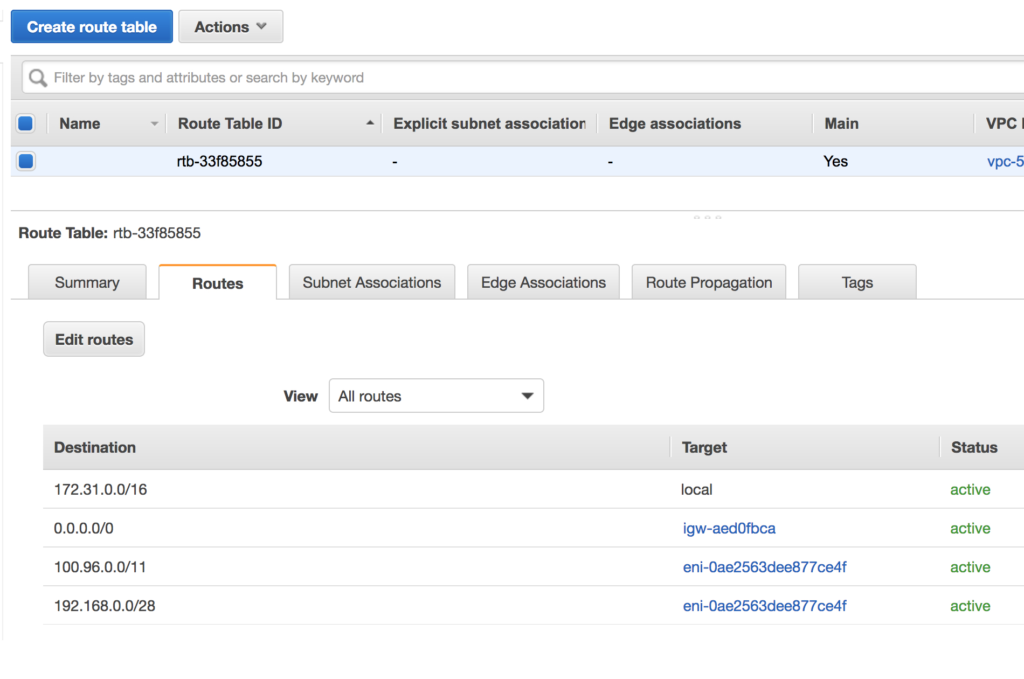
Optional: Check and add routes to the VPC Route Table associated with the subnet
Check that a route exists in the route table for the WPC Subnet IP address range configured in Network Settings of CloudConnexa. The default WPC IPv4 subnet address range for CloudConnexa is 100.96.0.0/11. If a route to destination 100.96.0.0/11 using the Connector instance as a target is absent, add it. If other CloudConnexa Networks need to be reached from the VPC, add a route with those Network subnets as the destination and the Connector instance as the target.
The screenshot below shows how the route table should look with an entry for the CloudConnexa WPC IP address subnet (100.96.0.0/11) and an entry for subnet 192.168.0.0/28 which is another Network (for example, office Network) that is reachable via CloudConnexa. Both entries have target as the instance running the Connector.
Note: If you allow CloudFormation to create RouteManagerRole IAM::Role resources, this role will configure routes in the VPC Route table to use the Connector automatically and update the route table as new Networks are added to the WPC.
Tutorial: Connect Your Azure VNet to CloudConnexa by Deploying a Connector
This tutorial shows you the steps to take to deploy a Connector on your Azure VNet. Once deployed, the Connector attempts to establish an outbound OpenVPN tunnel to the configured CloudConnexa Region. On a successful connection, the Azure VNet can be accessed by your CloudConnexa Users.
Launch Connector On Azure
You can deploy a Connector in the Microsoft Azure environment during the Network creation process. You can choose to either launch a template directly in Azure, or download a template and launch it manually.
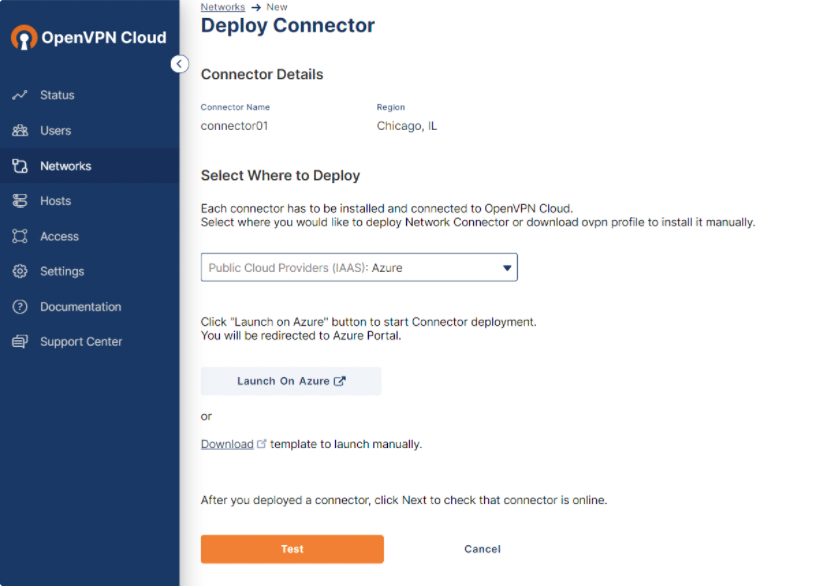
Steps: Launch a template directly on Azure
Click Launch On Azure.
You are redirected to your Azure environment, where a virtual machine (VM) is created automatically.
Define the parameters on the Azure VM, noting that the fields marked with an asterisk are mandatory.
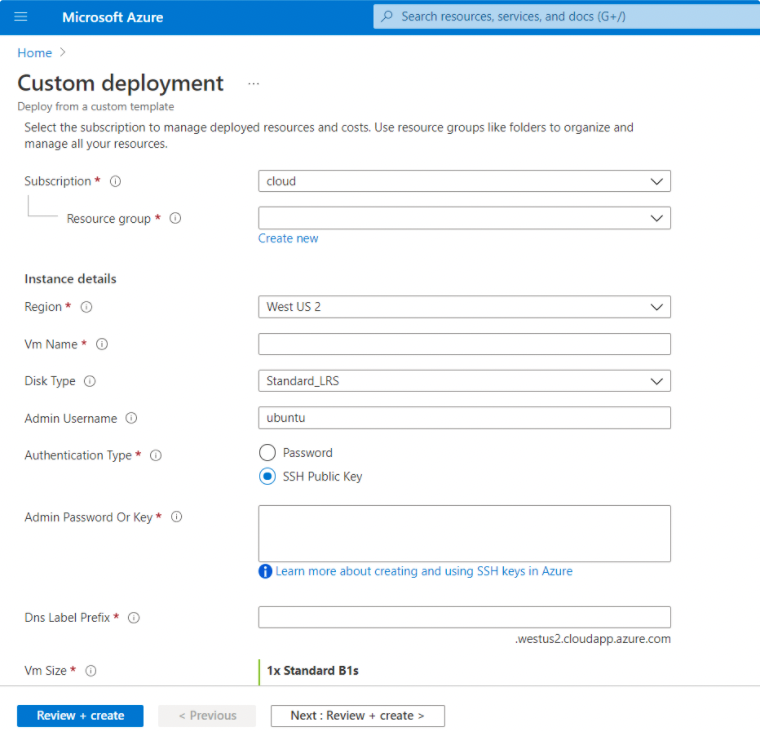
Parameter
Value
Subscription
A logical container used to provision resources in Azure. It holds the details of all your resources such as VMs, databases, and more.
Resource Group
A container that holds related resources for an Azure solution. The resource group includes those resources that you want to manage as a group.
Region
The region value propagates from the resource group.
Disk Type
The type of storage to be used for your VM disks.
Admin Username
The Administrator username for the VM.
Authentication Type
The type of authentication to use on the VM. SSH key is strongly recommended.
Admin Password Or Key
The SSH key or password for the VM.
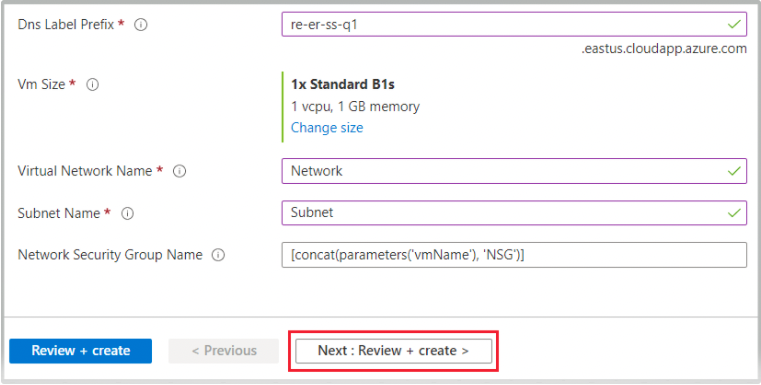
Dns Label Prefix
The unique DNS label prefix for the public IP that is used to access the VM.
Vm Size
The size of the VM.
Virtual Network Name
The name of the existing virtual Network (VNet). You can find the VNet name on the Virtual Networks page.
Subnet Name
The name of the existing subnet in the VNet you want to use. You can find the subnet name on the Subnets blade of the VNet. This subnet value must be the same as the subnet of the Network on the CloudConnexa Administration portal.
Network Security Group Name
The name of the Network security group.
Click Next: Review + create.
When validation passes, click Create.
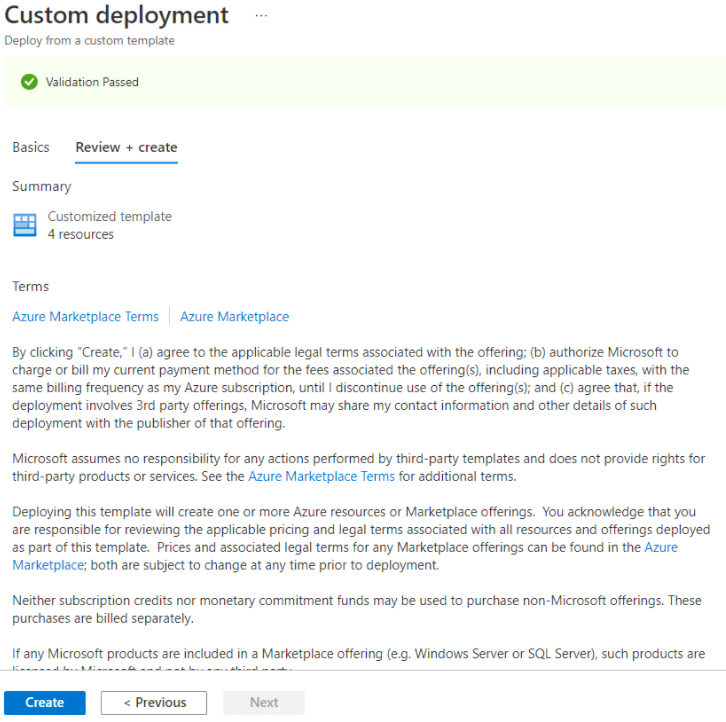
The Connector deployment is complete. You can navigate to your resource group to find your VM.
Steps: Launch Connector manually from template
In the CloudConnexa Administration portal, click Download to save the JSON Azure template to your local computer.

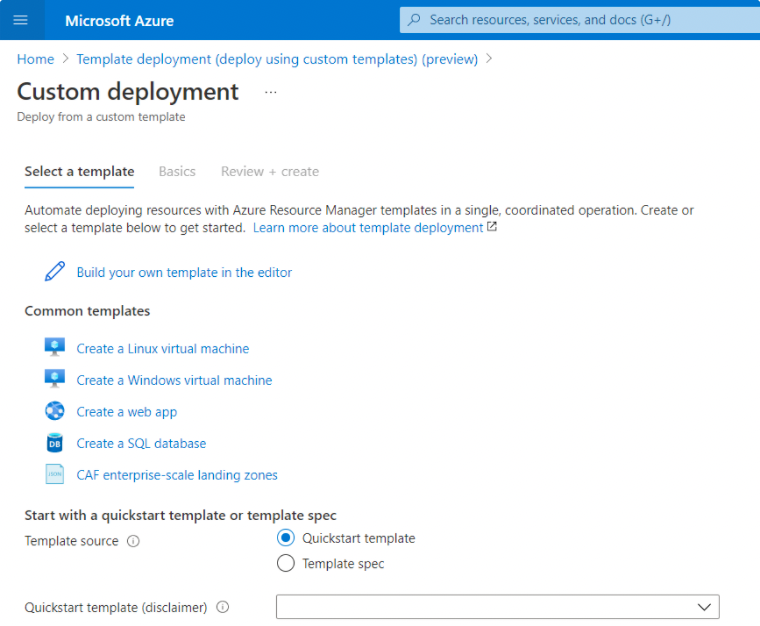
Access your Azure portal and click Create a resource.
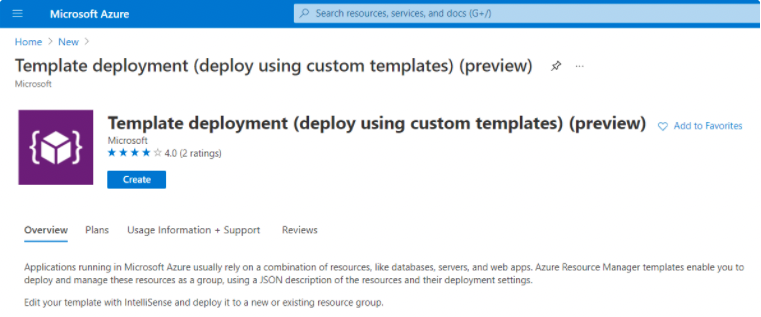
Search for Template deployment (deploy using custom templates) and click Create.
Click Build your own template in the editor.
Click Load File.
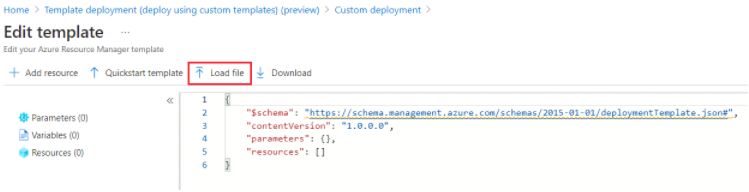
Load the template file from your local computer and click Save.
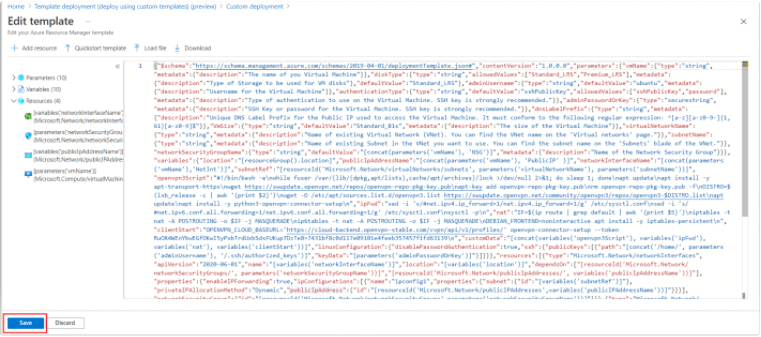
Follow the steps 2-4 shown in the Steps: Launch a template directly on Azure section to complete the configuration.
Tutorial: Connect Azure to CloudConnexa with IPsec
This tutorial shows how to configure an IPsec connection to your Azure VNet. Once configured, site-to-site IPsec tunnel(s) connects your Azure VNet to the configured CloudConnexa Region. On a successful connection, your CloudConnexa users and other networks connected to any of CloudConnexa's Regions can access the Azure VNet.
This tutorial shows how to configure an Azure Site-to-Site IPsec VPN connection between your Azure VNet and a CloudConnexa Region. A good reference for the Azure configuration aspect of this setup is available in Azure documentation.
The Azure configuration involves:
Creating a gateway subnet: The virtual network gateway requires a specific subnet named GatewaySubnet. The gateway subnet is part of the IP address range for your virtual network and contains the IP addresses that the virtual network gateway resources and services use.
Creating a Virtual Network Gateway: In this step, you create a virtual network gateway (VPN gateway) for your virtual network. Creating one often take 45 minutes or more, depending on the selected gateway SKU.
Creating a local network gateway: The local network gateway is a specific object deployed to Azure that represents your CloudConnexa Region for routing purposes.
Creating a VPN connection: Create a site-to-site VPN connection between your virtual network gateway and the CloudConnexa Region.
On a successful connection, your CloudConnexa users and other networks connected to any of CloudConnexa's Regions can access the Azure VNet.
Add a Network using the Network Configuration Wizard to represent your AWS VPC and select the IPsec Tunneling Protocol option.
In the Connector configuration step, select Azure from the Platform to Connect drop-down menu. Refer to CloudConnexa Connectors and About Network Connectors.
Instructions will appear on how to configure IPsec connectivity with CloudConnexa. You will see four steps:
Create Azure Gateways: Use these values when configuring the Azure Local and Virtual network gateways. See steps Step 6 and Step 7.
Setup CloudConnexa Tunnel: Complete the CloudConnexa tunnel setup using values as shown in Step 8 and Step 9.
Create Azure Connection: Use this information in Step 10
Verify Connectivity: After configuring the tunnel on both sides, click “Test Connection” to check that CloudConnexa can establish a connection to the remote network
(Azure) Create a gateway subnet. Refer to Azure documentation. The virtual network gateway requires a specific subnet named GatewaySubnet. The gateway subnet is part of the IP address range for your virtual network and contains the IP addresses that the virtual network gateway resources and services use.
When you create the gateway subnet, you specify the number of IP addresses that the subnet contains. The number of IP addresses needed depends on the VPN gateway configuration that you want to create. Some configurations require more IP addresses than others. It's best to specify /27 or larger (/26, /25, etc.) for your gateway subnet.
On the page for your virtual network, on the left pane, select Subnets to open the Subnets page.
At the top of the page, select + Gateway subnet to open the Add subnet pane.
Select an appropriate Size. For example, /27.
Click Add.
(Azure) Create a local network gateway. Refer to Azure documentation. The local network gateway is a specific object deployed to Azure that represents the CloudConnexa Region (the site) for routing purposes. You give the site a name by which Azure can refer to it, and then specify the IP address of the site's VPN device to which you create a connection. You also specify the IP address prefixes that are routed through the VPN gateway to the site's VPN device (CloudConnexa Region). The address prefixes you specify are the prefixes located on your on-premises network.
In the Azure portal, go to Local network gateways and open the Create local network gateway page.
Click + Create on the Local network gateways page.
On the Basics tab, fill in the following fields:
Resource Group: Select appropriately.
Region: Select appropriately.
Name: Enter name. For example, CloudConnexa
IP address: Copy from CloudConnexa Admin Portal instructions.
Address Spaces: Copy one-by-one from CloudConnexa Admin Portal instructions.
Click Next to move to the Advanced tab and set Configure BGP settings to NO.
Click Next to move to Review + create tab and click Create.
(Azure) Create a virtual network gateway (VPN gateway). Refer to Azure documentation.
In Search resources, services, and docs (G+/), enter virtual network gateway. Locate Virtual network gateway in the Marketplace search results and select it to open the Create virtual network gateway page. Click + Create.
On the Basics tab, fill in the following fields:
Subscription: Select appropriately.
Name: Enter name.
Region: Select same Region as selected for local network gateway.
Gateway Type: VPN
SKU: Recommend to choose the default setting.
Generation: Recommend to choose the default setting.
Virtual Network: Seclect the one on which the GatewaySubnet was created.
Specify the values for Public IP address. These settings specify the public IP address objects that will be associated to the VPN gateway. A public IP address is assigned to each public IP address object when the VPN gateway is created. Create or use existing Public IP address, enable Enable active-active mode, and create or use an existing SECOND PUBLIC IP ADDRESS.
Set Configure BGP to Disabled.
Click Next: Tags >
Click Review + create to run validation.
After validation passes, select Create to deploy the VPN gateway.
A gateway can take 45 minutes or more to fully create and deploy. You can see the deployment status on the Overview page for your gateway.
From the Deployment Details section of the Azure Portal's VPN gateway Overview page, copy the two IP addresses and paste it in the Remote Site Public IPv4 Address fields of Tunnel 1 and Tunnel 2 in the Setup CloudConnexa Tunnel section of CloudConnexa Administration Portal.
Create one complex random string for use as PSK and enter it in the Pre-shared Key field for Tunnel 1 and Tunnel 2.
(Azure) Create a VPN connection. Refer to Azure documentation.
At the top of the Connections page, select + Create to open the Create connection page.
On the Create connection page, on the Basics tab, configure the values for your connection:
Under Project details, select the subscription and the resource group where your resources are located.
Under Instance details, configure the following settings:
Connection type: Select Site-to-site (IPSec).
Name: Name your connection. Region: Select the region for this connection.
Region: Same as the previous created entities.
Click Next: Settings >
In the Settings tab, configure the following values:
Virtual network gateway: Select the virtual network gateway from the dropdown list that was created in Step 7.
Local network gateway: Select the local network gateway from the dropdown list that was created in Step 6.
Shared key: The value here must match the value that was entered in Step 9.
IKE Protocol: Select IKEv2.
Use Azure Private IP Address: Don't select.
Enable BGP: Don't select.
IPsec/IKE policy: Select Custom and match all the values for the various fields with what is shown in the CloudConnexa portal. Encryption uses AES256, Integrity uses SHA256, DH Group is 14 and PFS Group is PFS2048. Change IPsec SA lifetime in seconds to 3600.
Use policy based traffic selector: Select Enable.
DPD timeout in seconds: Select 45.
Connection Mode: Select ResponderOnly.
Click Next: Tags>.
Click Review + create to run validation.
After validation passes, click Create and wait till deployment is finished.
Click Test Connection 1 and Test Connection 2 to check connectivity for both the IPsec tunnels.
Continue with the network wizard instructions.
Tutorial: Connect Your GCP VPC to CloudConnexa by Deploying a Connector
Deploy an OpenVPN Network Connector on a GCP Compute Engine VM to connect your Google Cloud VPC to CloudConnexa — giving your remote users and other connected networks private access to GCP resources without exposing them to the public internet.
Overview
This tutorial walks you through deploying a Network Connector to a Google Cloud VPC directly from the CloudConnexa Administration portal.
CloudConnexa automatically deploys a Compute Engine VM and network to your selected GCP project, installs the Connector software, and enables the required networking configuration. This provides secure private network access between your Google Cloud VPC and users or other networks connected through CloudConnexa.
Many administrators use this deployment as a site-to-site connection between their Google Cloud environment and CloudConnexa.
Before you begin
Before starting this tutorial, ensure you have:
A CloudConnexa account and Cloud ID.
A Google Cloud Platform account.
Permission to create Compute Engine VM instances in your Google Cloud project.
A Google Cloud VPC where you want to deploy the Connector.
Step 1: Create a Network
To create a Network, follow the steps below:
Navigate to Networks.
Select Add Network and select your desired network scenario.
Complete the Define Network page.
Select Next.
The Deploy Network Connector page displays.
Step 2: Sign in to Google Cloud
To authorize CloudConnexa to deploy the Connector, follow the steps below:
On the Deploy Network Connector page, select Google Cloud Platform (GCP) from the drop-down.
Select Sign in to GCP.
In the authentication dialog, sign in using your Google account.
Review and grant the requested permissions.
After authentication, your GCP account is available for deployment.
Step 3: Configure the Connector deployment
To configure the Connector deployment, follow the steps below:
Select the GCP Project where you want CloudConnexa to deploy the Connector.
Select a network.
Enter a VM Name.
Select the Region and Zone for the Compute Engine VM.
Select Deploy.
CloudConnexa creates the Compute Engine VM, installs the Connector software, and enables IP forwarding. Deployment typically takes several minutes.
Note
Google Cloud requires IP forwarding to be enabled on the Connector VM so it can route traffic between your VPC and CloudConnexa. This differs from AWS, which uses source/destination checks to control routing behavior.
Verify the Connector
Note
Deployment typically takes several minutes.
After deployment completes:
If deployment succeeds, the Connector status displays as Connected.
If deployment fails, CloudConnexa displays an error message so you can review and correct the deployment configuration.
Select Finish to complete the deployment.
Tutorial: Connect Your GCP VPC to CloudConnexa using IPsec
Connect your Google Cloud VPC to CloudConnexa using GCP's built-in Classic VPN gateway and an IPsec site-to-site tunnel — no VM deployment required. Covers GCP VPN gateway setup, CloudConnexa tunnel configuration, and connectivity verification.
Overview
This tutorial shows how to connect your Google Cloud VPC to CloudConnexa using an IPsec site-to-site tunnel — without deploying a virtual machine in your GCP environment.
Unlike the connectors-based approach, IPsec uses GCP's built-in Classic VPN gateway to establish the tunnel. This means no virtual machine (VM) to manage, but it does require configuring the VPN on both the GCP side and in your CloudConnexa Administration portal. Once configured, a site-to-site IPsec tunnel connects your GCP VPC to the nearest CloudConnexa Region. Your CloudConnexa users — and any other networks connected to CloudConnexa — can then access resources in your VPC privately, without exposing them to the public internet.
Before you begin
Before configuring the IPsec connection, ensure you have the following:
Administrator access to your CloudConnexa Administration portal.
A Google Cloud project with billing enabled.
A Google Cloud VPC to connect to CloudConnexa.
Permissions to create Classic VPN gateways and related networking resources in your Google Cloud project.
Tip
For detailed Google Cloud prerequisites and permission requirements, see Google Cloud: Create a Classic VPN gateway.
Step 1: Configure the Network Connector in CloudConnexa
Navigate to Networks.
Select Add Network.
Select the appropriate Network Scenario.
Configure the network details.
When prompted, select IPsec for your tunneling protocol.
On the Configure Network Connector page, select GCP from Platform to Connect.
CloudConnexa displays the configuration values you need to create the corresponding VPN gateway and tunnel in Google Cloud.
Review and copy the following values:
CloudConnexa Public IP Address: Select the available CloudConnexa public IP address from the list. You'll enter this value as the remote peer IP address when creating the Google Cloud VPN tunnel.
Remote Network IP Ranges: Copy the displayed IP ranges. These are the CloudConnexa-side networks that Google Cloud routes through the IPsec tunnel.
Local IP Ranges: Copy the displayed local ranges when present. These should correspond to the Google Cloud VPC subnet ranges that you configured for this Network.
Tip
Keep the CloudConnexa page open while you configure the Google Cloud side so you can copy these values into the corresponding Google Cloud fields.
Review Set Up CloudConnexa Tunnel. Don't enter any values yet. You obtain them while configuring the Google Cloud VPN.
Leave Advanced Configuration unchanged unless the Google Cloud VPN configuration requires different IPsec parameters.
Open a new browser tab and sign in to the Google Cloud Console.
Step 2: Configure the Google Cloud VPN
Sign in to the Google Cloud Console.
Navigate to VPN.
Select Create VPN connection.
Select the VPN setup wizard.
Select the Classic VPN option.
Configure the VPN gateway:
Name: Enter the VPN gateway name.
Important
This can't be changed later.
Network: Select the VPC to connect.
Region: Select a Google Cloud region close to the CloudConnexa region.
IP address: Create or select a static external IP address.
Configure the VPN tunnel:
Name: Enter a name.
Remote peer IP address: Copy the CloudConnexa Public IP Address from the Create GCP VPN section.
IKE Version: IKEv2.
IKE pre-shared key: Enter a strong pre-shared key. You'll enter the same key later in CloudConnexa.
Tip
You can refer to Google Cloud's documentation on generating a strong, 32-character pre-shared key: Generate a strong pre-shared key.
Routing options: Policy-based.
Remote network IP ranges: Copy the Remote Network IP Ranges from CloudConnexa.
Local IP ranges: Enter the subnet ranges for your Google Cloud VPC.
Select Done, then Create.
Step 3: Set up the CloudConnexa tunnel
Return to the CloudConnexa Network Configuration Wizard.
In Set Up CloudConnexa Tunnel, enter:
Google Engine VPN Gateway IP: The static external IP address assigned to your Google Cloud VPN gateway.
Pre-shared Key (PSK): The same key you configured in Google Cloud.
Leave the Advanced Configuration settings at their default values unless your environment requires different IPsec parameters.
Select Test Connection to test connectivity.
Continue with the network wizard instructions.