Routers
Tutorial: Connect Your Cisco Router to CloudConnexa with IPsec
Configure an IPsec tunnel between a Cisco router and CloudConnexa, including network setup, authentication, advanced settings, and connectivity verification.
This tutorial walks you through setting up an IPsec tunnel between your Cisco router and CloudConnexa.
To complete this setup, you'll configure components on both the CloudConnexa side and your Cisco router, including:
A Network in CloudConnexa to represent your private network.
A Network Connector configured for IPsec.
Tunnel parameters such as authentication, encryption, and routing.
Your Cisco router using the provided configuration details.
Once configured, users and networks connected to CloudConnexa can securely access resources in your private network.
Before you begin
Ensure you have a CloudConnexa account and Cloud ID.
Ensure your Cisco router supports IPsec.
Ensure you have access to your router configuration instance.
Step 1: Create a Network in CloudConnexa
Navigate to Networks → Networks.
Click Add Network.
Select at least one Network Scenario. Refer to these tutorials for details:
Click Continue.
For the Network Configuration, enter a name and description (optional).
Select IPsec as the Connector Tunneling Protocol.
For the Connector, enter a name and description (optional).
Click Next.
Step 2: Configure the Network Connector
In the Configure Network Connector step, configure the IPsec Network Connector:
Configure the platform: In Platform to Connect, select Cisco.
Enter connection details: In Remote Site Public IPv4 Address, enter the public IP address of your router or VPN gateway.
Configure authentication:
Option 1: Shared Secret — Enter the pre-shared key (PSK), hostname, and domain for the IPsec Network Connector.
Tip
CloudConnexa doesn't generate a PSK. You need to create and configure the same key on both CloudConnexa and your network device. Use only alphanumeric characters, as some characters aren't supported.
Example (Linux/macOS):
openssl rand -hex 32
Option 2: Certificate-based — Upload the required files and provide a passphrase.
Tip
Ensure the certificates and private key:
Match each other (the private key corresponds to the uploaded certificate).
Are trusted by both peers (the correct CA certificate is provided).
(Optional) Configure advanced settings: Expand Advanced Configuration to customize IPsec parameters:
IKE Version: Select the version: IKEv1 or IKEv2.
Tip
If using IKEv2 and only GCM encryption algorithms (AES-128-GCM-16 and/or AES-256-GCM-16), the integrity algorithm and a DH group are optional in phase 2.
For non-GCM encryption algorithms, an integrity algorithm and a DH group are required. The default values are applied automatically.
Phase 1 settings:
Setting
Description
Encryption Algorithm
Select one or more supported encryption algorithms.
Integrity Algorithm
Select a supported integrity algorithm.
Diffie-Hellman Group
Select a DH group supported by your device.
Lifetime (sec)
Enter a value between 901 and 86400.
Phase 2 settings:
Setting
Description
Encryption Algorithm
Select one or more supported encryption algorithms.
Integrity Algorithm
Select a supported integrity algorithm.
Diffie-Hellman Group
Select a DH group supported by your device.
Lifetime (sec)
Enter a value between 900 and 28800.
IKE rekey settings:
Setting
Description
Rekey Margin Time (sec)
Value between 60 and half of Phase 2 lifetime.
Rekey Fuzz (%)
Value between 0 and 100.
Replay Window Size (packets)
Value between 64 and 2048.
Connection behavior:
Setting
Description
Startup Action
Defines how the tunnel is initiated.
CloudConnexa Connection Restoration
Controls whether the tunnel automatically reconnects if interrupted:
Defaults to Yes when Startup Action = Start.
Automatically set to No when Startup Action = Attach and can't be changed.
Step 3: Review remote tunnel configuration
CloudConnexa provides configuration details required for your network router.
Locate the Remote Tunnel Configuration section.
Note the values provided for:
Firewall configuration.
IPsec tunnel parameters.
Connection initiation and restoration parameters.
Static routes.
DNS settings.
Keep this information available for configuring your router.
Step 4: Configure your network router
Use the values from the Remote Tunnel Configuration section to configure your IPsec device.
Step 5: Verify connectivity
After configuring both sides of the tunnel, verify that the connection is established.
In the Verify Connectivity section, click Test Connection.
CloudConnexa attempts to establish a connection to your remote network.
Check the connection status:
Connected — The tunnel is successfully established.
Offline — The connection failed or hasn't been established yet.
Tip
If the connection status is Offline:
Click View Logs to review connection details.
Verify the following:
PSK or certificates match on both sides.
IPsec parameters (encryption, DH group, lifetimes) are aligned.
Firewall rules allow IPsec traffic.
The correct public IP address is configured.
Step 6: Complete the setup
Click Finish to complete the Network configuration.
Confirm that:
The Network is created.
The Connector shows a Connected status.
Tutorial: Configure a DD-WRT Router To Connect to CloudConnexa
This tutorial contains instructions on how to use a DD-WRT router and configure it to use a Connector profile to connect to CloudConnexa and make the network part of your WPC.
Introduction
Many of our Users have expressed interest in using DD-WRT or related routers to connect to CloudConnexa instead of using the Connector application.
While connecting in this manner may not yield the best performance, due to the limited processing power and memory of the router, it could be useful in cases where convenience, rather than high throughput, is required.
Important
The information provided here is for educational and informational purposes only. We are not responsible for any damages you incur as a result of using these instructions. For technical support, contact the router supplier or the appropriate community forums. It is not guaranteed that all firmware versions will work as expected with CloudConnexa, and some features may be incompatible. We recommend updating the firmware to the latest version.
Downloading the Connector Profile
To configure the routers you need to use specific sections of the OpenVPN Connector Profile in specific setting configurations.
First, you need to download the Profile in .ovpn format from the Network configuration you have created in the Administration portal to represent the router’s Network.
The Profile can be downloaded by selecting it as the option in the drop-down list shown after clicking on the download icon.
Configuring DD-WRT
Before you begin, make sure your router is properly configured for a NTP server. This setting could be found under the set up tab in your router configuration. Under Time settings, make sure the NTP Client is set to Enable and the Server IP / Name is populated with a proper time server. If you do not know what your time server is, please fill in time.nist.gov in the text box as indicated.
Afterward, visit the Services tab, then the VPN tab. Under the section Start OpenVPN Client, click the Enable radio box. If you do not see this section, it is possible that your DD-WRT build is not OpenVPN enabled. Please consult the proper DD-WRT documentation for more information on the various DD-WRT builds.
Once you have selected that option, also check the Enable option under Advanced Options, this will allow you to define options required for the WPC connection to work.
The following screen should then be displayed, as depicted below:
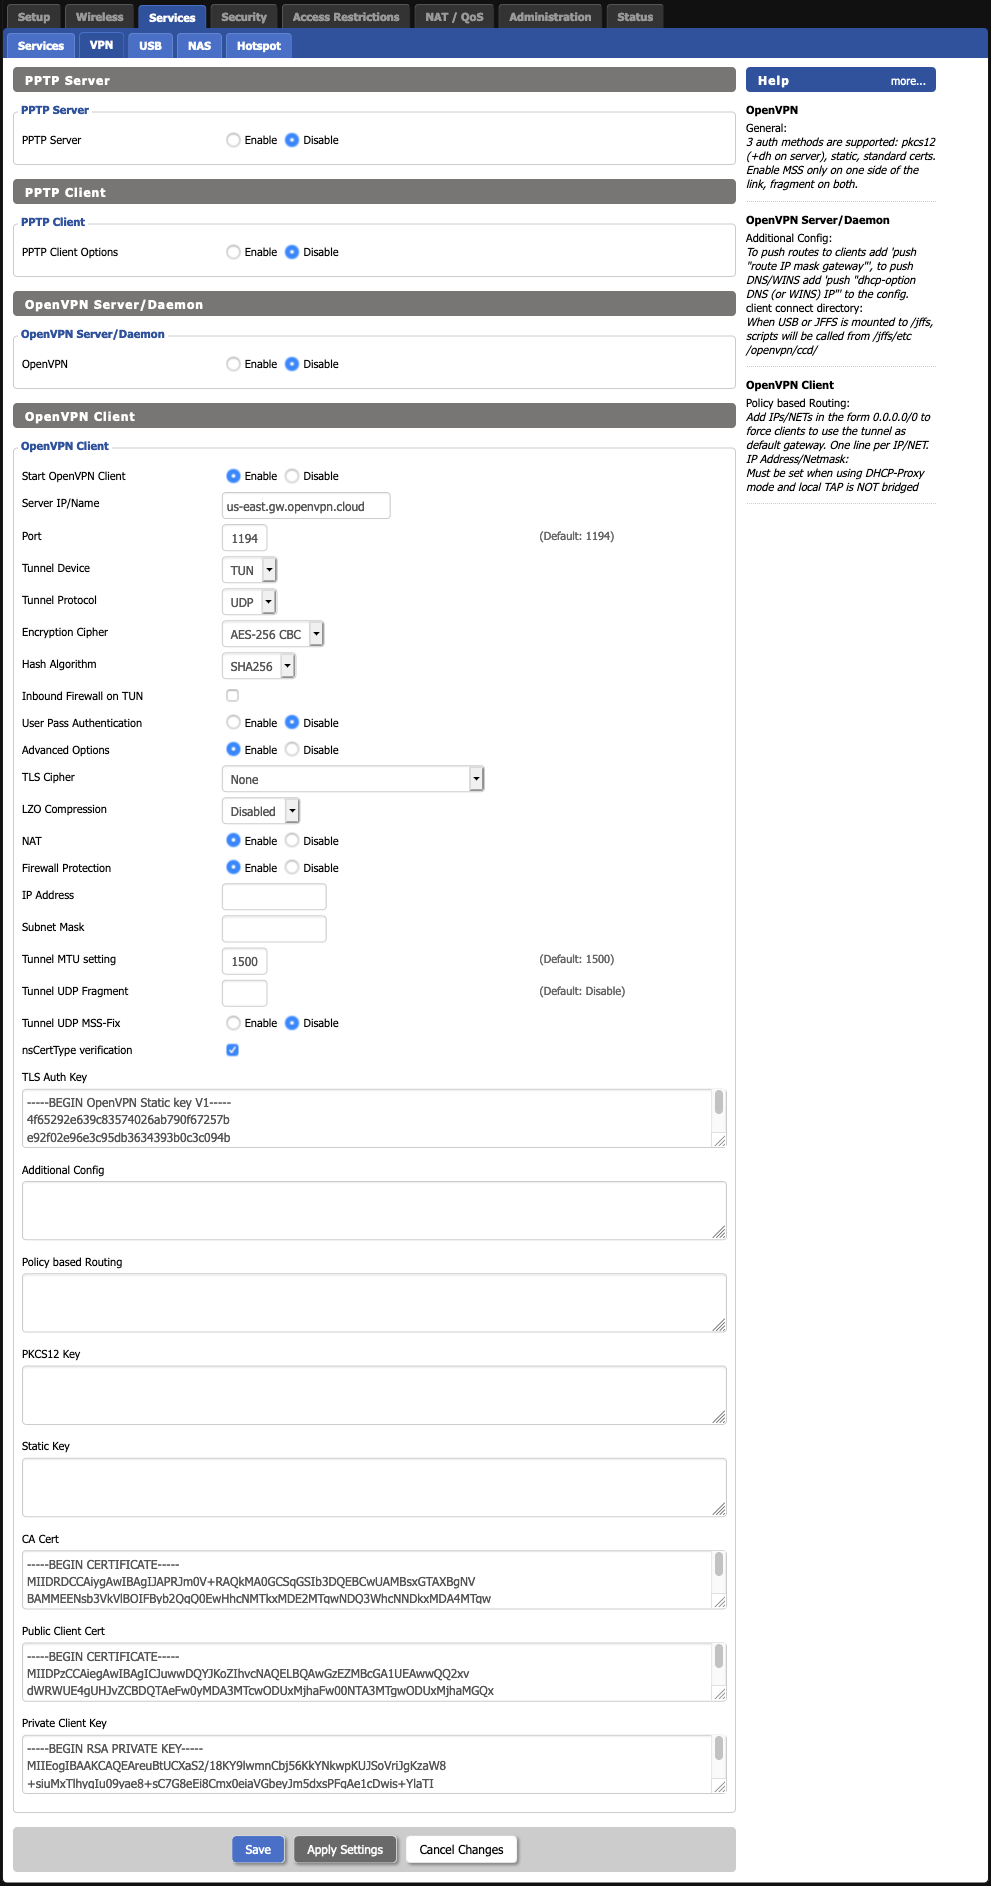
Configuration Descriptions
Start CloudConnexa Client: Enables/Disables the CloudConnexa client connection.
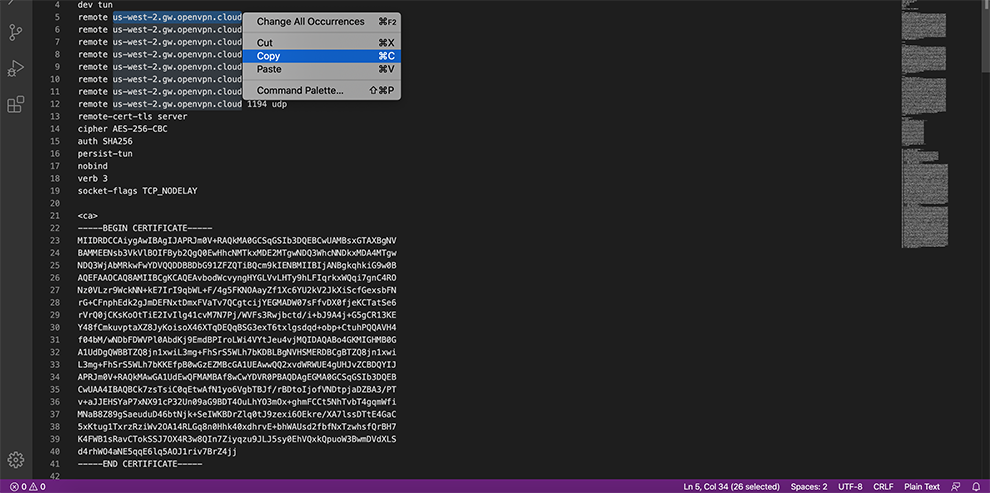
Server IP/Name: The hostname of the WPC server you are trying to connect to. Look inside your Profile for entries starting with remote. For example, the entry remote us.shieldexchange.com 1194 udp indicates that the hostname is us.shieldexchange.com.
Port: The port number the WPC server is listening on. If you do not know what this is, either look for the port number in remote entries such as the one shown in the previous example. In the previous example, the port is 1194. If your server is only using a single port, you may see the port number specified using the port directive (e.g. port 1194). It is preferable that you choose UDP ports over TCP, as UDP provides better reliability for your WPC sessions.
Tunnel Device: Select TUN
Tunnel Protocol: Select UDP
Encryption Cipher: Select whatever appears on the cipher line of the Profile. By default, AES-256-CBC is used for CloudConnexa.
Hash Algorithm: Select whatever appears on the auth line of the Profile. By default, SHA256 is used for CloudConnexa.
Verify Server Cert.: Located in Advanced Options. Checks to see if the remote server is using a valid type of certificate meant for OpenVPN Connections. As this is a security feature of CloudConnexa, it should be left enabled.
Advanced Options: As described previously, this option must be Enabled for you to set the required options necessary for a successful WPC connection.
LZO Compression: Enables compression over WPC. This option should be Disabled.
NAT: Creates a NAT layer over the WPC tunnel. This should be Enabled if you plan to have all your client’s traffic to be sent over the WPC tunnel under the shared WPC IP address assigned by CloudConnexa. If you want to send traffic from your clients directly over the tunnel without any address modification(s) (e.g. If you were using Advanced Routing), then this option should be Disabled. It is highly recommended that you turn this option ON, unless you know what you are doing.
Local IP Address: Specify a IP address that your CloudConnexa tunnel should use. This field is usually not applicable, since CloudConnexa automatically assigns an address upon a successful connection.
TUN MTU Setting: The maximum transmission unit (MTU) used over the WPC tunnel. Leave this at 1500, unless otherwise directed by a support staff or a Network professional.
Tunnel UDP Fragment (blank).
Note
Unless directed otherwise by a support staff or a network professional, leave this field blank.
Tunnel UDP MSS-Fix (Default: Disable).
TLS Cipher: What encryption algorithm CloudConnexa should use for encrypting its control channel. Selecting None will allow DD-WRT to auto-negotiate the strongest available cipher.
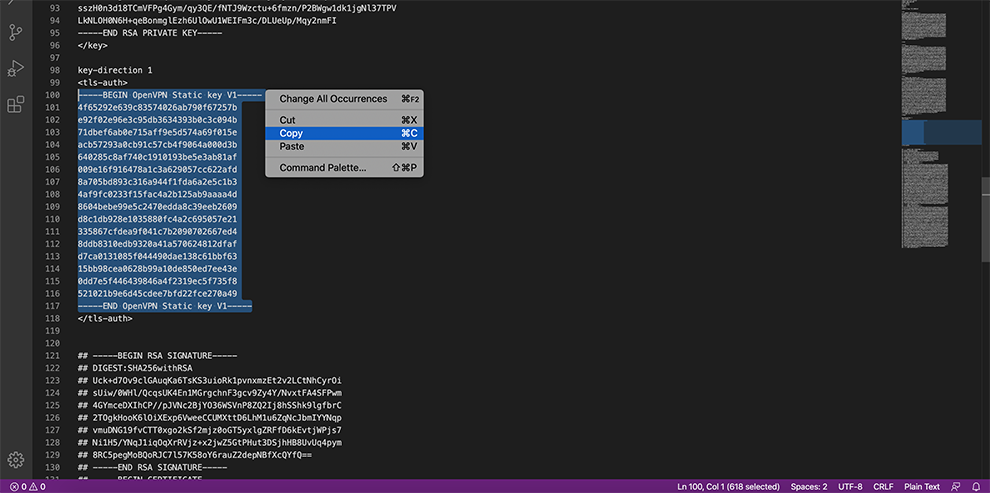
TLS Auth Key: The static key CloudConnexa should use for generating HMAC send/receive keys. You may find this key surrounded by the <tls-auth>..</tls-auth> brackets. Copy the contents from your Profile, starting from –BEGIN CloudConnexa Static key V1– until you reach –END CloudConnexa Static key V1–.
Additional Config: Any additional configurations you want to define for the WPC connection.
Policy based Routing: This field should be left blank.
PKCS12 Key: This field should be left blank.
Static Key: This field should be left blank.
CA Cert: The CA certificate used by the WPC server, found between the <ca>…</ca> brackets inside the Profile. Start copying from –BEGIN CERTIFICATE– until you hit the first –END CERTIFICATE–.
Public Client Cert: The CA certificate used by the WPC client, found between the <cert>..</cert> brackets inside the Profile. Start copying from –BEGIN CERTIFICATE– until you hit –END CERTIFICATE–.
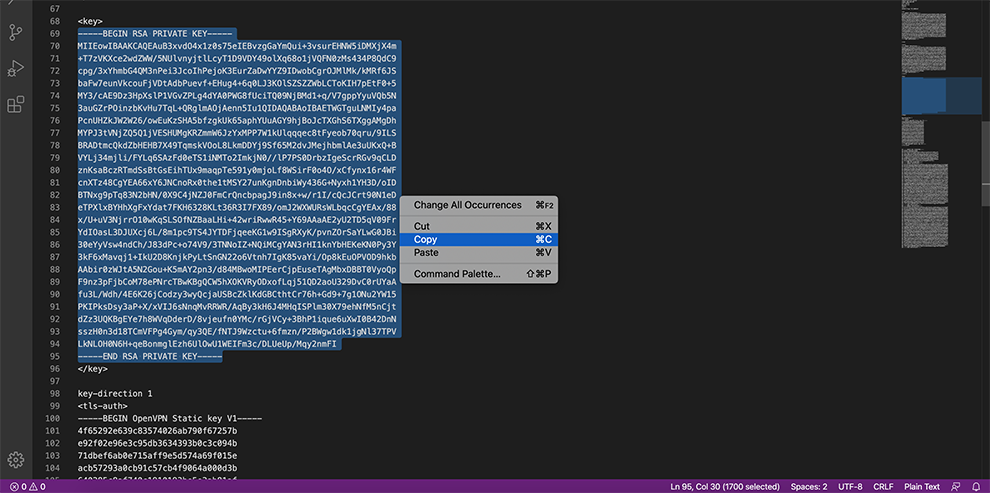
Private Client Key: The client’s private key used by the WPC client, found between the <key>..</key> brackets inside the Profile. Start copying from –BEGIN RSA PRIVATE KEY– until you hit –END RSA PRIVATE KEY–.
To start the WPC connection, click the Apply Settings towards the bottom of the page. You may view the status of your WPC connection by visiting the Status tab, and then the CloudConnexa tab.
Tutorial: Configure an OpenWrt Router To Connect to CloudConnexa
This tutorial contains instructions on how to use an OpenWrt router and configure it to use a Connector profile to connect to CloudConnexa and make the network part of your WPC.
Introduction
Many of our Users have expressed interest in using CloudConnexa protocol-compatible routers to connect to CloudConnexa rather than the Connector application.
While connecting in this manner may not yield the best performance due to the router's limited processing power and memory, it could be useful in cases where convenience, rather than high throughput, is required.
Important
The information provided here is for educational and informational purposes only. We are not responsible for any damages you incur as a result of using these instructions. For technical support, contact the router supplier or the appropriate community forums. It is not guaranteed that all firmware versions will work as expected with CloudConnexa, and some features may be incompatible. We recommend updating the firmware to the latest version.
Note
Refer to the instructions from OpenWrt for the latest information.
Downloading the Connector Profile
To configure the routers you need to use specific sections of the OpenVPN Connector Profile in specific setting configurations.
First, you need to download the Profile in .ovpn format from the Network configuration you have created in the Administration portal to represent the router’s Network.
The Profile can be downloaded by selecting it as the option in the drop-down list shown after clicking on Deploy.
Open the downloaded Profile file in a text editor. In Windows, the file must be opened in a text editor other than Notepad (e.g. Wordpad / Notepad++).
Configuring OpenWrt
To connect to the CloudConnexa service using your OpenWrt router, please follow the steps below:
If you have not already upgraded to the latest of OpenWrt, please follow the instructions on the OpenWrt website.
Login to the LuCI web interface, and then go to System -> Software.
Install the openvpn-openssl and the luci-app-openvpn packages on your system by putting the name of the package in the Download and install package: textbox and then click OK.
After the packages have been installed, refresh the web page. The OpenVPN option should appear under VPN. If the option does not appear, log out of the administration interface and then log back in.
In the LuCI interface, go to VPN > OpenVPN.
If your router supports the OVPN configuration file upload option, follow the steps in OVPN configuration file upload, otherwise follow Template based configuration.
OVPN configuration file upload
To upload the Profile to your router, follow the steps below:
VPN > OpenVPN.
Under ovpn configuration file upload, in the textbox instance name, enter CloudConnexa; Choose the downloaded profile in
.ovpnformat and click upload.Under the OpenVPN instances, check the Enabled checkbox from the newly created instance (CloudConnexa) and click start.
Click Save and Apply.
Template based configuration
In the blank text box that appears, enter CloudConnexa as the name, and use the Client configuration for a routed multi-client WPC drop-down option, and click Add.
Note
This is in the
template-based configurationtext boxinstance name.In the Profile editor that appears, click the Switch to advanced configuration >> link.
Note
You will need to edit the newly created instance.
From VPN > OpenVPN in the Profile editor:
Choose from the "additional field" drop-down list
fast_io.Check the fast_io checkbox.
Click the Save button.
In the Networking tab of the Profile editor:
Under — Additional Field —, add the sndbuf and rcvbuf fields.
Change the sndbuf and rcvbuf values to both 0.
Change the dev textbox to read tun0.
Select adaptive under the comp_lzo option.
Click the Save button.
In the VPN tab of the Profile editor:
Check the pull checkbox.
In the remote text box, enter the remote value from your Profile file. They should be near the top of the file and after the word remote (e.g. eu-west.gw.openvpn.com 1194 udp).
Click the + button next to the text box, and repeat the entry for the 443 tcp entry below (e.g. eu-west.gw.openvpn.com 443 tcp).
Click the Save button.
In the Cryptography tab of the Profile editor:
Under –Additional Field— , add the ca field.
In the Profile you have downloaded, copy the contents between the <ca> and </ca> tag into a new file. Make sure you include all of the —–BEGIN CERTIFICATE—– and —–END CERTIFICATE—– lines in the new file. There should be a total of four of such lines, and when copying the contents into a new file, omit the <ca> and </ca> tags in the beginning and the end, since these will be added automatically by OpenWrt.
Upload the certificate into OpenWrt by selecting the new file you have created.
Under –Additional Field— , add the cert field.
In the Profile you have downloaded, copy the contents between the <cert> and </cert> tag into a new file. Make sure you include all of the —–BEGIN CERTIFICATE—– and —–END CERTIFICATE—– lines in the new file. There should be a total of two of such lines, and when copying the contents into a new file, omit the <cert> and </cert> tags in the beginning and the end, since these will be added automatically by OpenWrt.
Upload the certificate into OpenWrt by selecting the new file you have created.
Under –Additional Field— , add the key field.
In the Profile you have downloaded, copy the contents between the <key> and </key> tag into a new file. Make sure you include all of the —–BEGIN RSA PRIVATE KEY—– and —–END RSA PRIVATE KEY—– lines in the new file. There should be a total of two of such lines, and when copying the contents into a new file, omit the <key> and </key> tags in the beginning and the end, since these will be added automatically by OpenWrt.
Upload the key into OpenWrt by selecting the new file you have created.
Under –Additional Field— , add the tls_auth field.
In the Profile you have downloaded, copy the contents between the <tls-auth> and </tls-auth> tag into a new file. Make sure you include all of the —–BEGIN CloudConnexa Static key V1—– and —–END CloudConnexa Static key V1—– lines in the new file. There should be a total of two of such lines, and when copying the contents into a new file, omit the <tls-auth> and </tls-auth> tags in the beginning and the end, since these will be added automatically by OpenWrt.
Upload the TLS auth key file using SCP to your router in the /etc/openvpn/ folder with the file name tlsauth.key. If you already have a WPC Profile that is using this file name, change the file name accordingly and then update the path value in the tls_auth text box that appears. If you are using Notepad++ to copy the contents of the file over a PuTTY or an SSH session, please make sure the new file is using the Windows EOL format, otherwise the copied lines will not be transferred properly. This option can be changed in Edit -> EOL Conversion -> Windows Format.
Click Save & Apply to save the CloudConnexa configuration on your router.
On the top of the LuCI interface, go to Network -> Interfaces.
Click Add new interfaces…
Enter CloudConnexa under the Name text box.
Select Unmanaged under the Protocol text box.
Click the drop-down next to Interface: and enter tun0 into the text box.
Click Create interface to save the custom interface.
On the top of the LuCI interface, go to Network -> Firewall.
Click the Add button.
Use the following settings for the newly created zone:
Name: OC
Input: drop
Output: accept
Forward: drop
Masquerading: Checked
MSS Clamping: Unchecked
Covered Networks: CloudConnexa (checked)
Inter-Zone Forwarding -> Allow forward from source zones: lan (checked)
Click Save & Apply to save the newly created zone.
To start the VPN connection, go to VPN -> OpenVPN, check the Enabled checkbox and then the start button under the CloudConnexa Profile.
Tutorial: Configure a PfSense Router To Connect to CloudConnexa
This tutorial contains instructions on how to use a PfSense router and configure it to use a Connector profile to connect to CloudConnexa and make the network part of your WPC.
Introduction
Many of our Users have expressed interest in using CloudConnexa compatible routers to connect to CloudConnexa instead of using the Connector application.
While connecting in this manner may not yield the best performance, due to the limited processing power and memory of the router, it could be useful in cases where convenience, rather than high throughput, is required.
Important
The information provided here is for educational and informational purposes only. We are not responsible for any damages you incur as a result of using these instructions. For technical support, contact the router supplier or the appropriate community forums. It is not guaranteed that all firmware versions will work as expected with CloudConnexa, and some features may be incompatible. We recommend updating the firmware to the latest version.
Downloading the Connector Profile
Sign in to the CloudConnexa Administration portal at https://cloud.openvpn.com.
Navigate to Networks.
Select Networks.
Click the name of the router Network.
Click the Connectors tab.
Click the Deploy drop-down menu of the Connector you wish to modify.
Select Deploy Connector.
Click the Provider Type drop-down menu.
Select pfSense.
Click Download OVPN Profile.
Alternatively, you may download the profile by clicking the Network name, and the edit icon for the Network.
Or from the Connectors menu.
Open the downloaded Profile file in a text editor. In Windows, the file must be opened in a text editor other than Notepad (e.g. Wordpad / Notepad++).
Configuring pfSense
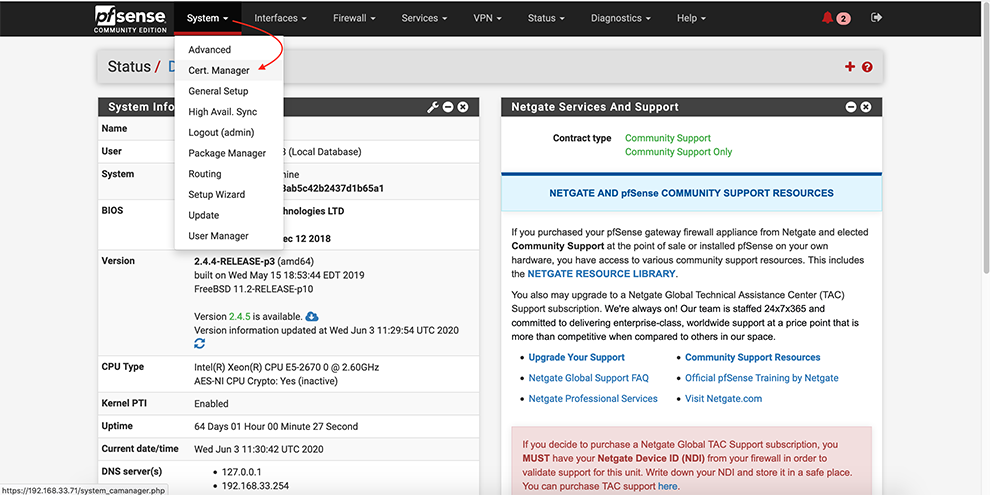
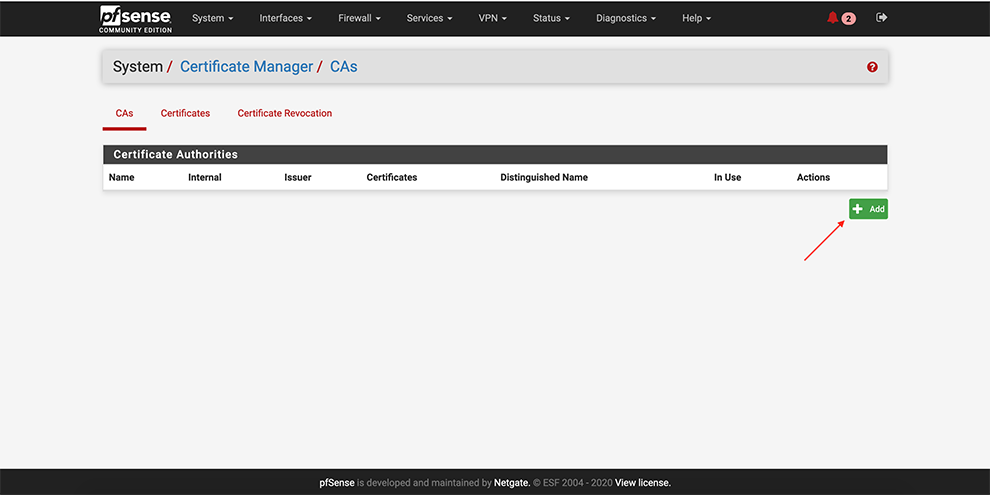
From the main menu go to System → Cert. Manager
Next, go select CAs → Add
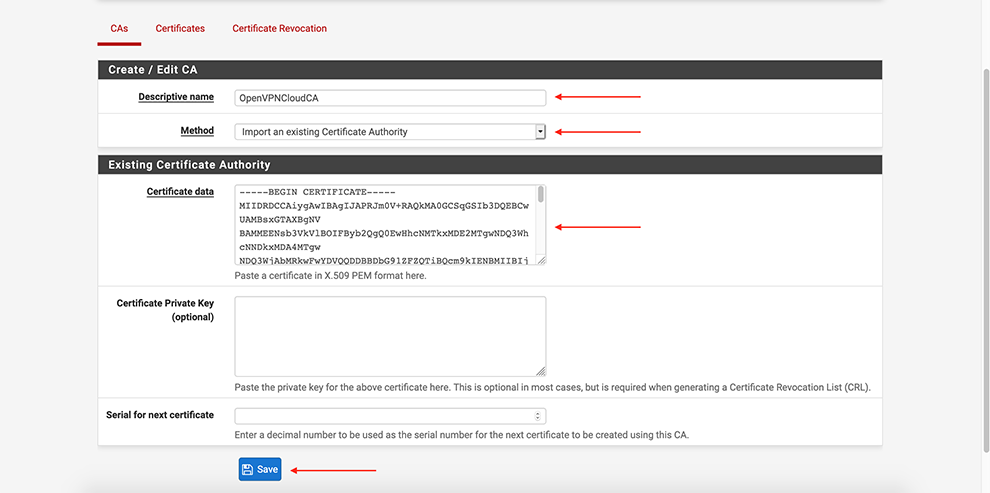
Select Method Import an existing Certificate Authority
Set some “Descriptive name”
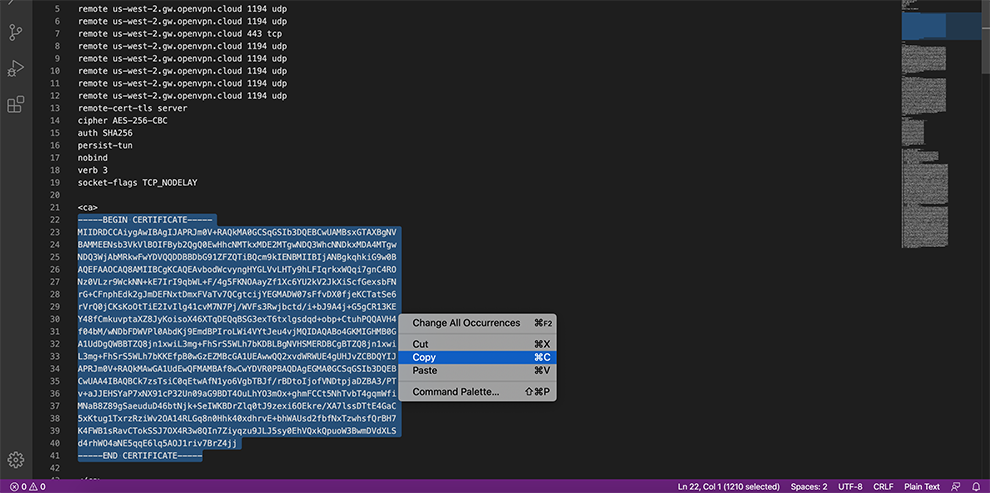
In the Certificate Data space, copy the data from the Connector’s Profile: everything between Certificate Authority <ca> and </ca>
Click Save
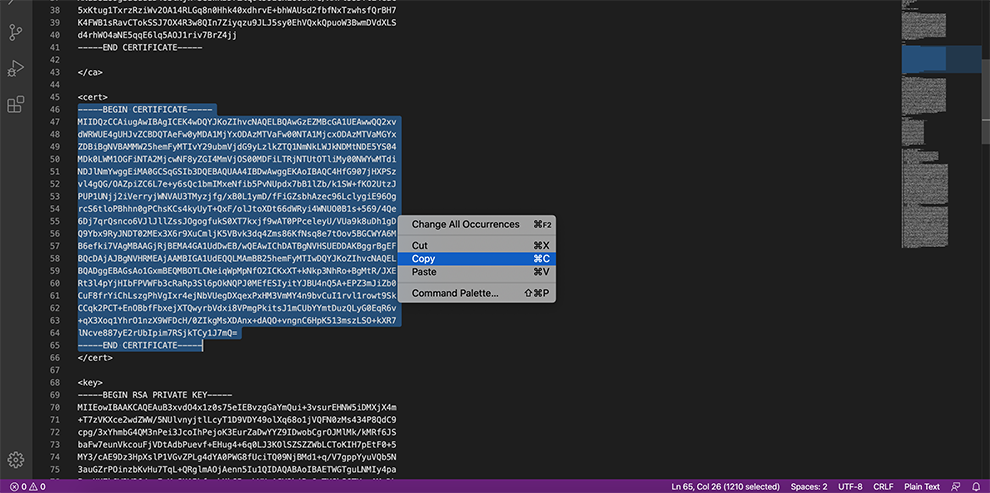
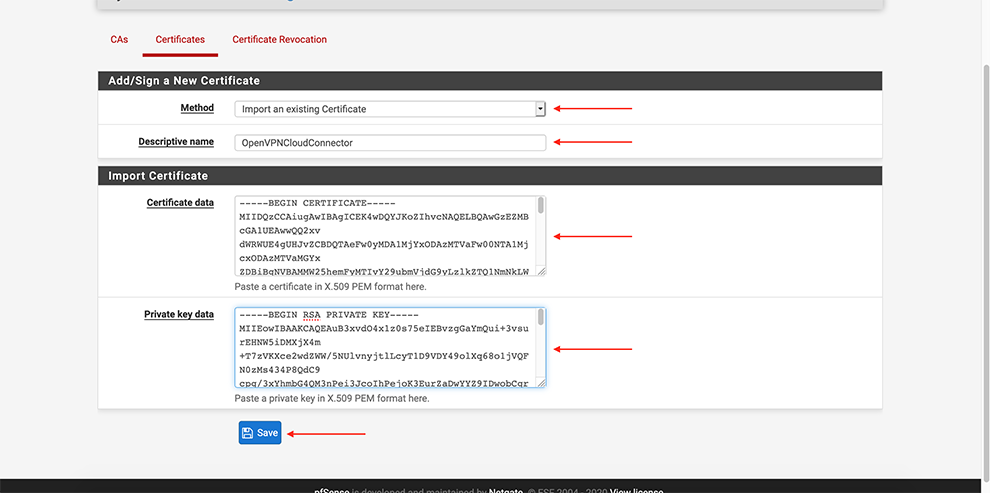
Certificates → Add
Select Method Import an existing Certificate
Set some “Descriptive name”
In the Certificate Data space, copy the data from the Connector’s Profile: everything between the Certificate data and between the Private key data <cert> and <cert>.
In the Private key data space, copy the data from the Connector’s Profile: everything between <key> and <key>.
In certificate type, choose: X.509 (PEM)
Click Save
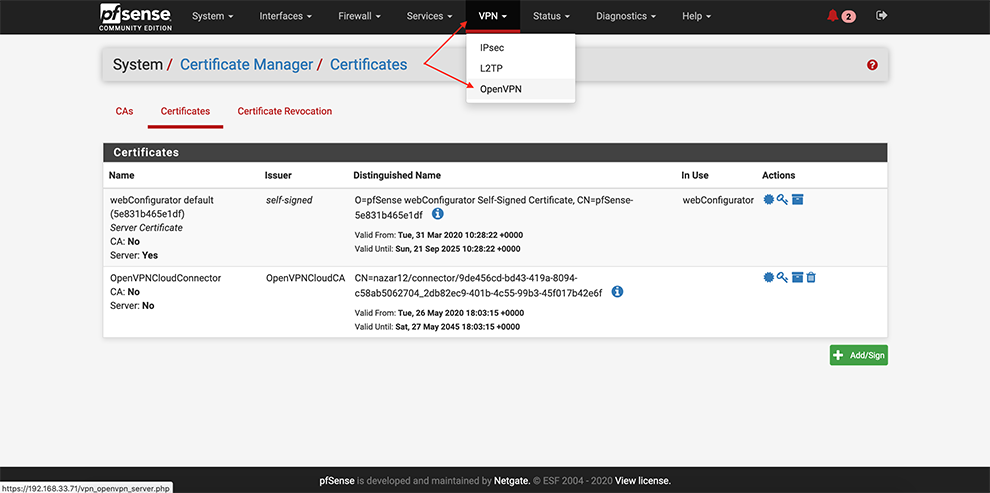
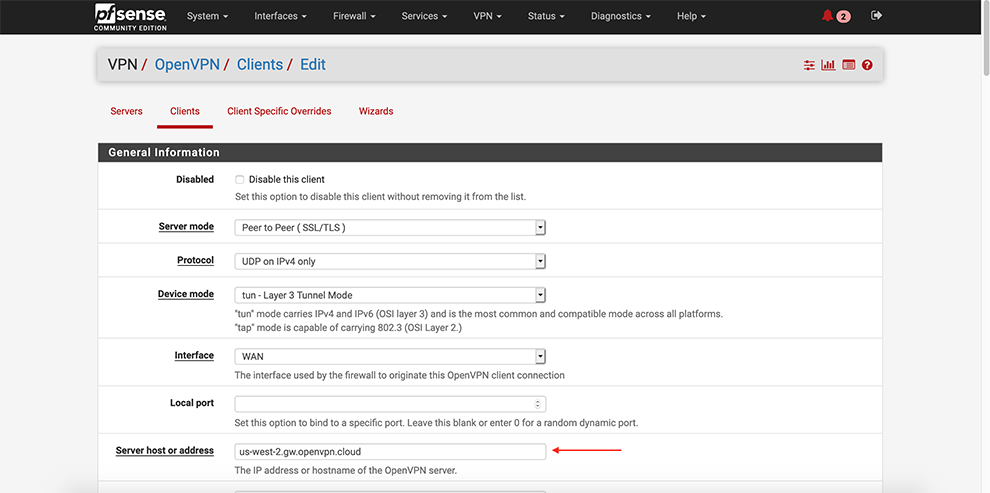
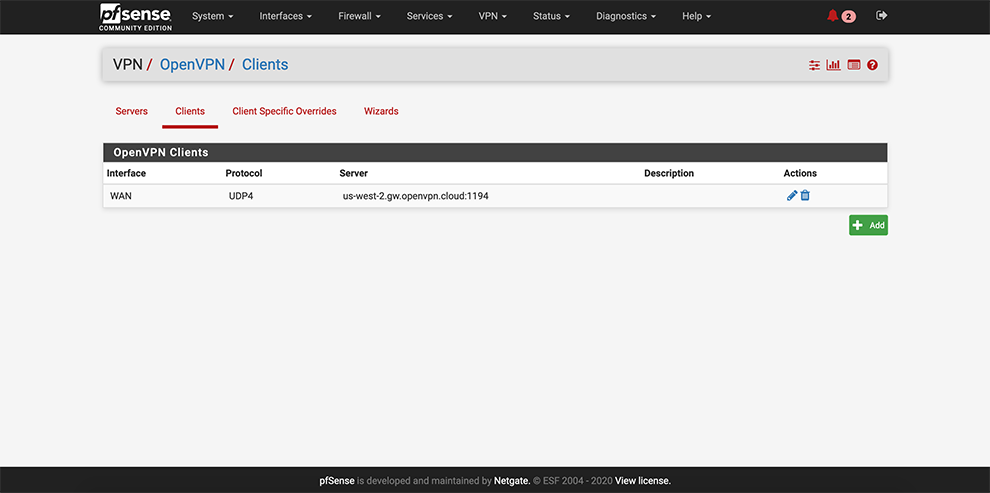
From the main menu go to VPN → OpenVPN
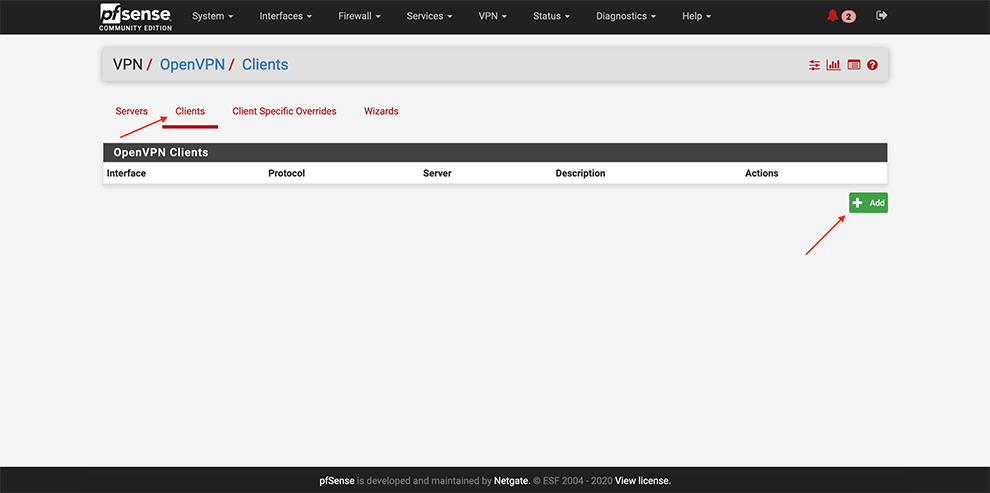
Select Clients → Add a client
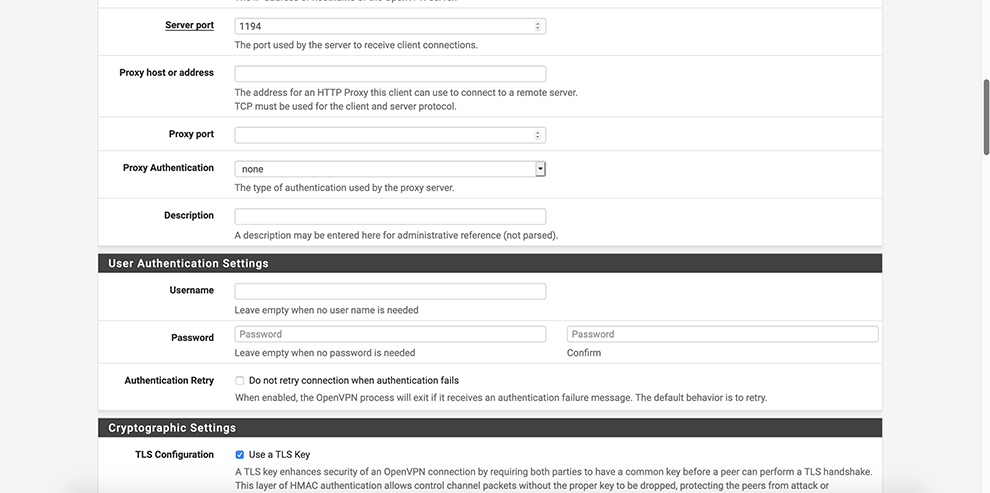
Enter preferable PGMT Hostname of the Cloud Connexa server in the Server Host or address field. Refer to Region Locations to find hostnames if needed.
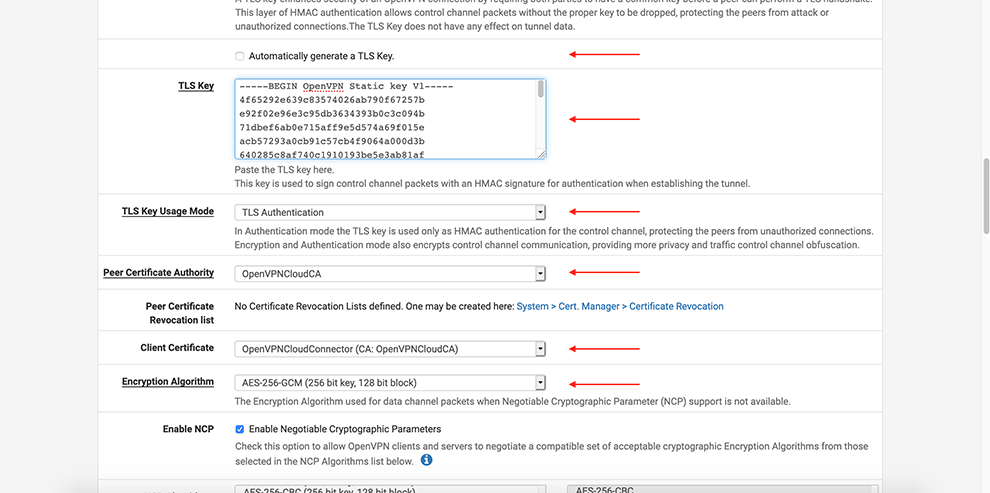
Uncheck Automatically generate a TLS Key
In the TLS Key space, copy the data from the Connector’s Profile: everything between the TLS Key <tls-auth> and <tls-auth>.
Select your Certificate Authority in the Peer Certificate Authority drop-down menu
Select your Certificate in the Client Certificate drop-down menu
Select AES-256-GCM in the Encryption Algorithm Data Encryption Algorithms drop-down menu
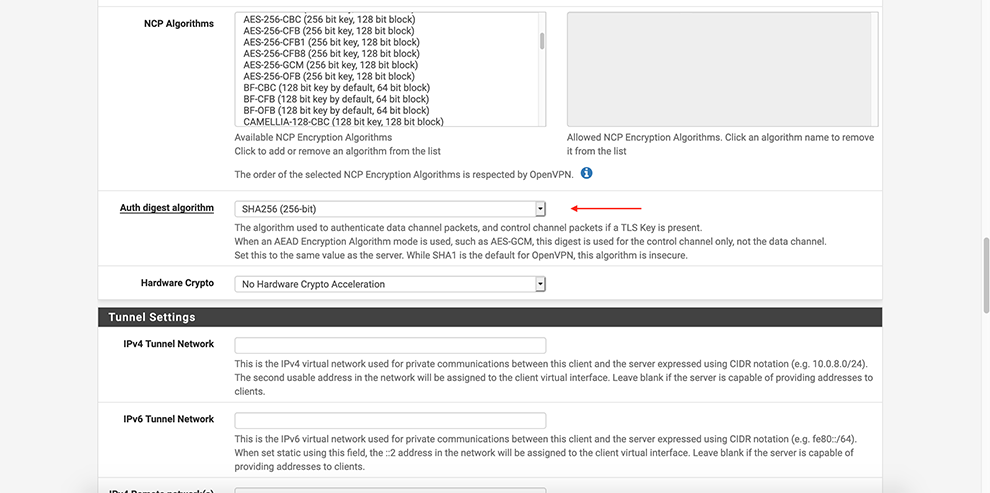
Select SHA256 in the Auth Digest Algorithm drop-down menu
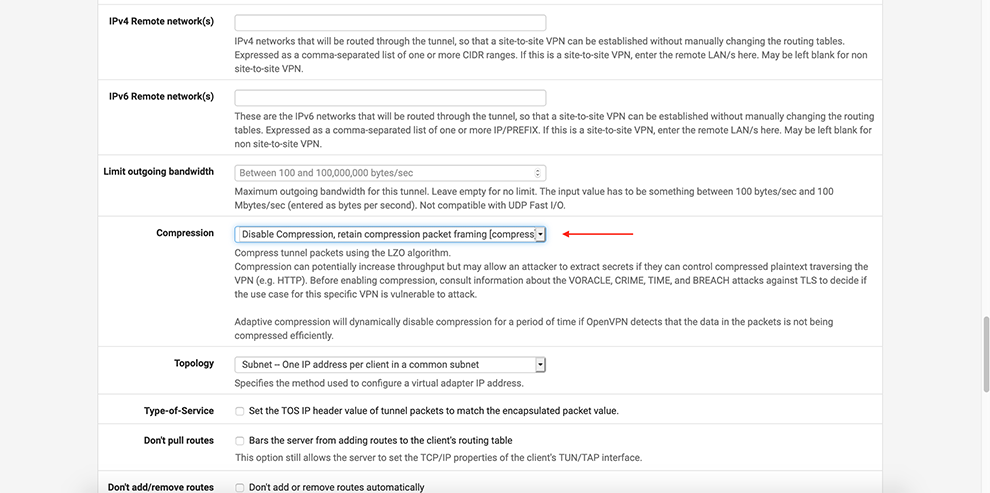
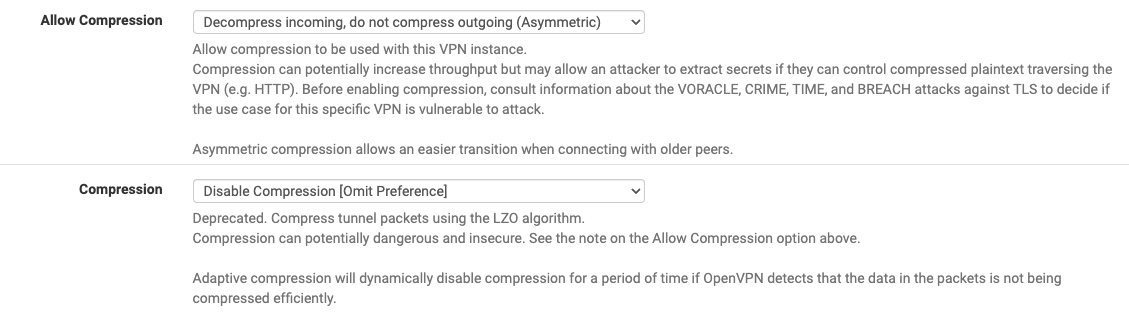
Select Disable Compression in the Compression drop-down menu
In Allow compression drop-down choose: Decompress Incoming, do not compress outgoing (asymmetric)
In Compression drop-down choose: Disable Compression [Omit Preference].
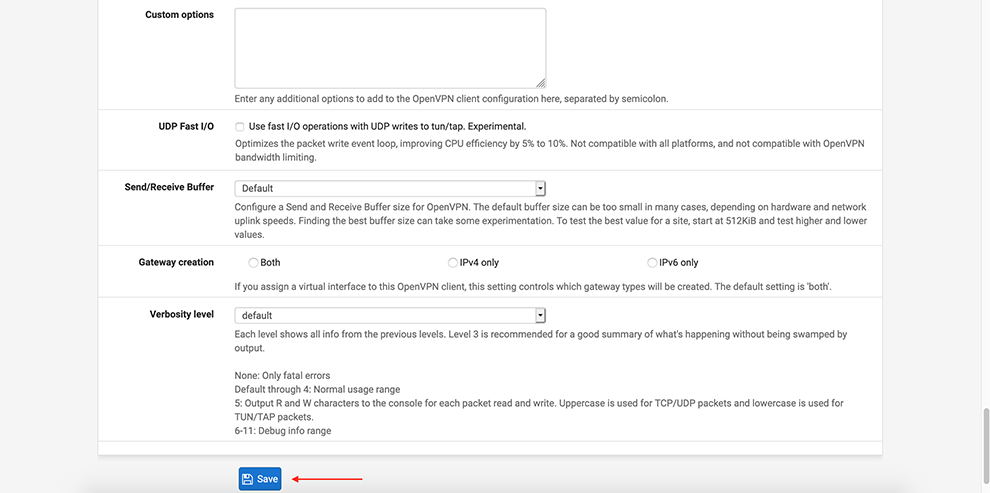
Click Save
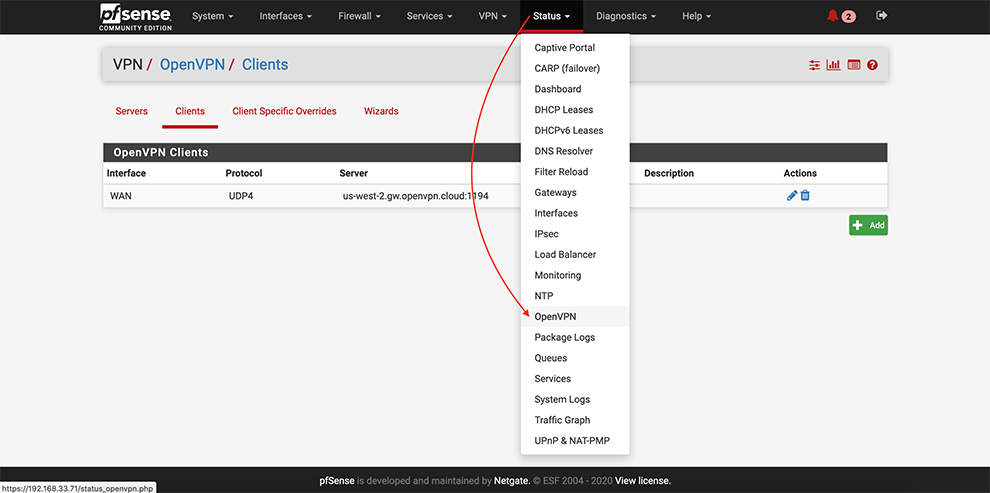
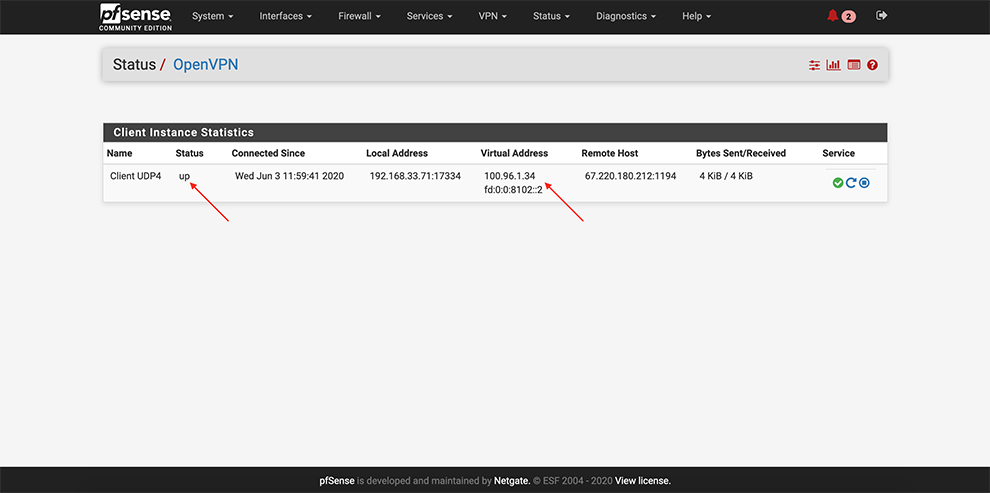
From the main menu go to Status → OpenVPN
Ensure that OpenVPN service is up and Virtual IP Addresses are assigned
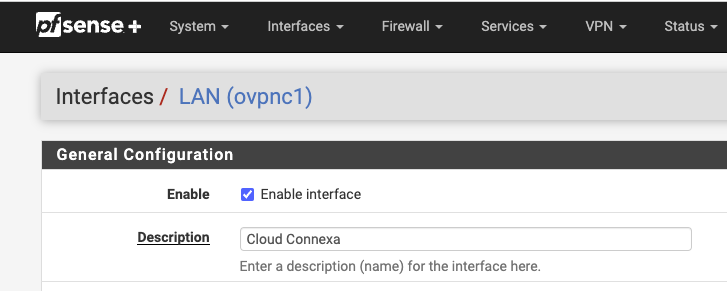
Enable the tunnel interface by carrying out the steps below:
Interfaces > assignment
Add > Choose the tunnel created for CloudConnexa. It will be shown as LAN. Click on the name > Enable it and change the name if desired.
Click Save.
Apply changes.
On Status > Interfaces check that the tunnel interface is added with status: Up.
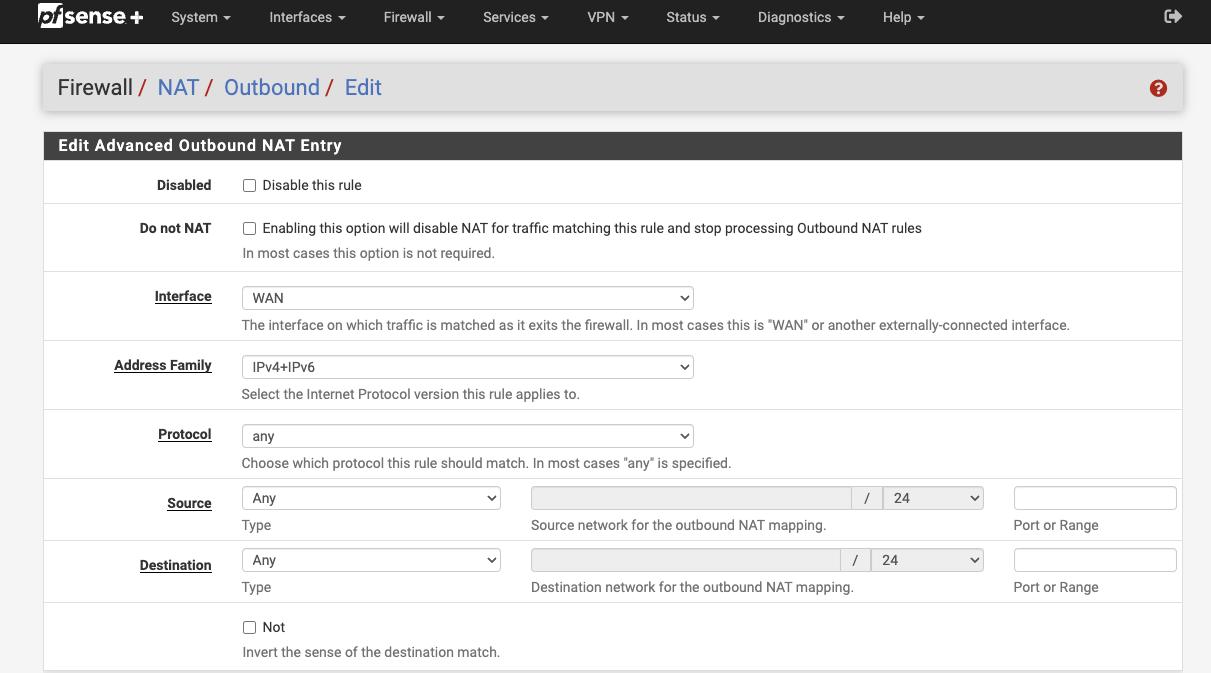
Enable NAT by carrying out the steps below:
Firewall > NAT > Outbound
Outbound NAT Mode: Hybrid
Add > interface Pointing to local resources
Interface > WAN
Address Family > IPv4+IPv6
Protocol > Any
Source > Any
Destination > Any
Click Save
Apply Changes
Note
If there are any problems, please check Status > System logs > Firewall to ensure that there are no firewall rules blocking traffic.
Tutorial: Configure a Teltonika Router To Connect to CloudConnexa
This tutorial contains instructions on how to use a Teltonika router and configure it to use a Connector profile to connect to CloudConnexa and make the network part of your WPC.
Introduction
You can configure a Teltonika-compatible router for Network Connector deployment. You must use specific sections from the OpenVPN Connector Profile and apply them to the associated router settings.
Downloading the Connector profile
Sign in to the CloudConnexa Administration portal at https://cloud.openvpn.com.
Navigate to Networks.
Select Networks.
Click the name of the router Network.
Click the Connectors tab.
Click the Deploy drop-down menu of the Connector you wish to modify.
Select Deploy Connector.
Click Provider Type drop-down menu.
Select Teltonika.
Click Download OVPN Profile.
Alternatively, you may download the profile by clicking the Network name, and the edit icon for the Network.
Or from the Connectors menu.
Configuring the Teltonika router
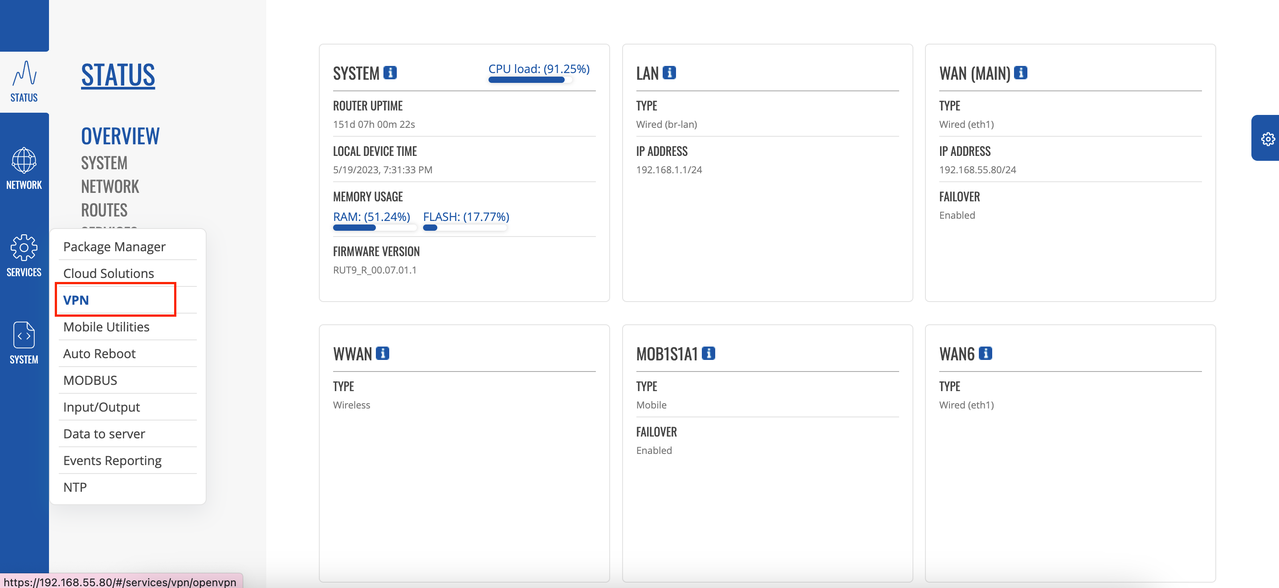
Sign in to the Teltonika router UI.
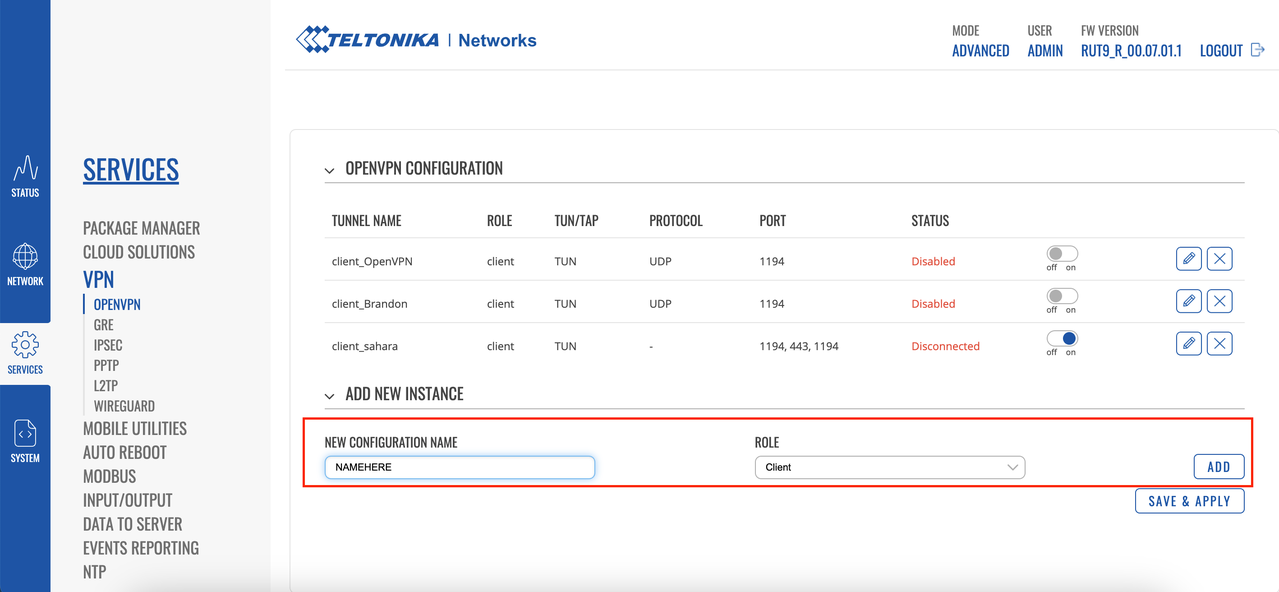
Access Services > VPN
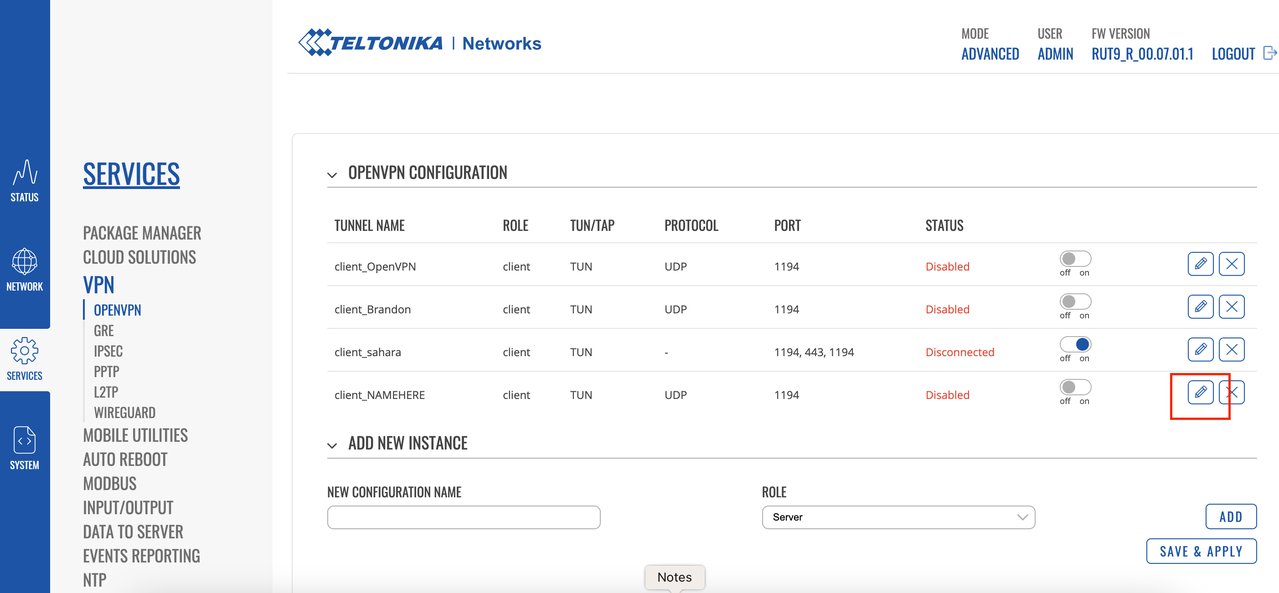
Click to select Client as the Role, add a name, and click Add New.
Click Edit for the newly created Profile.
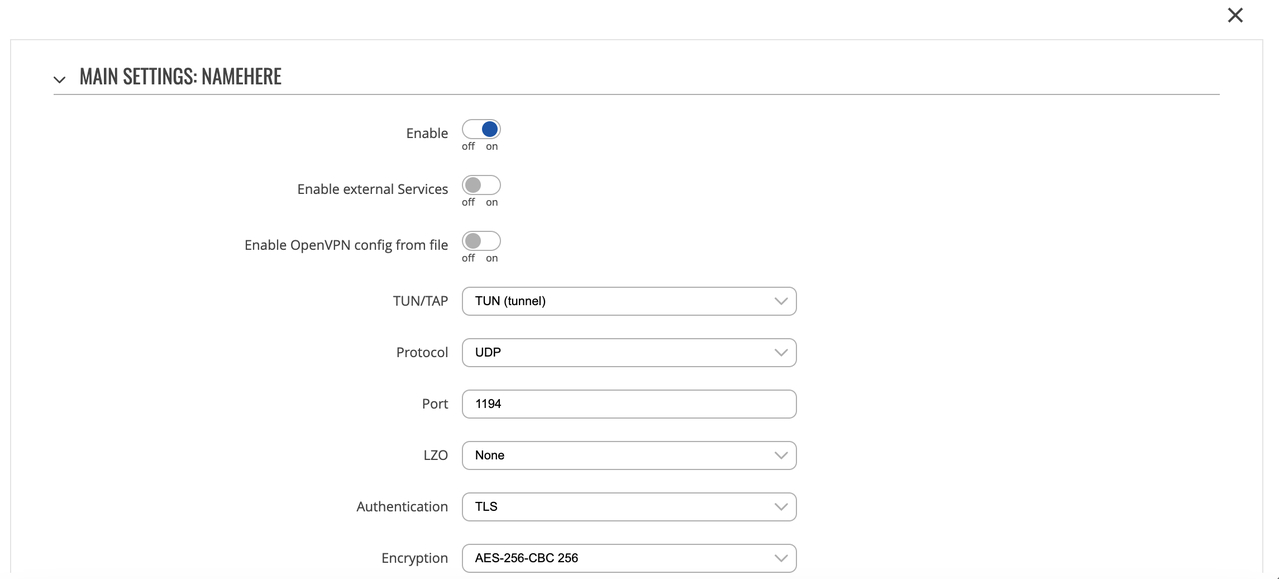
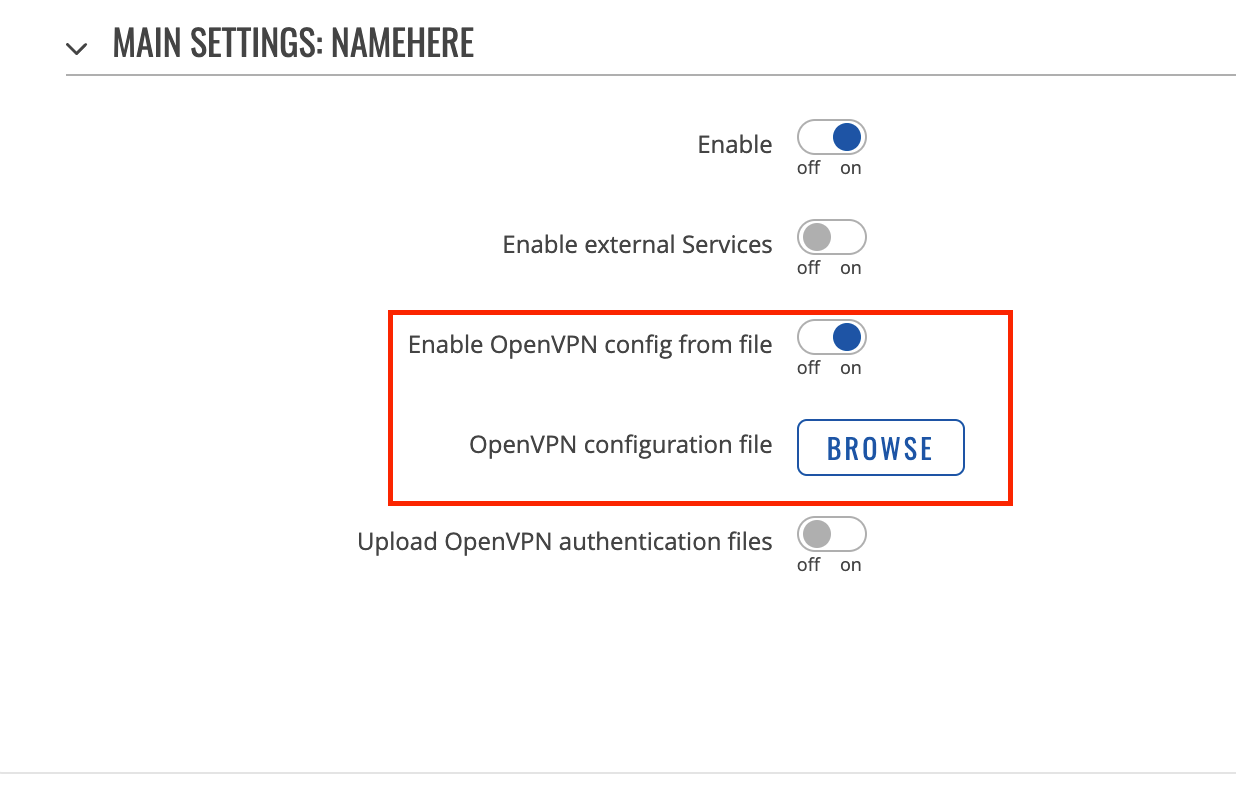
Set these parameters on the Main Settings screen.
Parameter
Value
Enable OpenVPN config from file
Disable
Enable
Enable
TUN/TAP
TUN(Tunnel)
Protocol
UDP
Port
1194
LZO
Disable
Authentication
TLS
Encryption
AES-256-CBC-256
TLS cipher
All
Remote Host/IP address
Open the
.ovpnProfile in a text editor, and copy and paste the Host address.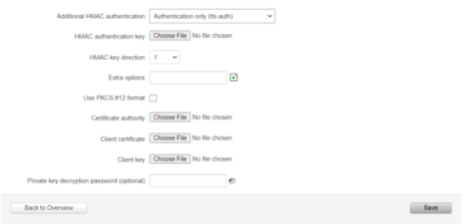
Resolve retry
Infinite
Keep alive
A helper directive designed to simplify the expression of –ping and –ping-restart. This option can be used on both the client and server side, but it is enough to add this on the server side because it will push appropriate –ping and –ping-restart options to the client. If used on both server and client, the values pushed from the server will override the client local values.
Remote Network IP address
Network IP Address
Remote Network IP netmask
Network subnet mask
HMAC authentication algorithm
SHA256
Additional HMAC authentication
Authentication only (tls-auth)
HMAC authentication key
1. In the
.ovpnProfile, copy the content between the<tls-auth> and </tls-auth> tags and paste them into a new file.2. Be sure that you include all of the --- BEGIN OpenVPN Static key V1--- and ---END OpenVPN Static key V1--- lines in the new file. There should be a total of two such lines.
3. When copying the contents into a new file, be sure to delete the starting <tls-auth> tag and the ending </tls-auth> tag.
4. Save the new file with a
.keyextension and upload it.HMAC key direction
1
Extra options
Not filed
Use PKCS #12 format
Disable
Certificate authority
1. In the
.ovpnProfile, copy the content between the <ca> and </ca> tags and paste them into a new file.2. Be sure that you include all of the ---BEGIN CERTIFICATE--- and ---END CERTIFICATE--- lines in the new file. There should be a total of four such lines.
3. When copying the contents into a new file, be sure to delete the starting <ca> tag and the ending </ca> tag.
4. Save the new file with a
.crtextension and upload it.Client certificate
1. In the
.ovpnProfile, copy the content between the <cert> and </cert> tags and paste them into a new file.2. Be sure that you include all of the ---BEGIN CERTIFICATE--- and ---END CERTIFICATE--- lines in the new file. There should be a total of two such lines.
3. When copying the contents into a new file, be sure to delete the starting <cert> tag and the ending </cert> tag.
4. Save the new file with a
.crtextension and upload it.Client key
1. In the .ovpn Profile, copy the content between the <key> and </key> tags and paste them into a new file.
2. Be sure that you include all of the ---BEGIN RSA PRIVATE KEY--- and ---END RSA PRIVATE KEY--- lines in the new file. There should be a total of two such lines.
3. When copying the contents into a new file, be sure to delete the starting <key> tag and the ending </key> tag.
4. Save the new file with a
.keyextension and upload it.Private key decryption password (optional)
Not required
Save your changes, and restart the WPC connection.
Navigate to Services > WPC and check that the configuration is enabled.
Navigate to Status > Network > OpenVPN and check that the status is Connected.
Tutorial: Configure a Ubiquiti (EdgeMAX) Router to Connect to CloudConnexa
Step-by-step instructions for configuring a Ubiquiti EdgeMAX router to connect to CloudConnexa as a Network Connector using an OpenVPN profile.
Introduction
This tutorial explains how to configure a Ubiquiti EdgeMAX router as a CloudConnexa Network Connector. After completing these steps, devices and subnets behind the router can securely communicate with resources in your CloudConnexa private network (WPC) without requiring VPN client software on individual devices.
You will:
Download a Network Connector connection profile from CloudConnexa.
Configure the profile on the EdgeMAX router using SSH and the EdgeMAX CLI.
Route traffic between your local network and your CloudConnexa WPC.
This setup is useful for connecting branch offices, lab environments, or remote networks to CloudConnexa through a site-to-site style deployment.
Note
Your router needs to be running EdgeRouter X v2.0 or newer.
Before you begin
You have a CloudConnexa account and can sign in to the Administration portal.
You have SCP access to the router from your local computer.
You have SSH access to the router.
Step 1: Create a Network in CloudConnexa
Navigate to Networks → Networks.
Select Add Network.
Select at least one Network Scenario, and select Continue. Refer to Add a Network for details.
Enter a Network name and optional description.
Leave the Connector Tunneling Protocol set to the default (OpenVPN).
Under Connector, enter a name, an optional description, and select a region.
Select Next.
Step 2: Deploy the Connector and download a connection profile
In the Deploy Network Connector step:
Select Ubiquiti from the Provider Type drop-down menu.
Select Download OVPN Profile to download the connection profile to your local computer.
Select Next.
CloudConnexa displays the Connector status. The Connector will show as Offline until the router is configured and connects in the following steps.
Step 3: Configure routing
Review the allocated WPC Subnets, Domain Routing Subnets, and routes of other connected networks displayed by CloudConnexa. Note any values you will need when configuring static routes on your router.
Optionally, you can add applications or IP services in the next wizard configuration steps.
Select Finish.
Step 4: Copy the connection profile to the router
Step 5: Create the OpenVPN interface
Connect to the router via SSH:
ssh admin@<router_ip_address>
Enter configuration mode:
configure
Create a new OpenVPN tunnel interface pointing to the connection profile:
set interfaces openvpn vtun0 config-file /config/auth/Profile.ovpn
set interfaces openvpn vtun0 description "CloudConnexa Connector"
Commit and save your changes, then exit configuration mode:
commit
save
exit
Note
The OpenVPN tunnel interface name must follow the format
vtun<num>(for example,vtun0). ReplaceProfile.ovpnwith the actual filename of your downloaded connection profile.
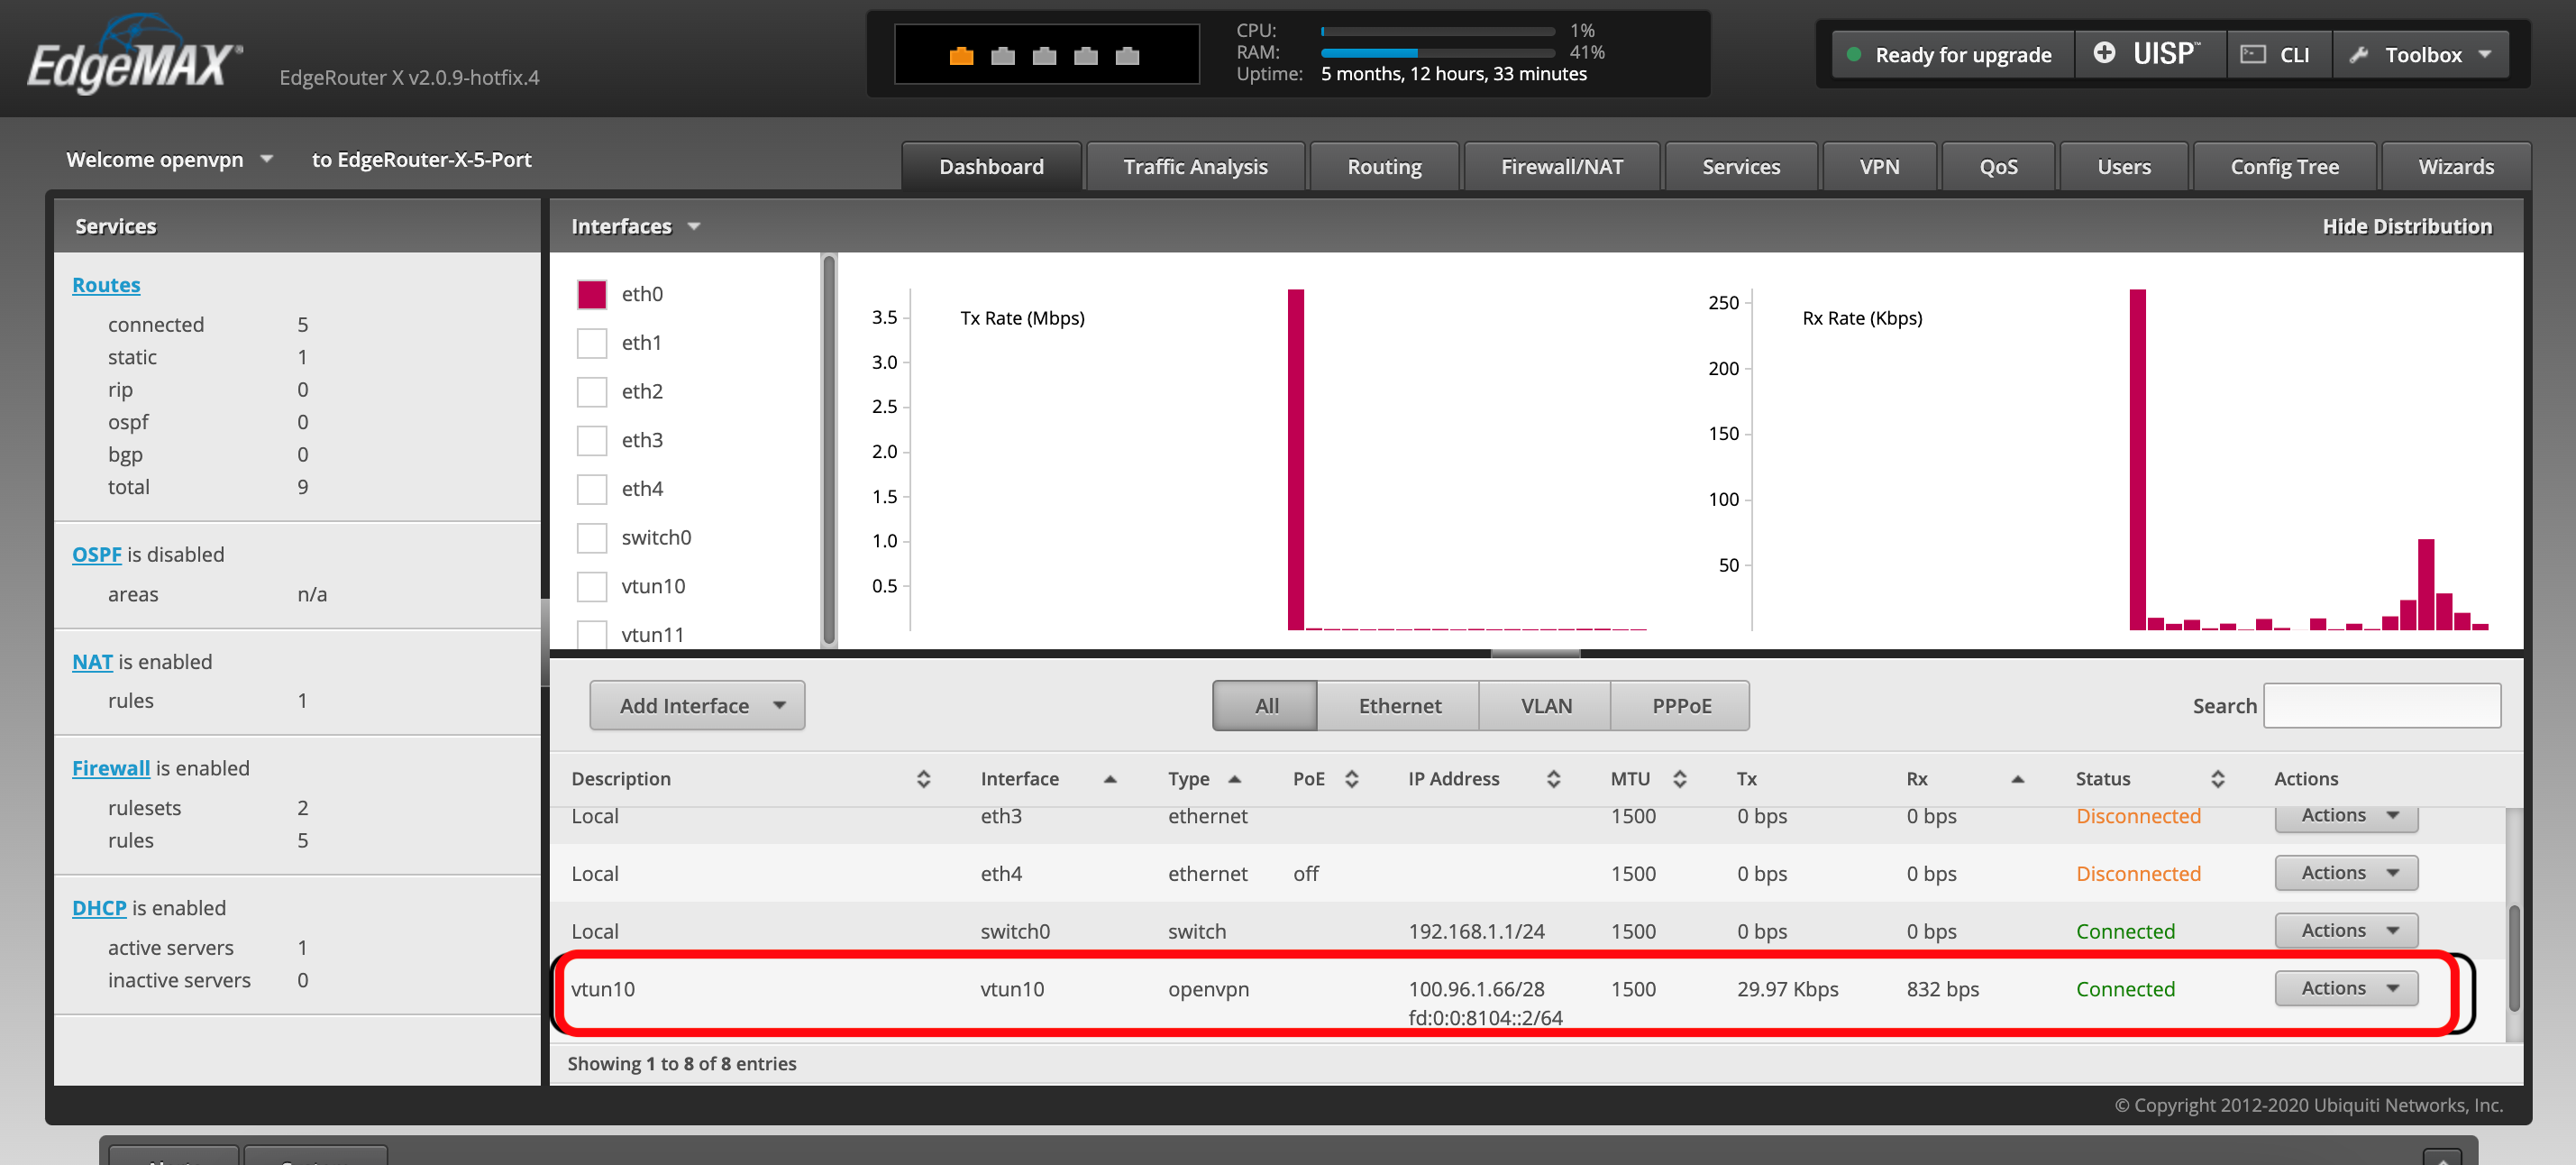
Step 6: Verify the connection
Connect to the router through HTTPS.
Navigate to the Dashboard tab.
Confirm that your newly created interface exists with:
Interface type:
openvpnStatus: Connected
An assigned IP address
In the CloudConnexa Administration portal, navigate to Networks → Connectors and confirm the Connector status is Connected.
Tutorial: Configure a Ubiquiti (UniFi) Router to Connect to CloudConnexa
Step-by-step instructions for configuring a Ubiquiti UniFi gateway to connect to CloudConnexa as a Network Connector using a connection profile.
Introduction
This tutorial explains how to configure a Ubiquiti UniFi router as a CloudConnexa Network Connector. After completing these steps, devices and subnets behind the router can securely communicate with resources in your CloudConnexa private network (WPC) without requiring VPN client software on individual devices.
You will:
Download a Network Connector connection profile from CloudConnexa.
Configure the profile on the UniFi router.
Route traffic between your local network and your CloudConnexa WPC.
This setup is useful for connecting branch offices, lab environments, or remote networks to CloudConnexa through a site-to-site style deployment.
Note
Ensure that your router is a UniFi Gateway or UniFi Cloud Gateway (for example, UniFi Gateway Ultra, UniFi Dream Machine, UniFi Dream Router, or UniFi Cloud Gateway Ultra). This tutorial does not apply to UniFi switches or access points.
Before you begin
You have a CloudConnexa account and can sign in to the Administration portal.
You have SCP access to the router from your local computer.
You have SSH access to the router.
Step 1: Create a Network in CloudConnexa
Navigate to Networks → Networks.
Select Add Network.
Select at least one Network Scenario, and select Continue. Refer to Add a Network for details.
Enter a Network name and optional description.
Leave the Connector Tunneling Protocol set to the default (OpenVPN).
Under Connector, enter a name, an optional description, and select a region.
Select Next.
Step 2: Deploy the Connector and download a connection profile
In the Deploy Network Connector step:
Select Ubiquiti from the Provider Type drop-down menu.
Select Download OVPN Profile to download the connection profile to your local computer.
Select Next.
CloudConnexa displays the Connector status. The Connector will show as Offline until the router is configured and connects in the following steps.
Step 3: Configure routing
Review the allocated WPC Subnets, Domain Routing Subnets, and routes of other connected networks displayed by CloudConnexa. Note any values you will need when configuring static routes on your router.
Optionally, you can add applications or IP services in the next wizard configuration steps.
Select Finish.
Step 4: Copy the connection profile to the router
Step 5: Create the OpenVPN interface
Connect to the router via SSH:
ssh admin@<router_ip_address>
Enter configuration mode:
configure
Create a new OpenVPN tunnel interface pointing to the connection profile:
set interfaces openvpn vtun0 config-file /config/auth/Profile.ovpn
set interfaces openvpn vtun0 description "CloudConnexa Connector"
Commit and save your changes, then exit configuration mode:
commit
save
exit
Note
The OpenVPN tunnel interface name must follow the format
vtun<num>(for example,vtun0). ReplaceProfile.ovpnwith the actual filename of your downloaded connection profile.
Step 6: Verify the connection
Connect to the router through HTTPS.
Navigate to Network → Settings → VPN.
Confirm that your newly created interface exists with:
Interface type:
openvpnStatus: Connected
An assigned IP address
In the CloudConnexa Administration portal, navigate to Networks → Connectors, and confirm the Connector status is Connected.
Troubleshooting
If the tunnel doesn't connect, use the following approaches to diagnose the issue.
Review OpenVPN log entries:
show log | match openvpn
Confirm the connection profile is present in the expected location:
ls -la /config/auth/
If you see authentication errors in the log, the connection profile may have expired or been revoked. Navigate to Networks → Connectors in the CloudConnexa portal, download a new connection profile, then repeat Steps 4 and 5.
Tutorial: Configure a GL.iNet Router to Connect to CloudConnexa
Configure a GL.iNet router as an OpenVPN client to connect your local network to CloudConnexa using a connector profile.
Overview
GL.iNet routers support OpenVPN client mode, which allows you to route traffic from a local network through CloudConnexa without installing clients on individual devices.
This approach acts as a gateway-level connection, enabling devices on the network to use CloudConnexa for secure connectivity based on the router's routing configuration.
Important
The information provided here is for educational and informational purposes only. We are not responsible for any damages you incur as a result of using these instructions. For technical support, contact the router supplier or the appropriate community forums. It is not guaranteed that all firmware versions will work as expected with CloudConnexa, and some features may be incompatible. We recommend updating the firmware to the latest version.
Before you begin
Ensure you have a CloudConnexa account and Cloud ID.
Ensure you have created a Network in CloudConnexa and added a Connector configured for OpenVPN. See Add a Connector to a Network for instructions.
Download the connector's
.ovpnprofile file from the CloudConnexa administration portal. See Download an OpenVPN Network Connector's connection profile as a .ovpn file for instructions.Ensure your GL.iNet router firmware is up to date.
Step 1: Add an OpenVPN client profile
Sign in to your GL.iNet router administration UI.
Navigate to VPN → OpenVPN Client.
Select Add Manually.
Enter a name in the Provider field, then select the check mark to confirm it.
Under Select a file to upload, navigate to your
.ovpnfile, and select Open.Select Apply to save the configuration.
Step 2: Start the VPN connection
In the profile list, select the three-dot menu next to your profile.
Select Start.
Step 3: Verify the connection
Navigate to VPN → VPN Dashboard.
Select the Options icon.
Confirm that the status indicator is green, indicating a successful connection with your WPC.
Step 4: (Optional) Set up LAN access through the VPN tunnel
If you want devices on the router's LAN subnet to be accessible from other networks connected to CloudConnexa, configure remote LAN access:
On the VPN Dashboard, select the Options icon.
Turn on Remote Access LAN.
Confirm that IP Masquerading is also turned on.
Select Apply.