Tutorial: One Overlay Network Can Meet a Variety of Needs
Overview
This guide provides a comprehensive set of steps to configure a VPN that meets a variety of needs including site-to-site networking, secure remote access, and more.
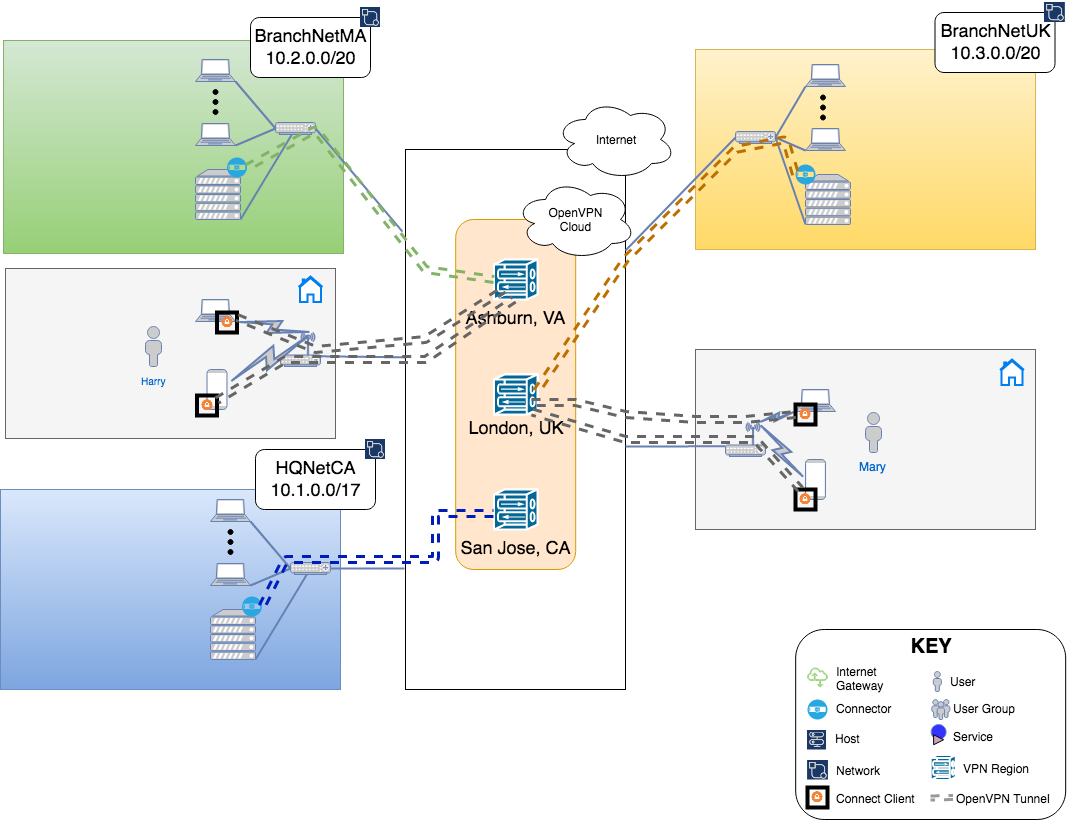
In this document, we examine a WPC set up to meet the needs of a fictitious company. In doing so, we aim to cover the use and configuration of CloudConnexa to meet the most common WPC scenarios. We will be building the WPC in phases. This allows us to cover various WPC setups using one example and progressively build in complexity while reducing the repetition of configuration steps.
A business has headquarters located in California, USA, a branch office in Massachusetts, USA, and another branch in the United Kingdom. Owen is in charge of IT and Networking for this company. Owen is looking for a WPC solution that does not require him to manage, install and maintain WPC servers and allows him to create a hosted WPC that can be accessed from regional locations worldwide.
Owen is aware that such a service is provided by CloudConnexa Inc and signs up to use CloudConnexa.
Owen completes the signup process as shown here. During the signup process, Owen selects technop.openvpn.com as the web domain for the User portal. This domain uniquely identifies the WPC that will be set up by Owen and is used by Connect Client applications (WPC Client software) to identify the WPC that it needs to connect to.
Site-to-Site Networking
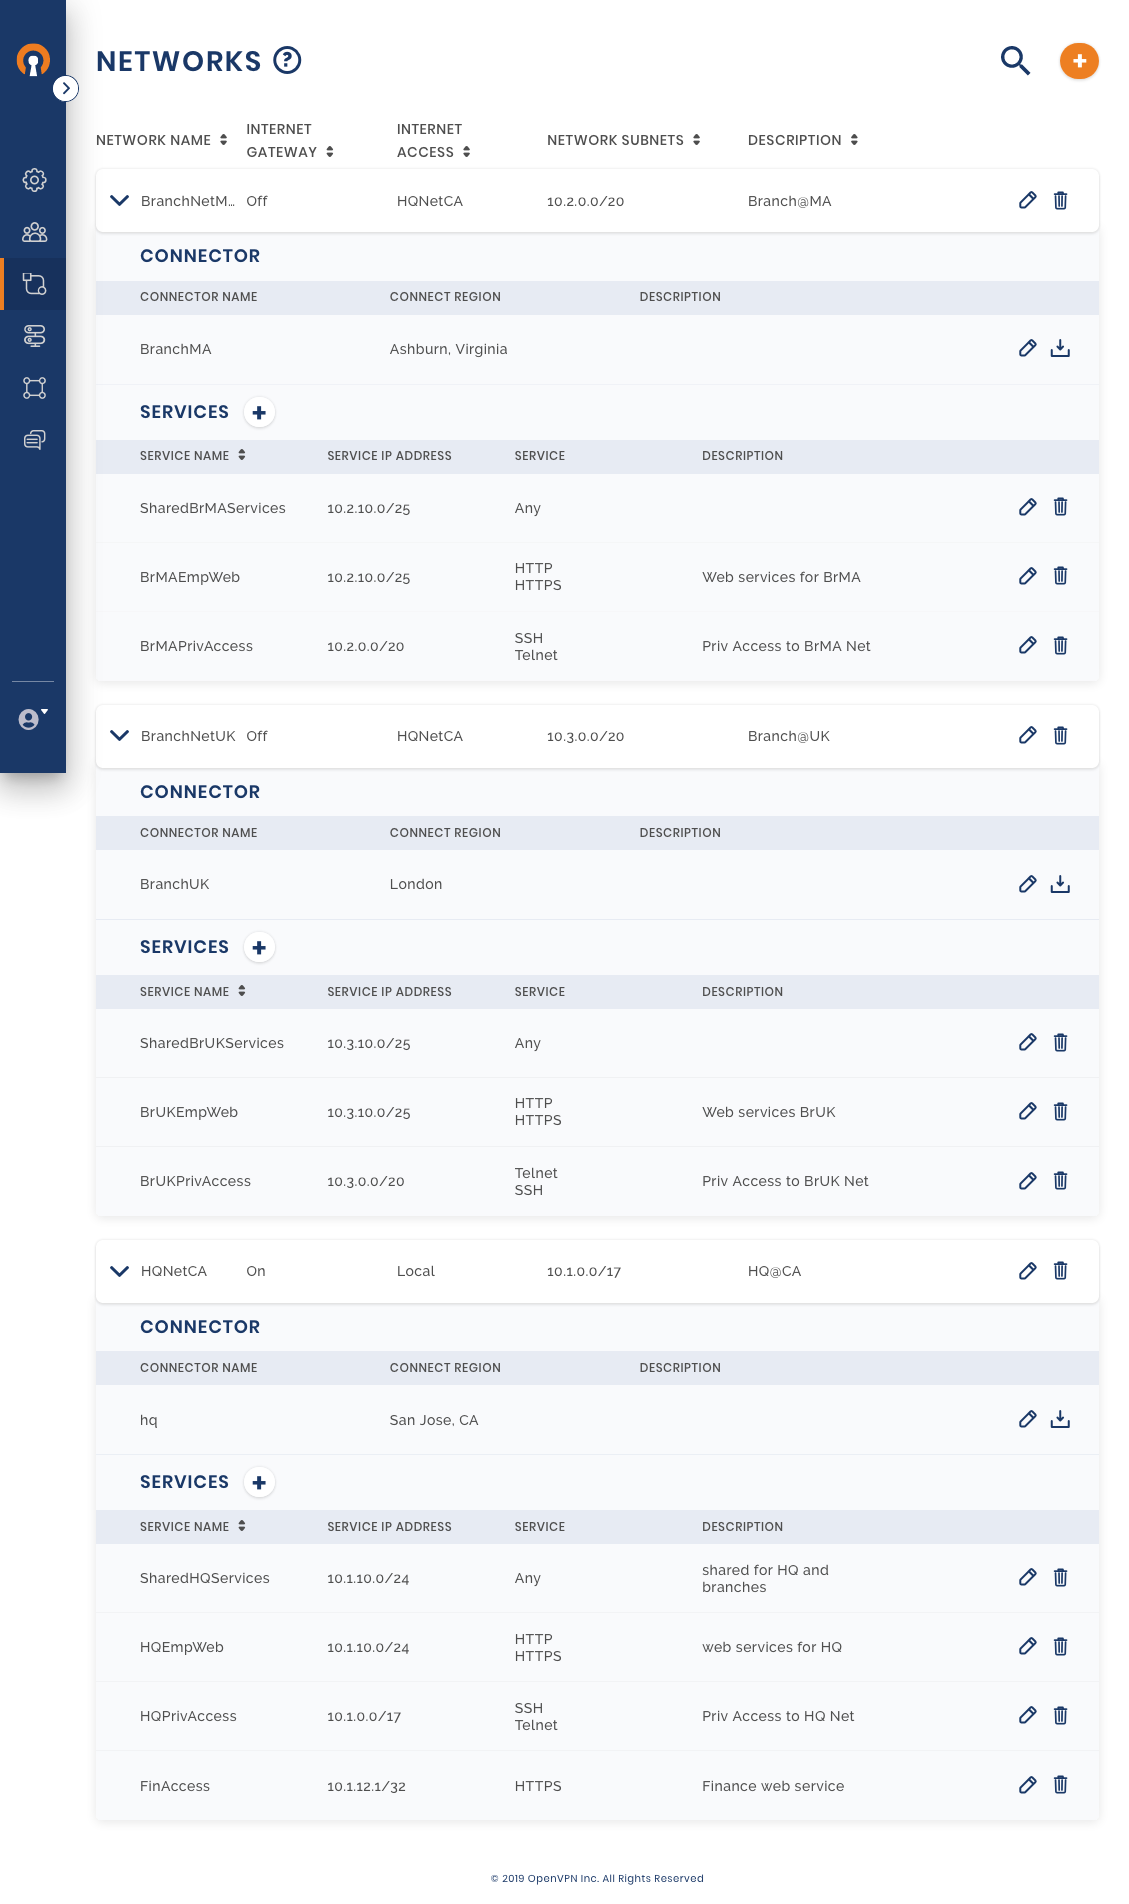
Owen’s first goal is to establish Site-to-Site networking between the private Networks in each office location. He wants Full-Mesh connectivity such that each location can communicate with the other two locations. Owen plans the connectivity using the table below:
Site Type | Site Location | closest CloudConnexa Region | Network Name | Subnets to associate with the Network | Route for public Internet traffic generated from this Network |
|---|---|---|---|---|---|
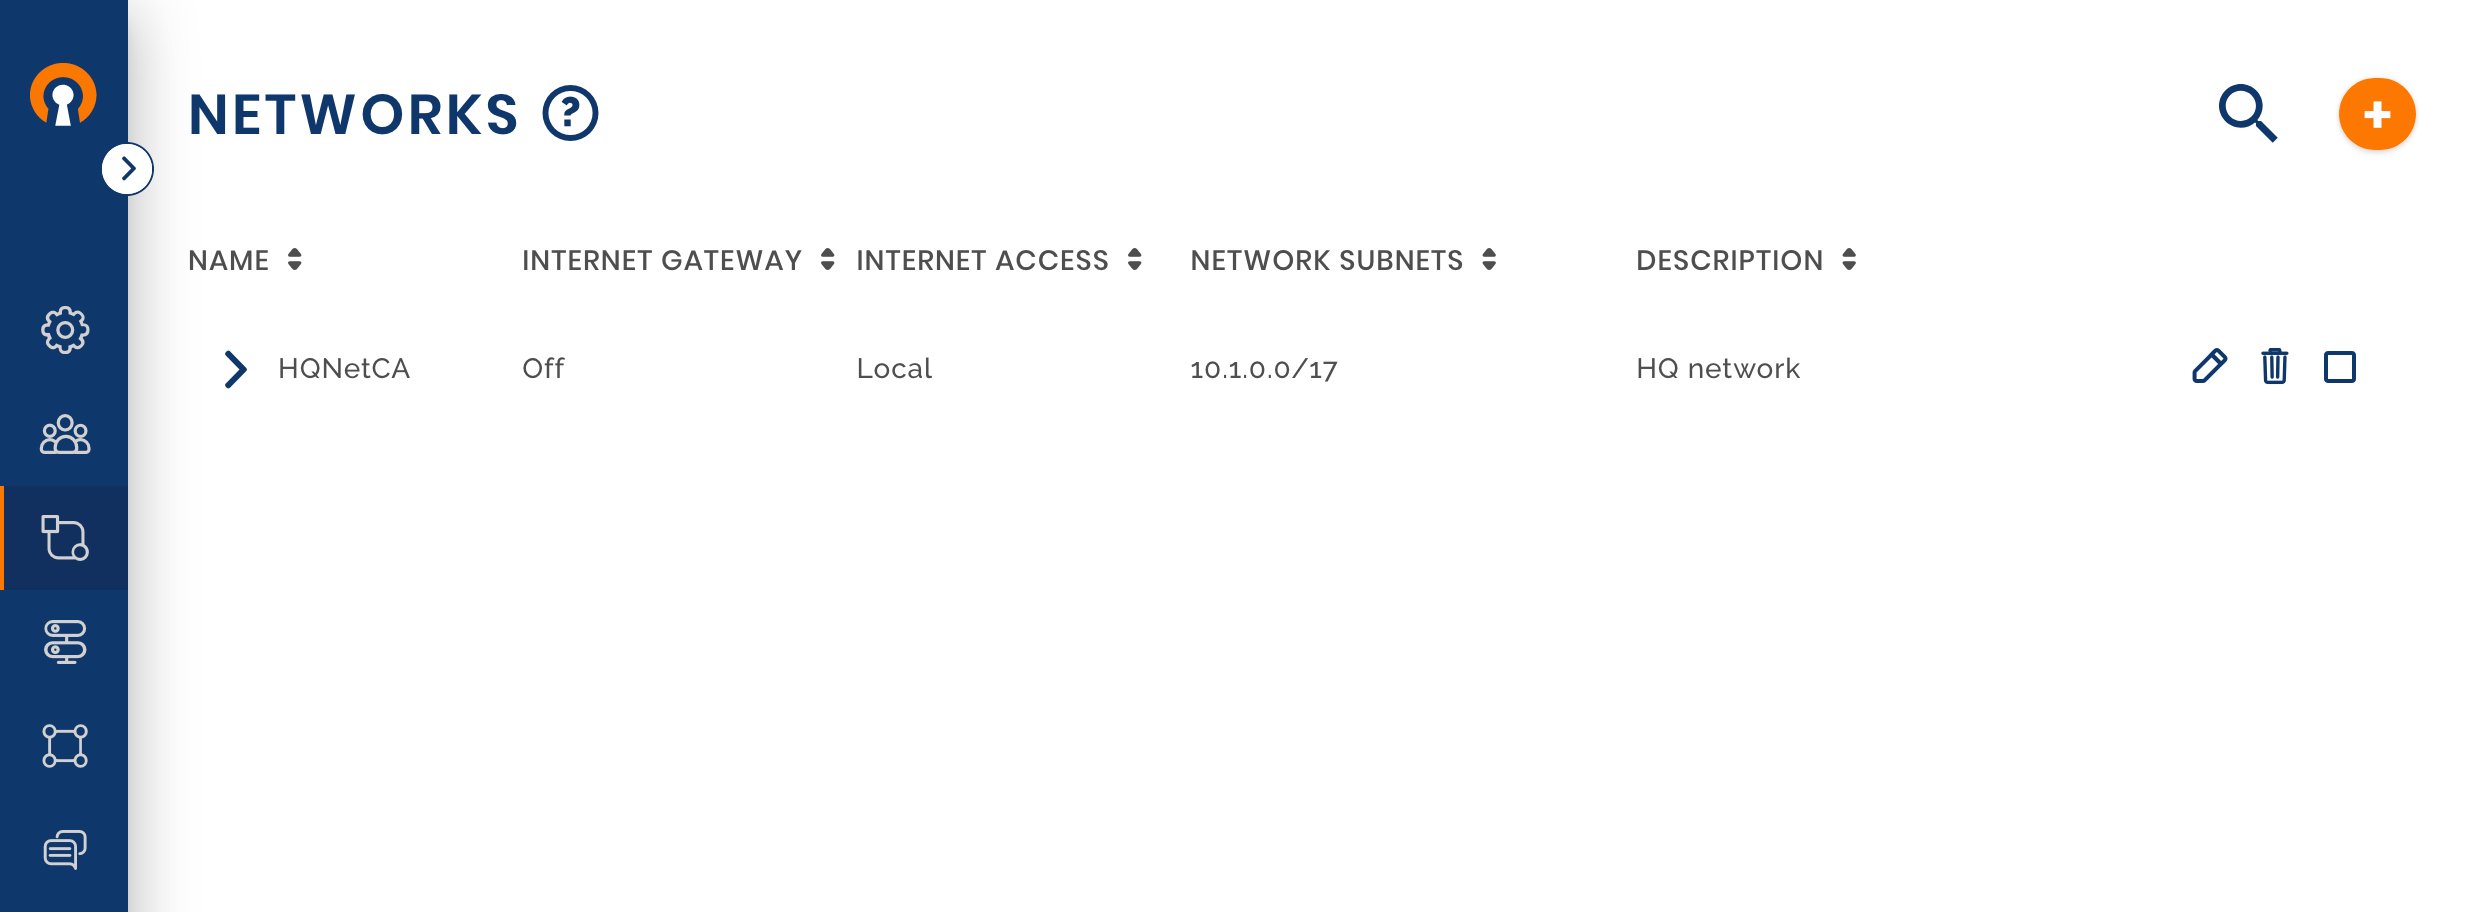
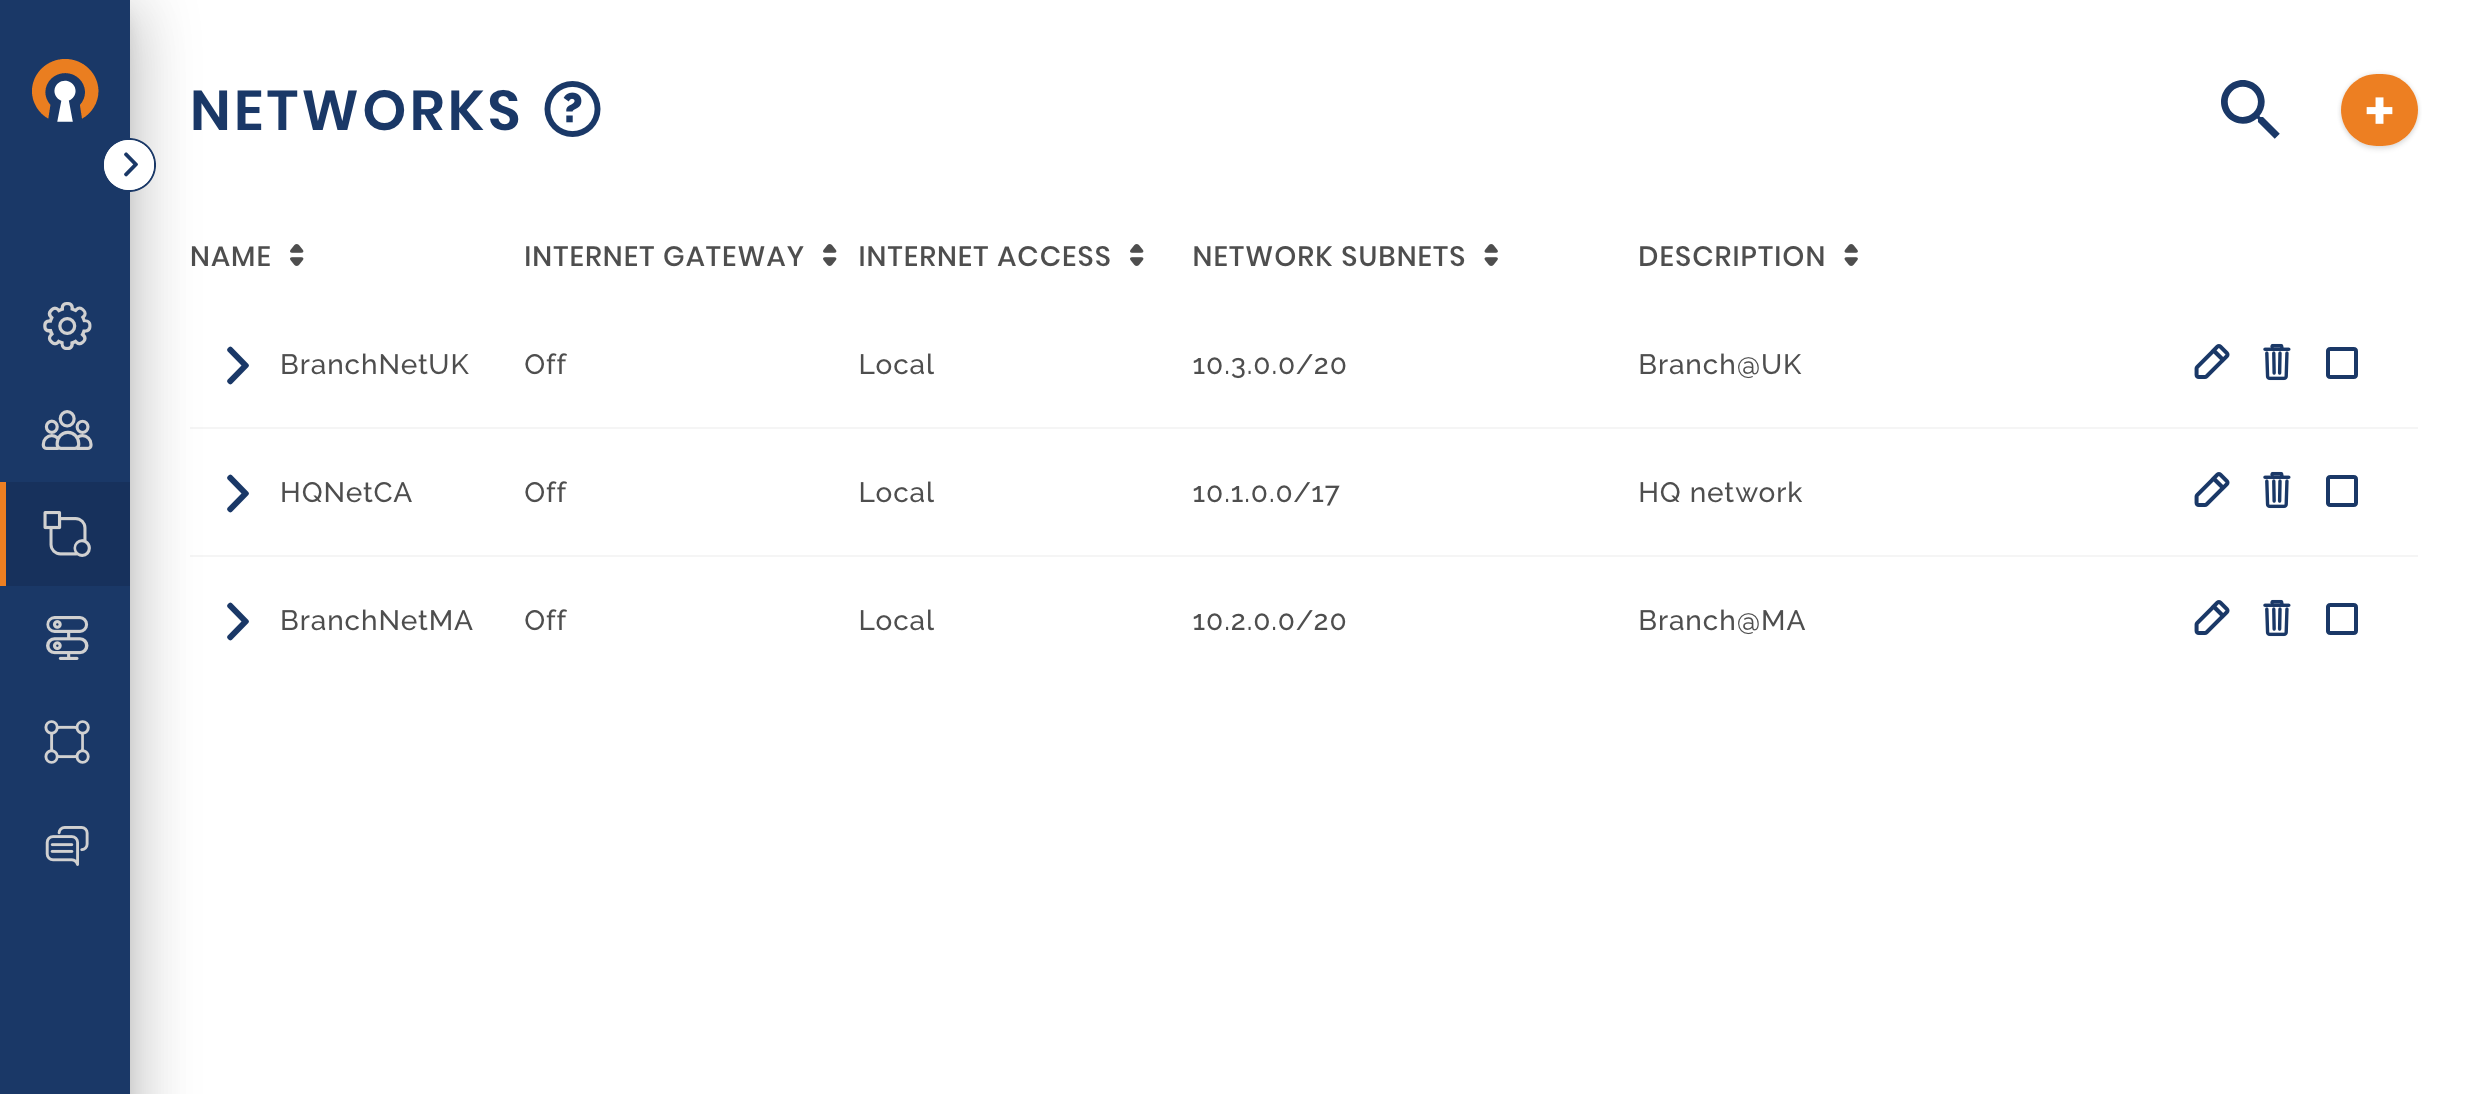
HQ Building | CA, USA | San Jose, CA | HQNetCA | 10.1.0.0/17 | use local exit point do not enter CloudConnexa WPC |
Branch office | MA, USA | Ashburn, VA | BranchNetMA | 10.2.0.0/20 | use local exit point do not enter CloudConnexa WPC |
Branch office | UK | London, UK | BranchNetUK | 10.3.0.0/20 | use local exit point do not enter CloudConnexa WPC |
Once the planning is done, Owen gets to implementation by following these steps:
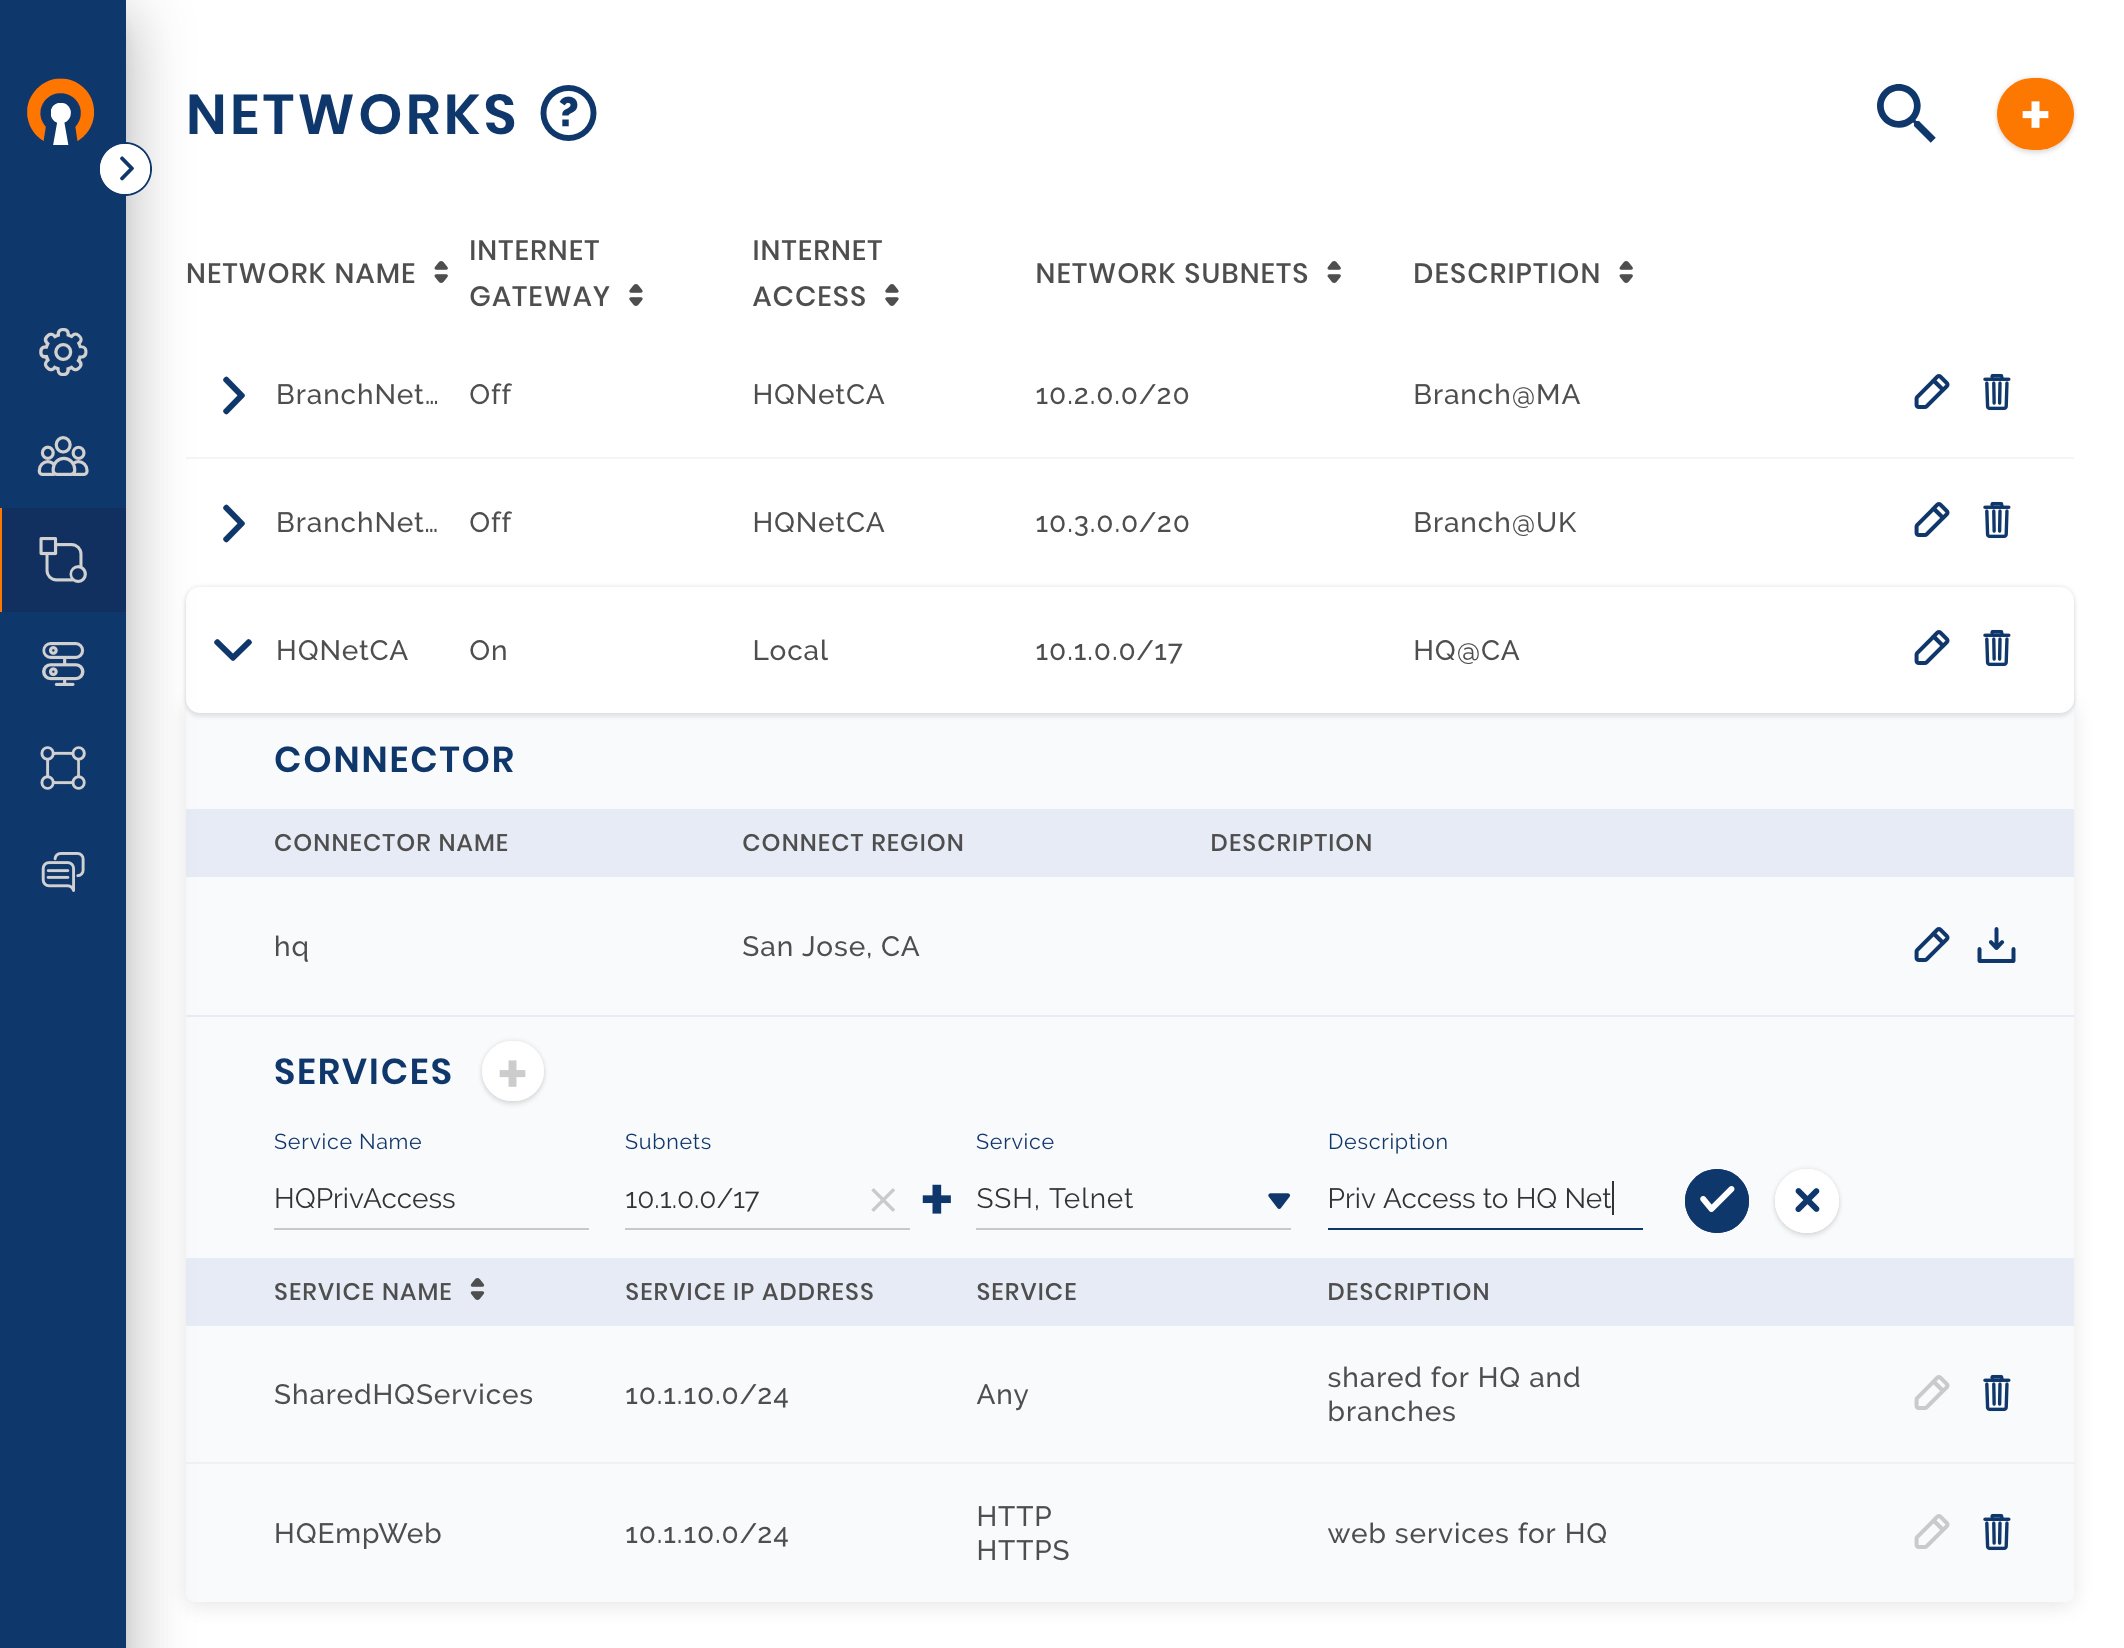
Sign in to the CloudConnexa Administration portal and configure the HQ Network
Owen uses the guide shown here to configure the first Network. Multiple Network Subnets can be configured for the same Network.
Setup the other two Networks
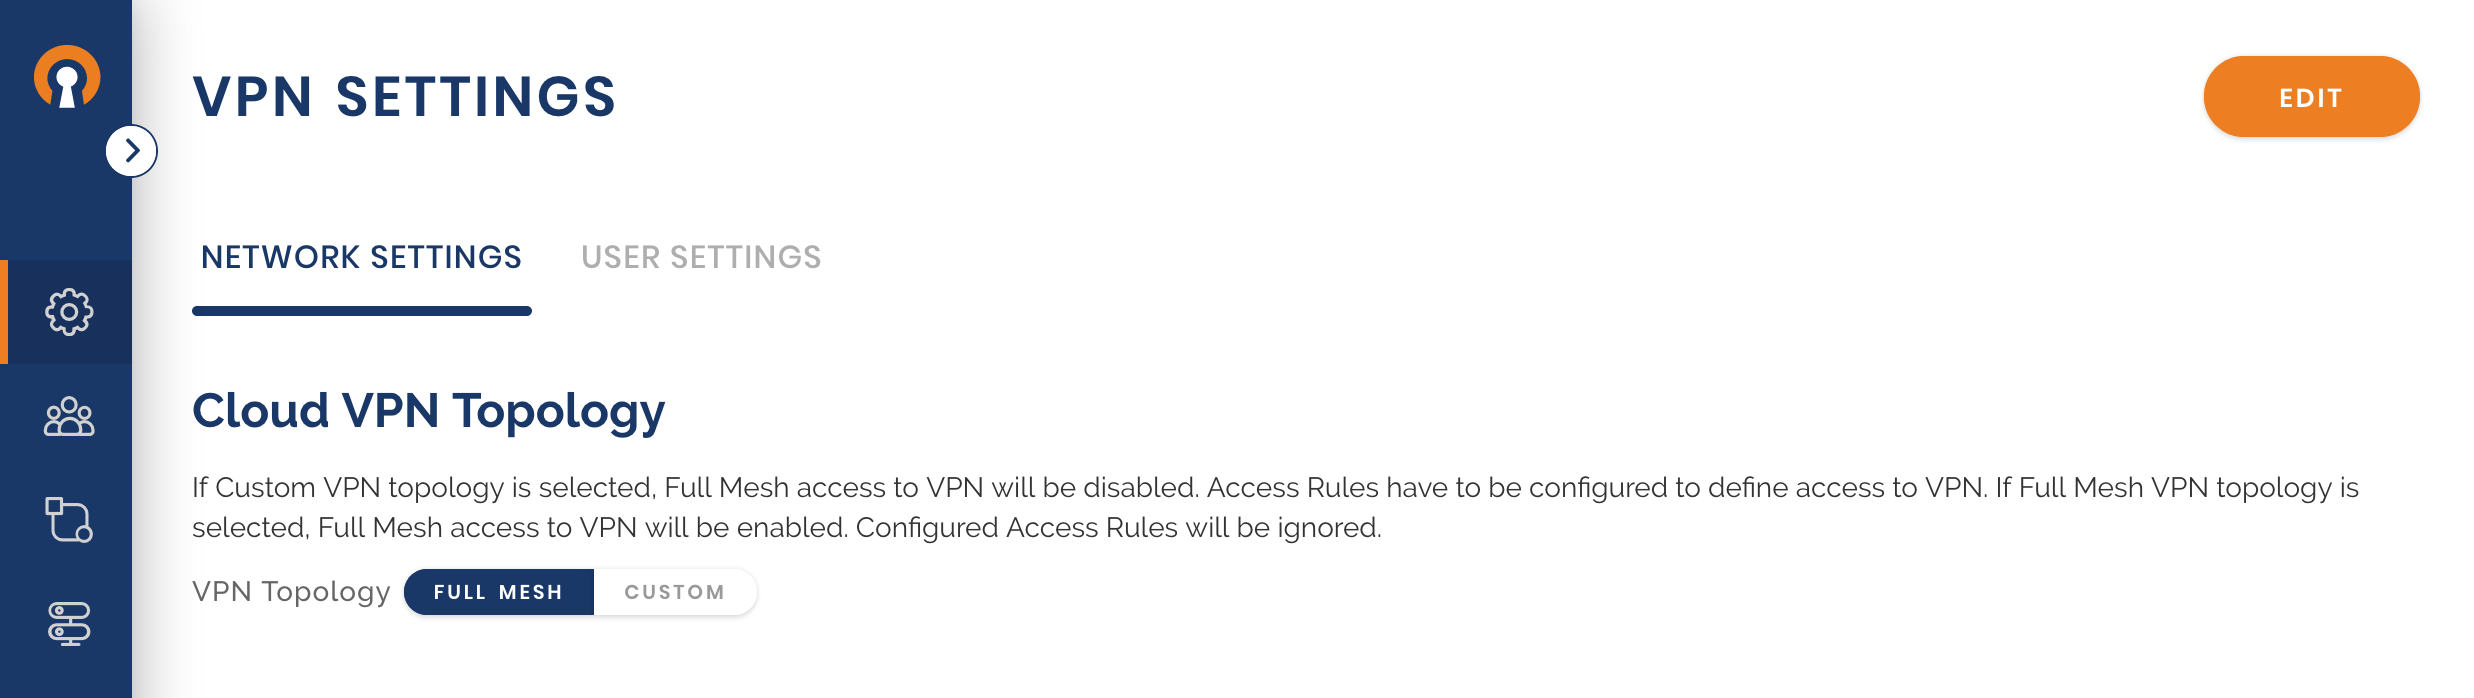
Check that access is set to Full-Mesh
Install Connector software and connect to CloudConnexa
A guide to installing the CloudConnexa client and connecting to CloudConnexa is shown at: Installing Network Connector – Linux.
Configure the Network routes at each of the sites
IP forwarding is the ability for an operating system to accept incoming Network packets on one interface, recognize that it is not meant for the system itself, but that it should be passed on to another Network, and then forwards it accordingly. This is what you need when you have for example a system set up that is sitting between two different Networks and needs to pass traffic between them. On pretty much any Linux system, barring a few exceptions, this can be accomplished by editing the /etc/sysctl.conf file and adding or uncommenting a specific line. To enable IP forwarding on Ubuntu/Debian, for example, see, Enable IPv4 forwarding. Check IPv6 forwarding as well if needed : https://wiki.gentoo.org/wiki/IPv6_router_guide.
The alterations you’ve made to the sysctl.conf file should now have taken effect and IP forwarding should now be enabled permanently on this system.
Now there is only one thing left to configure. The router in the Network where the Connector is installed needs to be made aware that it can reach the other two Networks, and that they can be reached by contacting the private IP address of the Connector. While the configuration shown below addresses the HQ Network, routes need to be added to both the branch Networks too.
In our example Network, the computer that has the Connector installed on it at HQ has an IP of 10.1.60.55. To make the router aware that BranchNetMA and BranchNetUK subnets can be reached via the Connector, look up the documentation of your router Device, and look up how to add static routes. Please note that you should add these static routes on the router present in the HQ. These are the static routes that need to be added:
Network
10.3.0.0with subnet mask255.255.240.0through gateway10.1.60.55Network
10.2.0.0with subnet mask255.255.240.0through gateway10.1.60.55
With the new static routes in place, whenever traffic now arrives at the router that has as a destination an IP address somewhere in 10.3.0.0/20 or 10.2.0.0/20, it will know that it should forward this to the OpenVPN Connector at IP address10.1.60.55. CloudConnexa will then route it to the correct site.
Remote Workers / Telecommuting
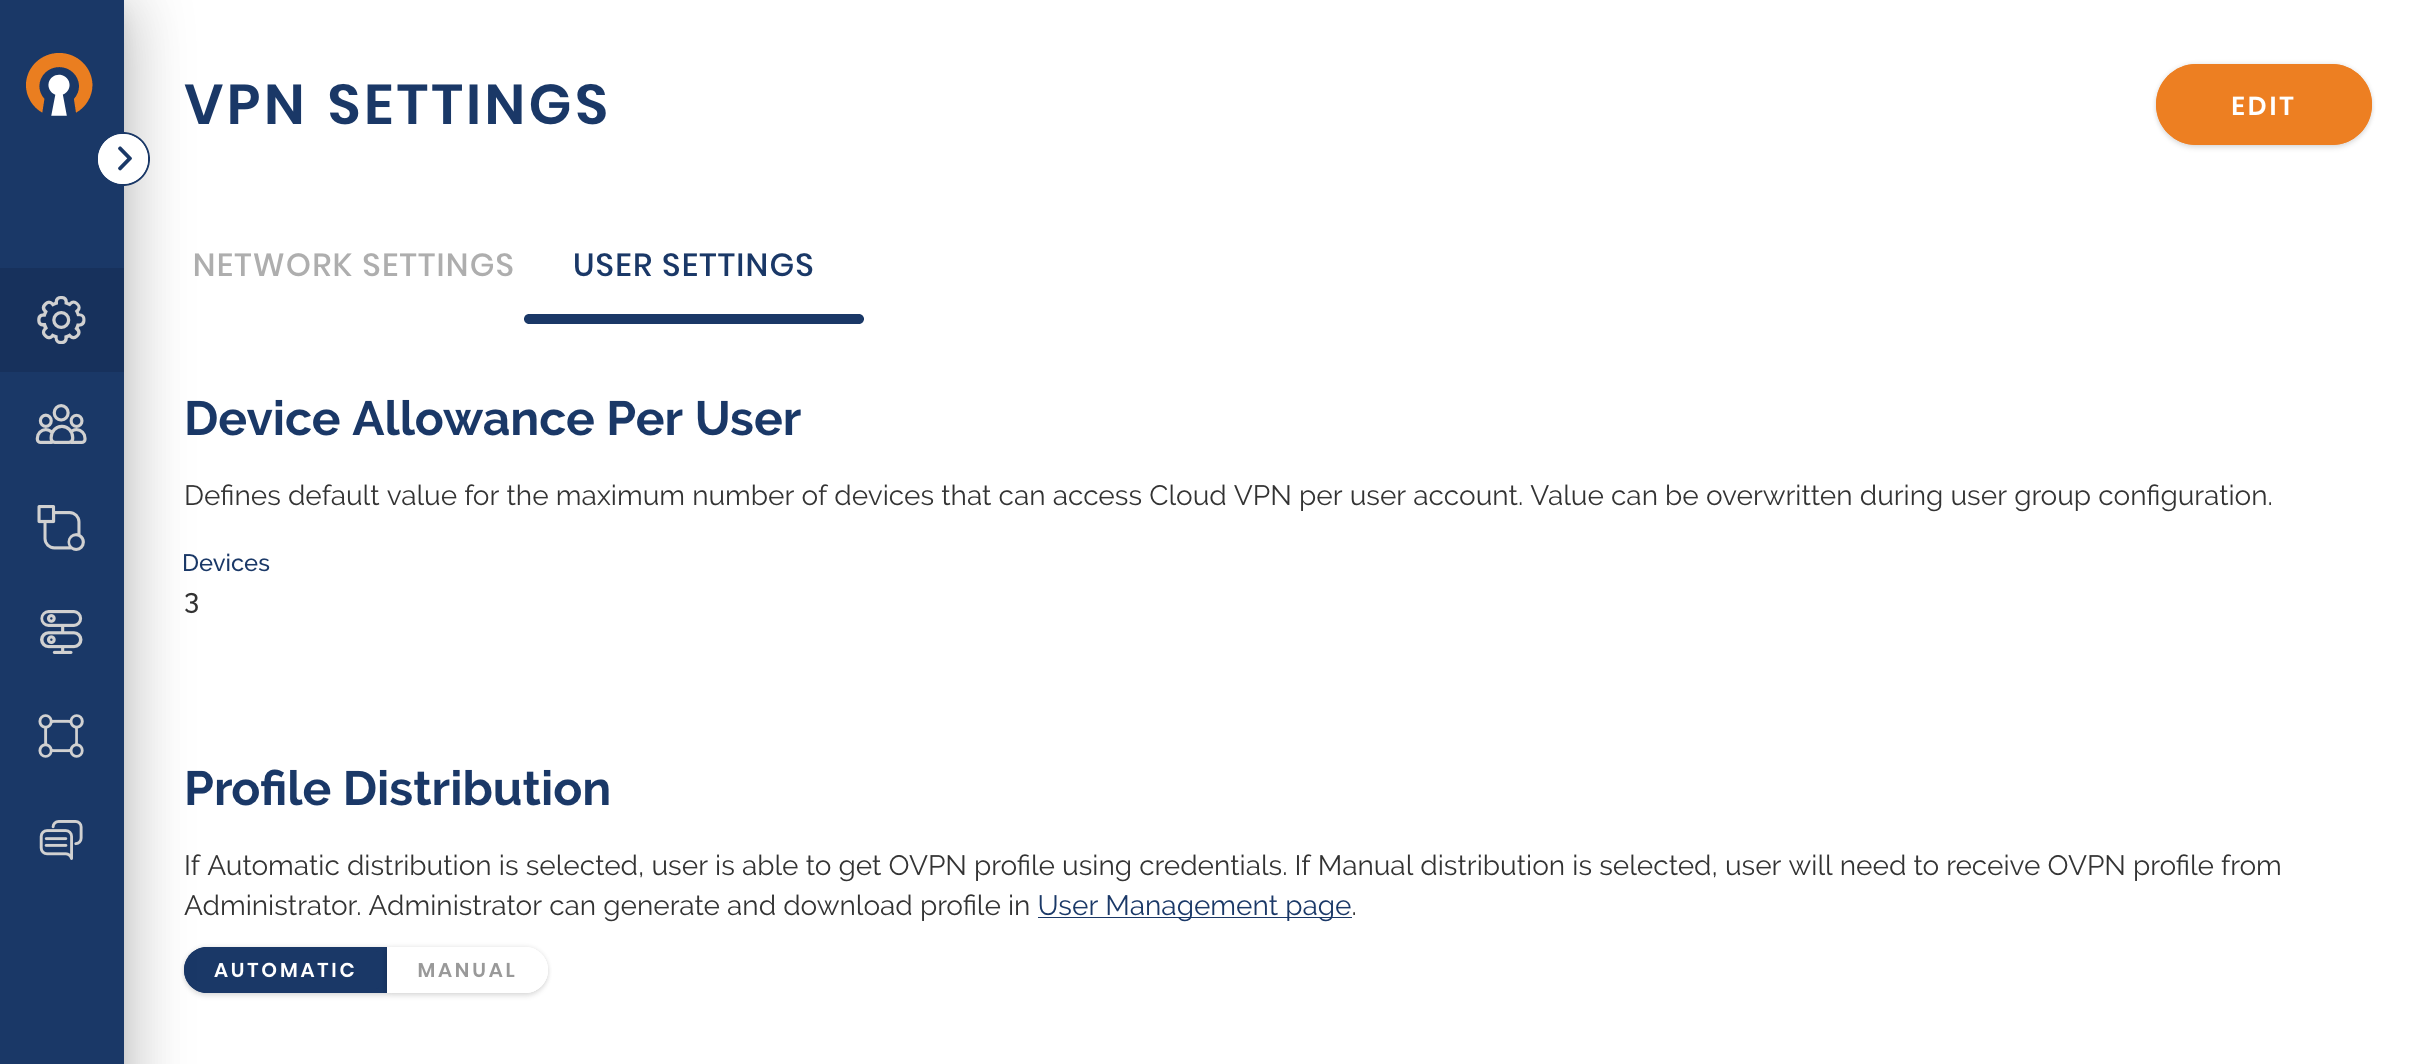
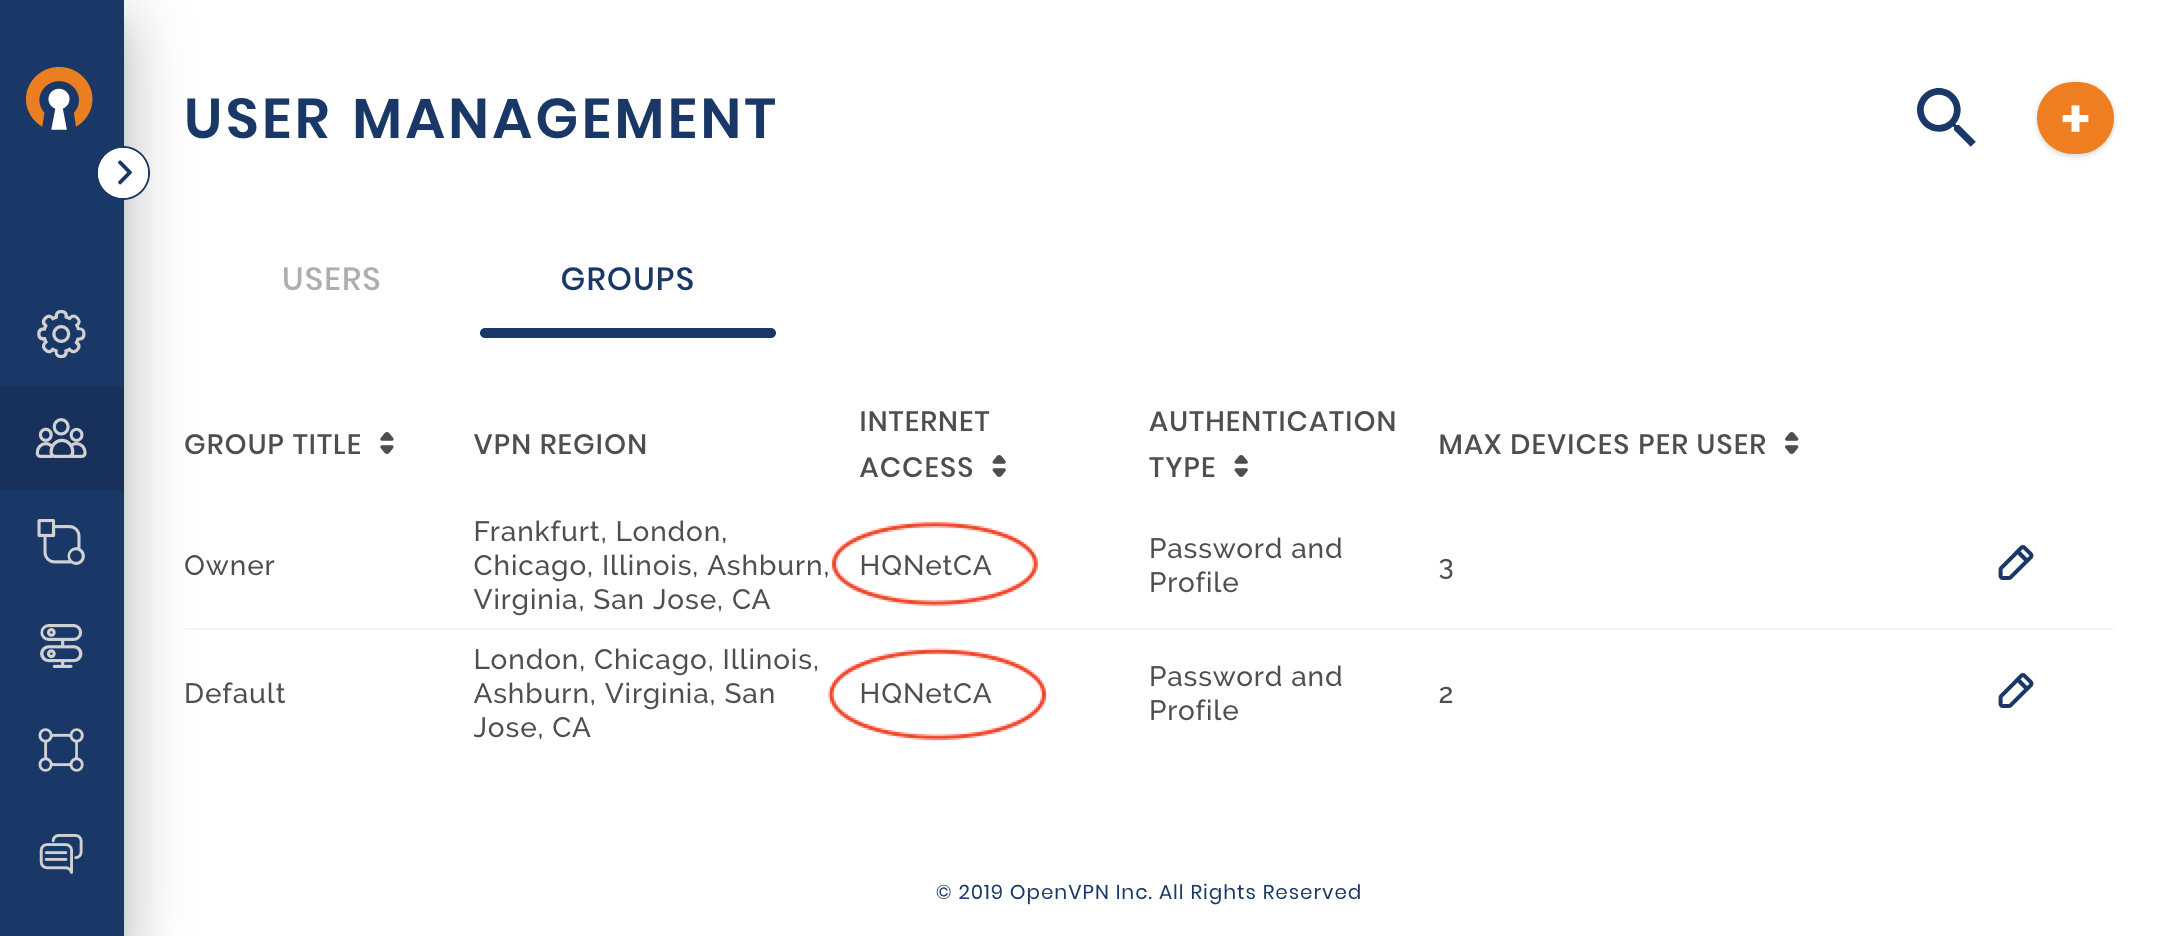
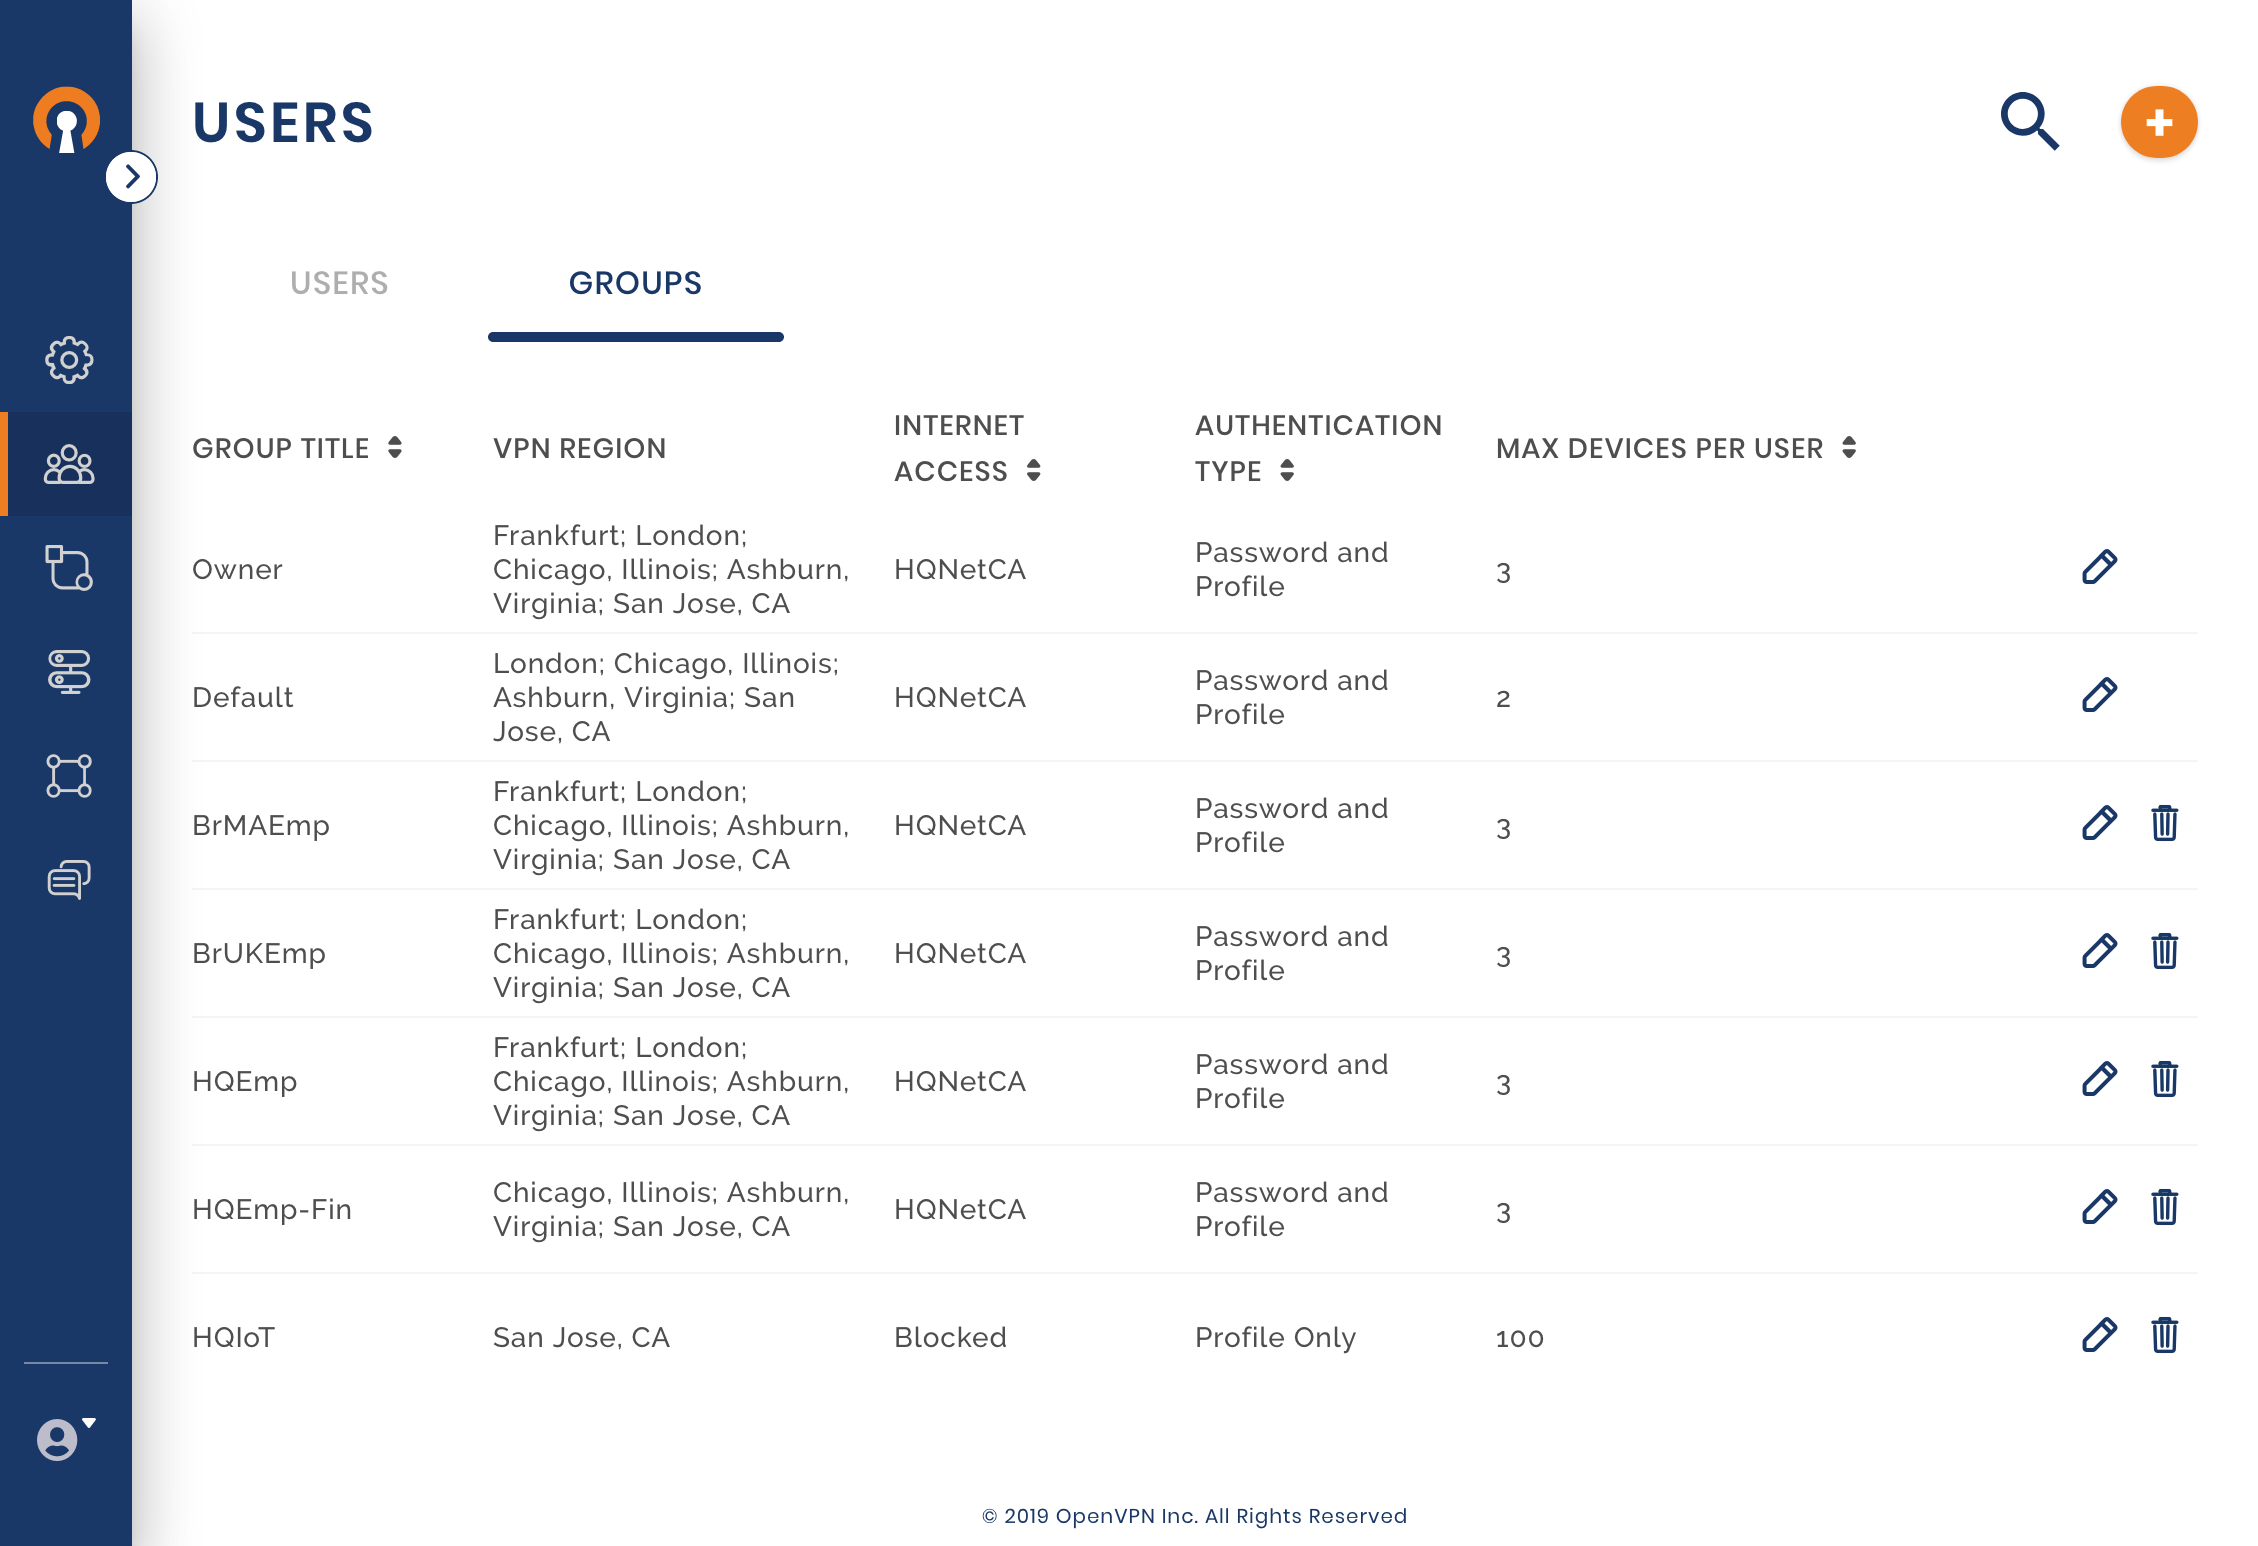
The business has hired two people with specialized skills and allowed them to work remotely. Harry and Mary will be working out of their home offices and need to access the corporate Network. Owen decides to make them part of the Full-Mesh WPC by setting them up as CloudConnexa Users. All CloudConnexa Users if not assigned to a specific group, belong to the Default Group. The Full-Mesh access configuration allows these Users to access all of the WPC even other User’s Devices.

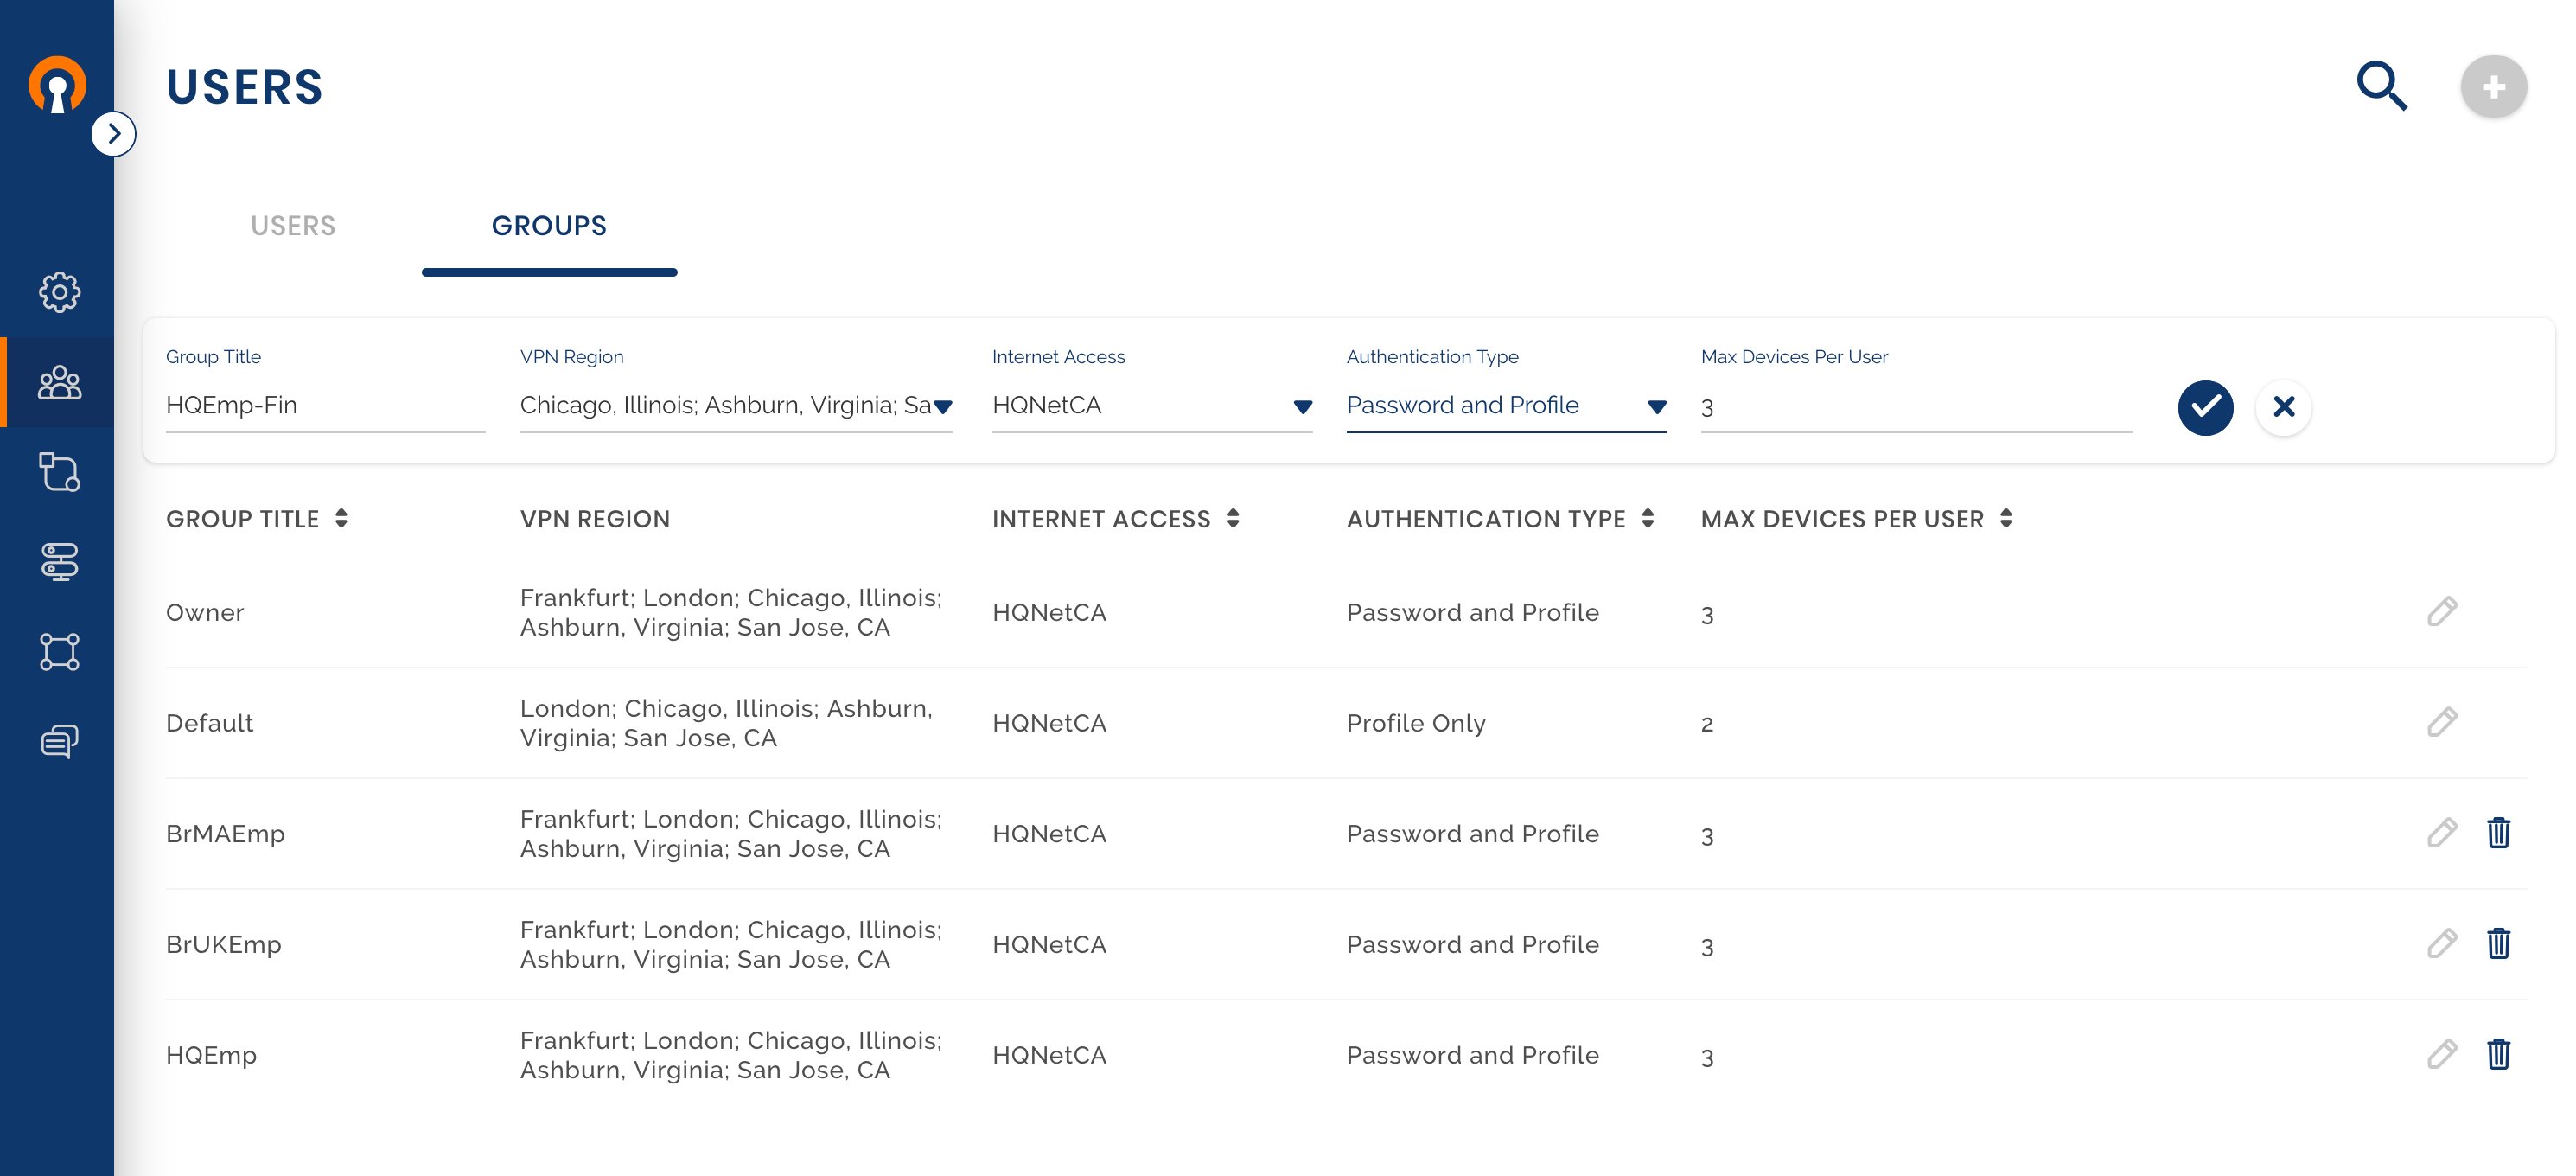
Check and edit the Default User Group settings
Owen checks whether the Default Group setting meets his needs. As he wants all Users to authenticate with username and password, he edits the Authentication Type to ‘Profile and password’. Owen refers to Editing Default User Group settings for set up.
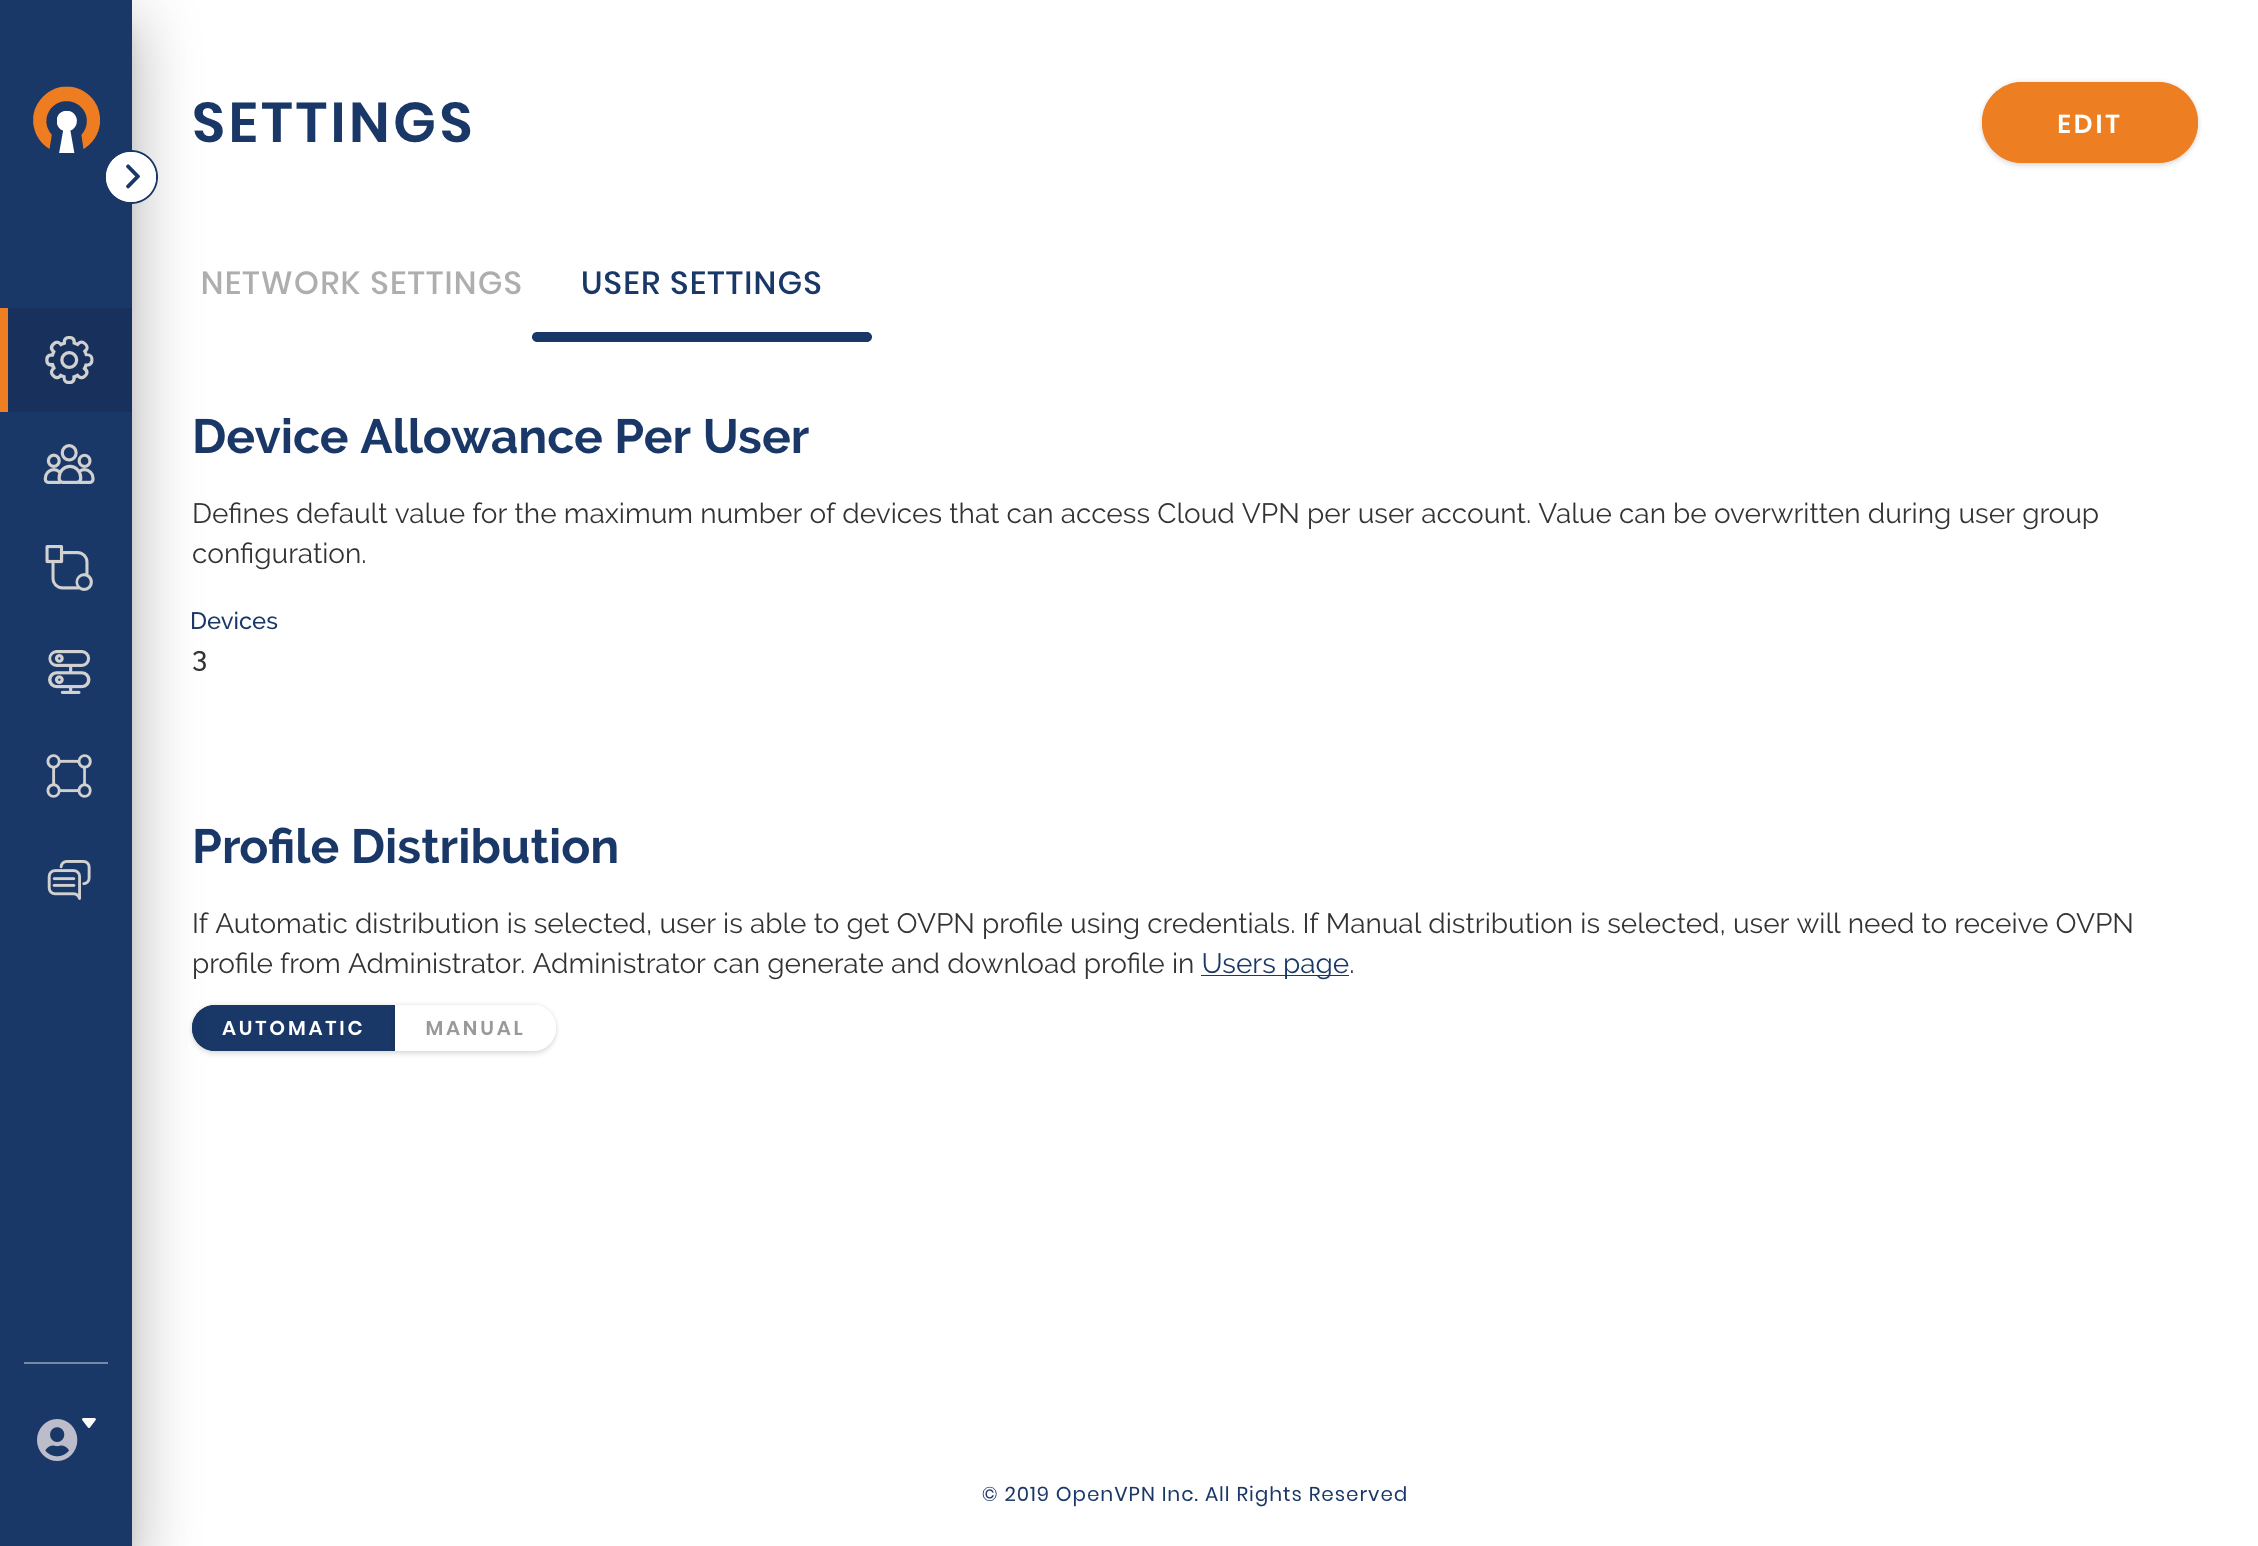
Choose the means of Profile distribution
Owen wants the employees to receive their profiles automatically once they take steps to add their Profile into the Connect Client and authenticate via their CloudConnexa credentials. He would have chosen the manual mode if delivering the Profile to the employee was being handled by the employee onboarding portal, a Device management system, or by other offline means.
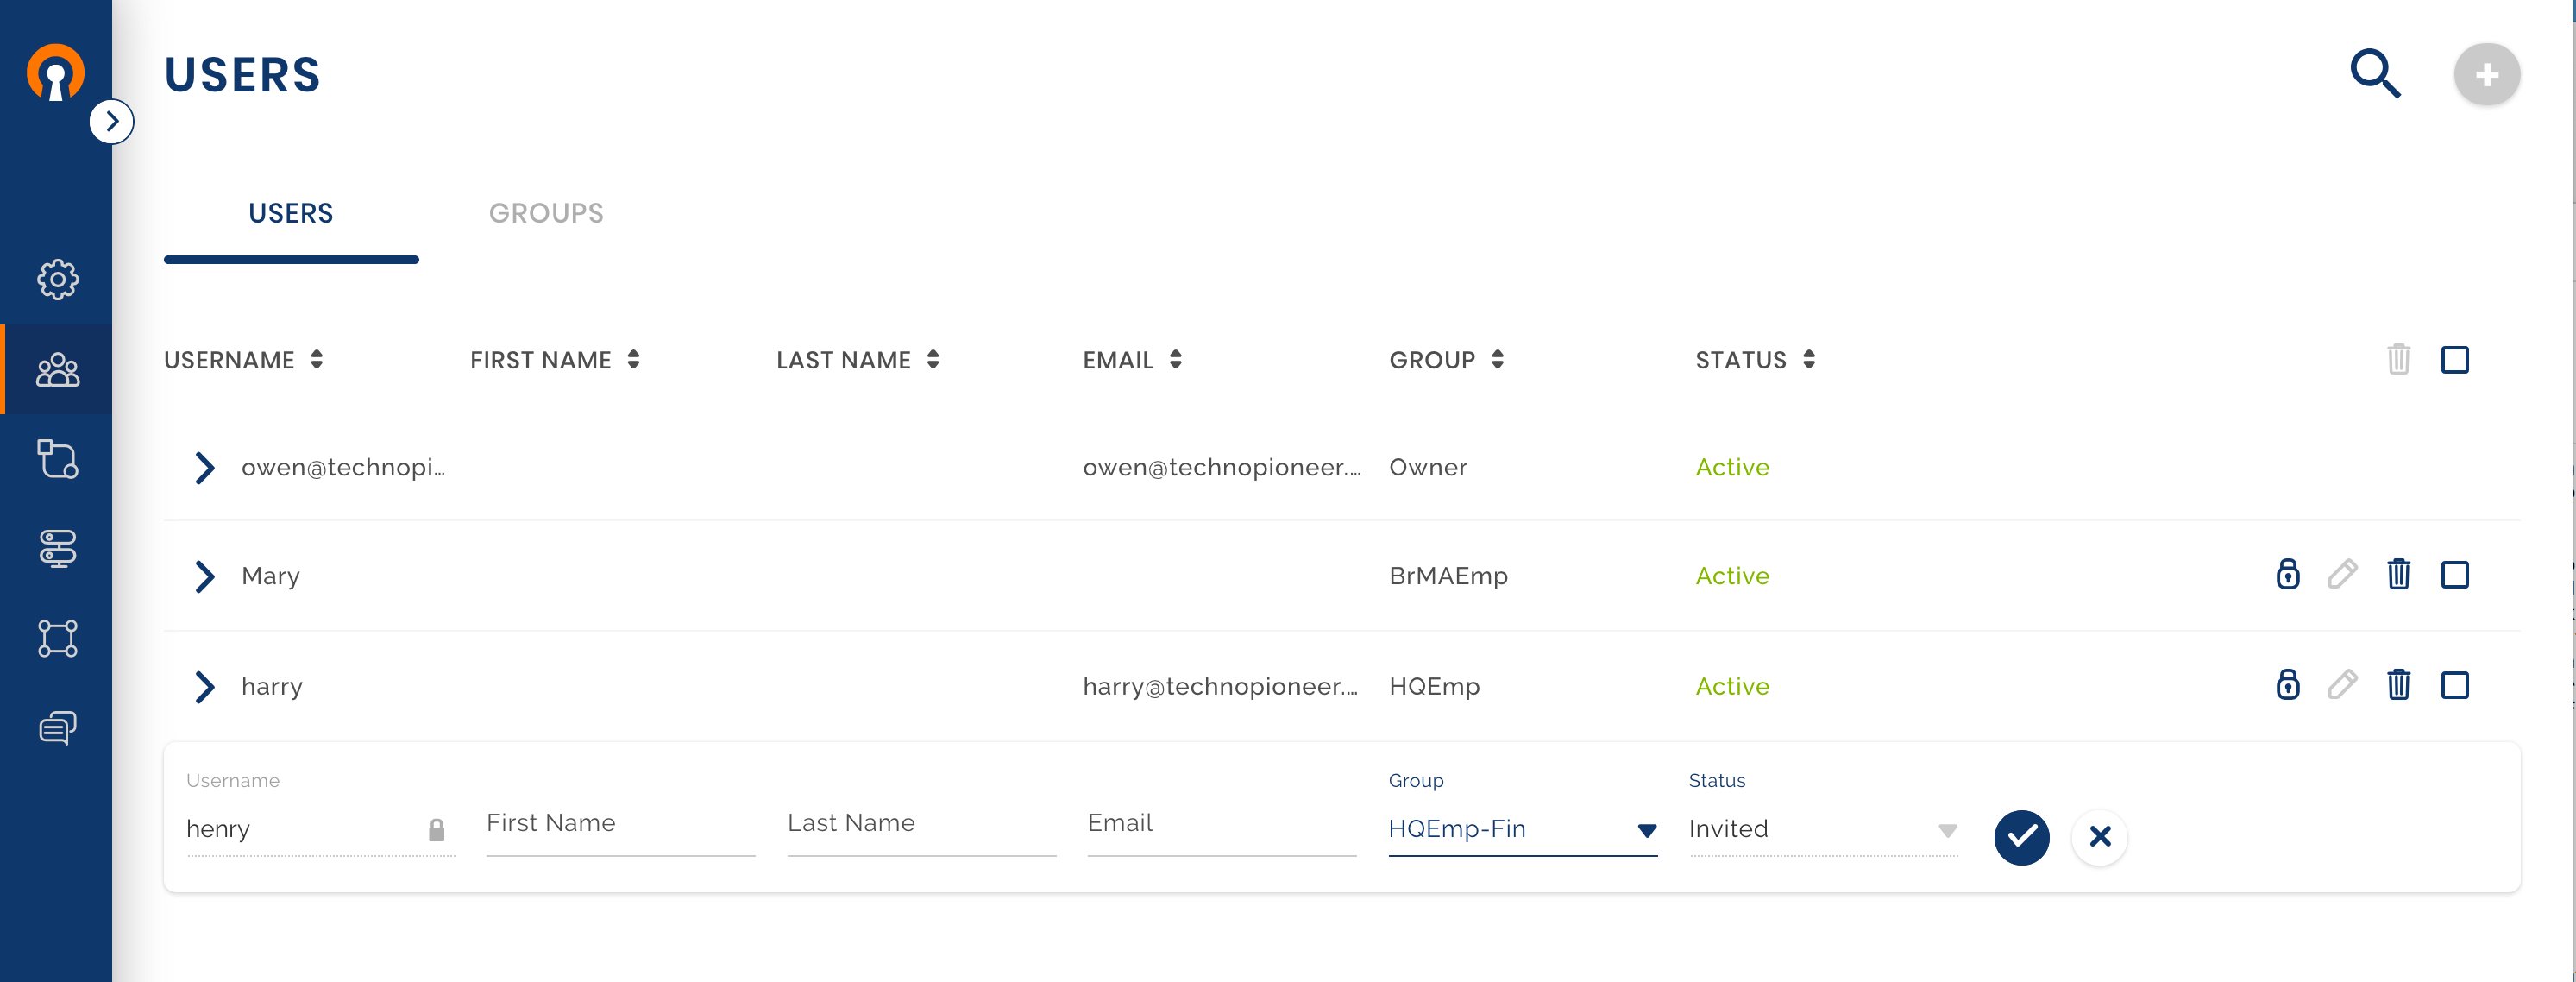
Add Users Harry and Mary
There are two ways that Owen can choose to invite Harry and Mary to be Users of the WPC:
Let CloudConnexa send an invitation to the User’s email and activate the User’s account when the User clicks on the invitation link. For this to happen, the User email must be supplied while adding the User.
The Administrator can provide the User portal link, username, and temporary password to the User via other means. For this to happen, the User email must NOT be supplied while adding the User.
Owen uses Adding a User as a guide to adding Harry with his email address. The alternative of using the temporary password is shown in Admin sends instructions with temporary password to new User. On receiving the credential and User portal link, the User can either User Account activation with temporary password to access the User portal or directly import the Profile using Connect Client User Account activation with temporary password using Connect Client.
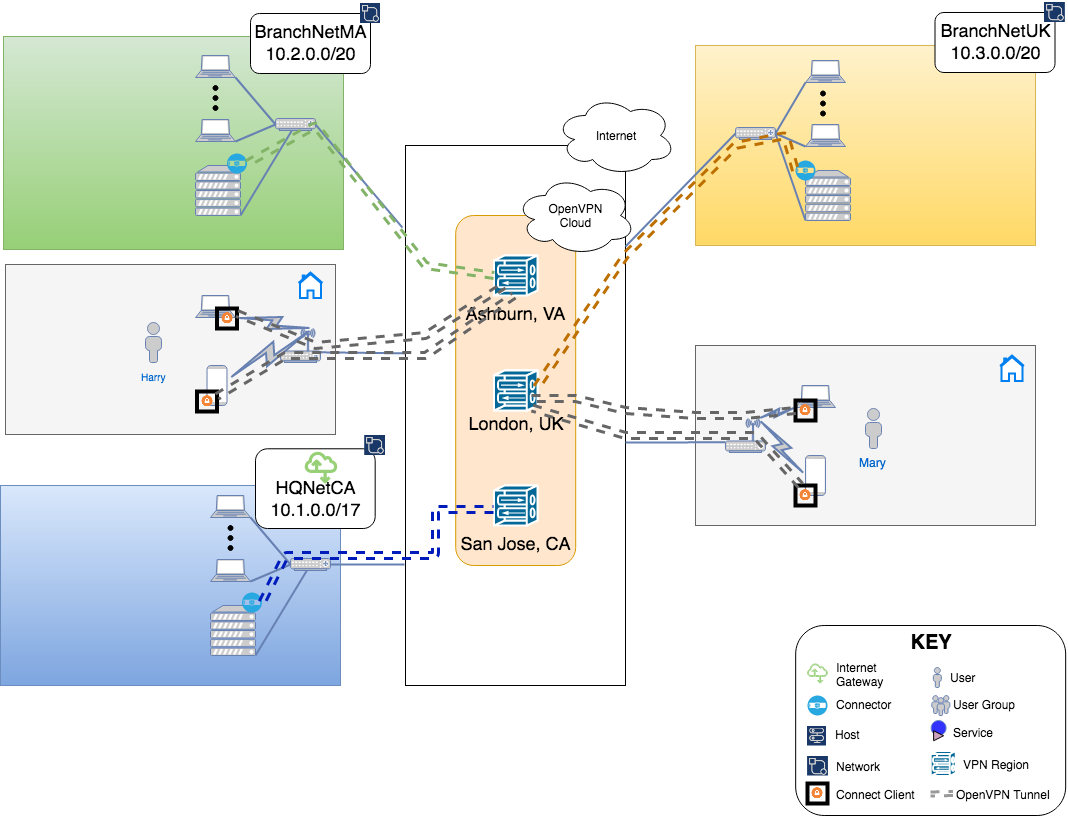
User Harry joins CloudConnexa
Harry receives the invitation email, activates his account, and downloads the Connect Client application for his Device. See, User Account Activation.
User Harry gets Profile and connects
Harry can now get the Profile and connect to one of the allowed Regions for the group Default. Notice that Frankfurt is not on the list because Default group was not allowed to connect to Frankfurt. See, User downloading app, getting profile and connecting.
Owen Checks that Harry has got his Profile
Check that Harry’s Status is now ‘Active’ and a Device is present. See, Check User and Devices.
Internet Security and Policies
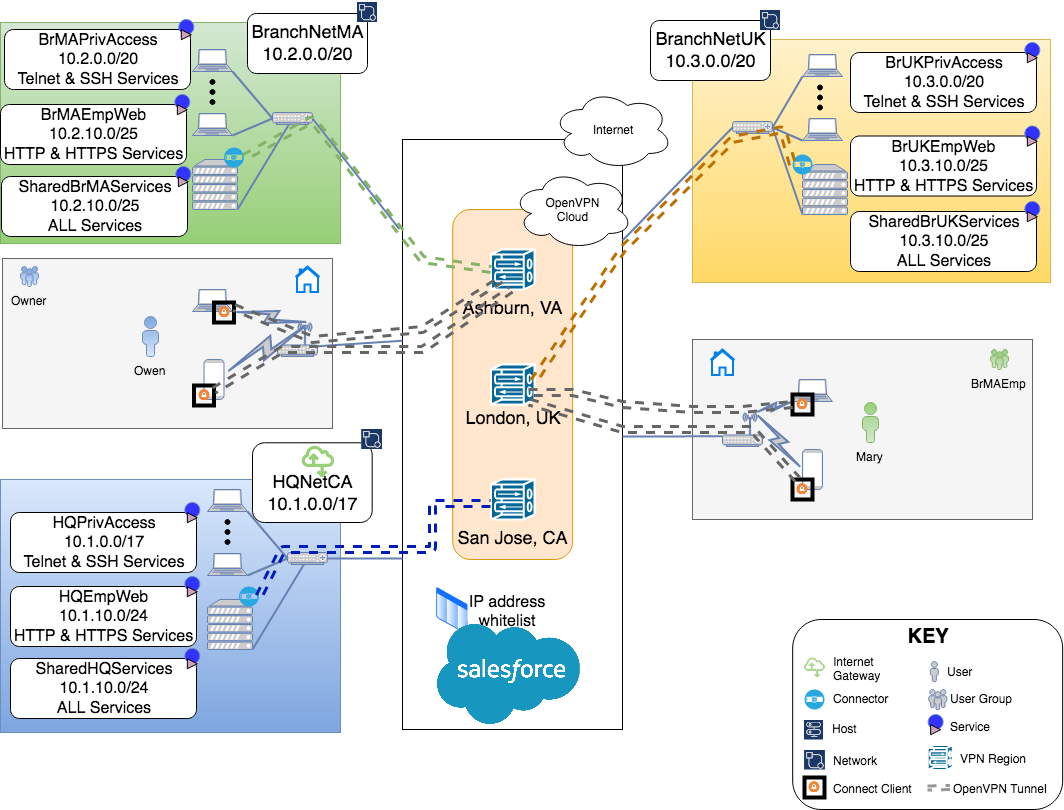
The IT Security department have started using various Network Threat Management tools such as Intrusion Detection and Protection systems, and malware scanning, among others. Owen wants to direct all public traffic from the branch Networks and any telecommuters to the HQ Networks. The HQ Networks will serve as the Internet exit point for the WPC so that the Internet security policies implemented at HQ is enforced and the security appliances don’t need to be installed in the branch locations. In order to do this, Owen carries out these steps:
Add an Internet Gateway to the HQ Networks
See, Adding Internet Gateway.
Configure the computer with the Connector as an Internet Gateway
Make changes to Internet Access for Networks
Using Changing a Network’s Internet Access to use Internet Gateway as a guide, Owen changes the Internet Access setting of BranchNetMA and BranchNetUK to use HQNetCA for Internet Access. Now the WPC is ready to accept public traffic from both Networks and route it over to HQNetCA for connectivity to the Internet.

Add Default Routes at the Branch Networks
Owen configures the routers at both branch sites to remove the static routes put in earlier (see, static routes ) and use the computer with the Connector software as the default route for the private Network.
Make changes to Internet Access for User Groups
To route the Internet traffic from WPC connected Users over to HQNetCA, the Groups need their Internet Access changes from Local to HQNetCA. Owen follows the guide Changing User Group’s Internet Access to use Internet Gateway to set both the Owner and Default Groups to use HQNetCA for Internet Access.
SaaS Whitelisting
Many SaaS providers offer a means to prevent unauthorized logins by letting their customers configure an IP address range to whitelist. Once configured, Login requests originating only from this whitelisted IP address range are allowed. Owen wants to put this additional security check in place for the SaaS tools used by his company. With telecommuters also needing access to these tools, it is hard to define an IP address range because their public IP address will change based on whether they work from home, cafe, or some other Internet access point. Owen does not need to work about these changing IP addresses because he has configured the Groups Internet Acces to use the HQNetCA Network (see, Changing User Group’s Internet Access to use Internet Gateway). Therefore, the traffic reaching the SaaS tools always have public IP address the same as the public IP address of HQNetCA even for telecommuters.
Owen can now configure the public IP address range of HQNetCA as the whitelist IP address range for SaaS. For example, https://help.salesforce.com/articleView?id=mc_overview_ip_whitelist.htm&type=5
Access Controls
CloudConnexa allows the configuration of strict access controls. Controls can be put in place that will restrict access from Networks, Hosts, and User Groups to fine-grained services defined under Networks and Hosts. The sections below illustrate some of the ways access controls can be used.
Inter-site Access Controls
While Owen has networked together the private Networks of HQ and the two branches, he knows that there is only a specific subnet in each location that houses services that need to be accessible from other sites and by telecommuters. Owen decides to constrain access to only those subnets between the sites.
User Group Application Access Controls
Owen wants to further tighten the security when employees are telecommuting. Instead of giving them access to the complete subnet housing shared services at all the locations, he wants to provide them with web access (protocols: HTTP and HTTPS) to that subnet and only to the subnet at the location that they normally work out of.

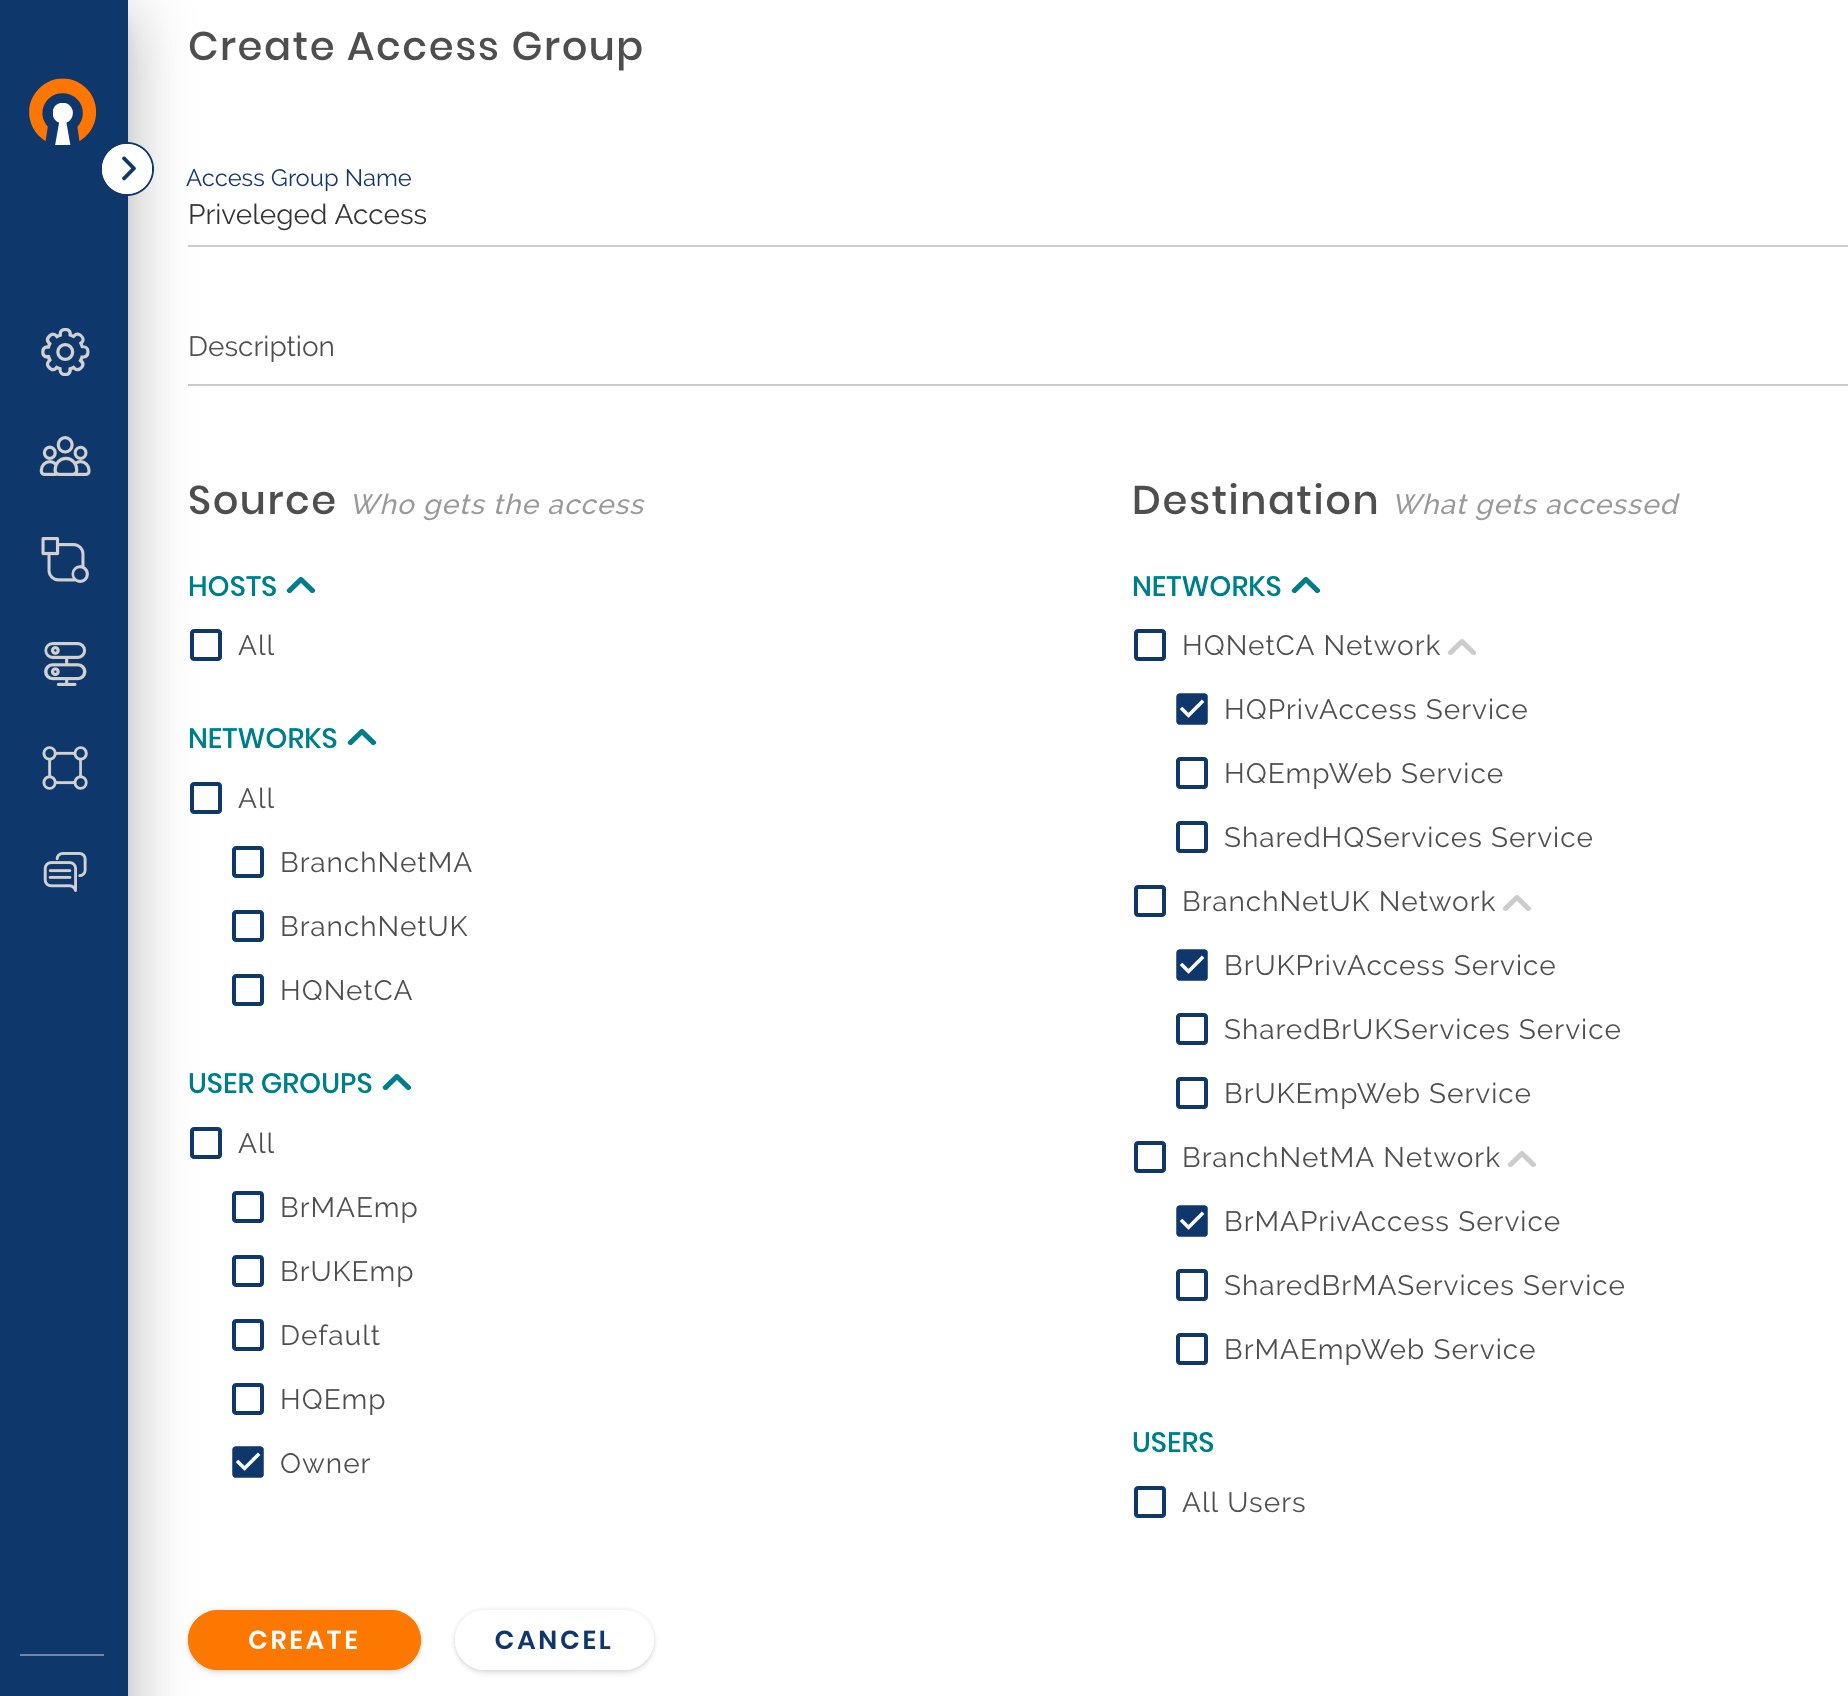
Privileged Access
Now that Owen has restricted telecommuters to just the use of web services, he is assured that none of the Users can access any other services while telecommuting. But, Owen would like to access Servers on any of the 3 location’s Networks while telecommuting. Owen frequently needs ssh access to his servers while at work. To get the same access while telecommuting, Owen needs to define new Services and Access Groups.

Create New Services
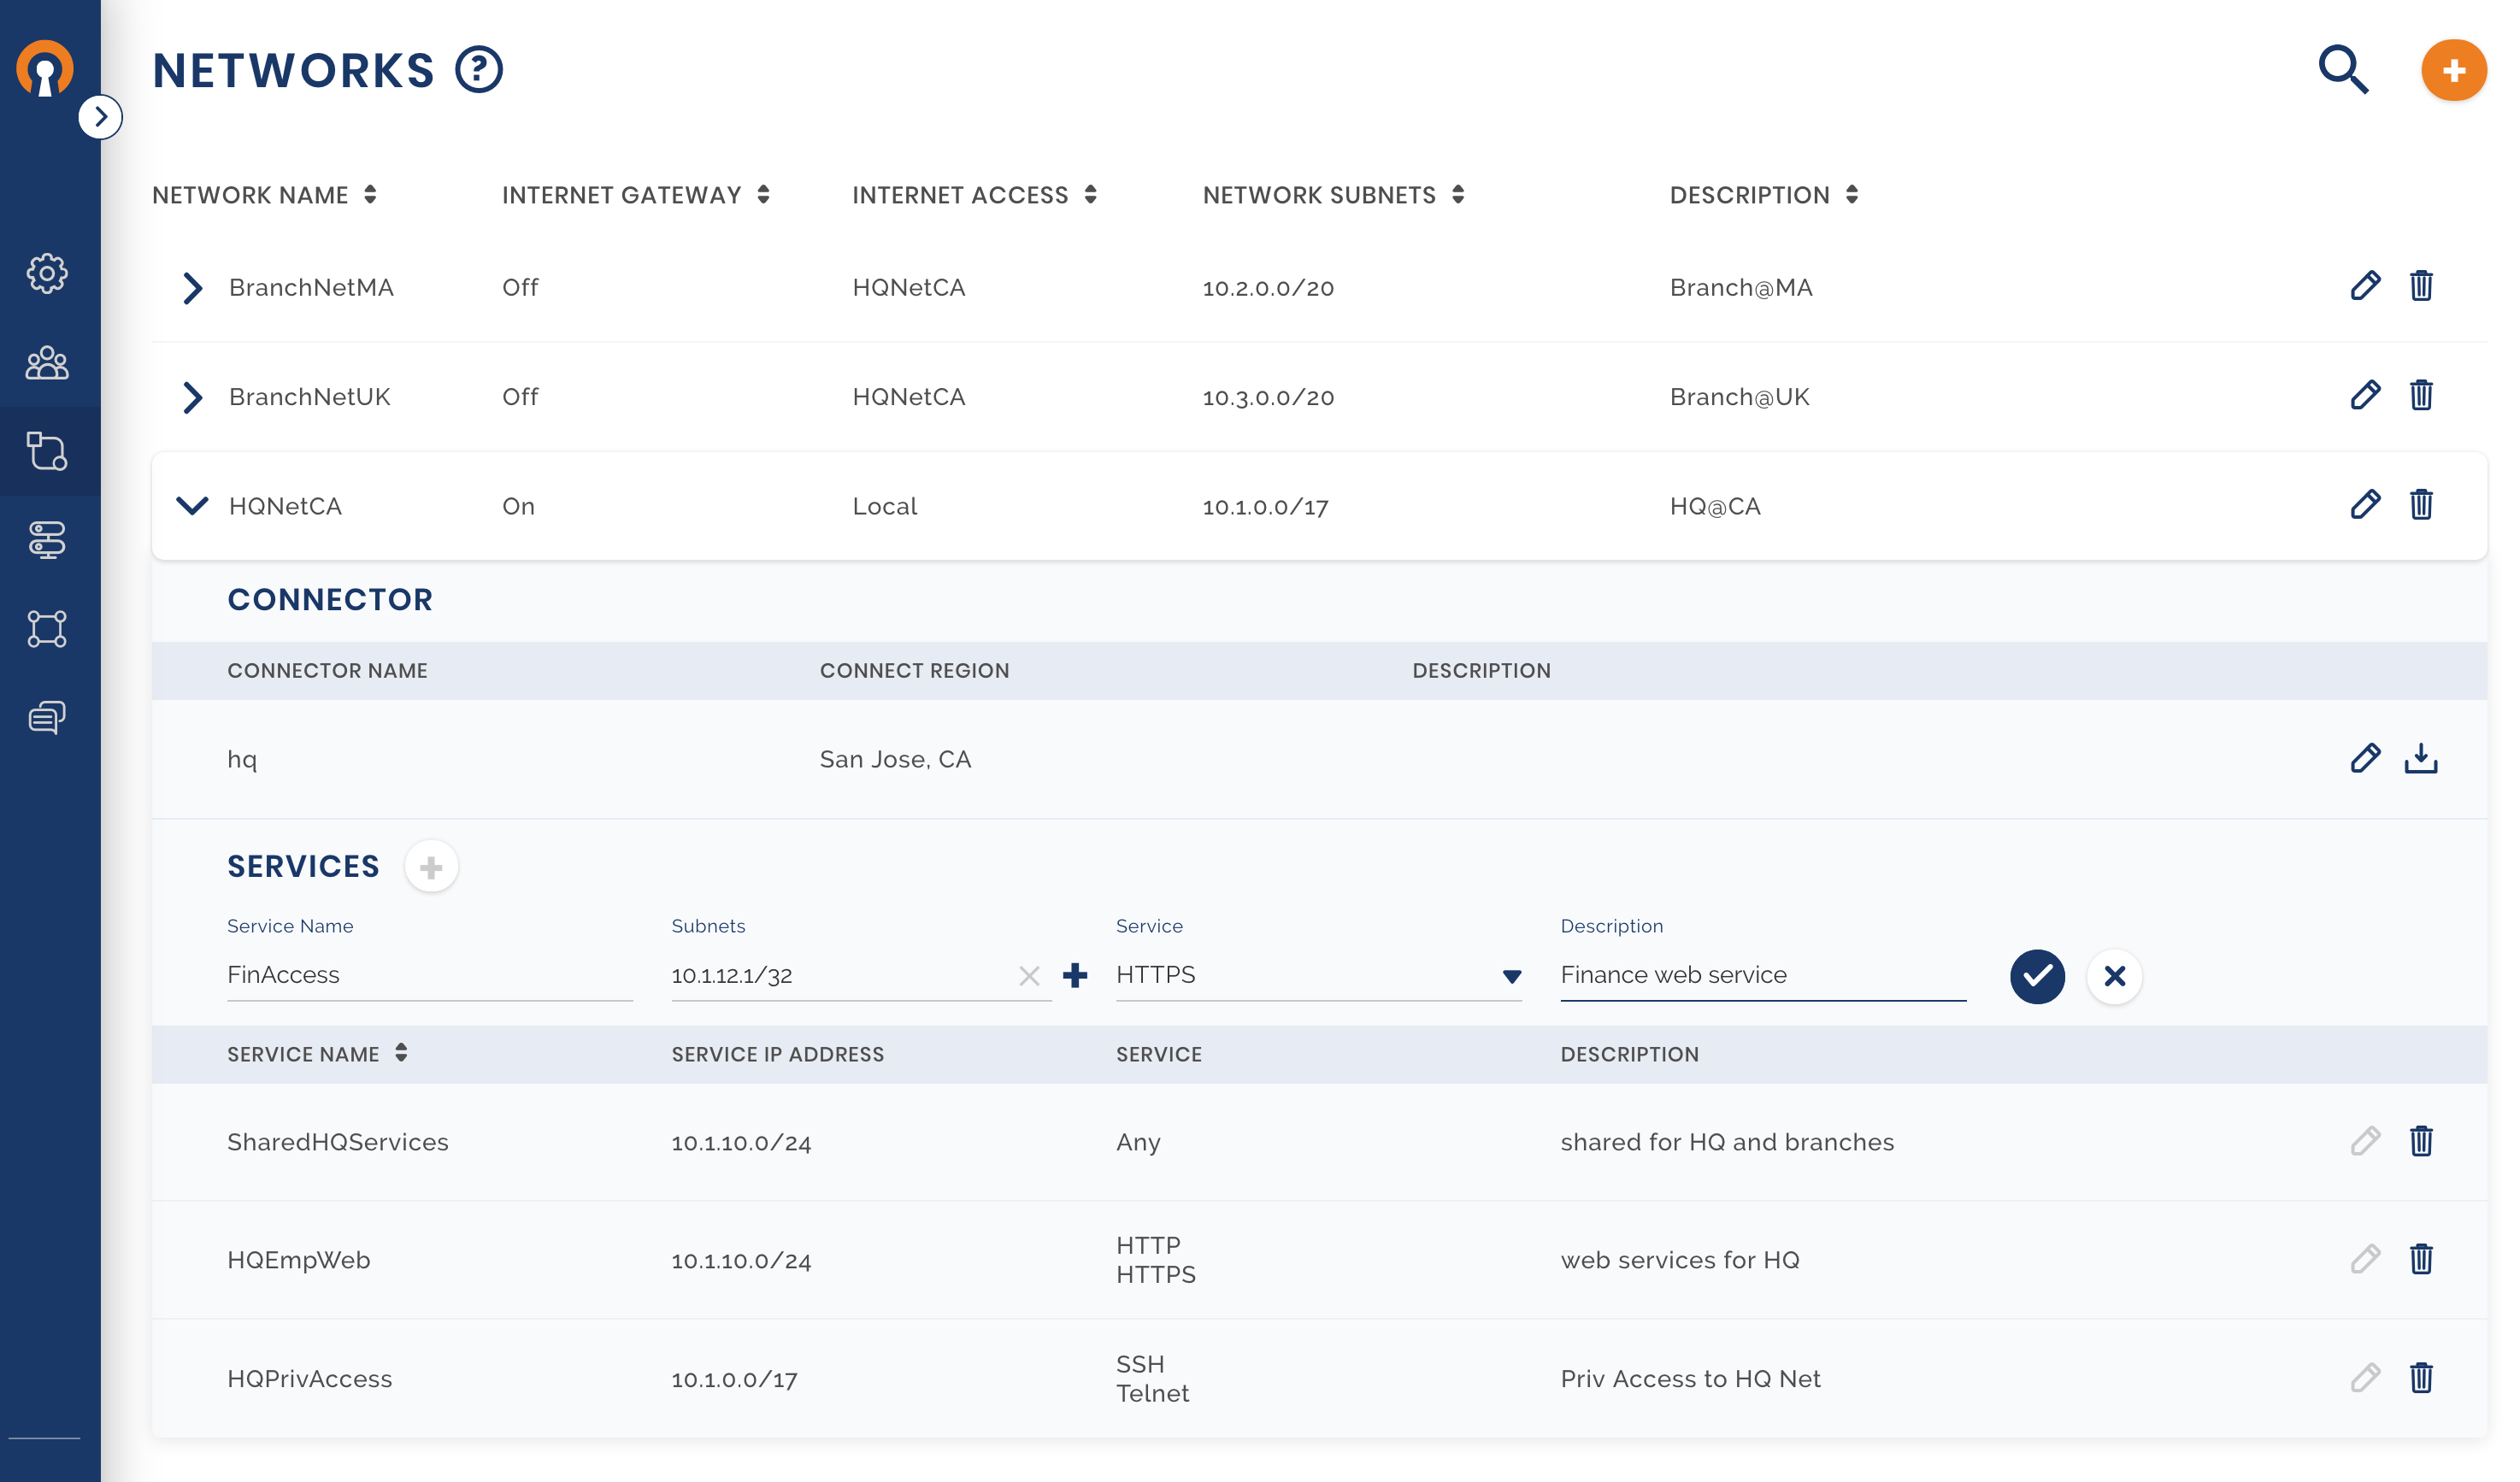
Owen creates a new Service under each Network for SSH and Telnet access to the complete private IP address space of those Networks. See, Protocol-specific Service for more details on setting up a Service.
Create a new Access Group
In the earlier step, Owen had created HQPrivilegeAccess, BrMAPrivilegeAccess, and BrUKPrivelegeAccess as Services. Now, he provides access to these services to the Owner User Group of which he is a member of by creating a new Access Group. For more specifics on creating Access Groups see, Add New User Group.
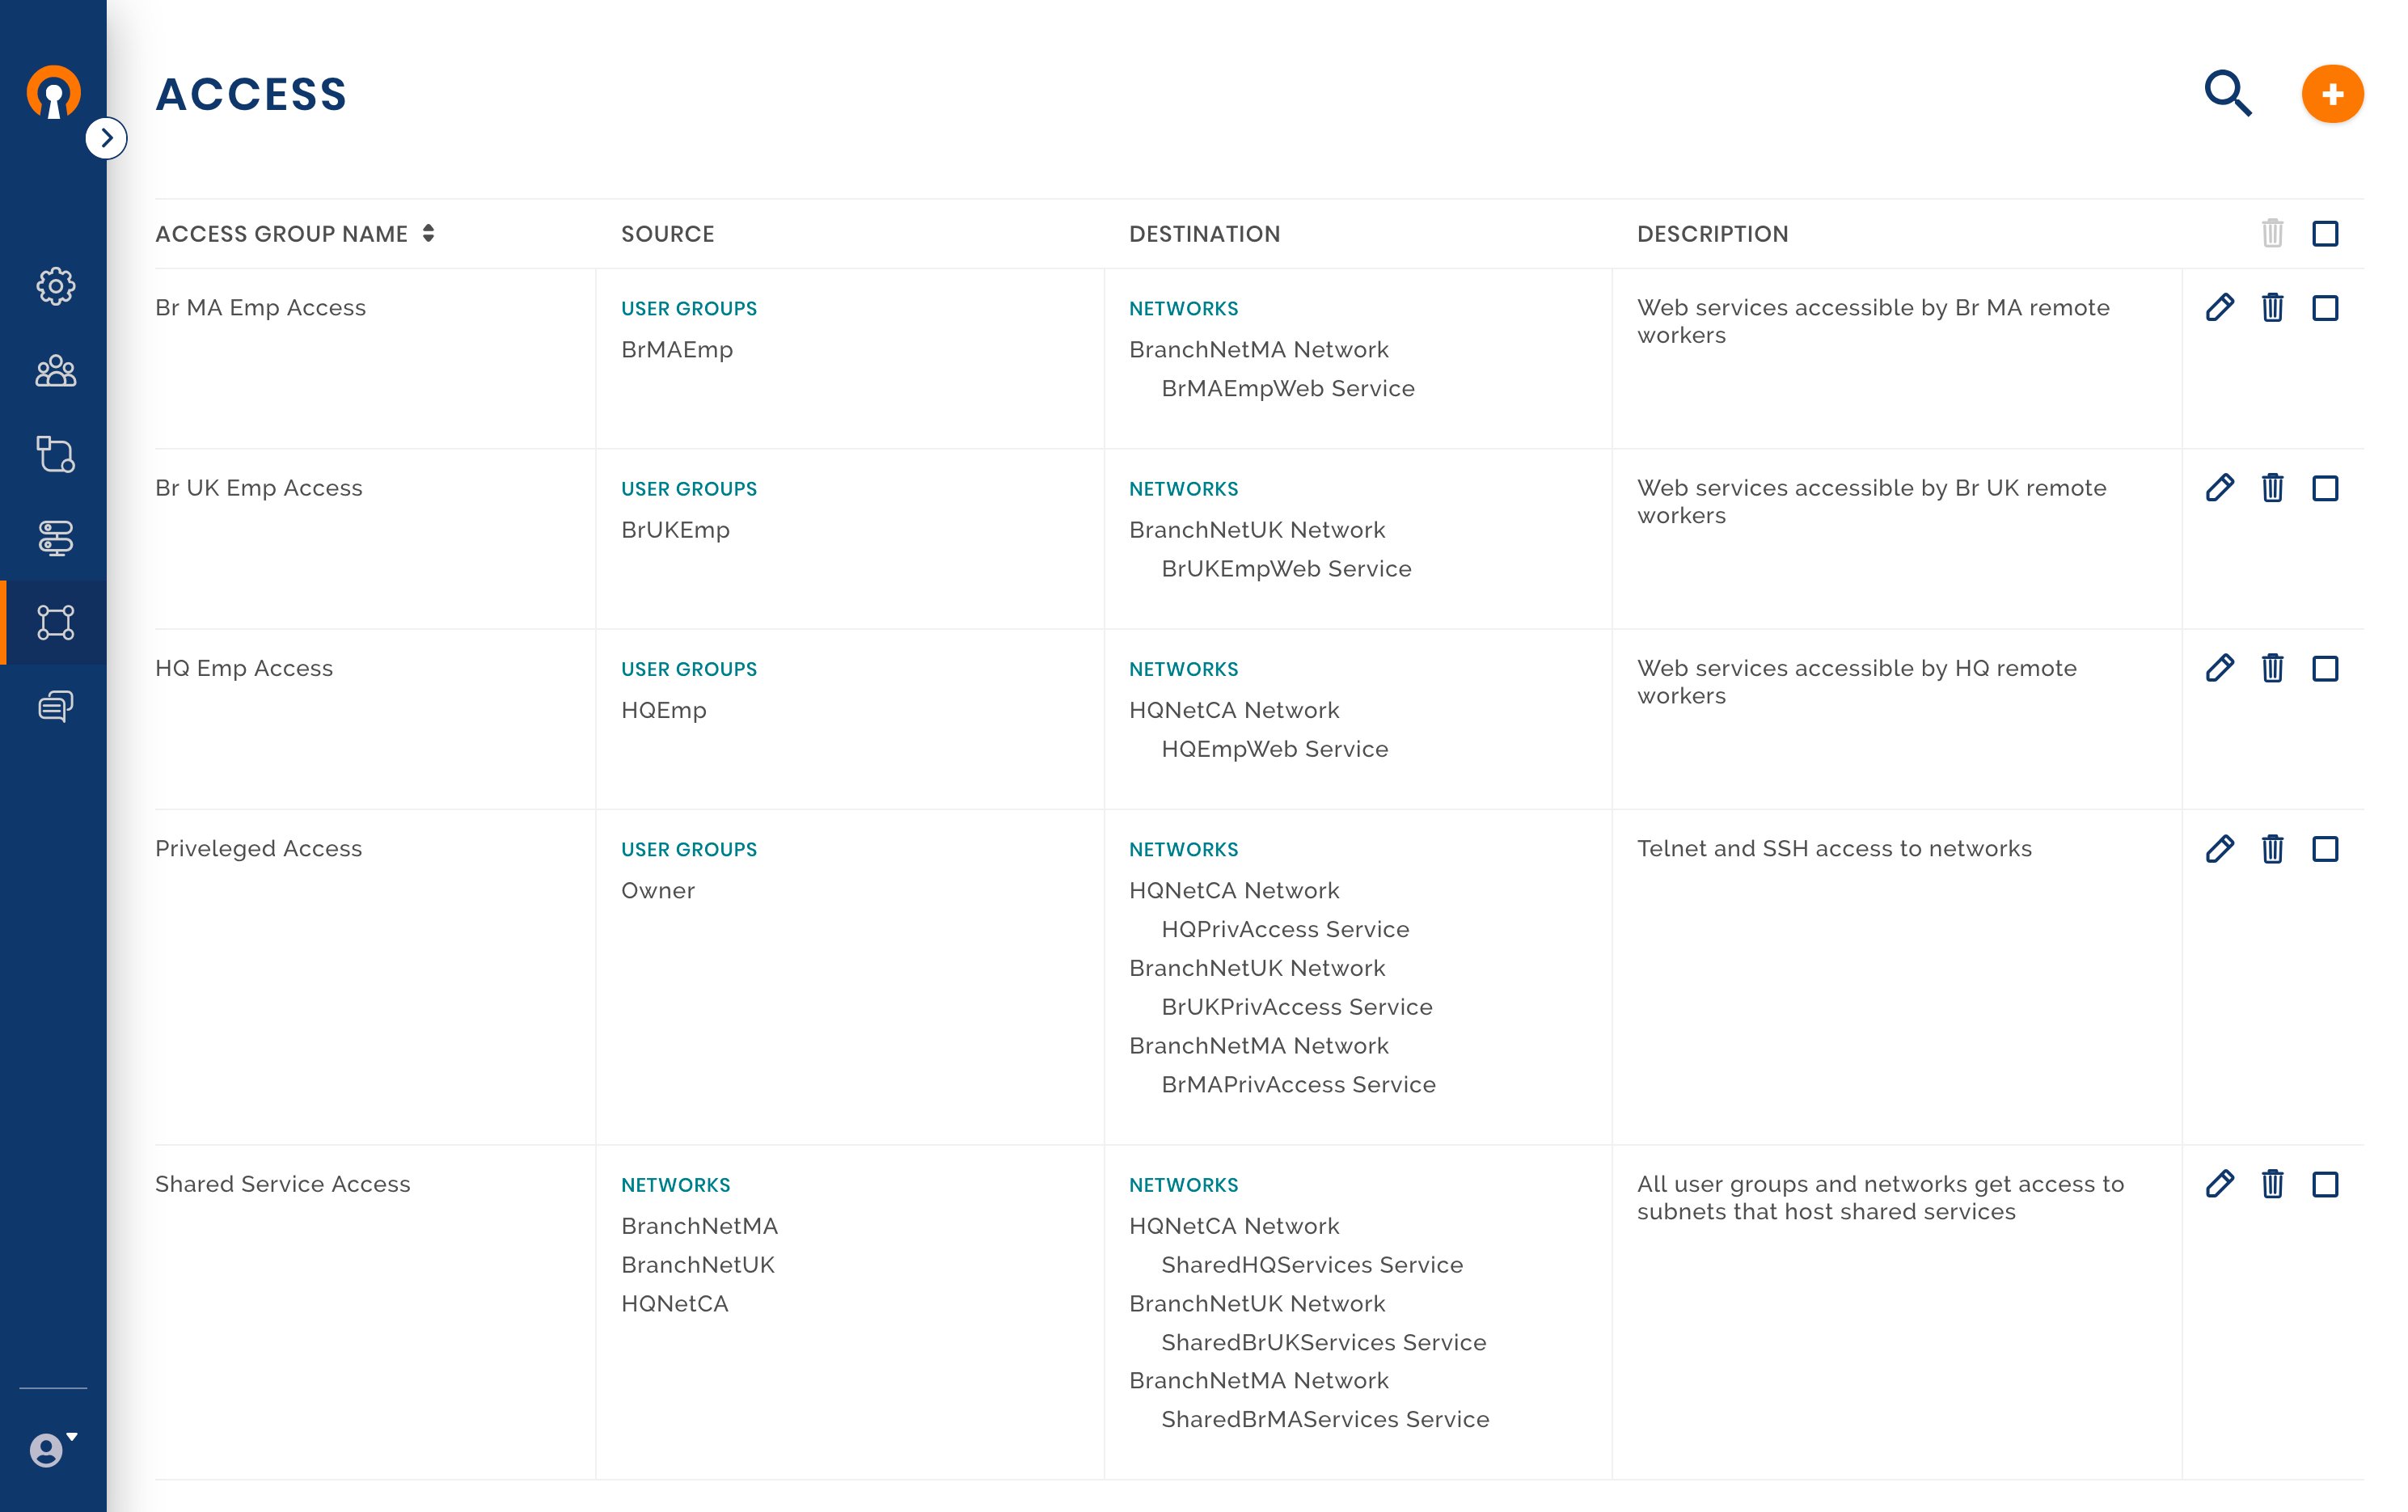
Access Rules in effect
With the Access Group for privileged access set up, the current access rules that are in effect are shown in the screenshot below.
Zero Trust
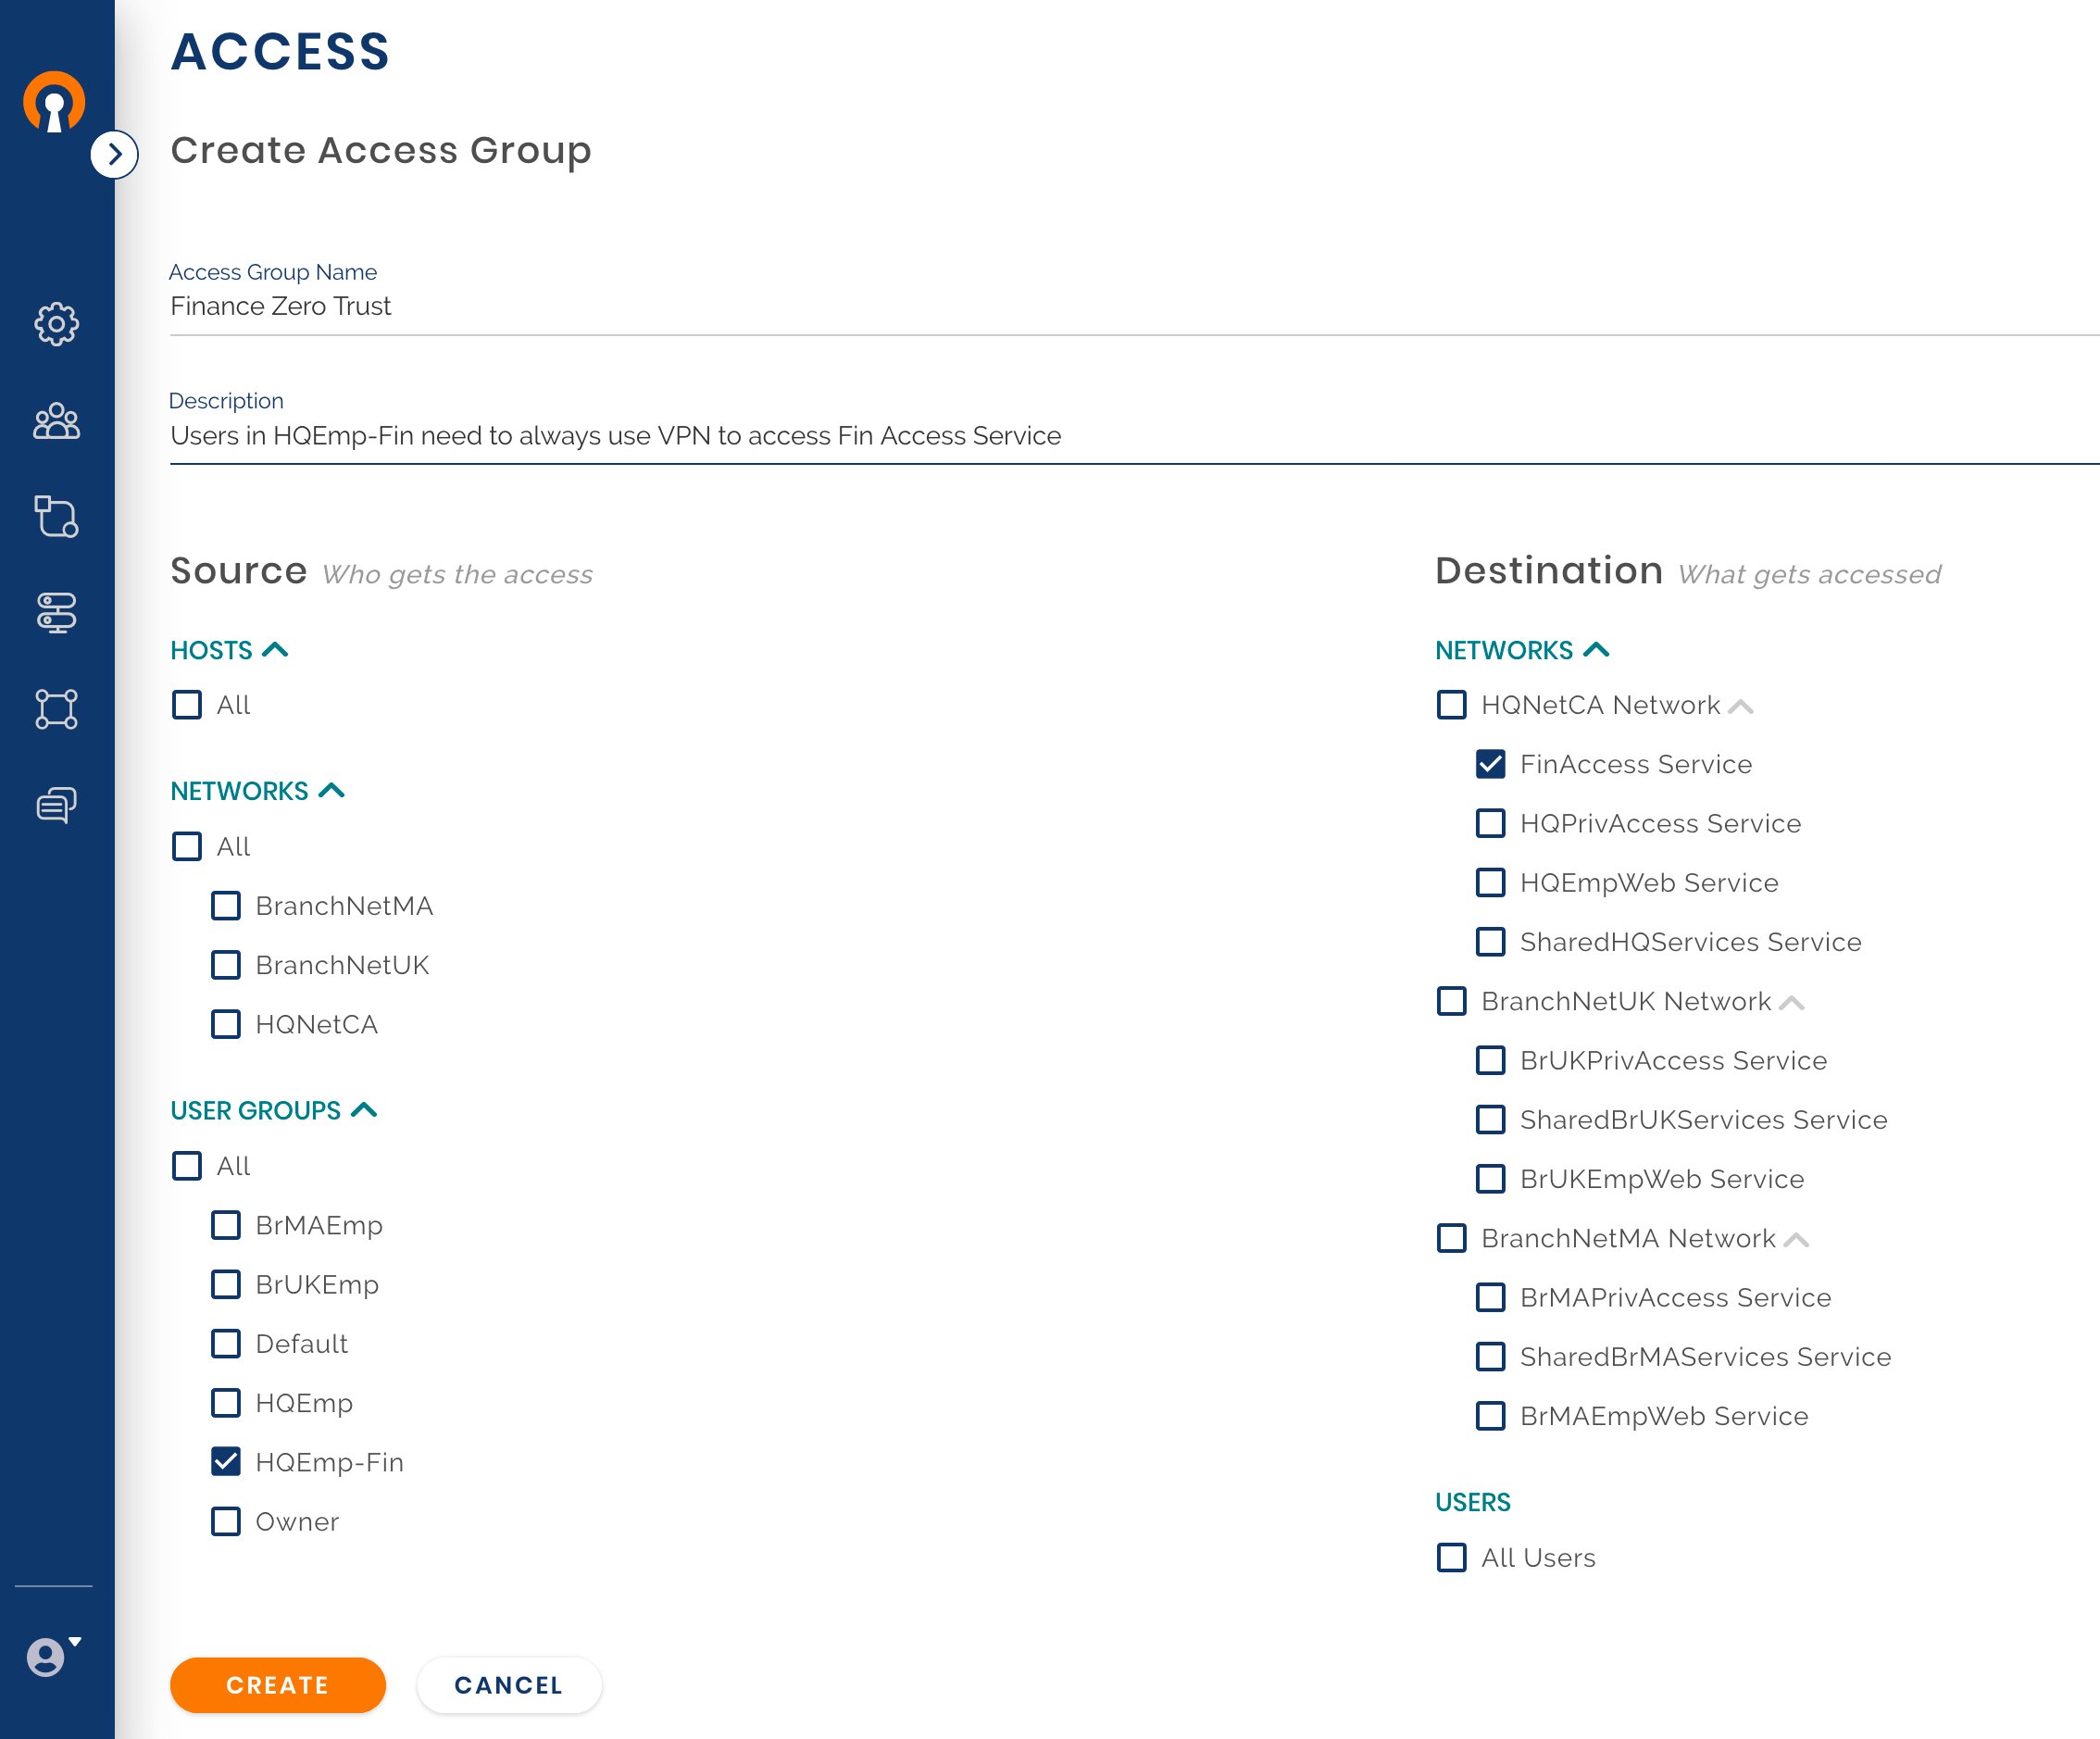
Owen has been asked to give the highest grade of access security to a particular server on HQ Network which houses financial reporting applications. The financial service should be accessible only to key members of the HQ finance department, of which Henry is a member. Owen decides to implement some of the zero-trust principles for this service. The private corporate Network is not treated as a trusted Network. For access to the service, the User needs to connect to the WPC. This enforces that User identity is authenticated and the Device too is authenticated by use of certificates. If the Device is compromised, the certificate can be revoked. After authentication, only authorized Users are provided access to the application. This strict zero-trust access policy along with additional web application authentication makes for a strong access security model.
To make the service inaccessible from the branch Networks, Owen deploys the server in a subnet that is different from the shared services subnet. To ensure that other computers on the HQ private Network do not have direct access to the service, Owen adds firewall rules to only allow traffic coming via the Connector computer to communicate with the financial application server.

Create a new User Group
Assign User to the Group

Create a Service for the financial web application
Create a new Access Group
Secure IoT Application
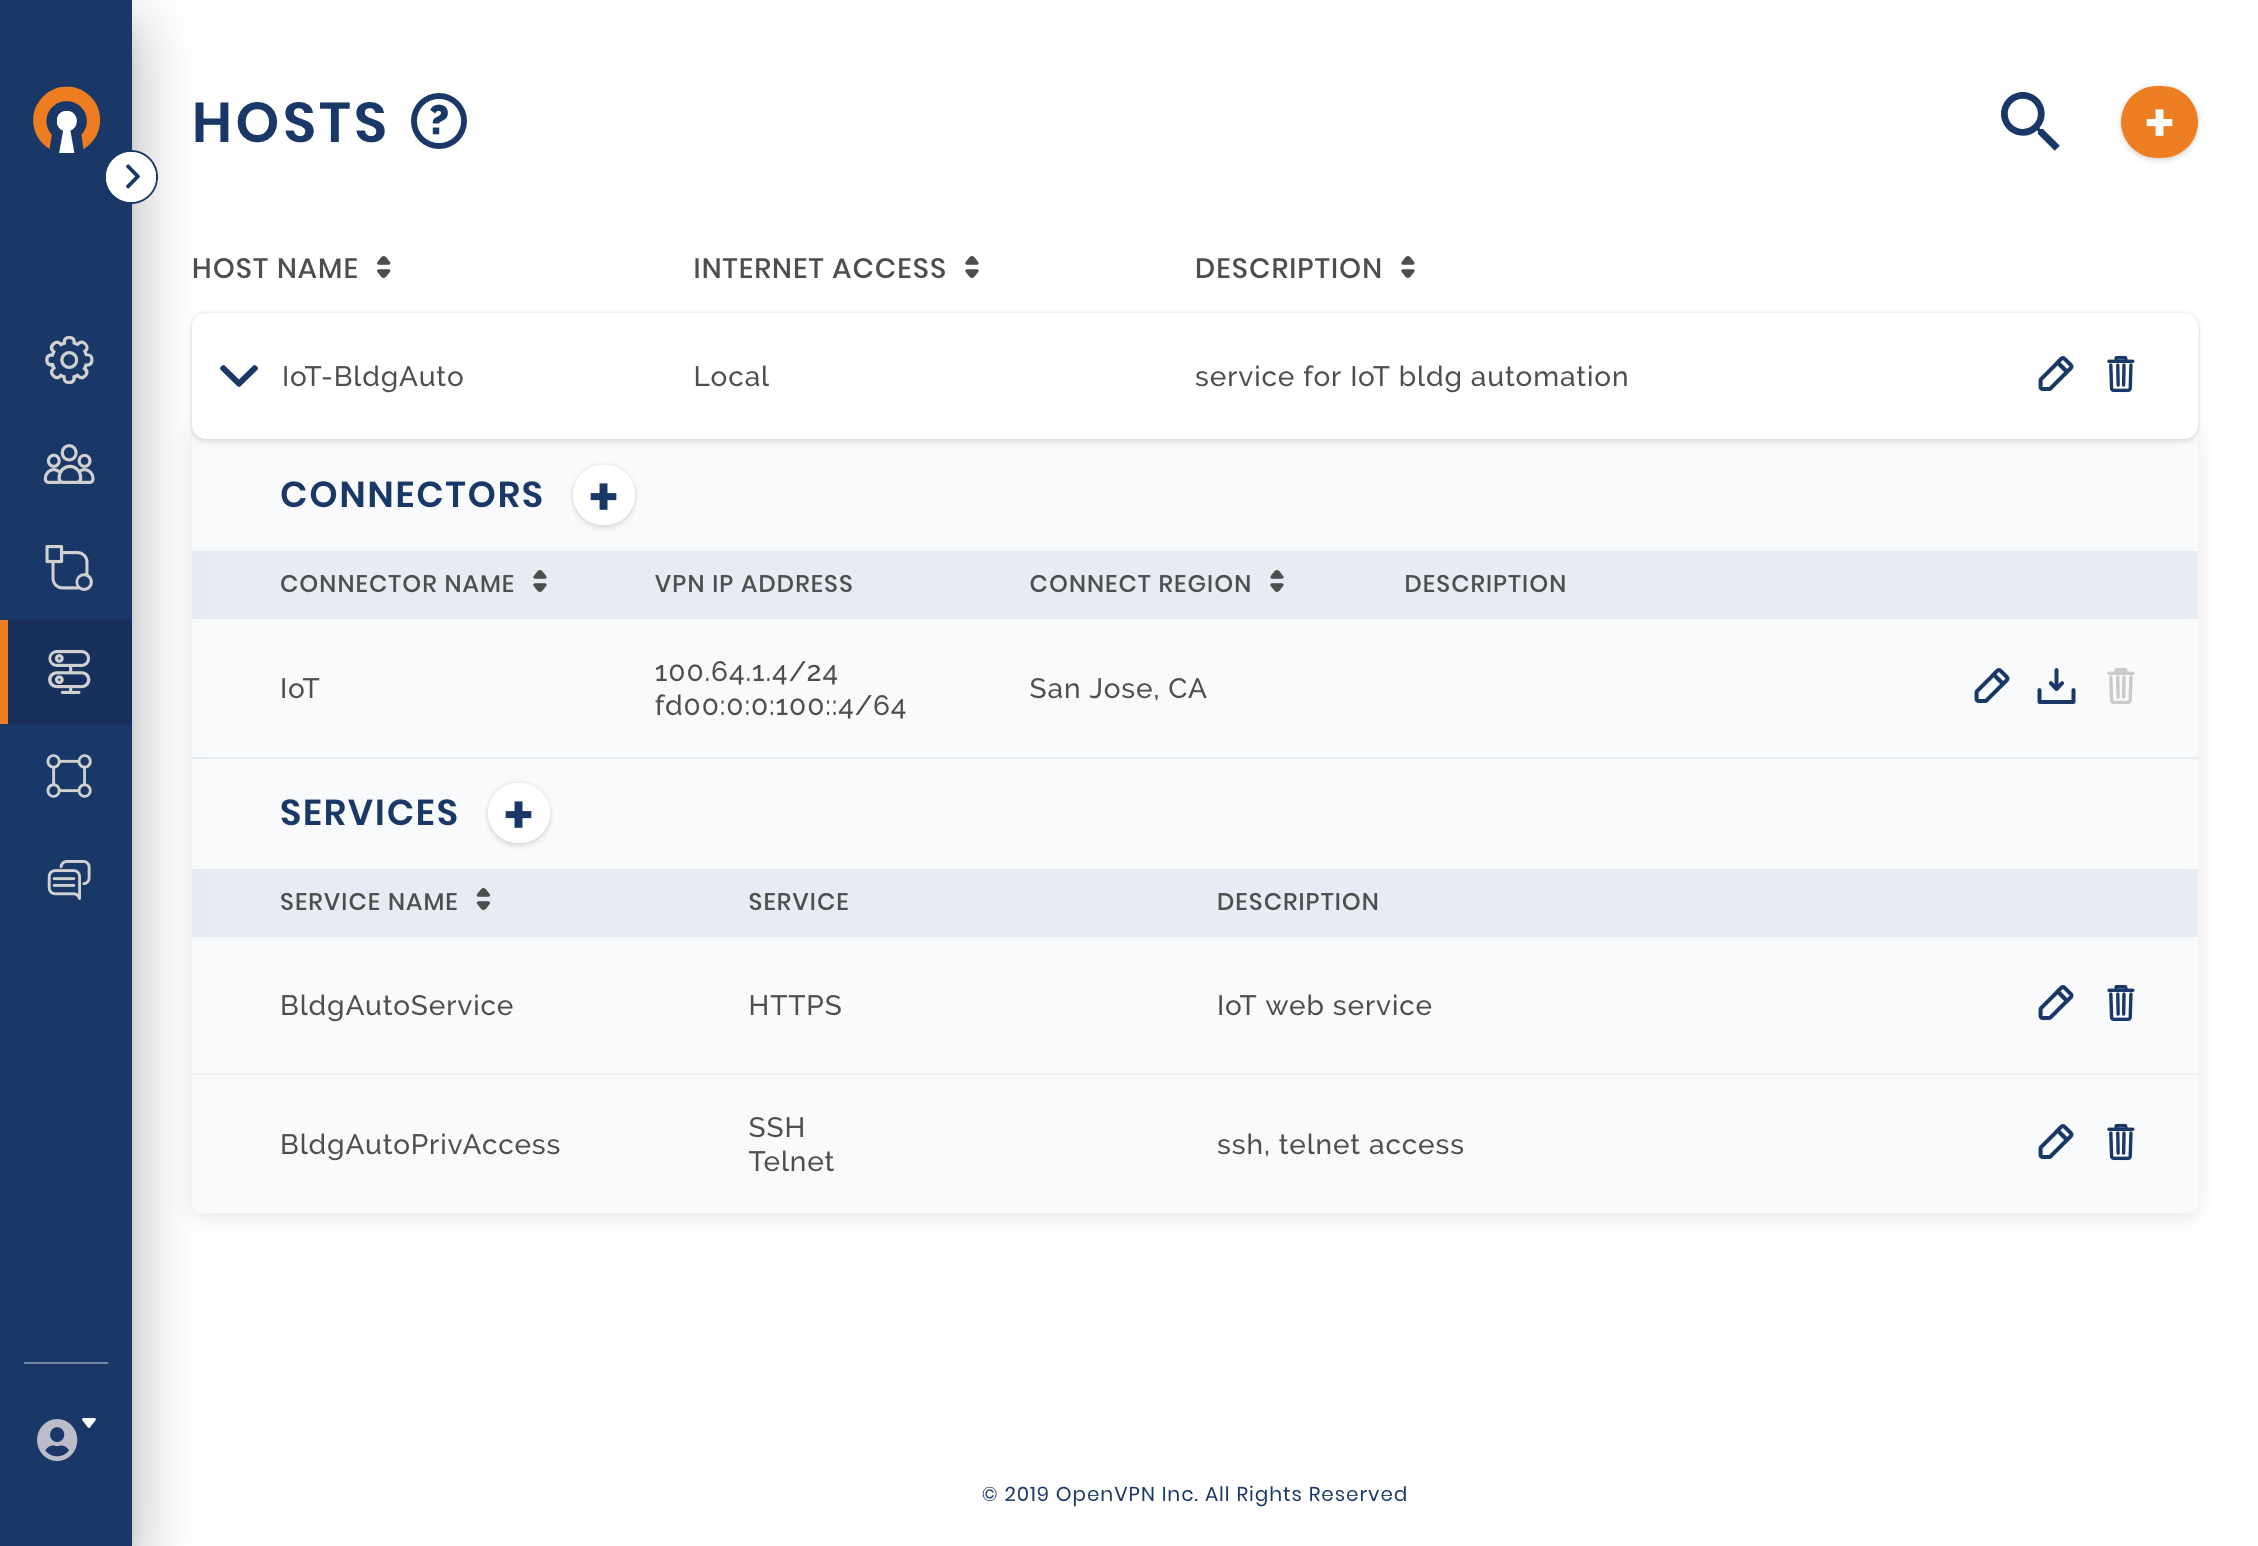
To conserve energy, the company has decided to upgrade its infrastructure at the Headquarters building to enable building automation. The solution requires that a number of control systems installed in the building communicate with the building automation control server. Owen decides to use AWS to Host the automation control server. Instead of making the complete AWS VPC a Network and using a Site-to-Site networking paradigm, just the Control server can be a part of the WPC by colocating the Connector client on the same server. The steps Owen follows for this solution are:

Adding a Host
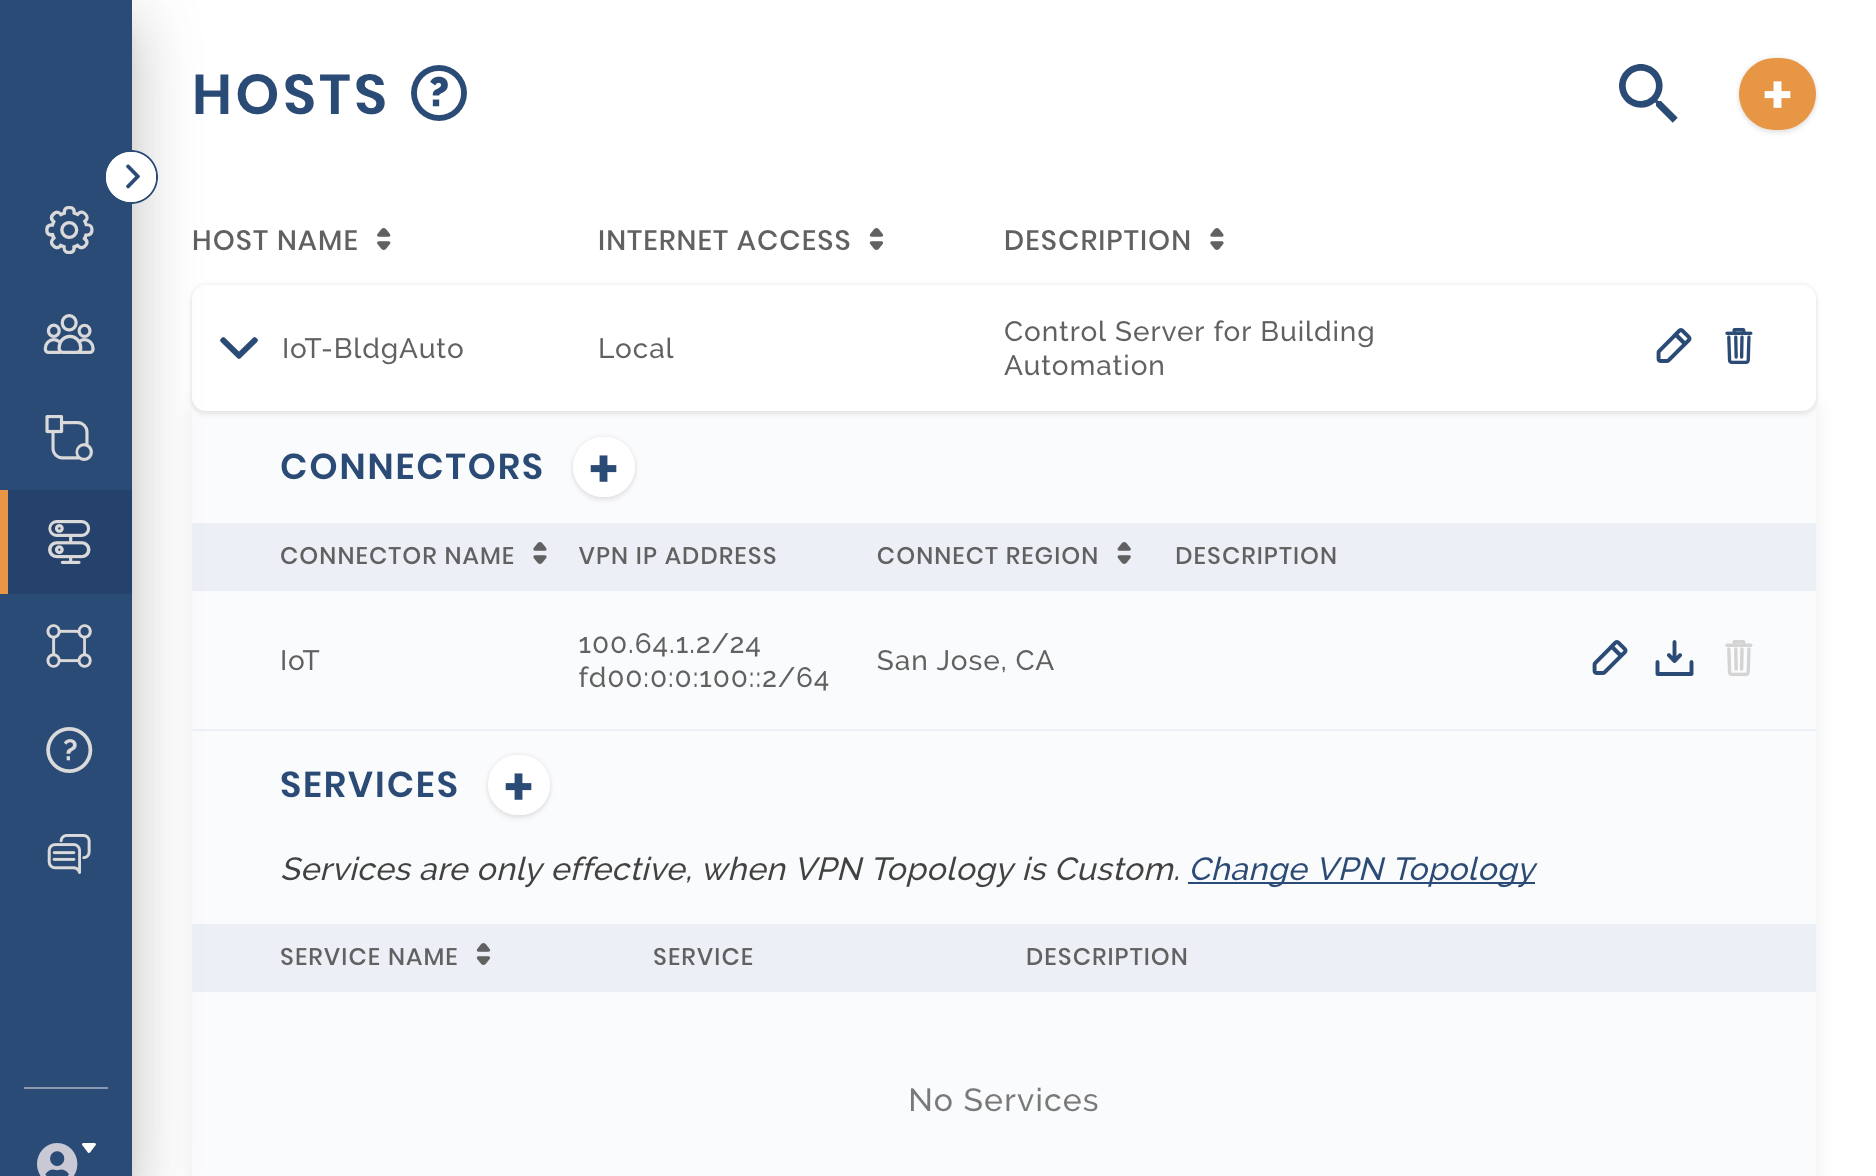
Owen configures a new Host called IOT-BldgAuto See, Adding a Host
Configuring Services
Owen configures two services, one a web service for the building automation application, and the other for privileged access to the server. See, Adding Service for a Host.
Installing Connector
Owen downloads the Profile for the Connector configured for the Host and uses that to configure the Connector software on the building automation control server. See, Installing Network Connector – Linux.
Adding User Group for IoT
Owen adds HQIoT as a new User Group. The building automation control systems in the HQ building will belong to this Group. As these systems are unattended and will need to set up the WPC connection without the need for someone to enter username and password, the Authentication Type is selected to use just the Profile (i.e. mutual authentication based on the use of digital certificates). San Jose, CA is the only Region that these Devices are allowed to connect to. Owen intends to use just on User (HQBldgIoT) to represent all the control systems in the HQ building. Each control system will be one Device that belongs to this User. As the number of control systems are many, Owen configures 100 as the number of Devices allowed per User. As these Devices will only communicate with their control server (Host IoT-BldgAuto), Internet Access is Blocked See, Customizing a User Group.
Adding a User
A new User, HQBldgIoT, is created and assigned to HQIoT User Group. See, Adding a User.
Installing Client and downloading Profile
The control systems run on Windows operating systems. The steps to download the Connect Client for Windows and connect to San Jose Region are similar to User downloading app, getting profile and connecting.
Providing the Control Server Address
The control systems need to be configured with the IP address of their control server for them to use the IoT web service. As the control server has been configured as a CloudConnexa Host, it can be reached using the WPC address assigned by CloudConnexa to the Host Connector. As seen from the configuration below, the Host has been assigned an IPv4 address of 100.64.1.2
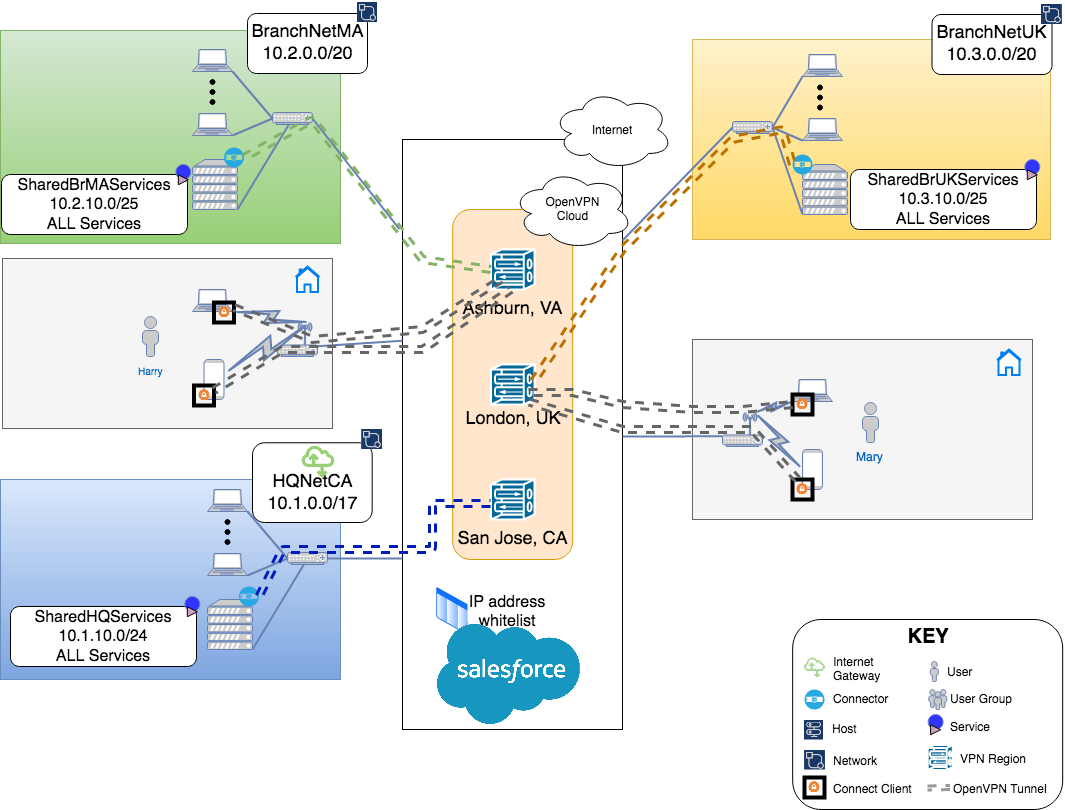
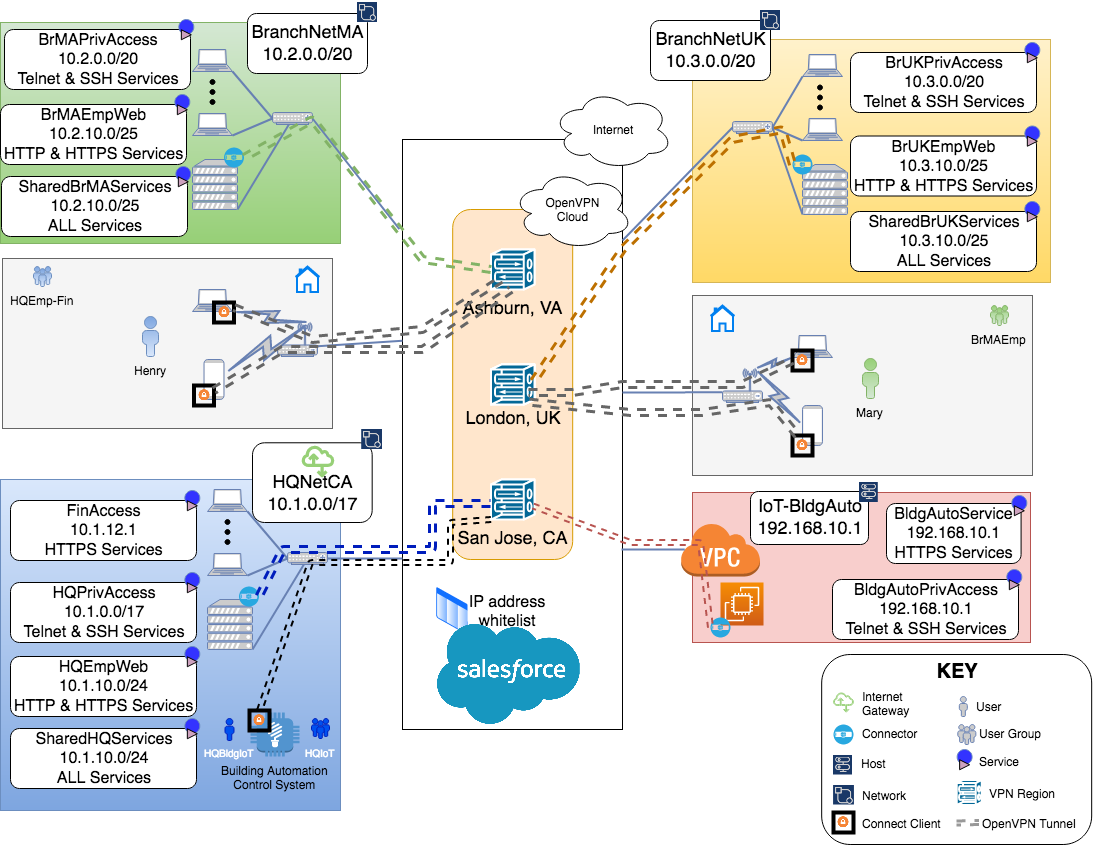
Final WPC and configuration
After all the configuration, the end state for the WPC is achieved.
Final Network Diagram
Network Settings
User Settings
Groups
Users
Networks
Hosts
Access
