Tutorial: Use CloudConnexa for Remote Access
This tutorial shows the generic steps for remote access to private networks.
This guide takes you through the process of providing secure, Remote Access to your private Networks and resources through CloudConnexa. Your private resources can be located on cloud platforms (IaaS) or on-premises or both. You can quickly build a Remote Access solution for your employees who are connecting from various regions around the world.
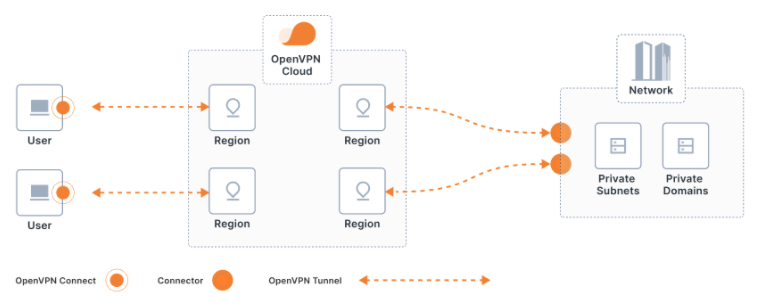
This illustration shows the high-level view of the secure Remote Access concept. On the left, each User connects to CloudConnexa with the OpenVPN Connect app on their computer, connecting through a secure tunnel to the Region that is closest to their geographic location. On the right, each Connector on your private Network establishes a secure tunnel to the geographically closest Region to make your private Network accessible from CloudConnexa.

You can easily get your workforce up and running with secure and reliable Remote Access. Here’s an overview of the set up workflow using default settings and with Split-Tunneling on:
Set up your CloudConnexa account.
Access CloudConnexa | Admin Portal and sign up to give it a try with up to three free connections.
Create a Cloud ID that uniquely identifies your WPC — for example,
myopenvpnID.openvpn.com. Your ID lets you administer your WPC Network and download the OpenVPN Connect Client and its configuration Profile. The Connect client also uses your unique ID to get your User Devices connected to CloudConnexa.
Configure your IaaS and on-premises Networks in the CloudConnexa Administration portal.
Access the Networks section and add a new Network — configure the routes to your Network using subnets, domains, or both. For further information, refer to Adding a Network | CloudConnexa.
Deploy a Connector on your private Network. You can choose your operating system or compatible router and use the quick launch directly in the portal to deploy the Connector.
More information is available here: Connector Deployment User Guides | CloudConnexa.
Connect your Users.
You can manually create Users in the Users section of the CloudConnexa Administration portal. When you add Users to your account and include an email address, those Users automatically receive an email with instructions for downloading the OpenVPN Connect client and their connection Profile.
If you don’t include an email address when creating new Users, you’ll need to send those Users the User portal link, username, and temporary password using some other means.
If you set up SAML or LDAP authentication with CloudConnexa, you can let your workforce know that they can use their existing SAML or LDAP credentials to download the Connect app for their Devices and import a Profile using your unique Cloud ID URL.
Note
you can also configure User Groups, which lets you set:
The Regions that Users are allowed to connect to.
The type of authentication needed to establish a connection.
The maximum number of Devices that can access the WPC simultaneously.
Split-tunneling on or off (routing public internet traffic).
Refer to these guides for more information:
Optional - configure Access Groups to enforce access controls.
Learn more about configuring access to private services here: CloudConnexa Services | CloudConnexa.
For information on setting up Access Groups for those services, refer to CloudConnexa Access Group | CloudConnexa.
Note
Your access controls aren’t active until your WPC topology is set to Custom.
Once you have completed steps 1 through 3, your Users can connect their Devices to CloudConnexa and reach the Network resources that you’ve allowed them to access. You can then choose to set up granular access and service controls using the guides in Step 4.
Tutorial: Use CloudConnexa for Secure Access to Your AWS VPC
Tutorial: Use CloudConnexa for Zero Trust Network Access (ZTNA)
Tutorial: Use CloudConnexa for Remote Access to a Private Application
Tutorial: Use CloudConnexa To Provide Remote Access to an Application With Load Balancing
Tutorial: Deploy Multiple Connectors To Increase the Performance and Availability of Remote Access
Video: Use CloudConnexa for Zero Trust Network Access to Private Applications on Your AWS VPC
Video: Use CloudConnexa to Remotely Access Your Home Network
Video: Use CloudConnexa to Connect to Your Remote Desktop Server
Video: Use CloudConnexa for Zero Trust Network Access to a Public SaaS Application
Video: No Incoming Connections To Your Network Prevents Denial of Service Attacks
Video: Application Domain-Based Routing Segments Your Network
Video: Application Domain-based Routing Allows IP Addresses to Overlap
Video: Automatic Network Segmentation Limits Lateral Movement