Tutorial: Use CloudConnexa for Remote Access to Applications on Networks Having Overlapping IP Address Subnets
This tutorial shows how CloudConnexa can network together private networks that use the same IP address subnets. Instead of using IP address-based routes to those networks, CloudConnexa uses the domain names of the applications in those networks as routes to select the correct network.
Overview
When Devices on one private Network can have all or some of their IP addresses in common with Devices in another private Network, the IP address ranges—subnets—for those two Networks are said to overlap. When you want to Network together multiple overlapping subnets it’s impossible to identify and route traffic to a specific Device by its IP address since the same IP address is being used in another Network.
Applications
The Network Application feature in CloudConnexa enables you to solve this by creating unique domain names (Applications) for public or private domains that are used as routes to the different Networks instead of the IP address subnets. Note that If private domains are used, you will need to add them to your DNS records or add them to CloudConnexa’s DNS records. When Application domains and their applicable protocols and/or ports are configured to uniquely identify each Network, CloudConnexa can route traffic within each Network. CloudConnexa can route traffic to the correct device even if its IP address overlaps with another Network because the FQDN signifies the destination.
About this content
This content is based on a scenario where a fictitious security company, Acme Security, needs Remote Access to various Devices at multiple customer sites. The person managing this effort is Owen, an IT and Network specialist for Acme Security.
Scenario
Acme Security provides video monitoring services mainly to small, independently owned stores. Their solution consists of installing one to four cameras in the store along with other monitoring Devices and video storage servers. The cameras store videos locally but Acme Security needs to remotely connect to the cameras, servers, and other equipment in order to update firmware, carry out diagnostics, change settings, etc. Technicians at Acme Security need to remotely access the embedded web servers running on the various connected Devices to administer them.
Owen has been tasked to do the following:
Provide Remote Access to the cameras and other monitoring equipment at customer sites, Store 1 and Store 2.
Manage access to Devices on the customer’s LAN in spite of the use of overlapping IP address ranges among customer LANs. The monitoring equipment uses the customer’s Network for access to the internet and static IP addresses are configured for the cameras and other equipment from the customer’s LAN IP address range. Therefore, it will not be possible to prevent IP address range overlap among customer sites. For example, two cameras installed in different customer stores might have the same IP address of
192.168.0.101Restrict communication between different customer’s Networks.
Ensure the Remote Access solution does not require any additional WPC servers.
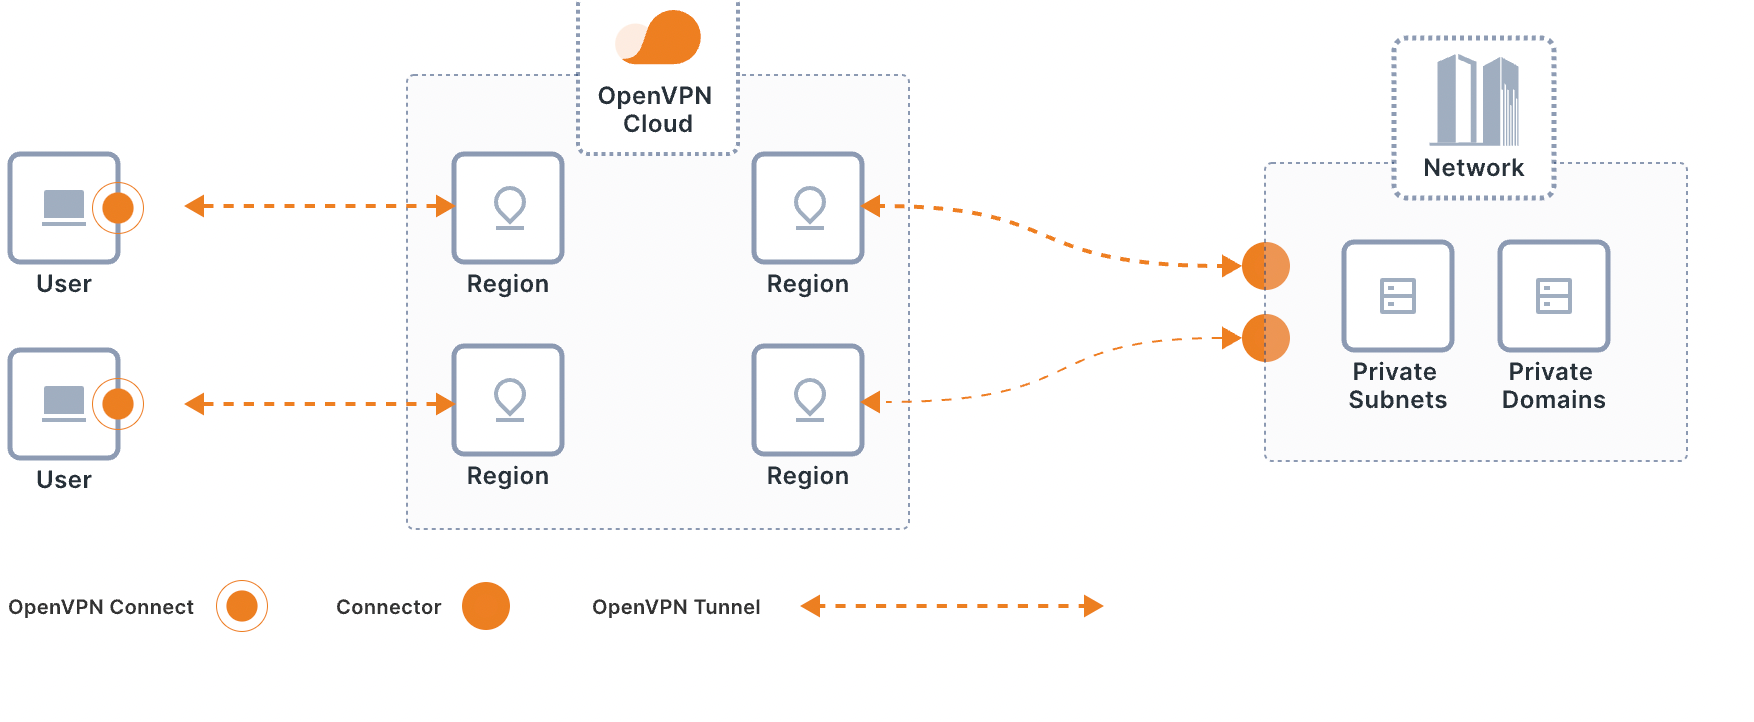
Owen decides to use CloudConnexa to build a WPC that provides secure Remote Access to the camera Networks at the different stores. During the signup process, he selects a Cloud ID for his WPC. This [company-name].openvpn.com domain uniquely identifies the WPC that has been set up by Owen.
From the WPC illustration below, note that the IP address of the video server in Store 1 is the same as the camera in Store 2. Connector software running on a Linux computer at all the customer sites connect the sites to CloudConnexa.
Configure domain names for Networks instead of IP subnets and using Access Groups
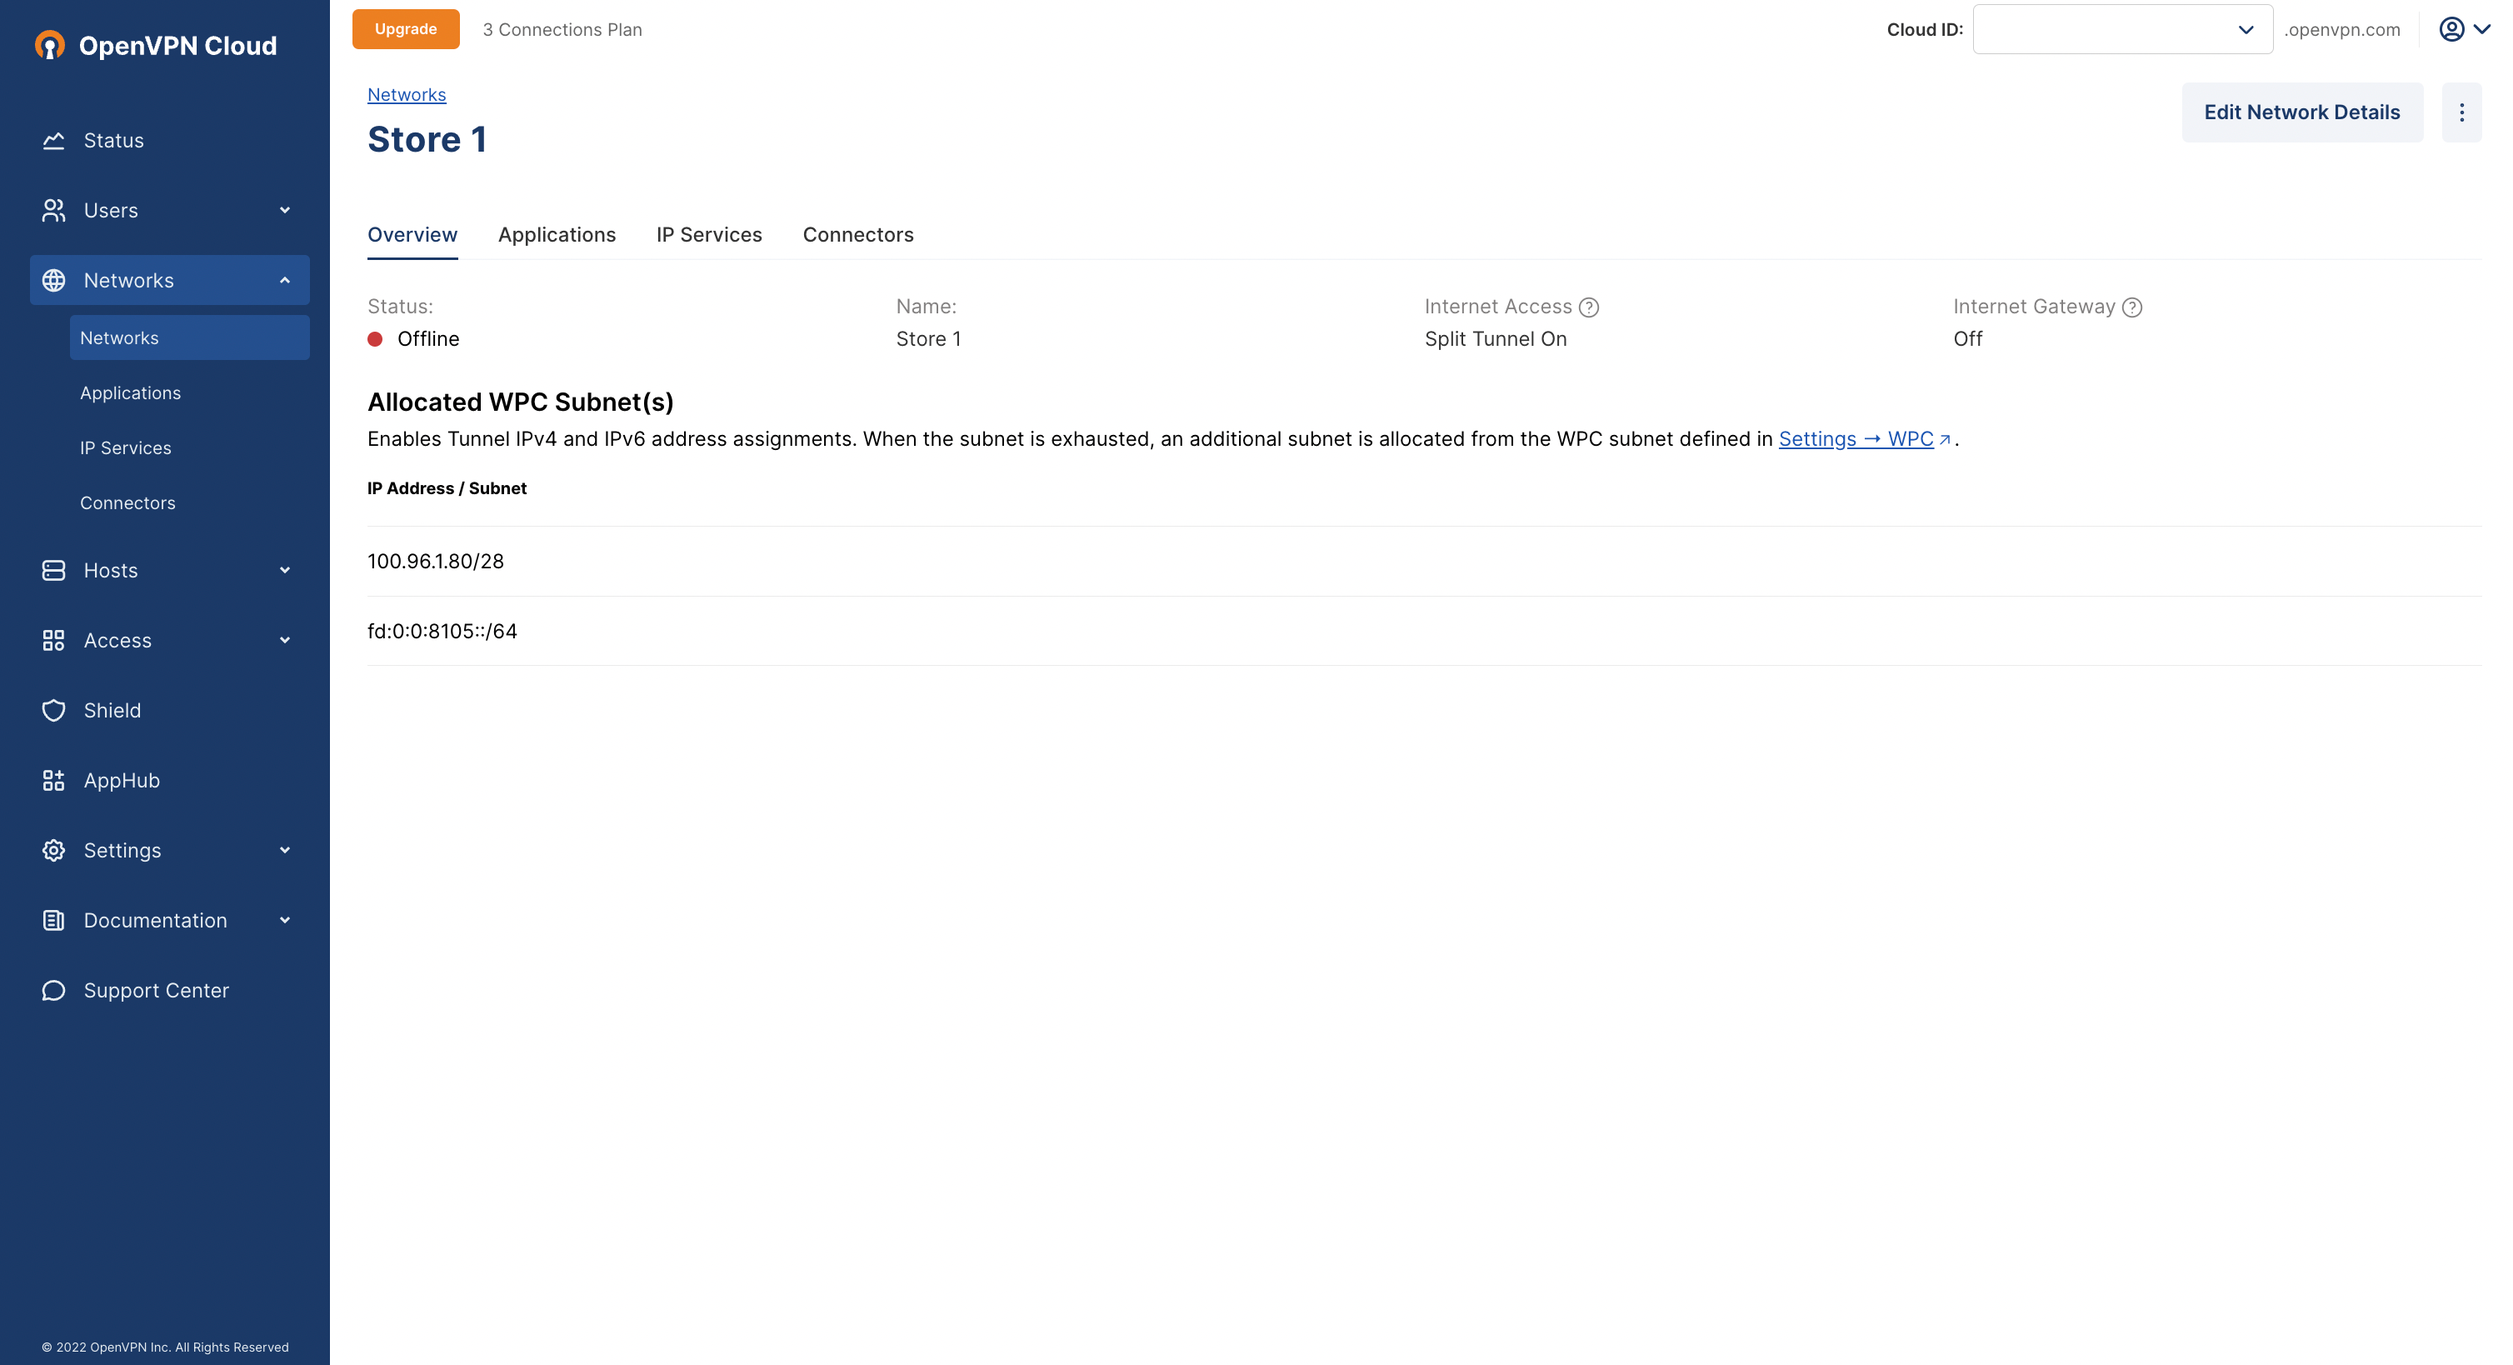
Owen logged into the Admin Portal and configured a Network (Networks > Add Network) to represent the Network in Store 1. He installed the Connector on a Linux computer on the Network in Store 1. While configuring the Network, Owen added domain store1.control.com
Important
Do not define a subnet under the Subnets section.
Owen configured another Network to represent the Network in Store 2 and installed the Connector on a Linux computer on the Network in Store 2. While configuring the Network, Owen added domain store2.control.com
Owen checked the Status screen and saw that both the Networks had come online.
Next, to prevent communications among the private Networks at each customer’s store via the WPC, Owen changed the WPC topology to Custom (see, Change WPC Topology) and set up an Access Group to only allow the Networks to communicate with the applicable User Groups and not with each other. See, Add Access Group
Accessing Devices with configured domain names
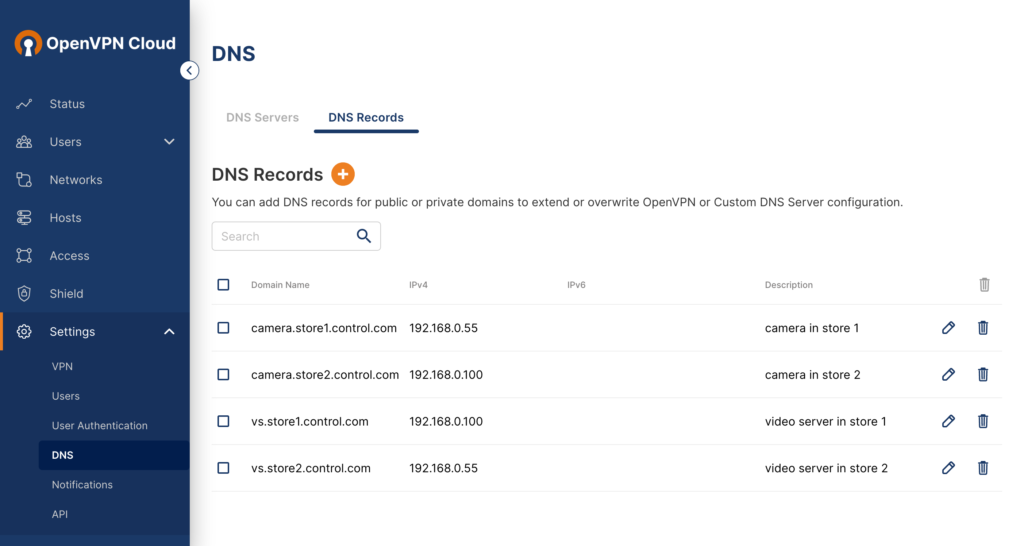
Because Owen does not have a DNS server, he opted to create DNS records for the Devices on the Network for store 1. From the DNS settings page (Settings > DNS > DNS Records) of the Admin Portal, he added DNS records for the equipment in Store 1. He then mapped
vs.store1.control.comto192.168.0.100andcamera.store1.control.comto192.168.0.55. For the equipment in Store 2, he mappedvs.store2.control.comto192.168.0.55andcamera.store2.control.comto192.168.0.100Owen connected to CloudConnexa (see, Connecting to CloudConnexa). On connection, Owen opened his web browser and used the domain names of the Devices to access the embedded web servers. For example, http://camera.store2.control.com let him access the Administration portal of the camera in Store 2 even though it had the same LAN IP address as the video server in Store 1.
Accessing Devices without configured domain names
CloudConnexa allows a shortcut to route to specific IP addresses in a Network that is configured with a domain name without needing to configure DNS Records. Owen can directly route to the video server in Store 2 present at 192.168.0.55 by constructing a name on the fly using the destination IP address 192.168.0.55 and the domain name of the Store 2 Network store2.control.com. The constructed hostname would replace the . in the IP address with - and prepend it to the domain name of the Network to create a unique hostname 192-168-0-55.store2.control.com
Owen wanted to use this ability to create hostnames on the fly without configuring DNS Records. He set the Allow Embedded IP switch for the domain names assigned to the two Networks to ON
Owen connected to CloudConnexa (see, Connecting to CloudConnexa). On connection, Owen opened his web browser and constructed the name of the Device he needed to access on the fly. For example, http://192-168-0-100.store2.control.com let him access the Administration portal of the camera in Store 2 even though it had the same LAN IP address as the video server in Store 1.
Owen can also log in as root and ssh into the device from terminal by typing
ssh@<private ip address>Network Application Domain Name.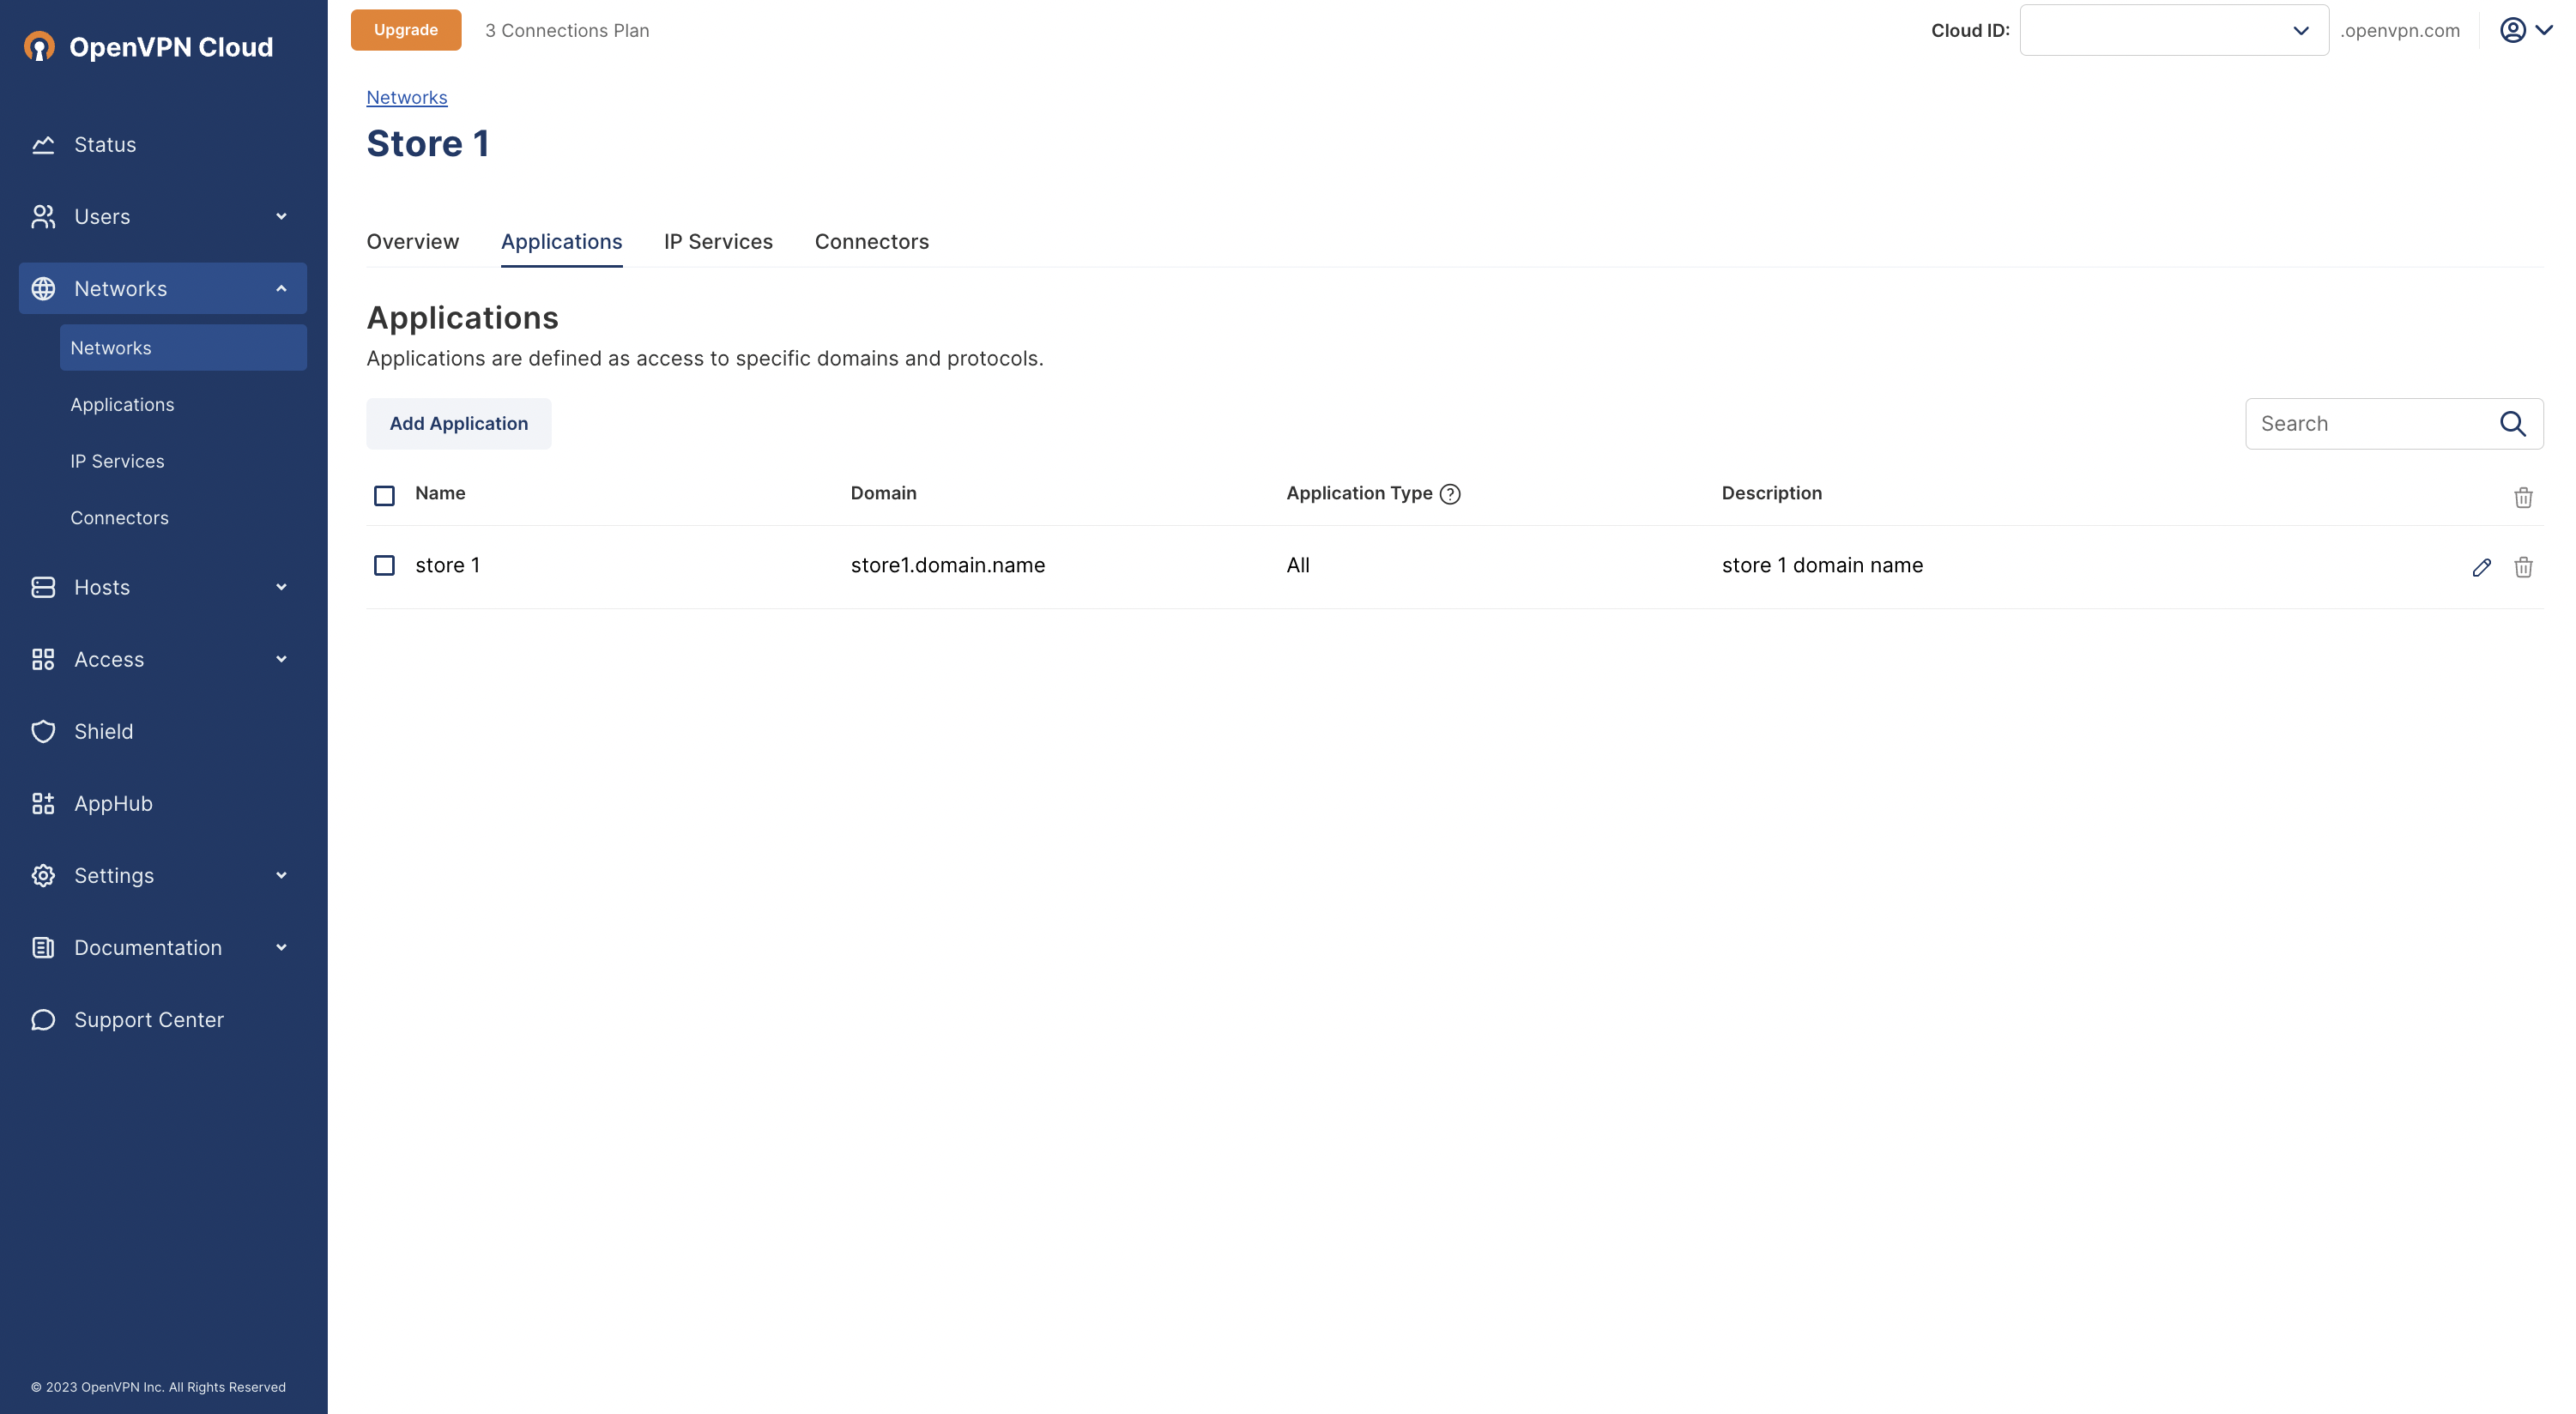
Tutorial: Use CloudConnexa for Secure Access to Your AWS VPC
Tutorial: Use CloudConnexa for Zero Trust Network Access (ZTNA)
Tutorial: Use CloudConnexa for Remote Access to a Private Application
Tutorial: Use CloudConnexa To Provide Remote Access to an Application With Load Balancing
Tutorial: Deploy Multiple Connectors To Increase the Performance and Availability of Remote Access
Video: Use CloudConnexa for Zero Trust Network Access to Private Applications on Your AWS VPC
Video: Use CloudConnexa to Remotely Access Your Home Network
Video: Use CloudConnexa to Connect to Your Remote Desktop Server
Video: Use CloudConnexa for Zero Trust Network Access to a Public SaaS Application
Video: No Incoming Connections To Your Network Prevents Denial of Service Attacks
Video: Application Domain-Based Routing Segments Your Network
Video: Application Domain-based Routing Allows IP Addresses to Overlap
Video: Automatic Network Segmentation Limits Lateral Movement