Tutorial: Secure Database Access Without Exposing Your Database to the Internet

Abstract

Remove your database port from the public internet and make it reachable only through Access Server. Covers two scenarios: a self-hosted database on a VPN-only host, and a managed database service (Amazon RDS, MongoDB Atlas) allowlisting Access Server's public IP address.

Overview

A publicly accessible database port is one of the most common attack surfaces for production environments. Attackers continuously scan the internet for exposed PostgreSQL (5432), MySQL (3306), and MongoDB (27017) ports, looking for misconfigurations, weak credentials, or leaked connection strings.

Traditional approaches reduce risk by combining IP allowlists, SSL enforcement, secrets management, and database authentication. While these are all recommended security practices, the database service remains reachable from the public internet.

OpenVPN Access Server takes a different approach by providing VPN-only access to your database. Rather than protecting an exposed database port, Access Server removes it from the public internet entirely. Only authenticated VPN users can attempt a connection, and you can further restrict access to specific users or groups with Access Server's access controls.

This tutorial covers two common deployment scenarios:

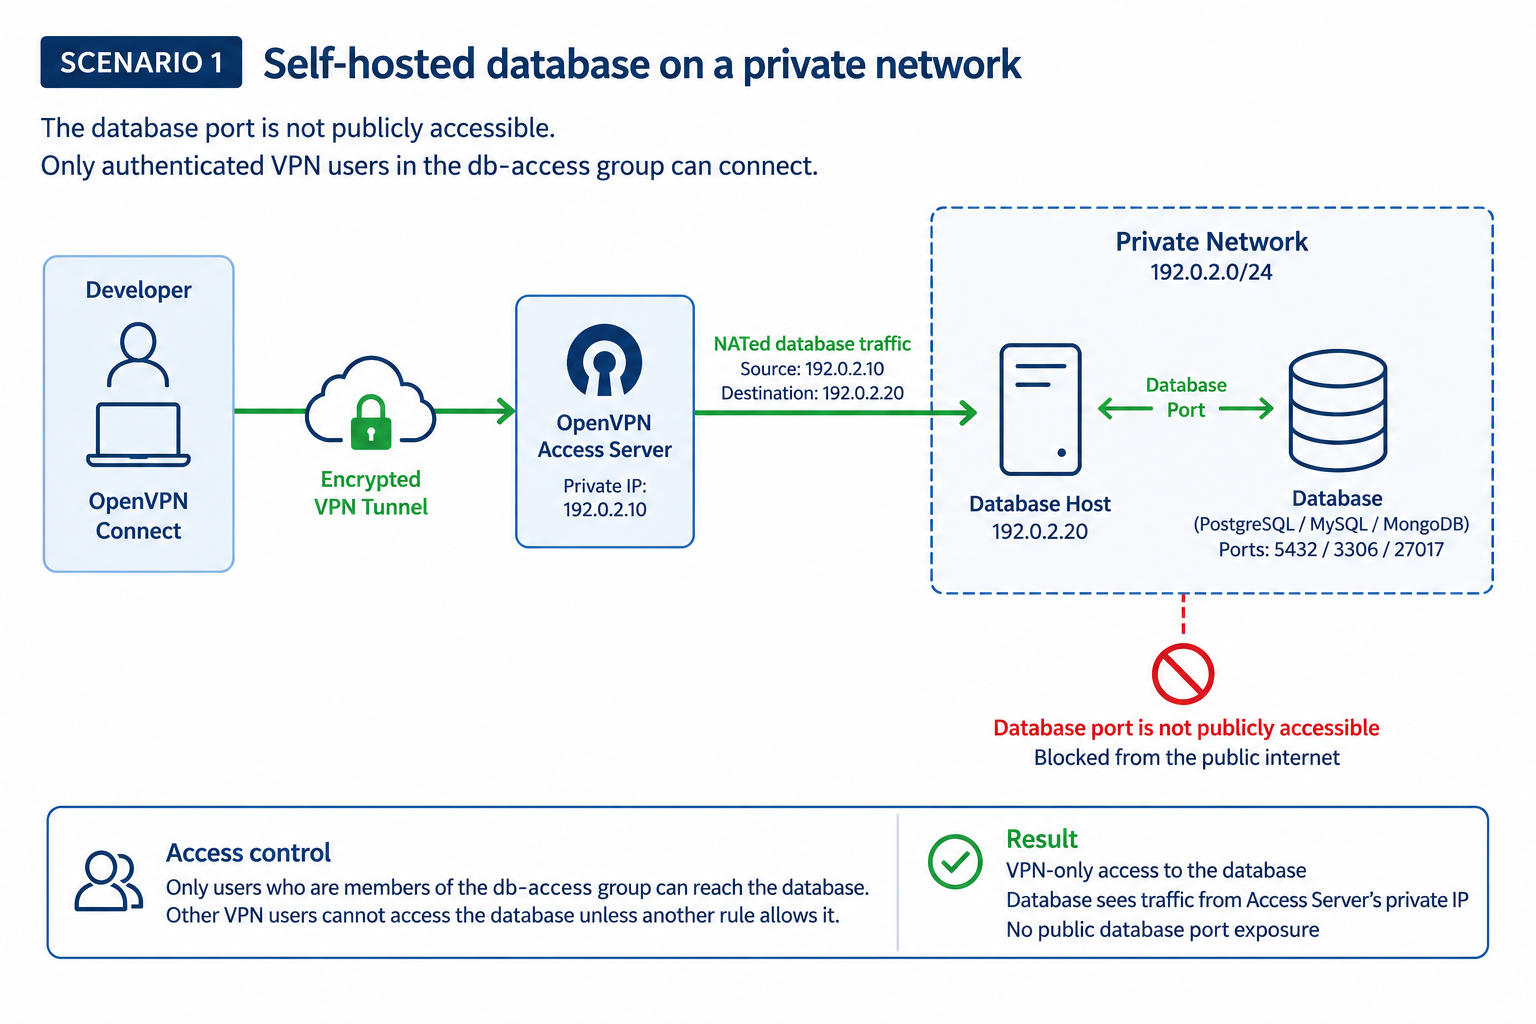
  • Scenario 1: Secure a self-hosted PostgreSQL, MySQL, or MongoDB database running on a private network.

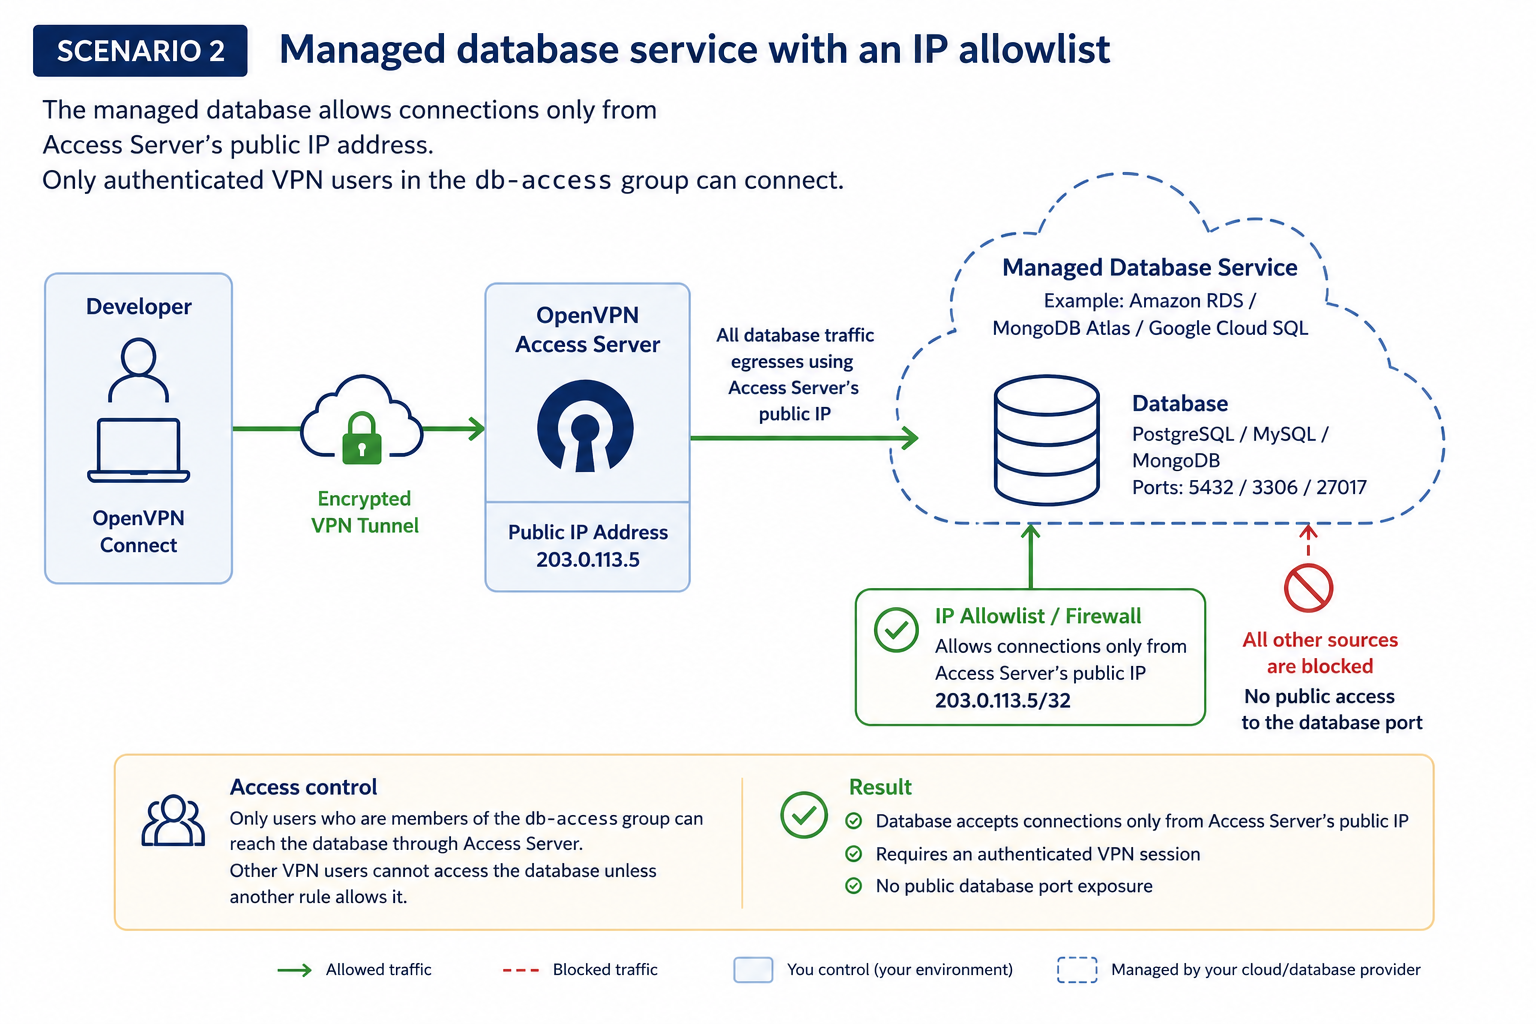
  • Scenario 2: Secure a managed database service, such as Amazon RDS, MongoDB Atlas, or Google Cloud SQL, by configuring an allowlist that permits connections only from Access Server's static egress IP.

Prerequisites

  • Access Server installed.

  • An Access Server user group created called db-access.

  • OpenVPN Connect installed on developer devices.

  • A database client appropriate for your database platform.

For Scenario 1, you'll also need:

  • A self-hosted PostgreSQL, MySQL, or MongoDB server on the same private network as Access Server, or reachable through subnet routing.

For Scenario 2, you'll also need:

  • A managed database service that supports IP allowlists, such as Amazon RDS, MongoDB Atlas, or Google Cloud SQL.

Note

In our documentation, we use example IPv4 addresses and subnets reserved for documentation, such as 192.0.2.0/24, 198.51.100.0/24, and 203.0.113.0/24.

Ensure you replace them with valid IPv4 addresses and subnets for your network(s).

Example environment

Component

Example value

Access Server public IP

203.0.113.5

Access Server private IP

192.0.2.10

VPN client subnet

198.51.100.0/24

Database host

192.0.2.20

PostgreSQL

TCP 5432

MySQL

TCP 3306

MongoDB

TCP 27017

Authorized group

db-access

access-server-database-access-nat.png
managed-database-IP-allowlist.png

Scenario 1: Secure a self-hosted database on a private network

Use this scenario when you host your own PostgreSQL, MySQL, or MongoDB database on a private network that's reachable from Access Server.

The goal is to remove the database port from the public internet so it's accessible only through an authenticated VPN connection.

Configure the database host so the database service isn't publicly accessible.

  1. Review your firewall or cloud security group protecting the database host.

  2. Remove any inbound rules that allow public access to your database port.

  3. Configure the following inbound rules:

    • Allow SSH (TCP 22) only from your managed network.

    • Allow the database port from the Access Server private IP. For example, 192.0.2.10.

  4. Deny other inbound traffic that isn't required by the database host.

For example, using ufw:

# Allow SSH from the management network
ufw allow from 203.0.113.0/24 to any port 22

# Allow PostgreSQL from Access Server
ufw allow from 192.0.2.10 to any port 5432

# Deny all other inbound traffic
ufw default deny incoming

ufw enable

Important

Don't expose your database port to the public internet. Remove any firewall or cloud security group rules that allow unrestricted inbound access to ports such as 5432, 3306, or 27017.

Configure Access Server so VPN clients can reach the private network where the database resides.

For most deployments, use NAT. Access Server translates VPN client traffic to its private IP address before forwarding it to the database. Because the database responds directly to Access Server, you don't need to configure a return route for the VPN client subnet.

  1. Sign in to the Admin Web UI.

  2. Select Access Controls.

  3. Select the Global Access Rules tab.

  4. Under IP Addresses and Subnets, add the database subnet. For example: 192.0.2.0/24.

  5. Set the routing mode to NAT.

  6. Select Save and Restart.

Route option

You can use Route instead of NAT if you want the database host to see the VPN client's assigned IP address.

When using Route, the database network must have a return route for the VPN client subnet through Access Server. For this example, configure the network routing so traffic destined for 198.51.100.0/24 returns through Access Server's private IP, 192.0.2.10.

The database firewall must also allow the VPN client subnet rather than the Access Server private IP.

Instead of allowing every VPN user to reach the database, create an access rule that permits only members of the db-access group.

  1. Sign in to the Admin Web UI.

  2. Select Groups.

  3. Select the db-access group.

  4. Select the Access Rules tab.

  5. Select New Access Rule.

  6. Configure the rule:

    Setting

    Example value

    Destination

    192.0.2.20/32

    Protocol

    TCP

    Port

    5432 (PostgreSQL), 3306 (MySQL), or 27017 (MongoDB)

    Routing mode

    NAT

  7. Select Save rule and Restart.

    Note

    Only users who are members of the db-access group can connect to the database. Other VPN users can't reach the database unless another access rule explicitly grants them access.

Create a VPN user with access to the database, then verify the connection..

Create the user

  1. Sign in to the Admin Web UI.

  2. Select Users.

  3. Select Add New User or select an existing user.

  4. Add the user to the db-access group.

  5. For a new user, select Reset Password and enter a new password.

    Tip

    Ensure the password meets password requirements.

  6. Select Save and Restart.

  7. Send the user the following information:

    • The Client Web UI URL.

    • Their username.

    • Their password or temporary password for a new user.

Get connected

The end user can download OpenVPN Connect for Windows, macOS, iOS, and Android directly from the Client Web UI. For Linux, see Option 1: Connecting with the OpenVPN 3 Linux client (using openvpn3-as to download a profile).

  1. Sign in to the Client Web UI using the credentials provided by your administrator.

  2. Download OpenVPN Connect with a bundled connection profile for your operating system.

  3. Install OpenVPN Connect.

  4. Launch OpenVPN Connect and connect to the VPN with the included connection profile.

  5. Connect to the database using the appropriate client.

    • For PostgreSQL:

      psql -h 192.0.2.20 -U your_db_user -d your_database
    • For MySQL:

      mysql -h 192.0.2.20 -u your_db_user -p
    • For MongoDB:

      mongosh "mongodb://192.0.2.20:27017"
  6. Disconnect the VPN and repeat the connection attempt.

Expected result:

  • A user assigned to the db-access group can connect to the database while connected to the VPN.

  • After disconnecting from the VPN, the database is no longer reachable because the database port isn't publicly accessible.

Optional verification

Connect to the VPN using a user who isn't a member of the db-access group. Verify that the database connection is denied, confirming that Access Server's group access controls are working as expected.

Scenario 2: Secure a managed database service with an IP allowlist

Use this scenario when your database is hosted by a managed service such as Amazon RDS, MongoDB Atlas, or Google Cloud SQL.

Unlike a self-hosted database, a managed database service can't usually be placed entirely on your private network. Instead, you can configure an allowlist so the database accepts connections only from Access Server's public IP address (static egress IP). Developers connect through the VPN, and all database traffic exits through Access Server using its public IP address.

Your managed database service will allow connections only from this IP address. Use this IP address to configure the managed database service's allowlist in the next step.

Admin Web UI

  1. Sign in to the Admin Web UI.

  2. On the Status page, locate the Server address under Server Details.

  3. Record the IP address.

Command line

You can also retrieve the public IP address from the Access Server console.

  1. Connect to the console and get root privileges.

  2. Run:

    sacli ip
    • Example output:

      203.0.113.5
  3. Record this IP address.

Important

The database service should allow connections only from the public IP address assigned to Access Server. If this IP address changes, update the allowlist accordingly. If you expect the server's public IP to change, configure a static public IP through your cloud provider before deploying this solution.

Configure your managed database service to accept connections only from Access Server's public IP address.

For example, in Amazon RDS, update the database's associated VPC security group so the database port accepts connections only from Access Server's public IP address.

Configure an inbound rule similar to the following:

Setting

Value

Port

Your database port (for example, PostgreSQL 5432, MySQL 3306, or MongoDB 27017)

Allowed source

203.0.113.5/32 (Access Server's public IP)

Remove any existing rules that allow unrestricted public access (such as 0.0.0.0/0).

Tip

Refer to your cloud provider's documentation for the current steps to configure IP allowlists or firewall rules. AWS, MongoDB Atlas, and Google Cloud Platform periodically update their management interfaces.

Configure Access Server so that database traffic exits using its public IP address.

  1. Sign in to the Admin Web UI.

  2. Select Access Controls.

  3. Create or edit an access rule for the managed database endpoint.

  4. Configure:

    Setting

    Example value

    Destination

    Managed database IP address or subnet

    Protocol

    TCP

    Port

    Database port

    Routing mode

    NAT

  5. Select Save and Restart,

    Important

    NAT routing causes outbound database traffic to use Access Server's public IP address, allowing it to match the database service's configured allowlist.

Instead of allowing every VPN user to reach the database, create an access rule that permits only members of the db-access group.

  1. Sign in to the Admin Web UI.

  2. Select Groups.

  3. Select the db-access group.

  4. Select the Access Rules tab.

  5. Select New Access Rule.

  6. Configure the rule:

    Setting

    Example value

    Destination

    Managed database endpoint

    Protocol

    TCP

    Port

    Database port

    Routing mode

    NAT

  7. Select Save rule and Restart.

    Note

    Only users who are members of the db-access group can connect to the database. Other VPN users can't reach the database unless another access rule explicitly grants them access.

Create a VPN user with access to the database, then verify the connection..

Create the user

  1. Sign in to the Admin Web UI.

  2. Select Users.

  3. Select Add New User or select an existing user.

  4. Add the user to the db-access group.

  5. For a new user, select Reset Password and enter a new password.

    Tip

    Ensure the password meets password requirements.

  6. Select Save and Restart.

  7. Send the user the following information:

    • The Client Web UI URL.

    • Their username.

    • Their password or temporary password for a new user.

Get connected

The end user can download OpenVPN Connect for Windows, macOS, iOS, and Android directly from the Client Web UI. For Linux, see Option 1: Connecting with the OpenVPN 3 Linux client (using openvpn3-as to download a profile).

  1. Sign in to the Client Web UI using the credentials provided by your administrator.

  2. Download OpenVPN Connect with a bundled connection profile for your operating system.

  3. Install OpenVPN Connect.

  4. Launch OpenVPN Connect and connect to the VPN with the included connection profile.

  5. Connect to your managed database using your preferred database client.

  6. Disconnect the VPN and repeat the connection attempt.

Expected result:

  • A user assigned to the db-access group can connect to the database while connected to the VPN.

  • After disconnecting from the VPN, the database is no longer reachable because the database port isn't publicly accessible.

Optional verification

Connect to the VPN using a user who isn't a member of the db-access group. Verify that the database connection is denied, confirming that Access Server's group access controls are working as expected.

Results

Before

After

Database port publicly reachable.

Database accepts connections only from Access Server's public IP address.

Database access based only on credentials.

Database access requires valid credentials and an authenticated VPN session.

Any source matching the allowlist can connect

Only members of the db-access group can reach the database through Access Server

Developers manage changing client IP addresses

Developers connect through a consistent static egress IP