Tutorial: Secure Access to code-server or OpenVSCode Server Without Exposing It to the Internet
Learn how to access code-server or OpenVSCode Server remotely without exposing it to the public internet — bind the service to your VPN interface, route access through Access Server, and lock it down to VPN-only traffic with firewall rules.
Overview
Self-hosted development environments such as code-server and OpenVSCode Server let you run Visual Studio Code on a remote Linux server and access it from any device via a web browser.
Because these applications provide direct access to your development environment, they shouldn't be exposed directly to the public internet. Traditional deployments often require reverse proxies, public DNS records, firewall rules, and additional authentication layers to secure access.
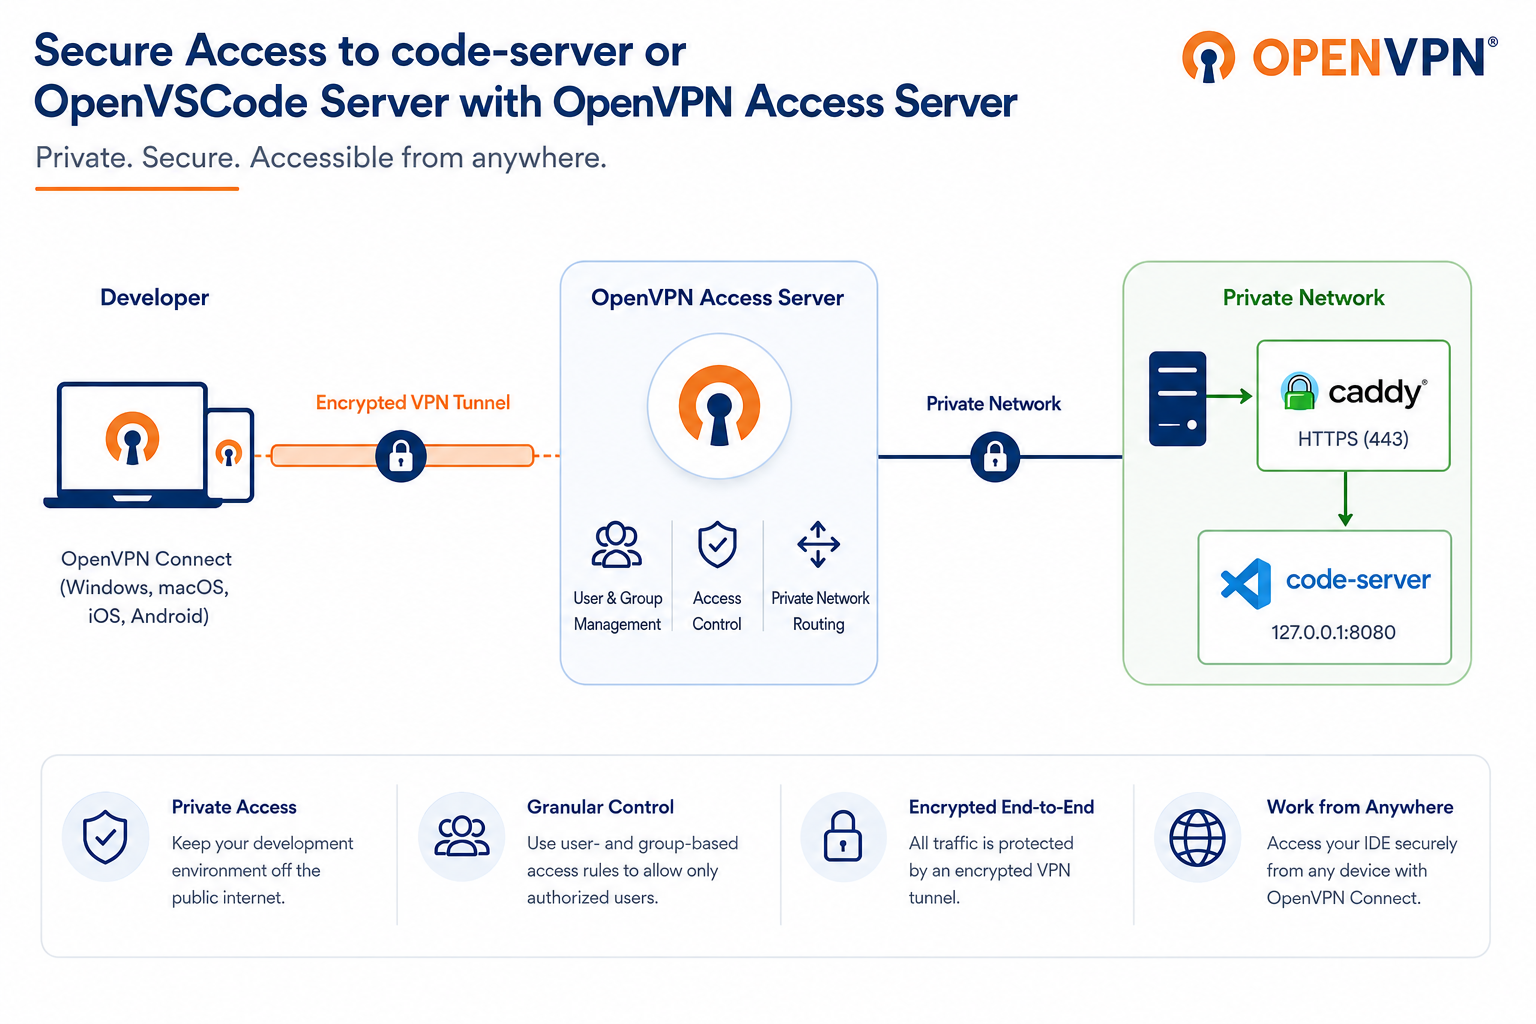
With OpenVPN Access Server, you can keep your development environment private by making it accessible only through an authenticated VPN connection. Access Server also lets you control who can access the server using user- and group-based access rules. For example, you can allow only members of your Developers group to reach the code-server host while preventing access from other VPN users.
In this tutorial, you'll:
Deploy code-server on a Linux server.
Configure Caddy as an HTTPS reverse proxy.
Restrict access with an Access Server group access rule.
Connect securely with OpenVPN Connect.
Verify that code-server is available only through the VPN.
Prerequisites
Access Server 3.1.0 or newer to use domain routing.
An Access Server user group called Developers.
A Linux server where code-server will be installed.
Tip
Deploy this server with at least 2 vCPUs and 1GB of RAM.
The Linux server must be on the same private network as Access Server or be reachable via subnet routing.
Administrative access to the Linux server.
OpenVPN Connect on the developer's device.
Deploy a new Linux server in the same environment as your Access Server. This tutorial uses Ubuntu 24.04 LTS.
Important
Deploy code-server in the same cloud provider or network as your Access Server so both systems can communicate over private IP addresses.
If you deploy them in separate networks or virtual private clouds, configure VPC peering or another private routing method that allows Access Server to route traffic to the code-server host. Refer to your cloud provider's documentation for the required networking steps.
Create a new Linux server instance in your environment. This can be:
A cloud virtual machine, such as an Amazon EC2 instance.
A virtual machine in your virtualization platform.
A bare-metal server.
Install Ubuntu 24.04 LTS or another supported Linux distribution.
Place the server on the same private network as Access Server to configure routing between the networks.
Record the server's private IP address. This tutorial uses
192.0.2.15.Confirm that you can connect to the server through SSH or its console.
Connect to the Linux server, install code-server, and configure it to accept connections only from the local Caddy reverse proxy.
Open a terminal or SSH client.
Connect to the server using your SSH user. Example command:
ssh -i /path/key-pair-name.pem1 <ssh-user>2@<instance-ipv4-address>3
Tip
You can refer to Tutorial: Connect to Access Server via SSH using PuTTY for steps to connect with the PuTTY SSH client from a Windows computer. If you have a different configuration, please follow your cloud provider’s instructions on connecting to your instance.
Replace
/path/key-pair-name.pemwith your private SSH key.Replace
<ssh-user>with your SSH user.Replace
<instance-ipv4-address>with your instance's public IP address.Install code-server:
curl -fsSL https://code-server.dev/install.sh | sh
Enable and start the code-server service so it starts automatically after system reboots:
systemctl enable --now code-server@$USER
Open the code-server configuration file:
~/.config/code-server/config.yaml
Replace its contents with:
bind-addr: 127.0.0.1:8080
auth: none
cert: false
This configuration:
Binds code-server to the local loopback interface.
Prevents direct network access to port
8080.Disables code-server password authentication.
Leaves HTTPS termination to Caddy.
Note
Access Server authenticates the VPN user before permitting access to the code-server host.
Save and close the file.
Restart code-server:
sudo systemctl restart code-server@$USER
Confirm that the service is running:
systemctl status code-server@$USER
Important
Don’t expose the code-server service directly to the internet. This tutorial assumes that users can reach it only through an authenticated VPN connection and the Caddy reverse proxy configured in the next step.
Caddy provides the HTTPS endpoint and forwards authorized connections to code-server on 127.0.0.1:8080.
Configure Caddy to listen only on the server's private IP address.
Install Caddy. Refer to the Caddy installation documentation for your Linux distribution.
Identify the server's private network interface:
ip -4 add
Record the interface name associated with the private IP address. For example:
eth1
Store the private IP address in a shell variable:
PRIVATE_IP=$(ip -4 addr show eth11 | grep -o 'inet [0-9.]*' | cut -d' ' -f2)
Replace
eth1with the private network interface for your server.Display the value:
echo "$PRIVATE_IP"
Example output:
192.0.2.15
Create the Caddy configuration:
sudo tee /etc/caddy/Caddyfile > /dev/null <<EOF
   ${PRIVATE_IP} {
    reverse_proxy localhost:8080
}
EOF
Restart Caddy:
sudo systemctl restart caddy
Confirm that Caddy is running:
systemctl status caddy
Note
Caddy’s internal certificate authority issues the certificate used for this private HTTPS endpoint. A developer device may need to trust the Caddy root certificate before the browser recognizes the connection as trusted.
Optional: Configure a domain name
You can use a domain name such as code-server.example.com instead of connecting by private IP address. This also lets you configure domain routing in Access Server.
Ensure the domain name resolves to the code-server host's private IP address for connected VPN clients.
Edit the Caddy configuration:
sudo tee /etc/caddy/Caddyfile > /dev/null <<'EOF'
   code-server.example.com1 {
      tls internal
      reverse_proxy localhost:8080
   }
EOF
Replace
code-server.example.comwith your internal hostname.Restart Caddy:
sudo systemctl restart caddy
Confirm that the service is running:
systemctl status caddy
Configure an access rule that permits only members of the Developers group to reach the code-server HTTPS endpoint.
Important
Access Server must have private network connectivity to the code-server host. When the systems are in separate networks or VPCs, configure private routing or VPC peering before creating the access rule.
Sign in to the Admin Web UI.
Select Groups.
Select the Developers group.
Select the Access Rules tab.
Select New Access Rule.
Configure the rule:
Address:
192.0.2.15/32Protocol: TCP
Port:
443
Select Save and Restart.
Tip
Creating the rule for the Developers group limits access to users in that group. Other VPN users can't reach the code-server host unless another access rule grants them access.
Optional: Configure domain routing
If you configured an internal hostname for code-server, create a domain access rule instead of, or in addition to, the IP address rule.
Sign in to the Admin Web UI.
Select Groups.
Select the Developers group.
Select the Access Rules tab.
Select New Access Rule.
Configure the domain rule:
Domain name:
code-server.example.com
Select Save and Restart.
Confirm that an authorized developer can reach code-server through the VPN and that the service is unavailable without the VPN connection.
Ensure the test user belongs to the Developers group.
Open OpenVPN Connect on the developer's device.
Connect to Access Server.
Open a web browser.
Navigate to the private IP address:
https://192.0.2.15
Or, when using a domain name:
https://code-server.example.com
Confirm that the code-server interface displays.
Disconnect from the VPN.
Refresh the page or try to open the URL again.
Expected result: The developer can reach code-server while connected to Access Server. After disconnecting from the VPN, the connection fails because the service isn’t exposed to the public internet.
Result
You now have a self-hosted development environment that:
Runs privately on your network.
Uses Caddy to provide HTTPS.
Is reachable only through an authenticated VPN connection.
Limits access to members of the Developers group.
Doesn't require exposing the code-server service itself to the internet.