Tutorial: Connect VPN Clients to Another EC2 Instance in AWS When Access Server Uses Route Mode
Learn how to enable communication between VPN clients and another EC2 instance in the same AWS VPC when Access Server runs in Route mode, using a static route and source/destination check configuration.
Overview
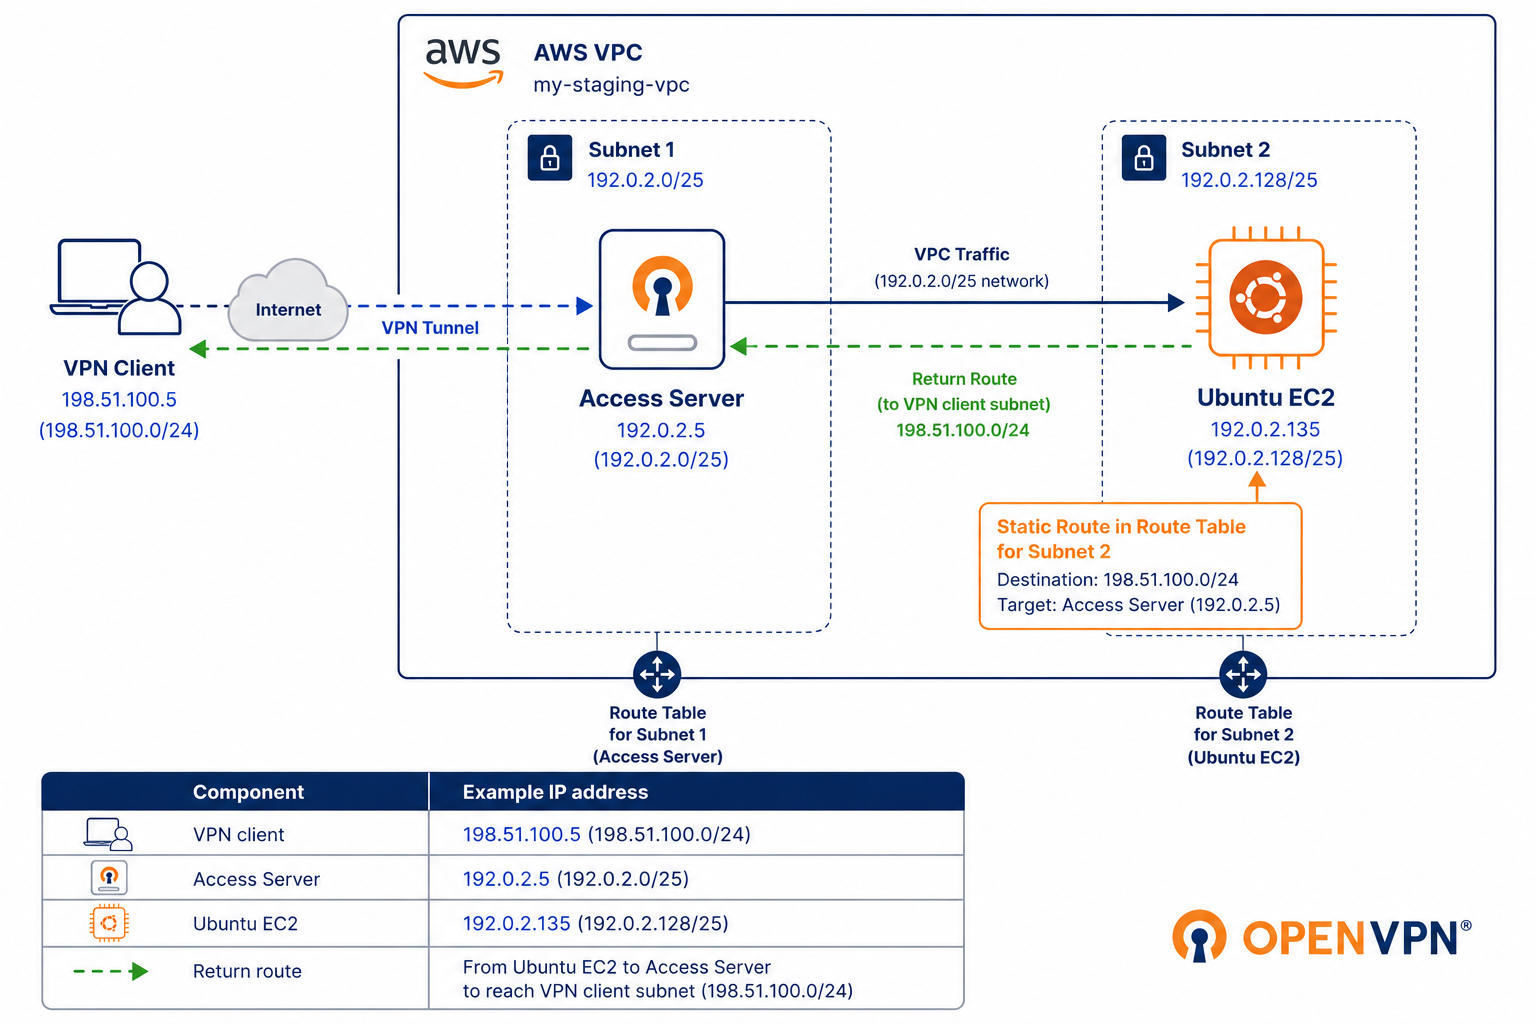
When Access Server operates in Route mode, VPN clients receive IP addresses outside the AWS VPC subnet. As a result, EC2 instances in the VPC don't have a return route to the VPN client subnet by default, so communication fails until you add a static route.
This tutorial shows how to configure AWS route tables and Access Server so VPN clients can communicate with another EC2 instance in the same VPC.
Note
In our documentation, we use example IPv4 addresses and subnets reserved for documentation, such as 192.0.2.0/24, 198.51.100.0/24, and 203.0.113.0/24.
Ensure you replace them with valid IPv4 addresses and subnets for your network(s).
Prerequisites
Access Server deployed.
Admin Web UI access.
One or more users or groups configured in Access Server.
Ensure the following AWS resources are available:
A VPC containing the Access Server and the target EC2 instance.
A subnet for the Access Server EC2 instance.
A subnet for the target EC2 instance.
A route table associated with the Access Server subnet.
A route table associated with the target EC2 instance's subnet.
Example environment:
EC2 Instance | VPC | Subnets | Private IPs |
|---|---|---|---|
Access Server | my-staging-vpc | 192.0.2.0/25 | 192.0.2.5 |
Ubuntu | my-staging-vpc | 192.0.2.128/25 | 192.0.2.135 |
VPN client subnet | Configured in |
|---|---|
198.51.100.0/24 | Access Server's Global Access Rules (Network Settings) |
Sign in to the AWS Management Console.
Navigate to VPC.
Under Virtual private cloud, select Route tables.
Select the route table associated with the Ubuntu EC2 instance.
Under Routes, select Edit routes.
Select Add route.
Configure the route:
Destination:
198.51.100.0/24Target: Select the Access Server EC2 instance.
Select Save changes.
Navigate to your Access Server EC2 instance.
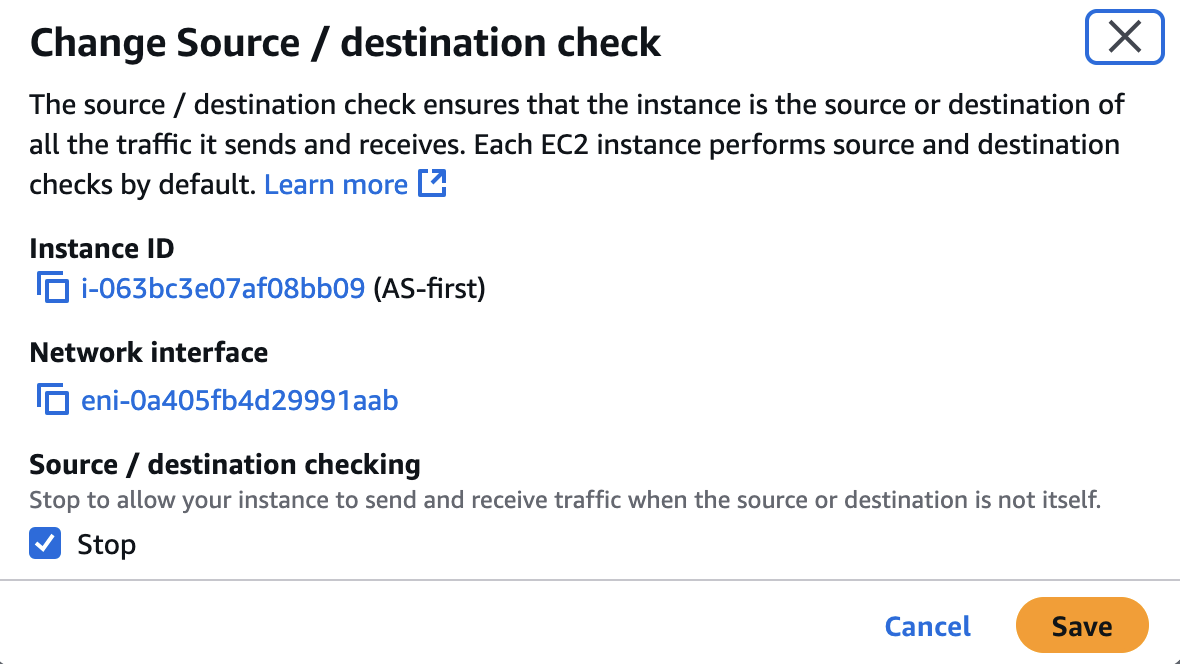
Select Actions → Networking → Change source/destination check.
Select the Stop checkbox under Source / destination checking.
Select Save to disable the check.
Tip
AWS source/destination checks prevent an EC2 instance from forwarding traffic that isn't addressed to itself. Disabling this check allows Access Server to route VPN traffic between clients and the VPC.
Note
If your Access Server EC2 instance has multiple network interfaces, you must disable the source/destination check separately on each interface that handles VPN traffic. Refer to Disable source/destination checks in AWS documentation.
Sign in to the Admin Web UI.
Select Access Controls.
Select the Global Access Rules tab.
Verify the routing mode is Route.
Add the Ubuntu subnet (
192.0.2.128/25) to Subnets.Select Save and Restart.
Connect to the VPN.
Ping the Ubuntu EC2 instance:
ping 192.0.2.135
Expected result example from a Windows client:
Pinging 192.0.2.135 with 32 bytes of data:
Reply from 192.0.2.135: bytes=32 time=30ms TTL=63
Reply from 192.0.2.135: bytes=32 time=30ms TTL=63
Reply from 192.0.2.135: bytes=32 time=29ms TTL=63
Reply from 192.0.2.135: bytes=32 time=30ms TTL=63
Reply from 192.0.2.135: bytes=32 time=31ms TTL=63
Ping statistics for 192.0.2.135:
    Packets: Sent = 5, Received = 5, Lost = 0 (0% loss)