Tutorial: Connecting Networks to CloudConnexa Using Connectors
Learn how CloudConnexa Network Connectors route traffic for remote access, internet gateway, and site-to-site networking — covers NAT, IP forwarding, and static routes for AWS, Azure, GCP, and Oracle Cloud.
Overview
A CloudConnexa Network Connector connects a private network to your WPC and acts as a software router between the private network and CloudConnexa.
After you deploy a Connector, you may need additional network configuration to route traffic correctly. Depending on your deployment, this can include enabling IP forwarding, configuring Network Address Translation (NAT), adding static routes, and changing routing settings on virtual machines deployed with an Infrastructure as a Service (IaaS) provider.
This tutorial examines traffic flows in depth for three Connector scenarios:
Remote access to private IP Services.
Using a private Network as an Internet Gateway.
Site-to-site networking between Networks.
You'll also learn how to configure static routes and the routing settings required when a Connector runs on an IaaS virtual machine.
For background on deploying Connectors in public clouds, refer to Connector for Public Cloud / IaaS Providers.
For information about using CloudConnexa for remote access, refer to Secure Remote Access.
Before you begin
Before using the traffic flow configurations in this tutorial:
Add the Network you want to connect to CloudConnexa.
Deploy a Network OpenVPN Connector for the Network.
Verify that the Connector connects to CloudConnexa.
Identify the private IP address assigned to the system running the Connector.
Identify the private subnet or subnets that the Connector must route.
Note
The Connector installation scripts for Linux virtual machines automatically configure IP forwarding and NAT. Refer to About Network Connectors for more information.
Traffic flow for remote access to private IP Services
When a remote user accesses an IP Service on a private Network, traffic travels from the user's device through CloudConnexa to the Network Connector. The Connector must then forward the traffic from its CloudConnexa tunnel interface to the private network.
IP forwarding allows the Connector to accept a packet on one network interface and forward it through another. This lets the Connector act as a software router rather than accepting only traffic addressed directly to itself.
For our example, we have this configuration:
HQ Network subnet |
|
Connector private IP address |
|
HR application server |
|
Default CloudConnexa WPC range |
|
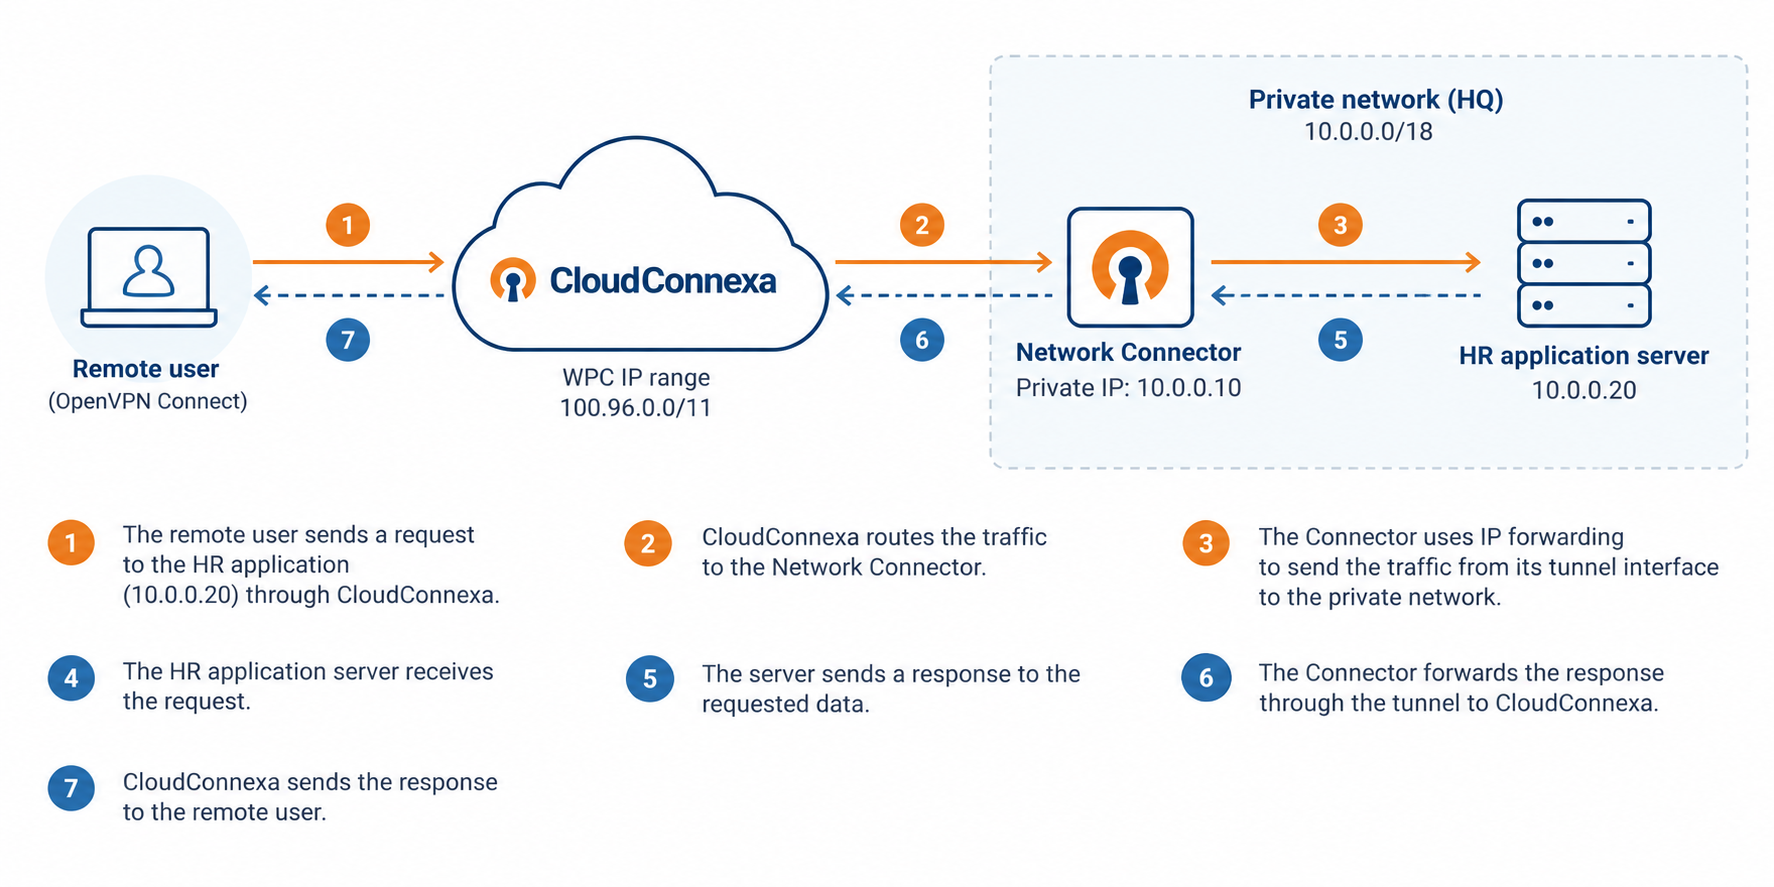
How traffic reaches the private resources
Add a Network for Remote Access and configure
10.0.0.0/18as its subnet.Deploy and connect the Network Connector.
CloudConnexa routes traffic destined for
10.0.0.0/18to the Connector.A connected user sends traffic to the HR application at
10.0.0.20.CloudConnexa sends the traffic through the tunnel to the Connector.
The Connector uses IP forwarding to route the traffic from its tunnel interface to the private network.
The HR application receives the request.
The return traffic must also have a route back through the Connector to CloudConnexa. You can provide that return path with a static route or NAT.
Option 1: Add a static route
Add a static route to the private network router that sends traffic destined for the CloudConnexa WPC range (100.96.0.0/11) to the Connector's private IP address.
The return traffic then follows this path:
Application → private network router → Connector → CloudConnexa → user
Use a static route when resources on the private Network must be able to initiate connections to remote clients or when preserving the original source IP address is important.
Option 2: Use NAT
Alternatively, configure NAT on the Connector.
With NAT, the Connector replaces the remote client's source address with its own private IP address before forwarding the request to the application. The application therefore sends its response directly back to the Connector.
The return traffic follows this path:
Application → Connector → CloudConnexa → user
NAT is appropriate when connections are initiated by remote clients and private resources don't need to initiate connections to those clients.
Note
Linux Connector installation scripts configure IP forwarding and NAT automatically. Refer to About Network Connectors.
Traffic flow when using a Network as an Internet Gateway
You can configure a private Network as an Internet Gateway so internet traffic from CloudConnexa exits through that Network.
For our example, we have this configuration:
HQ Network subnet |
|
Connector private IP address |
|
CloudConnexa WPC range |
|
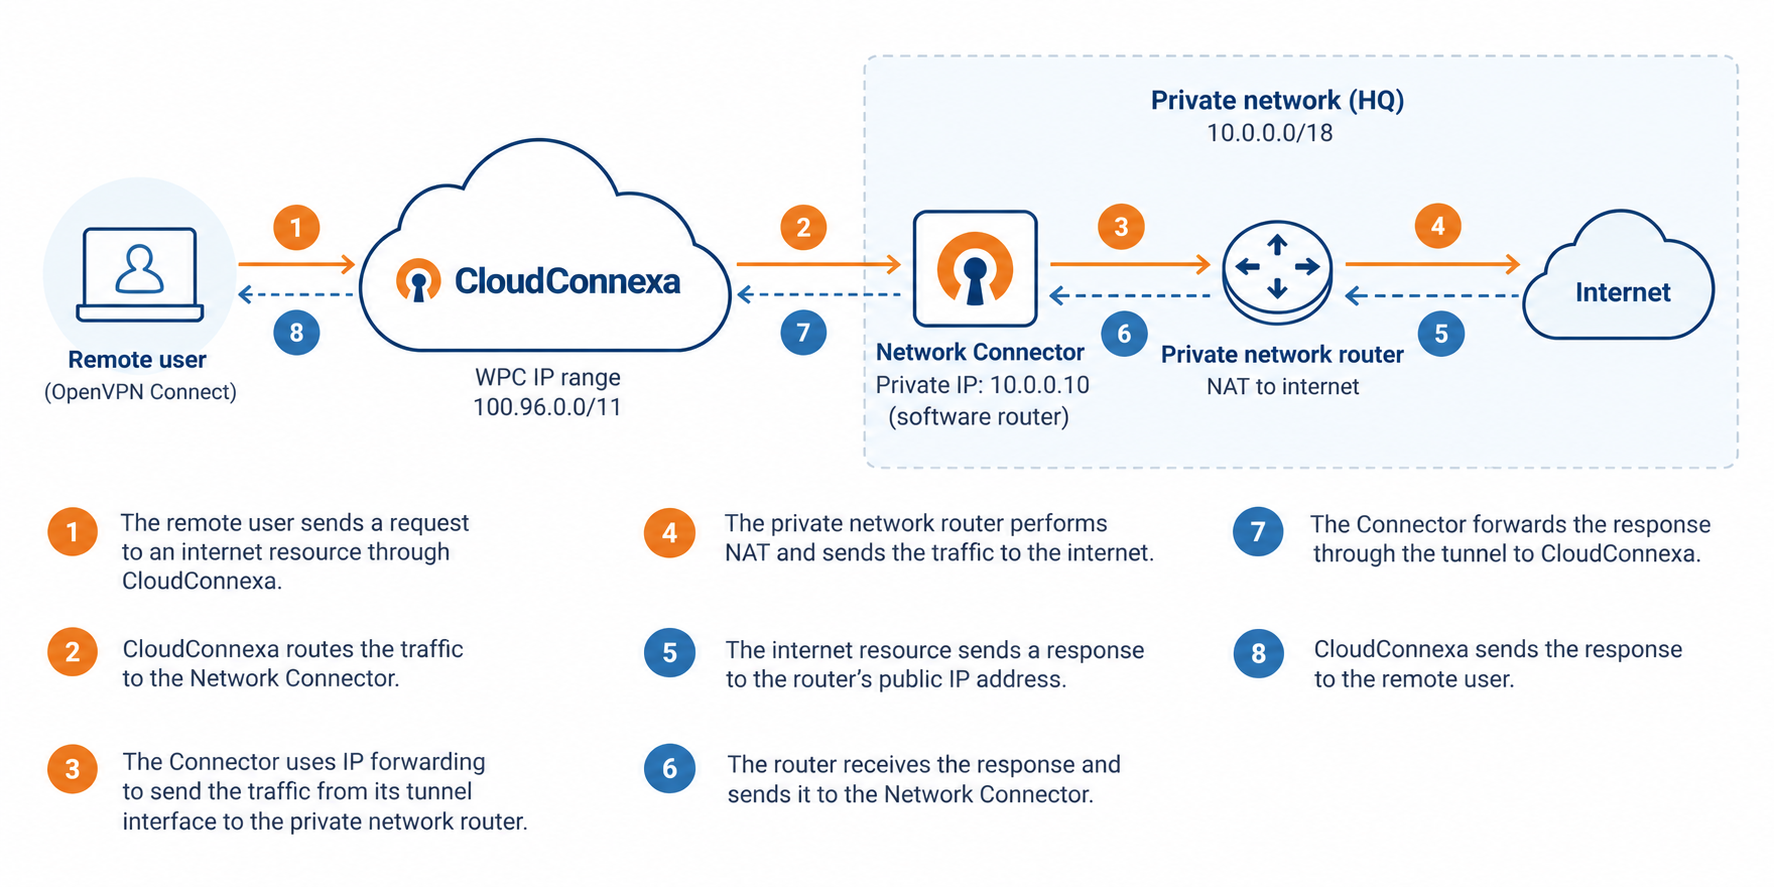
How internet traffic flows through the Network
Add a Network for Secure Internet Access and configure the Network as an Internet Gateway.
Configure the appropriate User Groups to route internet traffic through the Internet Gateway.
A connected user requests an internet resource.
CloudConnexa routes the traffic to the Network Connector.
The Connector uses IP forwarding to send the traffic to the private network router.
The router performs NAT and sends the traffic to the internet.
The internet resource sends its response to the private network's public address.
The private network router receives the response.
At this point, the response needs a route back to the CloudConnexa user.
Option 1: Add a static route
Configure the private network router to send traffic for 100.96.0.0/11 to the Connector's private IP address.
The Connector preserves the CloudConnexa source IP address when it forwards the request. When the response returns from the internet, the static route tells the private network router to send traffic destined for the CloudConnexa WPC range back to the Connector.
The return traffic then follows this path:
Internet → private network router → Connector → CloudConnexa → user
Option 2: Use NAT
Alternatively, configure NAT on the Connector.
With NAT, the Connector replaces the CloudConnexa source IP address with its own private IP address before forwarding the traffic to the private network router. The router therefore doesn't need a static route to 100.96.0.0/11 for the return traffic.
When the response returns from the internet, the router sends it to the Connector. The Connector reverses the NAT translation and sends the response through CloudConnexa to the user.
The return traffic follows the same path:
Internet → private network router → Connector → CloudConnexa → user
Use a static route if resources on the Network must initiate traffic to remote clients. NAT is sufficient when remote clients initiate sessions.
Note
Linux Connector installation scripts configure IP forwarding and NAT automatically. Refer to About Network Connectors.
Traffic flow for site-to-site networking
CloudConnexa can route traffic between private Networks connected to the same WPC.
For example:
Network | Subnet |
|---|---|
HQ Network |
|
Branch Network |
|
Unlike remote access, where NAT can provide the return path, site-to-site communication requires the routers at each site to know how to reach the other site's subnet.
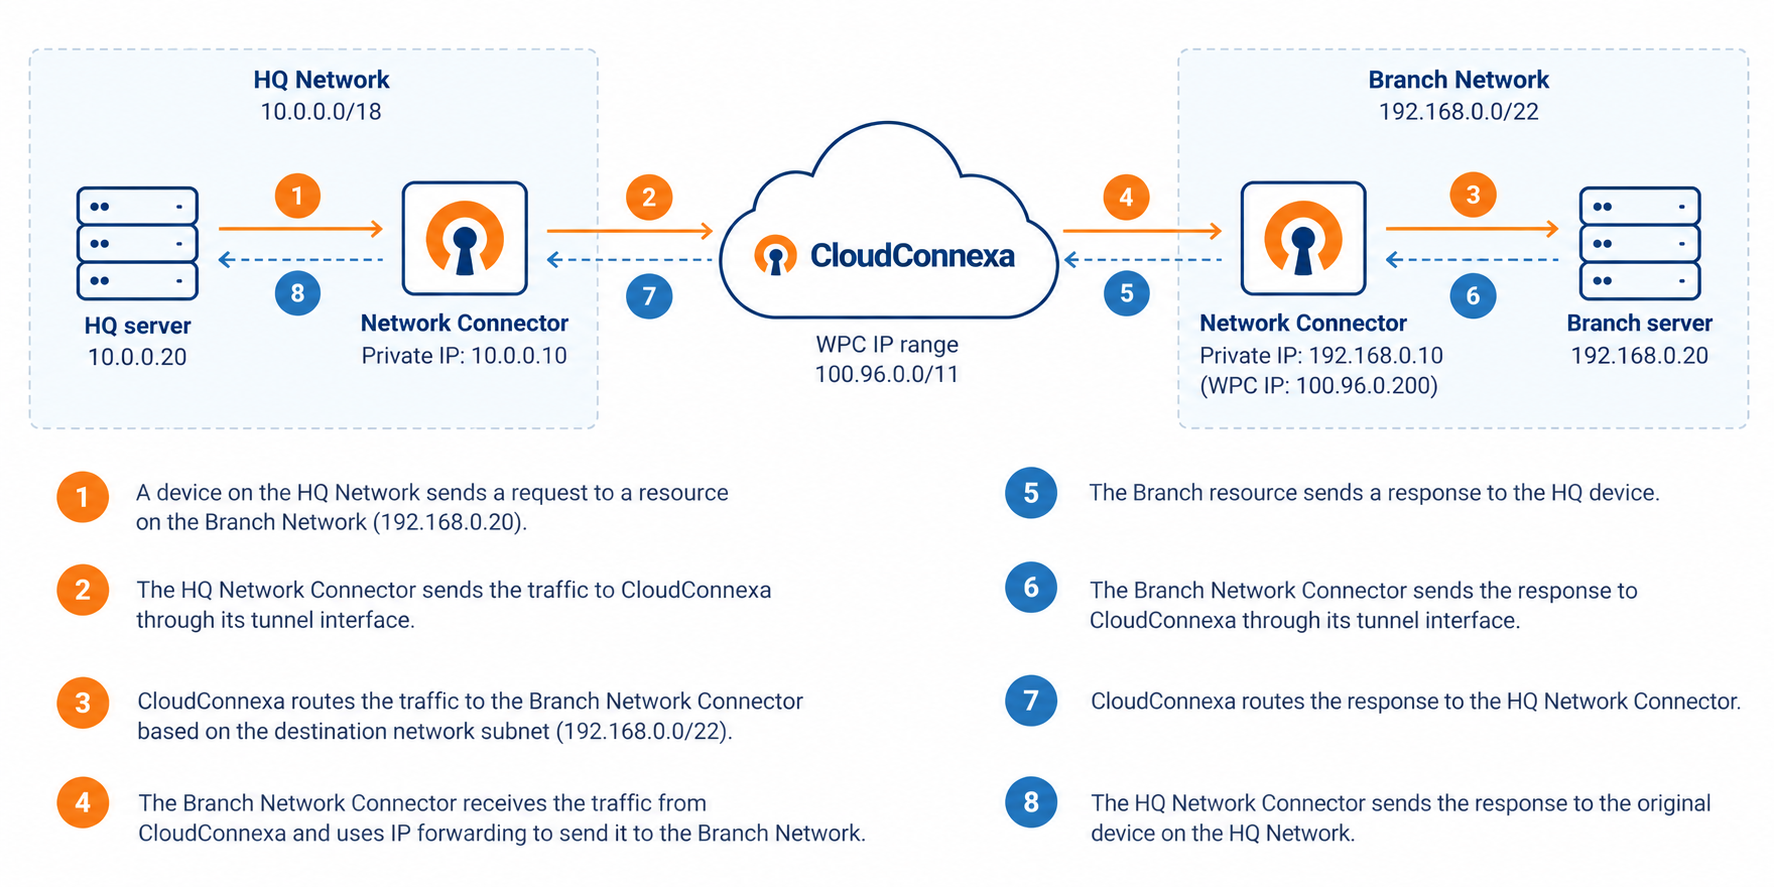
Configure routing between the Networks
Deploy and connect a Connector for HQ Network.
Configure the HQ Network Connector to forward IP traffic.
On the HQ network router, add a static route for
100.96.0.0/11with the HQ Connector as the next hop.Deploy and connect a Connector for Branch Network.
Configure the Branch Network Connector to forward IP traffic.
On the Branch network router, add a static route for
100.96.0.0/11with the Branch Connector as the next hop.On the HQ router, add a static route for the Branch Network subnet (
192.168.0.0/22) with the HQ Connector as the next hop.On the Branch router, add a static route for the HQ Network subnet (
10.0.0.0/18) with the Branch Connector as the next hop.Verify that a system on HQ Network can reach an allowed resource on Branch Network.
Verify connectivity in the opposite direction.
When you add another Network to the site-to-site configuration, update the required router static routes so that each site knows to send traffic for the new Network's subnet through its local Connector.
Note
Linux Connector installation scripts configure IP forwarding and NAT automatically. Refer to About Network Connectors.
Add static routes
A static route tells a router where to send traffic for a specific IP range. For CloudConnexa, configure your router to send traffic for the WPC IP address range (100.96.0.0/11 by default) to the private IP address of the Connector.
Configure these routes as required:
Add a static route with:
Destination:
100.96.0.0/11Target/next hop: Private IP address of the Connector.
For site-to-site networking, add a route for each remote Network subnet that must be reached through CloudConnexa.
Set the Connector's private IP address as the target or next hop for those routes.
Save or apply the routing configuration.
Verify connectivity to the destination Network.
The exact procedure depends on your router or IaaS provider.
AWS
When deploying an AWS Connector with the CloudFormation template, set ManageRoutes to True for a site-to-site configuration if you want CloudConnexa to add routes for other connected Network subnets to the VPC route table.
For AWS-specific configuration, refer to Tutorial: Connect Your AWS VPC to CloudConnexa by Deploying a Connector.
Azure
Azure uses user-defined routes (UDRs) for custom routing.
Refer to:
GCP
Refer to:
Oracle Cloud
Refer to the Oracle Cloud route tables documentation.
Configure routing on IaaS Connector instances
A Connector deployed on an IaaS virtual machine must be allowed to forward traffic that isn't addressed to the virtual machine itself.
Cloud providers commonly apply checks to a virtual network interface that prevent this behavior by default. Configure the appropriate provider setting so that the Connector can function as a software router.
AWS
Disable the source/dest check on the Connector instance.
The AWS source/dest check verifies that an EC2 instance is the source or destination of traffic passing through its network interface. A Connector acting as a router must forward packets for other systems, so this check must be disabled.
Azure
Enable IP forwarding on the Connector's network interface.
Refer to Azure IP forwarding documentation.
GCP
Enable IP forwarding for the Connector VM.
Refer to GCP IP forwarding documentation.
Oracle Cloud
Configure the Connector VNIC to allow traffic forwarding.
Refer to Oracle Cloud VNIC documentation.
Check rp_filter on Linux
On some Linux systems, rp_filter in /etc/sysctl.conf or the appropriate file in /etc/systctl.d/ may need to be disabled because reverse path filtering can drop packets whose source address doesn't match the expected interface.
If routing fails even though IP forwarding and the applicable IaaS routing settings are configured correctly, check the system's rp_filter configuration.
Refer to the Linux rp_filter documentation.
Configure IaaS security rules
If an IaaS security group or equivalent firewall protects resources that receive traffic through the Connector, configure its inbound rules to permit the required traffic.
Identify the resources that CloudConnexa users or other connected Networks must access.
Review the security group or firewall rules applied to those resources.
Add the Connector's security group or the appropriate source network to the inbound rules.
Restrict the allowed protocols and ports to those required by the protected resources.
Test access through CloudConnexa.
For AWS deployments, refer to the AWS security groups documentation.
Verify the Connector routing configuration
After configuring the required routing:
Verify that the Connector is connected to CloudConnexa.
From a permitted source, connect to a resource on the private Network.
Verify that the resource receives the request.
Verify that response traffic returns through the Connector.
For an Internet Gateway, verify that internet traffic exits through the expected private Network.
For site-to-site networking, test connectivity in both directions between permitted resources.
If traffic doesn't return, verify the static routes or NAT configuration.
For an IaaS Connector, verify that the provider's forwarding or source/dest check setting permits the instance to route traffic.
What happens next
Your Network Connector can now route traffic between CloudConnexa and your private network.
As you add Networks or change private network subnets, review your static routes and Access Groups to ensure that CloudConnexa can route traffic to the intended destinations and that only authorized sources can reach them.