Tutorial: Use CloudConnexa for Secure Access to Your AWS VPC
This tutorial shows how users can get access to the applications on your AWS VPC using CloudConnexa.
Overview
Owen has completed the signup process as shown here. During the signup process, Owen selects technop.openvpn.com as the web domain for the User portal. This domain uniquely identifies the WPC that will be set up by Owen and is used by Connect Client applications (WPC Client software) to identify the WPC that it needs to connect to.
Owen wants to provide Remote Access to a private website and other private services hosted in an Amazon Web Services (AWS) Virtual Private Cloud (VPC) to himself and employees.
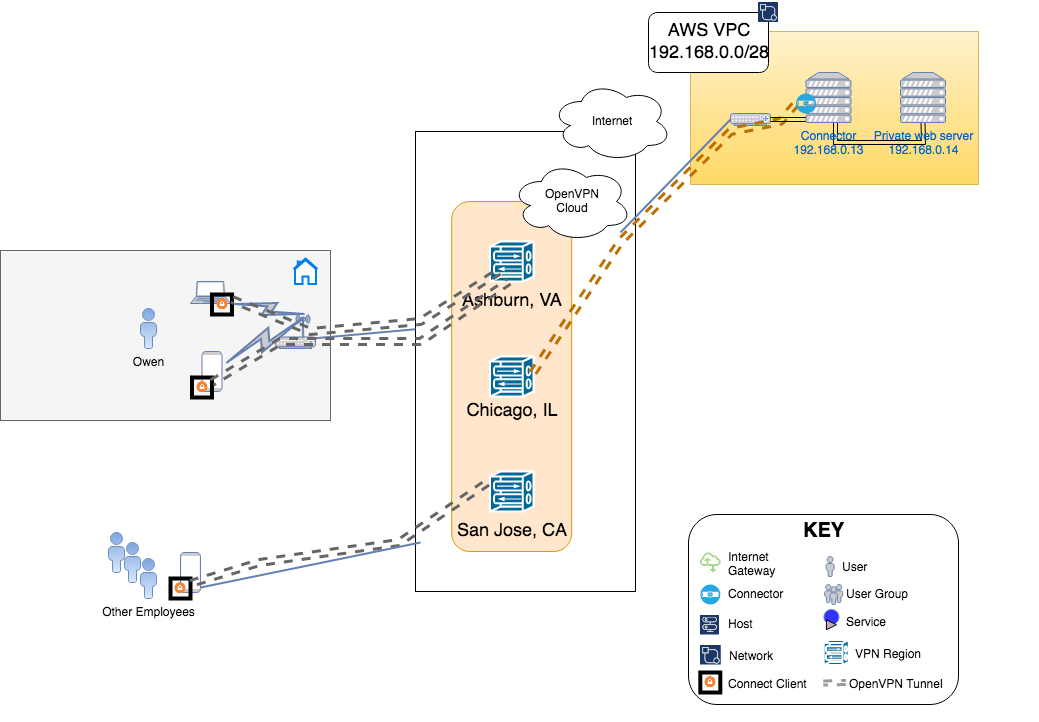
Illustration of WPC
Setup
Owen followed the steps shown below to make the AWS VPC with IP address range of 192.168.0.0/28 part of the WPC.
Configured a Network to represent the AWS VPC and enters 192.168.0.0/28 as the Subnets for the Network. See, How to add a Network
Clicked on the download icon next to the Connector created for the Network to reveal various options and selected Launch Connector on AWS from the options list. This started the process of using the CloudFormation template to instantiate a Connector VM in the AWS VPC. See, Launch Connector on AWS
This newly launched Connector instance is shown with the IP address of
192.168.0.13in the WPC illustration above. Owen had allowed CloudFormation to create IAM resources, the Connector will automatically configure the VPC route table and update it as needed when Connectors are deployed in other Networks.As shown in Launch Connector on AWS, Owen added the Security Group of the Connector instance to the inbound rules of the Security Group associated with the webserver at
192.168.0.14. This will allow traffic to be routed through the Connector instance.Now Owen connects to CloudConnexa (see, Connecting to CloudConnexa). On connection, Owen can access the application server on the AWS VPC at
192.168.0.14.
Tutorial: Use CloudConnexa for Secure Access to Your AWS VPC
Tutorial: Use CloudConnexa for Zero Trust Network Access (ZTNA)
Tutorial: Use CloudConnexa for Remote Access to a Private Application
Tutorial: Use CloudConnexa To Provide Remote Access to an Application With Load Balancing
Tutorial: Deploy Multiple Connectors To Increase the Performance and Availability of Remote Access
Video: Use CloudConnexa for Zero Trust Network Access to Private Applications on Your AWS VPC
Video: Use CloudConnexa to Remotely Access Your Home Network
Video: Use CloudConnexa to Connect to Your Remote Desktop Server
Video: Use CloudConnexa for Zero Trust Network Access to a Public SaaS Application
Video: No Incoming Connections To Your Network Prevents Denial of Service Attacks
Video: Application Domain-Based Routing Segments Your Network
Video: Application Domain-based Routing Allows IP Addresses to Overlap
Video: Automatic Network Segmentation Limits Lateral Movement