Tutorial: Configure pfSense as an OpenVPN Client to Connect to Access Server
Learn how to configure pfSense as an OpenVPN client to connect your entire network to Access Server — covers adding the VPN client interface in pfSense, importing the connection profile, configuring firewall rules, and verifying the tunnel.
Overview
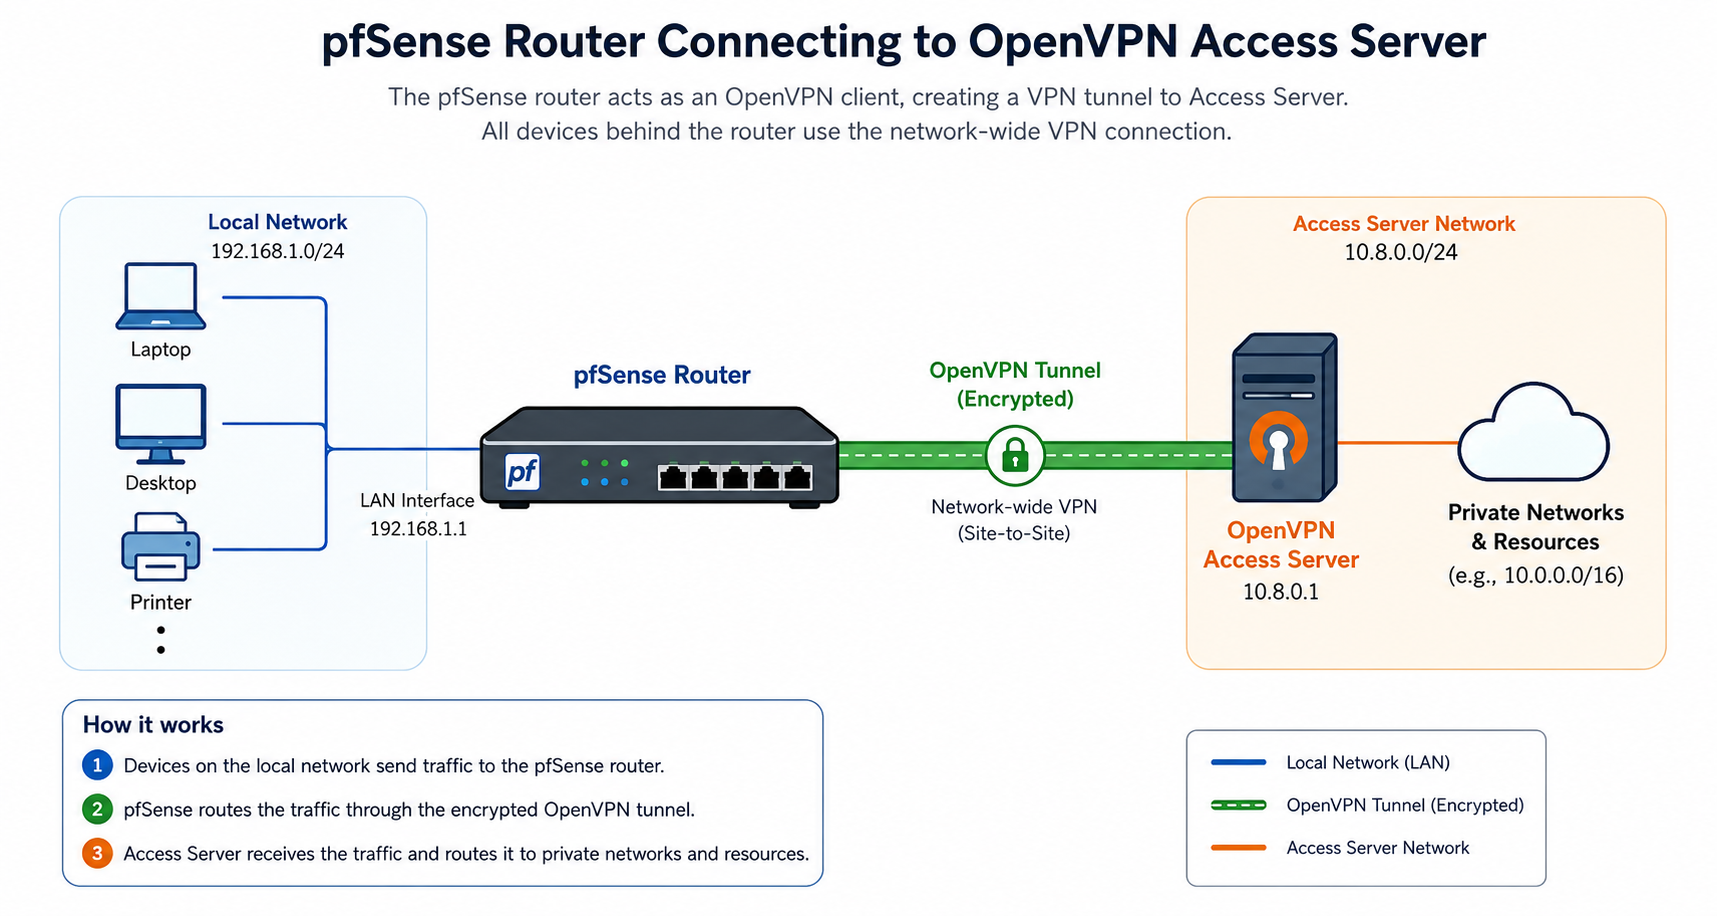
This tutorial shows you how to configure a pfSense router as a VPN client for OpenVPN Access Server. When you confiugre the connection for site-to-site access, the VPN tunnel allows devices behind the pfSense router to use a network-wide VPN connection without installing a VPN client on each device.
You can also use this configuration as part of a site-to-site deployment connecting a remote office or network to resources available through Access Server. For a broader explanation of this topology, refer to:
This tutorial uses an auto-login connection profile and the OpenVPN Client Import package for pfSense.
Prerequisites
An installed Access Server.
Admin Web UI access.
A pfSense router.
Administrative access to the pfSense web interface.
The latest supported firmware installed on the pfSense router.
This tutorial was tested with pfSense version 26.03.1-RELEASE, which uses OpenVPN 2.6.20. Menu names and options may differ in other versions.
Review the following documentation before configuring the connection:
Tutorial: Configure Network Settings with the Admin Web UI for configuring the Access Server hostname, VPN network, and routing settings.
Routing and NAT for understanding how Access Server routes traffic between VPN clients and private networks.
Important
The primary procedure uses tls-crypt, which is the default control-channel security setting for new Access Server installations.
A connection profile using tls-crypt-v2 can’t be imported directly from the pfSense web interface. The import fails with the following validation error:
The field 'TLS Key' does not appear to be valid
To use tls-auth or tls-crypt-v2, refer to the optional procedures at the end of this tutorial.
Create a dedicated Access Server user account for the pfSense router.
Sign in to the Admin Web UI.
Select Users.
Select Add New User.
The new user modal is displayed.
Enter a username for the PfSense router, then select Save.
Set the password by selecting Reset Password and entering it in the new password field, then select Reset.
Set Allow Auto-login to Enabled.
Select Save and Restart.
Download an auto-login connection profile that uses tls-crypt.
Sign in to the Client Web UI with your new user account.
Select the Connection Profiles tab.
Select Add New Profile.
Under Auto-login, select the three-dot menu for the profile.
Select Download legacy profile (no TLS Crypt v2).
The connection profile downloads as an
.ovpnfile.
Open the
.ovpnfile in a plain-text editor.Locate the following block:
<tls-crypt>
...
</tls-crypt>
Copy the content between the
<tls-crypt>and</tls-crypt>tags.Store the copied TLS key securely. You need it in Step 5.
Important
The
.ovpnfile contains credentials that can be used to connect to Access Server. Store the connection profile securely and don't share it.
Install the package that imports an .ovpn file into the pfSense OpenVPN client configuration.
Sign in to the pfSense web interface.
Navigate to System → Package Manager.
Select the Available Packages tab.
Search for OpenVPN Client Import. (The package name is
openvpn-client-import.)Select Install.
Select Confirm to begin the installation.
Wait for the installation to finish.
Import the Access Server connection profile into pfSense.
Select VPN → OpenVPN.
Select the Client Import tab.
For .ovpn config file, select Browse.
Select the
.ovpnfile downloaded from Access Server.Optional: Enter a descriptive name for the connection in Name.
Tip
If you don't provide a name, pfSense uses the
.ovpnfilename.Select Import.
pfSense parses the certificates, keys, and OpenVPN client settings from the
.ovpnfile and creates a new OpenVPN client instance.
Note
The VPN tunnel may not connect successfully until you complete the TLS configuration in the next step.
Add the tls-crypt key extracted from the connection profile.
Select VPN → OpenVPN.
Select the Clients tab.
Locate the imported OpenVPN client instance.
Select the edit icon.
Under Cryptographic Settings → TLS Configuration, select Use a TLS Key.
Clear Automatically generate a TLS Key.
In TLS Key, paste the content copied from between the
<tls-crypt>and</tls-crypt>tags.For TLS Key Usage Mode, select TLS Encryption and Authentication.
Under Advanced Configuration → Custom options, remove the options added during the profile import.
Select Save.
Apply the changes when prompted.
pfSense restarts the OpenVPN client instance and attempts to establish the VPN tunnel.
Verify the connection from both Access Server and pfSense.
Verify the connection in Access Server
Sign in to the Access Server Admin Web UI.
Select Status → Active Connections.
Confirm that the user account created for the pfSense router appears as connected.
Verify the connection in pfSense
Sign in to the pfSense web interface.
Select Status → OpenVPN.
Locate the imported OpenVPN client.
Confirm that Status displays Connected (Success).
Establishing the VPN tunnel doesn’t automatically determine which devices or traffic use it. Configure the OpenVPN client interface, routing, and firewall rules based on your intended deployment.
For example, to send traffic from a pfSense LAN through the VPN tunnel:
Assign the OpenVPN client instance as a pfSense interface.
Enable the interface without configuring an additional IP address unless required by your network design.
Configure the appropriate gateway or policy-based routing.
Add firewall rules to the source network's interface, such as the LAN interface.
Set the rules to route the intended traffic through the OpenVPN gateway.
Configure outbound NAT if required by your routing design.
Test access from a device behind the pfSense router.
The exact firewall rules depend on whether you want to route:
All internet traffic through Access Server.
Only traffic for specific private subnets.
Traffic between the pfSense-connected network and other VPN clients or sites.
Review the Access Server logs
Access Server records connection and authentication events in the following log file: /var/log/openvpnas.log.
Connect to the Access Server host using SSH and review the log for messages associated with the pfSense user account.
Review the OpenVPN client logs in pfSense
Sign in to the pfSense web interface.
Select Status → OpenVPN.
Locate the OpenVPN client instance.
Select the log icon for the client entry to view its OpenVPN logs.
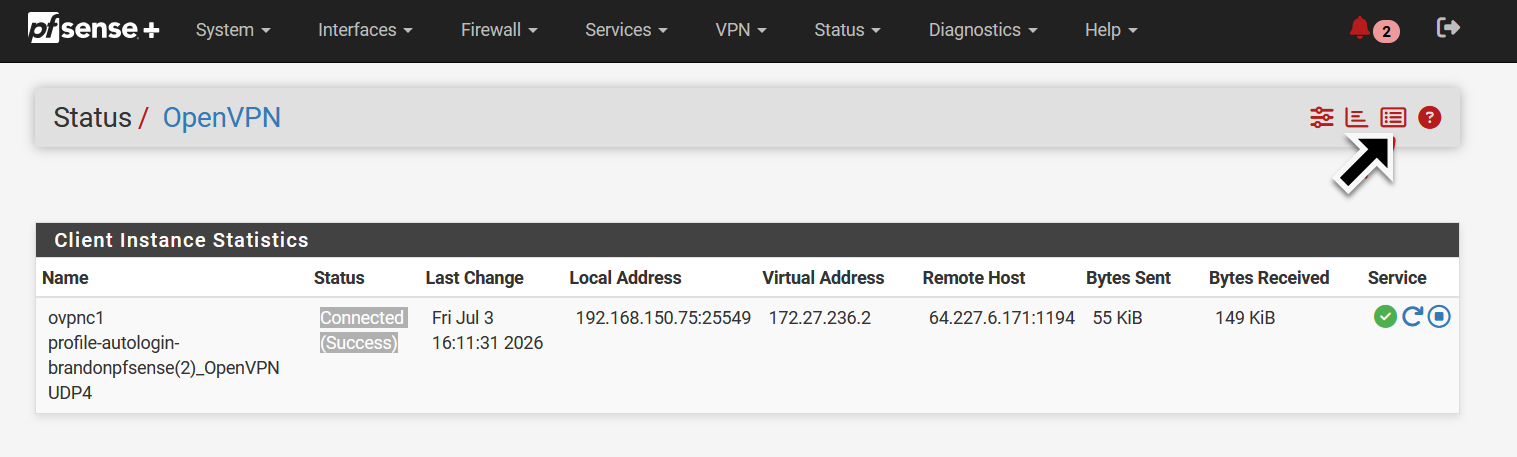
Review the logs for TLS, certificate, authentication, routing, or communication errors.
Use this procedure to temporarily test an Access Server connection profile using tls-auth from the pfSense command line.
Important
This procedure uploads the connection profile to /tmp and starts OpenVPN manually. Files in /tmp and manually started processes don’t persist after a pfSense restart. Don’t use this method as a persistent production configuration.
Step 1: Configure the Access Server user
Create a dedicated user account with auto-login permission as described in Step 1 of the primary procedure.
Step 2: Download the connection profile
Sign in to the Client Web UI with your new user account.
Select the Connection Profiles tab.
Select Add New Profile.
Under Auto-login, select the three-dot menu for the profile.
Select Download legacy profile (no TLS Crypt v2).
The connection profile downloads as an
.ovpnfile.
Step 3: Upload the connection profile to pfSense
Sign in to the pfSense web interface.
Select Diagnostics → Command Prompt.
Under Upload File, select Browse.
Select the
.ovpnfile.Select Upload.
A successful upload displays a message similar to the following:
Uploaded file to /tmp/<connection_profile_name>.ovpn.
Step 4: Start the VPN connection
Connect to the pfSense router using SSH.
Multiple options display, for example:
 0) Logout / Disconnect SSH            9) pfTop
 1) Assign Interfaces                 10) Filter Logs
 2) Set interface(s) IP address       11) Restart GUI
 3) Reset admin account and password  12) PHP shell + Netgate pfSense Plus tools
 4) Reset to factory defaults         13) Update from console
 5) Reboot system                     14) Disable Secure Shell (sshd)
 6) Halt system                       15) Restore recent configuration
 7) Ping host                         16) Restart PHP-FPM
 8) Shell

Enter an option:
At the pfSense console menu (above), enter
8to open a shell.Run the following command to start the VPN connection:
openvpn --config /tmp/<connection_profile_name>.ovpn
Keep the shell session open while testing the connection.
Step 5: Verify the connection
Sign in to the Access Server Admin Web UI.
Select Status → Active Connections.
Confirm that the pfSense user account appears as connected.
Press Ctrl+ C in the pfSense shell to stop the manually started OpenVPN process.
Use this procedure when Access Server generates the pfSense connection profile with tls-crypt-v2.
Important
This procedure uploads the tls-crypt-v2 key to /tmp. Files in /tmp don’t persist after a pfSense restart. To create a persistent configuration, store the key in an appropriate persistent location and update the custom OpenVPN option with that path.
Step 1: Configure the Access Server user
Create a dedicated user account with auto-login permission as described in Step 1 of the primary procedure.
Step 2: Download the connection profile and extract the key
Sign in to the Client Web UI with your new user account.
Select the Connection Profiles tab.
Select Add New Profile.
Under Auto-login, select Download.
The connection profile downloads as an
.ovpnfile.
Open the
.ovpnfile in a plain-text editor.Locate the following block:
<tls-crypt-v2>
...
</tls-crypt-v2>
Copy the content between the
<tls-crypt-v2>and</tls-crypt-v2>tags.Paste the content into a new plain-text file.
Save the file as
tls_crypt_v2.key.
Step 3: Install the OpenVPN Client Import package
Install the openvpn-client-import package as described in Step 3 of the primary procedure.
Step 4: Import the connection profile
From the pfSense console, select VPN → OpenVPN.
Select the Client Import tab.
For .ovpn config file, select Browse.
Select the
.ovpnfile downloaded from Access Server.Optional: Enter a descriptive name in Name.
Select Import.
pfSense creates the OpenVPN client instance. The connection won't start successfully until the separate
tls-crypt-v2key is configured.
Step 5: Upload the tls-crypt-v2 key
Select Diagnostics → Command Prompt.
Under Upload File, select Browse.
Select
tls_crypt_v2.key.Select Upload.
A successful upload displays:
Uploaded file to /tmp/tls_crypt_v2.key.
Step 6: Configure the tls-crypt-v2 key
Select VPN → OpenVPN.
Select the Clients tab.
Locate the imported OpenVPN client instance.
Select the edit icon.
Under Advanced Configuration → Custom options, remove the options added during the profile import.
Enter the following option:
tls-crypt-v2 /tmp/tls_crypt_v2.key
Select Save.
Apply the changes when prompted.
Step 7: Verify the VPN tunnel
Verify the connection in Access Server
Sign in to the Access Server Admin Web UI.
Select Status → Active Connections.
Confirm that the user account created for the pfSense router appears as connected.
Verify the connection in pfSense
Sign in to the pfSense web interface.
Select Status → OpenVPN.
Locate the imported OpenVPN client.
Confirm that Status displays Connected (Success).
Next steps
To make the private subnet behind the pfSense router reachable by other VPN clients, refer to Tutorial: Configure Client-Side Subnet Routing in Access Server.
For additional deployment guidance for users at a remote office who need secure access to central resources, refer to the Secure Remote Access use case.