Tutorial: Create a Site-to-Site Network with Access Server
Create a site-to-site VPN to connect your business networks using Access Server — secure access through an encrypted OpenVPN tunnel.
Overview
A site-to-site VPN connects two or more private networks over a secure, encrypted tunnel. This allows devices on separate networks—such as a headquarters (HQ) network and a branch office—to communicate as if they were on the same local network.
In this tutorial, you'll configure a site-to-site (or site-to-branch) VPN using:
Access Server hosted on the headquarters network.
An OpenVPN client acting as a site-to-site connector on the branch network.
Traffic between the two networks is encrypted and routed through the VPN tunnel.
Prerequisites
Access Server installed on a Linux system in the HQ network
Internet access and a private IP address for Access Server
Port forwarding so Access Server is reachable from the internet
A public IP address or DNS record for Access Server
Administrative access to:
The Access Server Admin Web UI
Routers, firewalls, or gateways on both networks
Distinct (non-overlapping) subnets for each network
Important
Subnets must differ between the separate networks for site-to-site to work with Access Server.
Example site-to-site setup
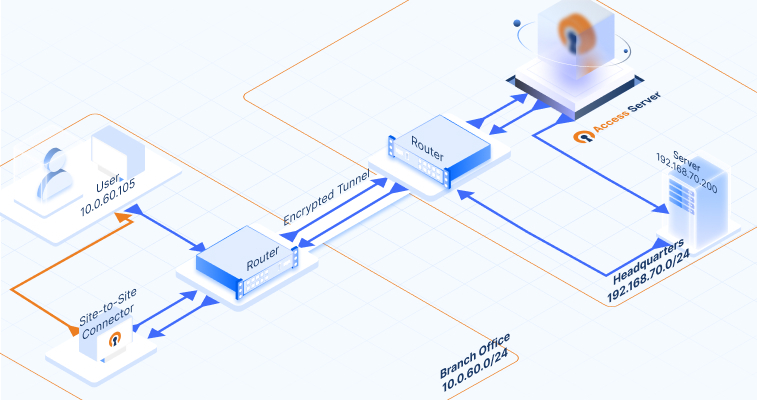
Notice that the diagram of our example setup includes the following IP addresses and subnets:
We'll use the IP addresses and subnets for our example procedure. As you set up your site-to-site VPN, use your specific IP addresses and subnets for your devices and networks in the appropriate steps.
How does data communication flow between the connected networks? Click on the images below to follow the traffic flow of data communication. It gives you a visual of what happens when a request from a computer in a branch office reaches an application server at the HQ network, and how that response makes it back. Here’s how the data travels:
This step configures Access Server to route traffic to the HQ private network.
Sign in to the Admin Web UI for your Access Server.
Click Access Controls.
The Group and User Access Rules tab displays.
Click the Global Access Rules tab.
Click Route to enable routing.
Ensure Allow access from these private subnets to all VPN client IP addresses and subnets is checked.
Enter the network subnet where your Access Server is located—for our example, 192.168.70.0/24.
Click Save and Restart.
This user represents the branch gateway.
Click User.
Click Add New User.
Enter a new username for your OpenVPN client.
Click Save.
Set Allow Auto-login to Enabled.
Set the Auth method to Local.
Set Configure VPN gateway to Enabled.
Enter the subnet of the remote network of the OpenVPN client into the box for Network on the VPN client side—for our example, 10.0.60.0/24.
Click Reset Password and enter a new password.
Click Save and Restart.
Important
Ensure your site-to-site connector user has autologin privileges with local authentication.
The HQ router must know how to reach the VPN and branch subnets. Add static routes pointing to Access Server's private IP.
Configure your route table to include routes to the additional subnets for devices and networks:
For our examples, we added the following static routes:
Network 172.16.0.0 with subnet mask 255.255.240.0 through gateway 192.168.70.222.
Network 10.0.60.0 with subnet mask 255.255.255.0 through gateway 192.168.70.222.
Refer to your router documentation as needed for adding static routes.
Tip
Note that we specify a subnet mask. Most routing equipment prefers subnets defined this way rather than the CIDR format (e.g.,/24, /20, and so on). You can look up tables to easily convert between them.
Ensure firewalls allow traffic between these networks.
Use a Linux system (Ubuntu LTS recommended) as the branch gateway.
Connect to the console for the branch system.
Install the OpenVPN client:
apt-get install openvpn
Tip
If the command doesn't succeed, check if the Linux system has the proper repository. For more details, refer to the instructions for adding it here:
Download the auto-login profile using the Client Web UI or directly with cURL:
Option 1: Client Web UI:
Open
https://<Access_Server_IP_or_domain>.Sign in with the site-to-site user.
Download the autologin profile.
Place it in
/etc/openvpn/and rename it (e.g.,headquarters.conf).
Option 2: Download directly with cURL:
Reboot the system.
The VPN should connect automatically.
IP forwarding allows the branch system to route traffic between networks.
Check the current status:
sysctl net.ipv4.ip_forward
If the value is 1, IP forwarding is already enabled; proceed to the next section.
If
0, enable it.
Run the following command to enable it:
sysctl -w net.ipv4.ip_forward=1
Apply the changes:
sysctl -p
Reboot your Linux machine:
reboot
Add static routes on the branch router pointing to the site-to-site connector.
Configure your route table to include the additional subnets for the devices and networks:
For our example, we added the following static routes:
Network 172.16.0.0 with subnet mask 255.255.240.0 through gateway 10.0.60.55.
Network 192.168.70.0 with subnet mask 255.255.255.0 through gateway 10.0.60.55.
Refer to your router documentation as needed for adding static routes.
Tip
Note that we specify a subnet mask. Most routing equipment prefers subnets defined this way rather than the CIDR format (e.g.,/24, /20, and so on). You can look up tables to easily convert between them.
Branch traffic destined for HQ routes now goes through the VPN.
Confirm bi-directional traffic works as expected.
Run ICMP (ping) tests:
From Access Server
192.168.70.222→ branch client10.0.60.105.From branch client → Access Server
From branch client → HQ server
192.168.70.200.From HQ server → branch client.
All tests should succeed.
Note
For our tutorial, we suggest verification with ICMP. Ensure it's allowed in the network. You can test with your preferred traffic (TCP, UDP, etc). ICMP is just a suggestion for ease of troubleshooting.
If traffic fails in one direction:
Identify the failing path (example:
10.0.60.105 → 192.168.70.200).Run
tcpdumpsimultaneously on:The branch gateway (OpenVPN client)
Access Server
The destination host
Observe where packets stop flowing.
Common issues include:
Missing or incorrect static routes.
Firewall rules blocking "unknown" subnets.
Cloud provider security group restrictions.
Incorrect LAN/WAN routing on gateways.
For additional diagnostics, see Troubleshoot Reaching Destinations over the VPN Tunnel.
Routing for groups is more complicated if you have a cluster setup because each node needs a unique group default subnet. Access Server 2.12.0 and newer supports this use case. Refer to our documentation for details: Group Default IP Address Networks for Access Server.