User Management
The sections under User Management give you control over user and group accounts, access control, and user profiles.
With the clean interface of the Admin Web UI, you can:
Create users and groups.
Assign authentication methods.
Add or remove credentials.
Configure rights for sub-networks.
Manage privileges.
Configuring user authentication and network settings
We recommend you configure your server's method of authentication before adding users. Refer to the authentication sections.
We recommend you then configure network settings before adding users. Refer to the configuration sections.
Add/edit users and admins
From the Admin Web UI, adding new users and groups is easy. For each new account, you can configure settings such as administrator access, auto-login, and individual authentication methods.
You can create granular user access control with additional settings for each account, such as dynamic or static IP addresses, configuring users as a VPN gateway client, or configuring DMZ settings.
The User Management: User Permissions page is where you adjust all user configurations: you can modify users' local passwords, assign users to groups, grant or remove admin access, ban users from the server, and assign users to different authentication methods.
User Permissions

User Permissions provides you with a table to configure user permissions. To finalize any changes, click Save Settings and Update Running Server.
Username | To enter a user, enter their username into the New Username text field on the last row in the table. When adding a new user, click Save Settings and Update Running Server. |
Group | All configured groups from User Management: Group Permissions display in the drop-down menu. Assign each user to a group or leave without a default group. Users in a group inherit the group’s configuration, which includes admin access, auto-login, assigned IP addresses, access control, and client scripting. |
Admin | Check Admin to grant login access to the Client Web UI. |
Allow Auto-login | Check Allow Auto-login to enable auto-login profiles. This client configuration enables connecting to the VPN without authenticating with a password. This is useful to connect gateway clients or machines that should always have a VPN connection. |
Deny Access | Check Deny Access to revoke a user's privileges. |
Delete | Check Delete to delete a user record. You can’t delete the unique admin user, openvpn. |
More Settings
You can configure additional settings by clicking More Settings. Many of these settings are user-specific, so they will take precedence over any global settings.
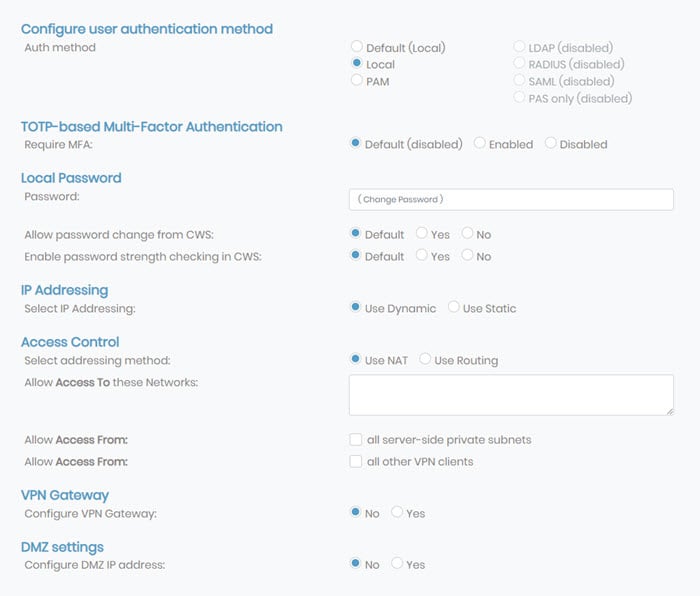
Configure user authentication method
You can assign users and groups to different authentication methods. You must configure LDAP, RADIUS, SAML, or PAS-only methods to select them as the authentication method. If they are not configured, they are disabled for users.
TOTP-based Multi-Factor Authentication
You can control TOTP-based MFA at the group level by enabling or disabling it here.
Local Password
You can manage password options for each user set to local authentication. Enter the local password in the Password field for authentication when connecting to Access Server or signing into the Client Web UI. This password is for users authenticating with local authentication.
In the Client Web Server (CWS), you can choose to allow password changes and enable password strength checking.
Allow password change from CWS:
Default: Inherit the group or global setting (defined in group permissions or CWS settings).
Yes: User can change their password after signing into the CWS.
No: User can't change their password, and an administrator must manage passwords.
Enable password strength checking in CWS:
Default: Inherit the group or global setting (defined in group permissions or CWS settings).
Yes: User passwords must meet these rules: must be at least eight characters and must contain a digit, an uppercase letter, and a symbol from !@#$%&’()+,-/[\]^_{|}~<>.
No: User can create any password of any length that they choose.
Select IP Addressing
You have two options for IP addressing: Static or Dynamic.
Dynamic: Access Server dynamically assigns the user’s IP address from the subnets configured in VPN Settings.
Static: Access Server assigns the static IP address you define in the VPN Static IP Address field that displays when you select Use Static. Ensure the IP address is within the subnet defined in VPN Settings.
Access Control
Select addressing method: Set either network-address translation (NAT) or routing.
Allow Access To these Networks: You can define the routing for a specific user's client and grant access to specific subnets. Doing so at the user level takes precedence over global settings.
Allow Access From: You can configure user access from server-side subnets and other VPN clients by checking the appropriate boxes.
VPN Gateway
You can configure a user account to act as a gateway for the VPN server, allowing VPN users to access local machines and services on the LAN of the VPN gateway. Click Yes and enter the subnets the client serves as a gateway for in the Allow client to act as VPN gateway for these client-side subnets text field.
DMZ Settings
You can permit traffic from Access Server to the client on a specific port using a specific service with DMZ settings. Click Yes and enter the ports in the DMZ IP Address text field.
User Management: User Profiles allows you to manage your VPN client user profiles. This section of the Access Server applies to version 2.9 and newer.
User Profiles

A user profile or connection profile is a collection of configuration instructions and certificates necessary to establish a VPN connection to your Access Server. Each user can have none, one, or many profiles. For instance, your admin user may not have a profile if it only manages Access Server through the Admin Web UI. Other users may have more than one profile, downloaded through the Client Web UI, downloaded with an OpenVPN Connect app, or downloaded manually from the Access Server web interface.
For each profile, this information displays:
SN# | Serial number, automatically assigned. |
Autologin | Whether the profile is autologin (managed in user settings). |
tls-acrypt-v2 | Whether or not the profile uses an additional layer of per-client static encryption on the TLS control channel — a new feature as of Access Server 2.9. |
Created | The date of profile creation. |
Expires | The expiration date of the profile. |
Signing CA | The certificate authority associated with your Access Server that signed this profile’s certificate. |
Comment | An optional comment that you can enter when creating a new profile. Access Server may populate this with informational text. |
Last Used | The date the profile last connected. |
Delete | To delete a profile, check this box and then click Delete. The VPN client using this profile will then need to obtain a new profile in order to connect again. |
New Token URL
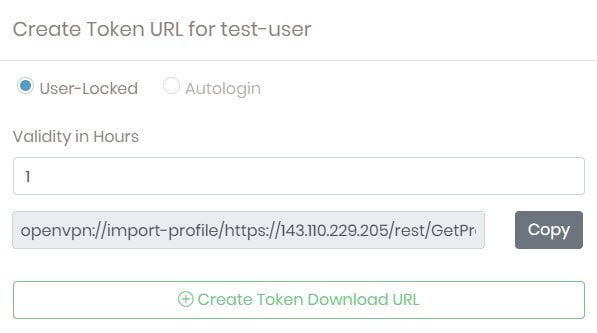
You can create a token URL for your users, an authentication token valid for a specific amount of time. With this URL, you automatically trigger OpenVPN Connect, the VPN client, to create a profile.
Click New Token URL for the user.
Select User-Locked or Autologin and the length of time, in hours, the token is valid.
Click Create Token Download URL.
Copy the automatically generated URL and provide it to your User.
New Profile
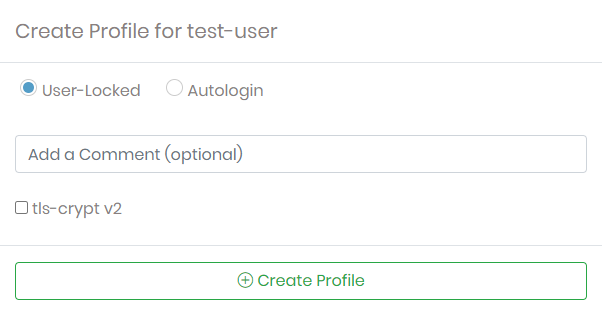
You can manually create and download new user profiles from the User Profiles page:
Click New Profile for the user.
Choose whether it's a user-locked or autologin profile, add an optional comment, select or deselect tls-crypt v2, then click Create Profile.
This creates a new user profile with the current CA for your Access Server and downloads the ovpn file.
Server-locked and compatibility profile
A server-locked profile is a pseudo-profile instructing OpenVPN Connect to authenticate and retrieve VPN connection profiles through the Access Server web interface API. When a user logs in, the client retrieves their profile; after the user disconnects, the client forgets the profile. This allows you to distribute a single universal profile to your users, which allows any valid user on the Access Server to authenticate and establish a VPN connection.
OpenVPN Connect v3.2 and older versions don’t send their intention (either connecting or importing a profile) to Access Server and would generate a new profile for each connection with the server-locked profile. To solve this problem, Access Server recognizes these clients and creates a single compatibility profile per user when needed. This compatibility profile is served to Connect clients v3.2 and older. On more modern clients, each device gets a unique profile.
Note
Access Server 2.9 and newer uses a newer server-locked profile type that works quite differently than the older version. It can be used on community OpenVPN clients (not only OpenVPN Connect) and doesn’t require web service interaction.
User Management: Group Permissions allows you to configure group settings for Access Server clients. These configurations take precedence over any global settings. If a user setting isn’t defined, then the group configurations are used.
Group Permissions

Group Permissions provides a table for configuring group permissions for authentication options. To finalize any changes, click Save Settings and Update Running Server.
Group | To enter a new group, enter the name into the New Group text field on the last row in the table. Whenever you add a new group, click Save Settings and Update Running Server. |
Admin | Check Admin to grant login access to the Admin Web UI for the entire group. |
Allow Auto-login | Check Allow Auto-login to enable auto-login profiles for the entire group. This client configuration enables connecting to the VPN without authenticating with a password. This is useful to connect gateway clients or machines that should always have a VPN connection. |
Deny Access | Check Deny Access to revoke a group's privileges. |
Delete | Check Delete to delete a group record. This won't delete the individual users in that group. |
More Settings
You can configure additional settings by clicking More Settings. These settings are group-specific; they take precedence over any global settings when individual user settings aren’t defined.
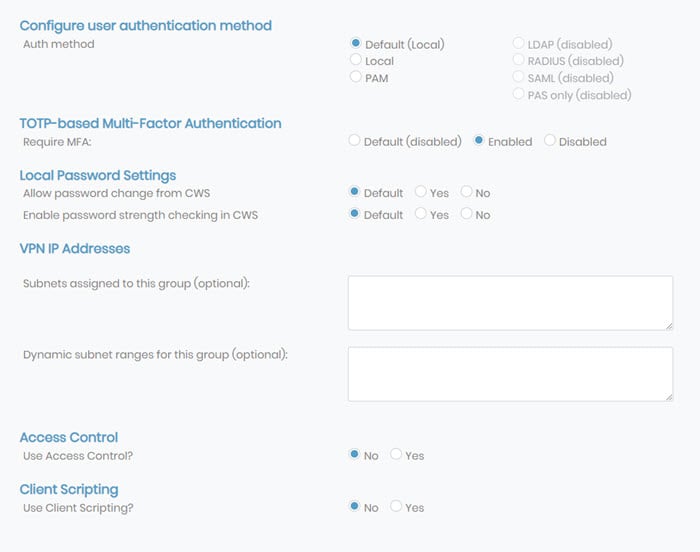
Configure user authentication method
You can assign users and groups to different authentication methods. You must configure LDAP, RADIUS, SAML, or PAS-only methods to select them as the authentication method. If they are not configured, they are disabled for users.
TOTP-based Multi-Factor Authentication
You can control TOTP-based MFA at the group level by enabling or disabling it here.
Local Password Settings
You can manage password options for each group set to local authentication. You can choose to allow password changes and enable password strength checking in the Client Web Server (CWS).
Allow password change from CWS:
Default: Inherit the global setting (defined in CWS settings).
Yes: Users within the group can change their password after signing into the CWS.
No: Users within the group can't change their passwords, and an administrator must manage passwords.
Enable password strength checking in CWS:
Default: Inherit the global setting (defined in CWS settings).
Yes: Passwords for users within the group must meet these rules: must be at least eight characters and must contain a digit, an uppercase letter, and a symbol from !@#$%&'()+,-/[\]^_{|}~<>.
No: Users within the group can create any password of any length that they choose.
VPN IP Addresses
VPN IP Addresses allows you to define a subnet from which Access Server assigns all group addresses and the range within that subnet.
Caution
If you assign a user a static IP and assign that user to a group with the VPN IP addresses defined, then that IP address must be within the range of the group subnet.
Access Control

If you enable group access control, you can permit group access to specific subnets and services.
Allow Access To Networks and services: You can define the subnets and services to permit group access. List subnets in Networks/nbits. List services as Network/nbits:services, for example: 203.0.113.10/24:tcp/80,icmp-echo-request.
Allow Access To groups: Grant access for users in the selected group to communicate with users in another group by selecting them here. To select more than one group, hold down Ctrl on Windows or Command ⌘ on macOS and click on all desired groups. Access Server, by default, isolates groups if you use separated subnets for each, which means that users from group A can communicate only with users in the same group.
Allow Access To Users: Grant access for users in the selected group to communicate with a particular user or selected users. To select more than one user, hold down Ctrl on Windows or Command ⌘ on macOS and click on all desired users.
Important
The functionality for Allow Access To group and Allow Access To Users only works when you use separated subnets for each group on Access Server.
Client Scripting
You have the option to allow client scripting which pushes scripts to VPN clients.
Click Yes and the options to push scripts for Windows, macOS, and Linux display. These scripts execute based on when users and admins connect and disconnect respectively. Therefore, you have the option to push scripts for all four scenarios.
Click one of the options and more settings appear. You can push scripts executed by the client and you can define the environment variables that any of these scripts depend on.
Default Group
You can assign a default group for users not assigned to specific groups. Users inherit the group permissions from the defined group set as the default. You can also leave this set to No Group Selected.