Configuration
With the Configuration sections, you can set up different network configurations supported by the flexibility of Access Server.
Access Server creates an independent, virtual VPN IP subnet on which each connected VPN client is assigned an IP address. When you enable access to private networks, Access Server sets up a NAT or internal routing system to allow VPN clients from the VPN subnet to reach the private network via the server's private IP address.
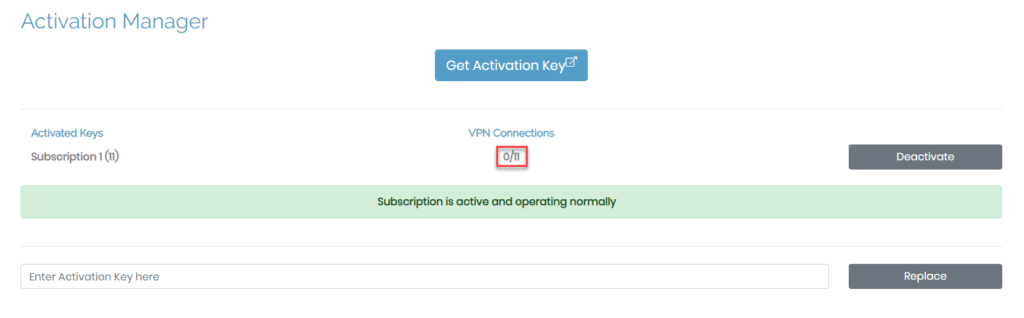
Configuration: Activation provides information on subscriptions or your activated key. If you don't have any on your Access Server, the default number of concurrent connections will be limited to two users. Otherwise, the amount depends on the key.
Get Activation Key

When you purchase an activation key for the number of active connections and time frame chosen, you need to activate it. To do this, simply copy and the key from the Access Server portal into the field, Enter Activation Key here and click on Activate.
Adding and Renewing Your Key
To add more VPN connections, simply increase the number of connections for your subscription. Your activation key scales up or down as you adjust it in the pricing portal on our website. You can see your total VPN connections on your Activation page, the Status Overview page, and your pricing portal.
To add connections, sign in to the portal on OpenVPN.net, increase the number needed, then complete the payment process. Your updates automatically display on your Access Server.
You no longer need to manually enter new keys to renew your activation key. Within the subscription portal, your key automatically renews monthly or annually, depending on your choice.
If you need to replace your subscription key, you can do that by copying and pasting the new key into the field, Enter Activation Key here, then click Replace.
The Configuration: Cluster page allows you to define the settings for Access Server within a cluster architecture. If you haven't installed a MySQL client on your server, you won't be able to configure the settings but will instead receive the message as seen below.
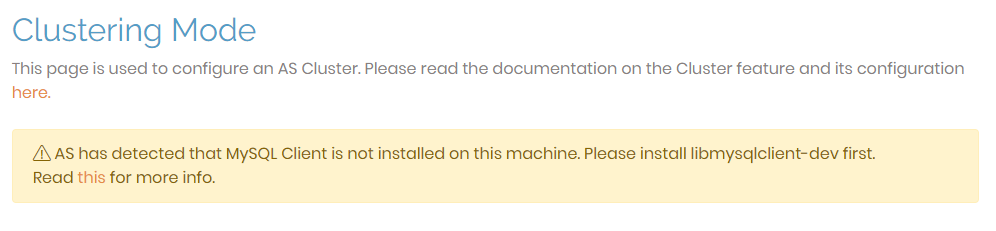
Ensure you install the MySQL client on your server to set up the necessary database. Once you have completed this set up, you are ready to use this UI to finalize and synchronize your new cluster nodes.
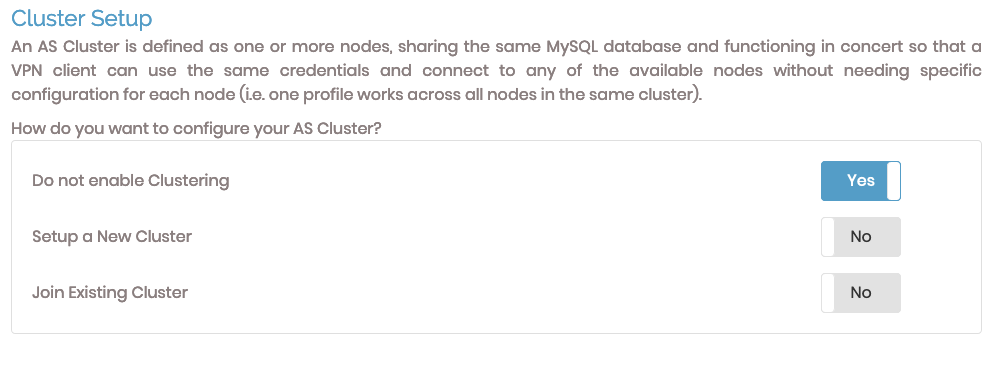
Cluster setup
To configure Access Server for a cluster, you can create a new cluster or join an existing cluster.
Selecting either option displays configuration fields.
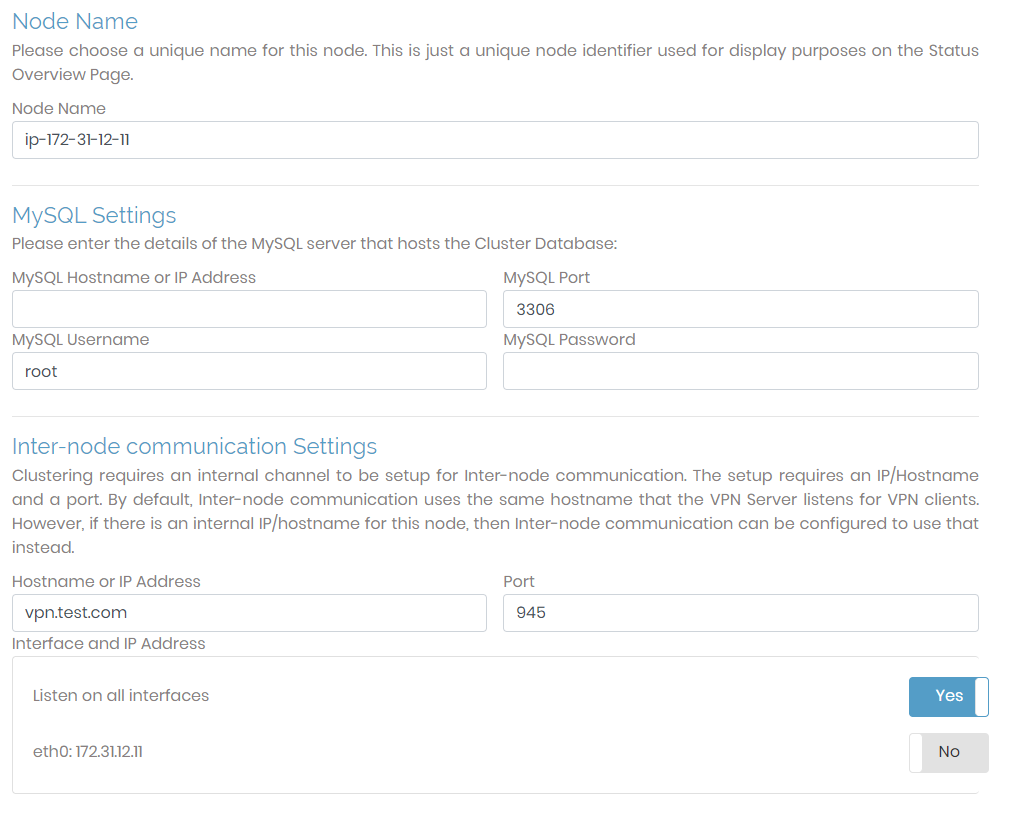
Node Name | A setting for Status display. You define the name for the cluster node that will be displayed in the GUI. You have the option to give this whatever identifier you prefer. |
MySQL Settings | You must set up a MySQL database for a cluster. You can use any MySQL-compatible database (e.g., MySQL, Amazon RDS, MariaDB). You can use these for the cluster configuration as long as you have the necessary credentials and the correct port. |
Inter-node communication Settings | It is necessary to set up an internal channel for inter-node communication in the cluster. This setup requires an IP/Hostname and a port. By default, inter-node communication uses the same hostname that the VPN server listens for VPN clients; the port used is 945. However, if there is an internal IP/hostname for this node, then inter-node communication can be configured to use that instead. Ensure that the port you are using is open. |
More Options for a New Cluster
When you select Setup a New Cluster, found in the Cluster Setup section, additional sections display at the bottom of the page.
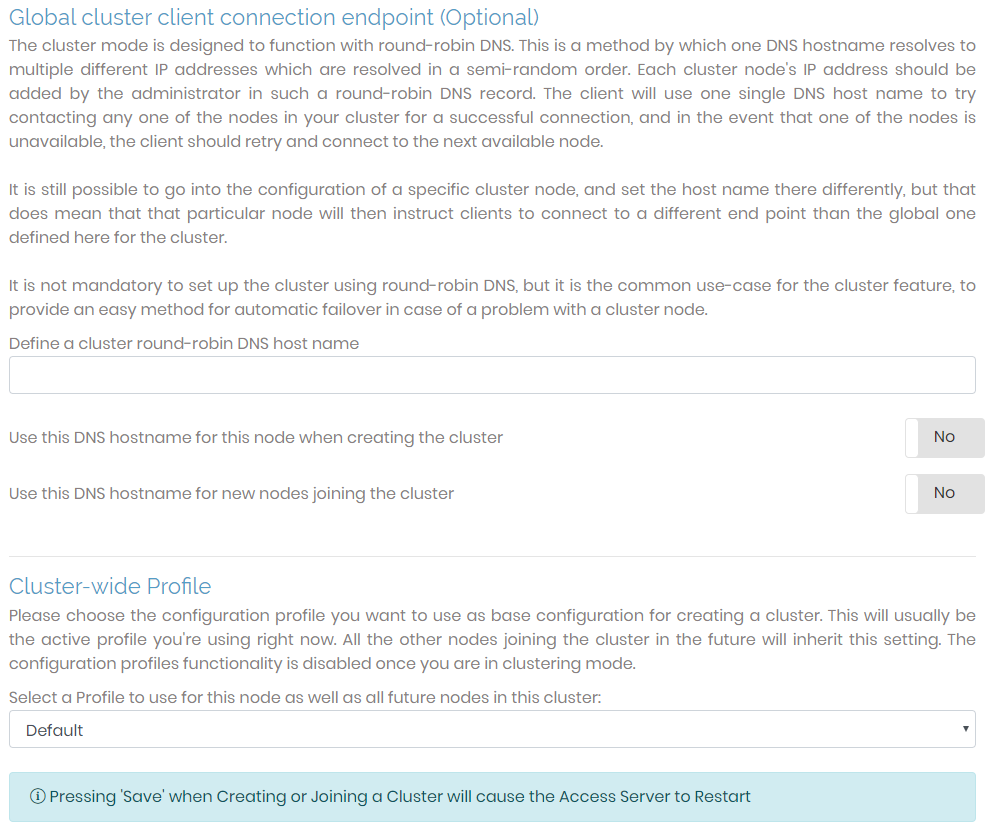
Global cluster client connection endpoint | This is the default DNS hostname used when a client attempts to connect to an Access Server node. Unless specified in the configuration for a particular cluster node, this hostname will be used for the round-robin DNS, which chooses a semi-random cluster node for the client to connect to. |
Cluster-wide Profile | When creating a new cluster, this defines a configuration profile you can use for additional nodes to inherit the same settings. The selected configuration settings can always be changed for each individual cluster. The selected profile only acts as the default setting when adding a new cluster or when settings are not defined for an existing cluster. |
UI for an Access Server Cluster
The following UI fields are relevant to an Access Server that is part of a network of nodes.
After you configure the cluster fields and restart Access Server, this message displays: You are currently viewing Settings for the whole Cluster. The side menu of the Admin Web UI has sections that are inaccessible when viewing the cluster and others that are inaccessible when viewing an individual node. Certain settings can only apply to specific nodes, while others apply to the entire Access Server cluster.
Cluster Overview

The following changes in functionality now affect the Status Overview page. The name in the sub-menu remains the same but when you click it, you navigate to the Cluster Overview page. This page consists of a table listing relevant information for each node in the cluster, providing an overview of the node(s) while also providing an interface to execute actions for each node.
Status/Node Name | This column displays the node status, active or inactive, and the general name. When you click on the column, you can see more information about the node: activation type, authentication, IP address, port, OSI layer, and server cipher.  |
Node IP Address Port | This column displays the host IP address of the node and the port it's using. |
Version | This column displays the Access Server version for the node. Ensure all nodes are running the same version and we recommend being on the latest version. |
VPN Connections | This column lists the total amount of VPN connections permitted for the node based on your subscription. |
More Info | Clicking this icon displays additional information about the node. The table that displays when you click the node's name is the same. |
View Node | Clicking this icon allows you to configure the settings of the specific node. Here, you can view the node's status and current users, generate logs, and configure the routing settings. However, certain settings are unavailable, such as authentication, since these are handled by the cluster instead of the individual nodes. |
Restart | Clicking on this icon restarts the node. |
Remove | Clicking on this icon removes the node from the cluster. |
The Configuration: TLS Settings page allows you to adjust the TLS settings for the OpenVPN protocol (tunnel) and the Access Server web server.
Note
Access Server uses OpenSSL as the SSL library.
TLS options for VPN Server
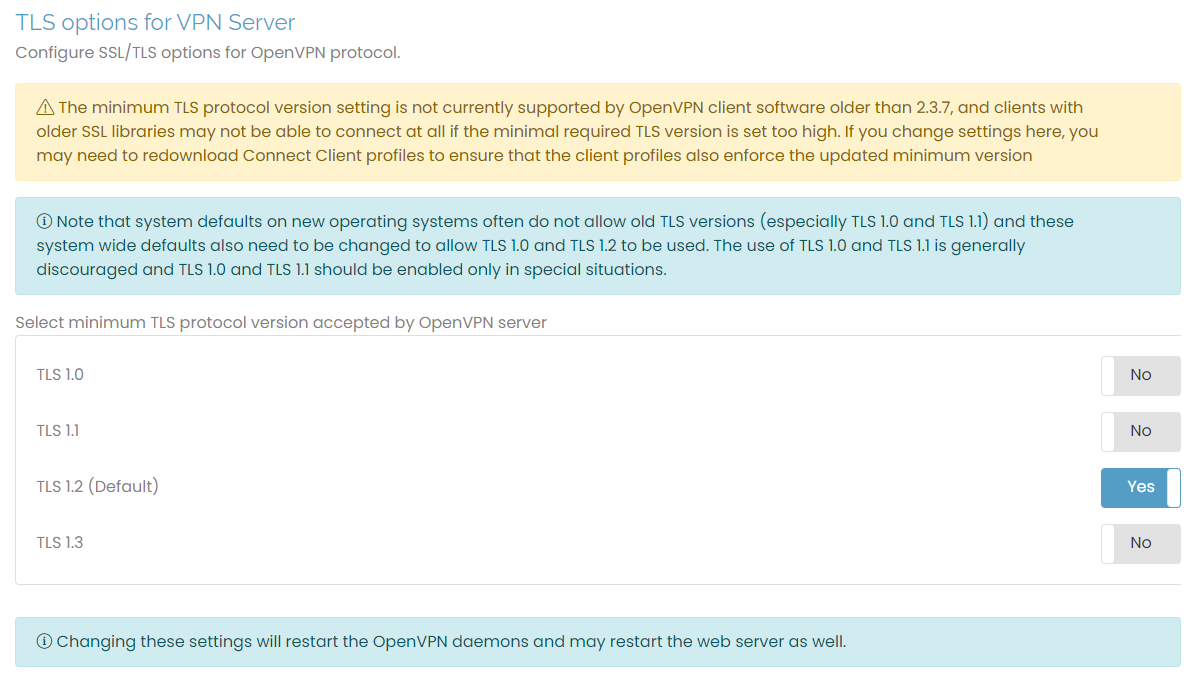
To configure the TLS options for the OpenVPN protocol, click the toggle to select the minimum TLS protocol to use. The default is TLS 1.2.
Not all OpenVPN clients support the minimum TLS protocol setting, which may prevent some clients from connecting to the server. When possible, we recommend updating older clients to use improved security protocols.
Changing these settings here may restart the web server. Ensure you refresh your browser to reload the page after the server restarts.
TLS options for Web Server

To choose between TLS options for the Access Server web server, toggle between the different protocol versions. The default is TLS 1.2. Toggling these settings restarts the server. Again, refresh your browser when you change settings.
Network Settings allows you to edit the settings for hostname, protocol, daemons, and port numbers for the three network servers compromising Access Server: the VPN, Admin Web UI, and Client Web UI servers.
VPN Server
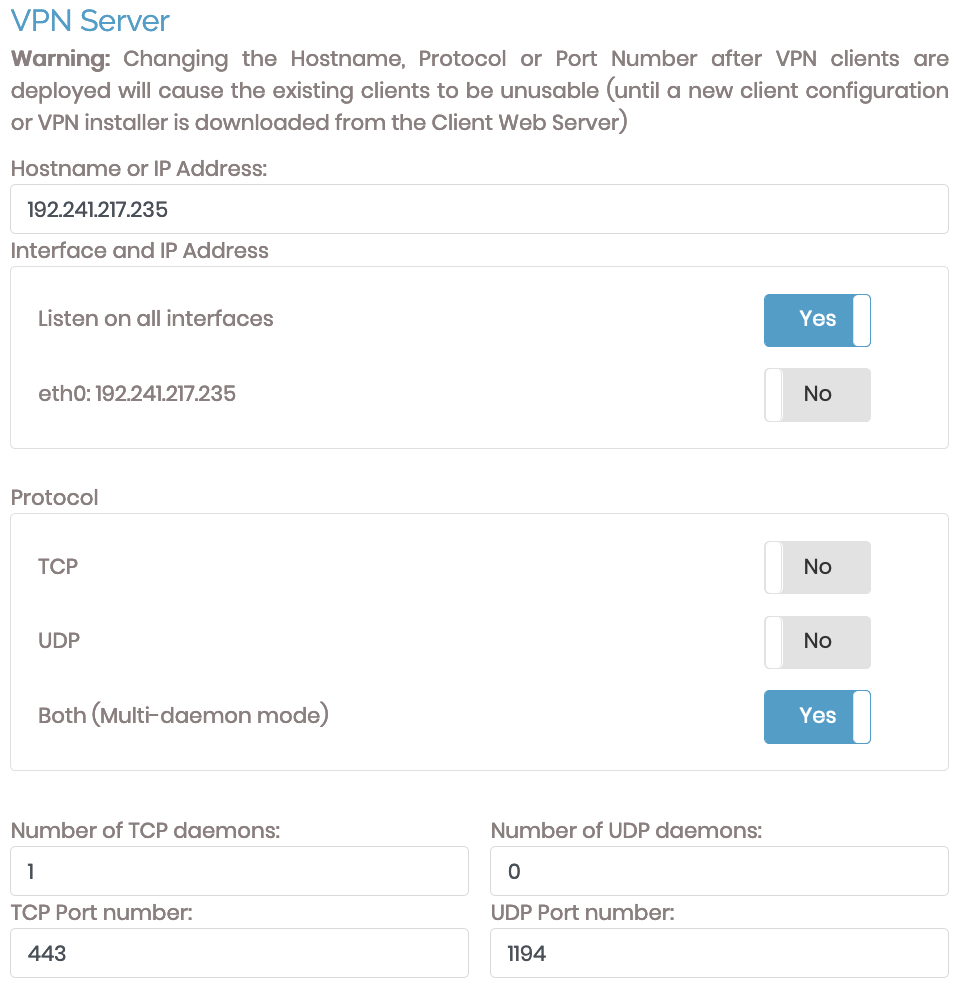
Use this section to configure the VPN server's hostname or IP address, interfaces, protocols, daemons, and ports. Incorrect configuration of your server's hostname or IP address breaks Access Server functionality. Any changes to these settings directly affect client configuration files issued to VPN clients. Thus, making any alterations requires users to update their connection profiles.
Ensure you correctly configure the server's hostname or IP address for Access Server to function. You can choose between using TCP, UDP, or both protocols. You can also define the port used by each protocol. When you select both protocols, you can define how many daemons both protocols may have.
Hostname or IP Address
This is the name or IP address that VPN clients use to access the VPN server. It must be a public IP address or a fully qualified domain name (FQDN). We strongly recommend using an FQDN for this setting.
Interface and IP Address
This configures the port where Access Server listens to VPN server requests. If clients can't access the interface listed, they can't connect to the server.
Protocol
You can choose TCP, UDP, or Both (multi-daemon mode) for protocol options.
Tip
The OpenVPN protocol functions best over the UDP protocol. By default, Access Server's downloaded connection profiles are pre-programmed to try UDP first and then TCP if that fails. However, you may need TCP or both for specific networks that block certain types of traffic.
For example, only traffic for protocols such as HTTP, HTTPS, FTP, SMTP, POP3, and IMAP is allowed on a public network. Most of those are TCP-only. Supporting TCP connections is helpful for connections through such a network. By default, we choose port TCP 443, the same port as HTTPS traffic, which is usually allowed even on restrictive networks.
We consider TCP less ideal due to the possibility of the TCP meltdown phenomenon, which occurs when one transmission protocol is stacked on top of another (such as TCP traffic transported within an OpenVPN TCP tunnel). The underlying layer may encounter a problem and attempt to correct or compensate for it, but the layer above overcompensates, resulting in delays and additional issues.
Daemons and Port Numbers
You can change the number of TCP or UDP daemons and their port numbers with these fields.
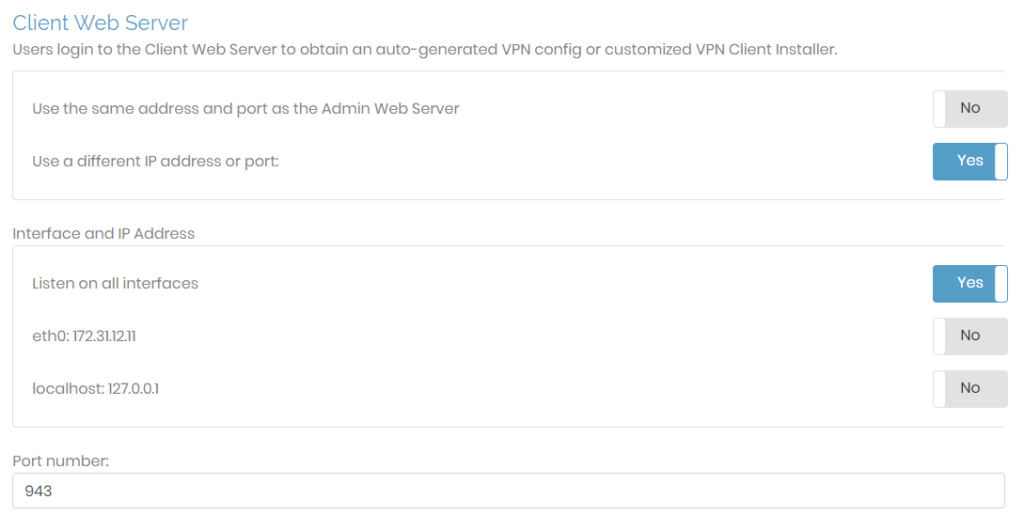
Admin and Client Web servers
When TCP or Both (multi-daemon mode) are selected, you can choose whether the VPN server provides access to the admin and/or client web server services through its IP address and port. If you choose No, they are still accessible via their configured IP address and port number.
Admin and Client Settings
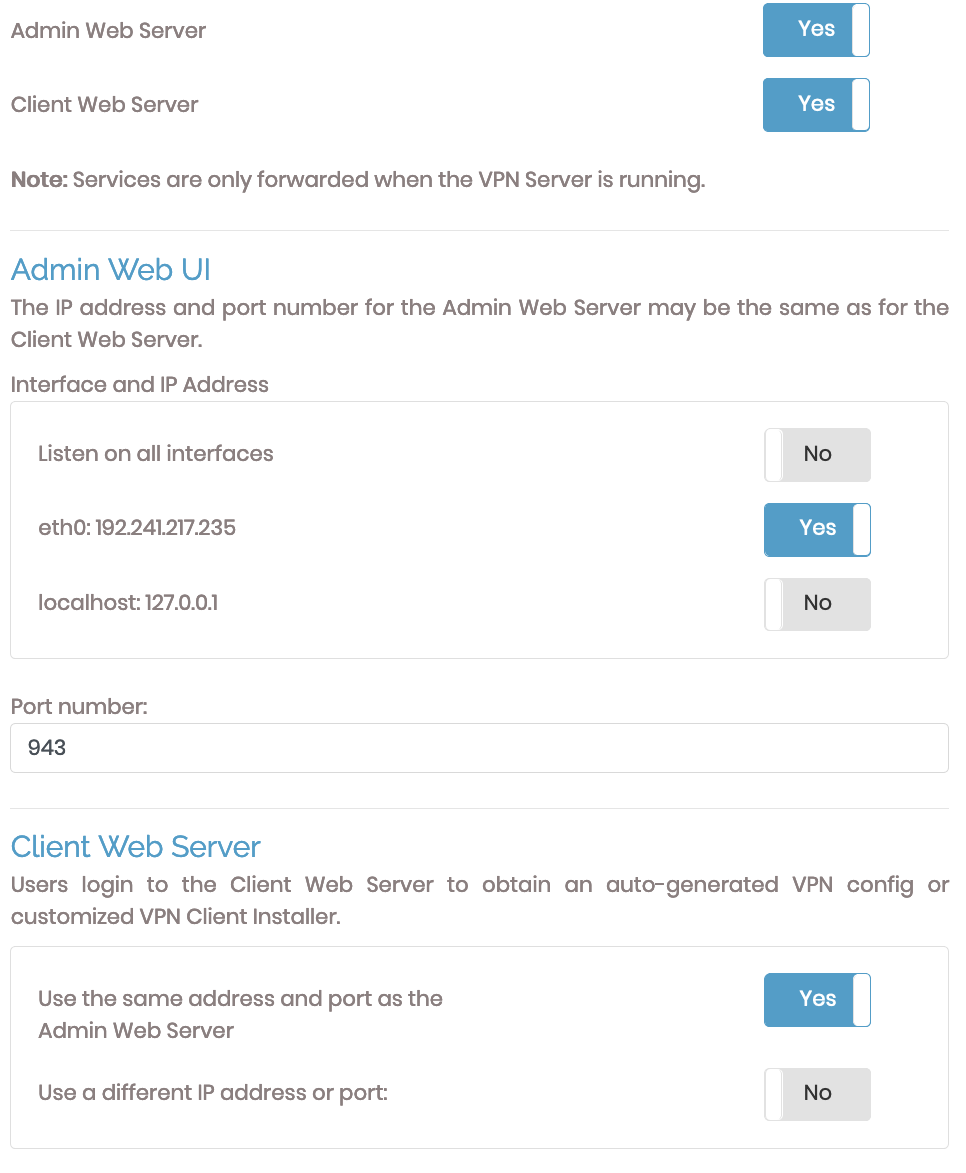
The admin and client UIs sections allow you to configure the ports to access each and the interfaces they listen on. You can change these settings with one of the three options beneath Interface and IP Address.
The Client Web Server section can use the same IP address and port as the Admin Web UI. If chosen, it inherits the port, interface, and IP address defined for the Admin Web UI. You will see additional configuration options if you choose to use a different IP address or port.
If you select Use a different IP address or port, then additional fields display for configuration.
The Configuration: VPN Settings page provides an interface to adjust how Access Server handles routing. You can define the VPN IP subnetworks, configure the settings for routing, and define the clients' DNS server settings. The settings here are global. Access Server also supports defining them at the user and group levels.
VPN IP Network
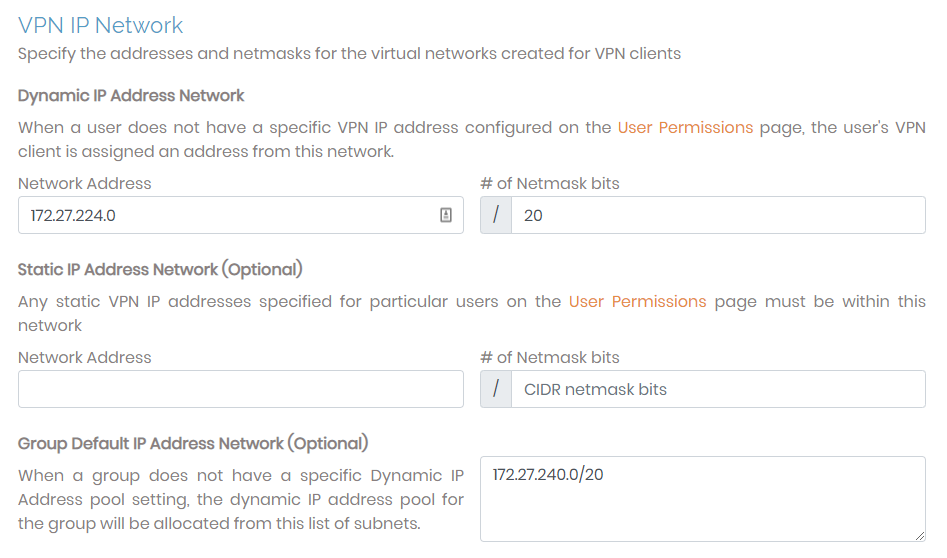
When a VPN client connects to your Access Server, it is assigned a unique IP address on the virtual VPN IP network. This is managed by the dynamic IP address network you can configure with this page.
You can define the VPN IP subnetworks from which an address is pulled when a user connects to the network. If the user doesn't have a predefined IP address, Access Server assigns one for the connection. (You configure predefined IP addresses on the User Permission page at the user level.)
Dynamic IP Address Network | Access Server pulls IP addresses from this subnet unless predefined for specific users. The number of netmask bits determines an upper bound on the maximum number of VPN clients that may concurrently use the subnet. For example, a 24-bit netmask yields a maximum of 254 simultaneous VPN clients (provided that the subscription allows that number of concurrent users). |
Static IP Address Network (optional) | Set up a unique subnet that Access Server uses for static IP address assignment. This is an optional setting. |
Group default IP Address Network (optional) | When a group doesn't have a specific dynamic IP address pool, the group references this subnet list to allocate client IP addresses.
|
Routing

You can configure important global settings here. This is where you globally define whether or not connected users can access server-side resources, whether all traffic routes through the VPN, and whether clients can access network services on the VPN gateway IP address. If you have user or group-specific routing needs, ensure you configure them at the user or group level.
Should VPN clients have access to private subnets |
|
Specify the subnets to which all clients should be given access | This setting allows you to define the server-side subnets that all users can access. |
Allow access from these private subnets to all VPN client IP addresses and subnets | This choice only displays when you select Yes, using Routing. This setting creates a simple way to toggle access to the subnets defined by routing. |
Should client Internet traffic be routed through the VPN? | This setting determines whether internet traffic routes through the private tunnel. If set to Yes, then all connected user traffic goes through the private tunnel. If set to No, then only traffic destined for the private networks traverses the VPN, while other traffic bypasses it. |
Should clients be allowed to access Network services on the VPN gateway IP address? | This setting determines if the VPN should allow access to network resources on the gateway client side. You can enable VPN gateway clients on the User Permissions page. |
DNS Settings
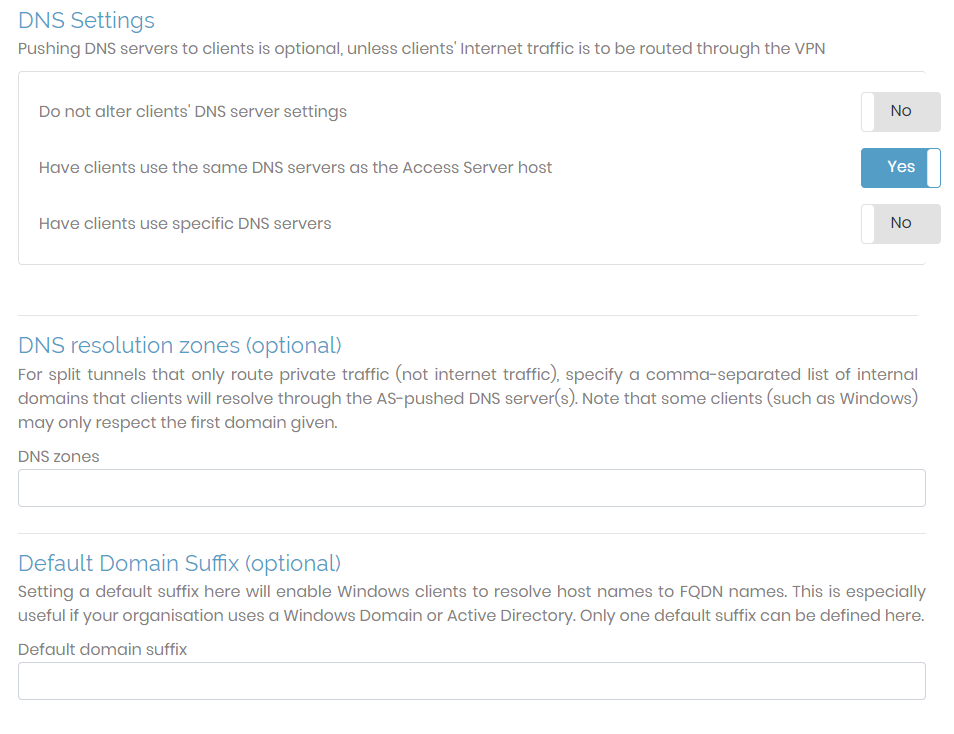
In the DNS section, you can leave the client’s DNS settings as is, use the Access Server’s DNS settings, or push specific DNS server IP addresses.
If you choose yes for Should client Internet traffic be routed through the VPN?, you must have clients use the same DNS servers as the Access Server host or specifically defined servers here.
Do not alter clients' DNS server settings: Access Server doesn't push DNS servers to clients.
Tip
If you enable this setting, ensure internet traffic shouldn't be routed through the VPN.
Have clients use the same DNS servers as the Access Server Host: When a client connects to the VPN, its DNS settings are altered so that the client resolves names using the DNS servers configured for the Unix host running Access Server.
Have clients use specific DNS servers: You can specify particular DNS servers for VPN client use by entering an IP address for the primary DNS server and an optional IP address for a secondary DNS server.
Below these are optional DNS resolution zones and default domain suffix settings. You can alter these settings after setting up Access Server; they are pushed to the client with each connection.
DNS Resolution Zones | This optional setting (also known as split-DNS) allows you to define DNS zones that will be resolved by DNS servers pushed from the Access Server. |
DNS Domain Suffix | This optional setting is intended as a Windows-OS-specific setting. Since Windows clients might only use the first domain provided in DNS Resolution Zones, you may need to define a suffix for the domain zone here. This resolves DNS resolution conflicts between clients running on Windows that may not occur in clients installed on other operating systems. |
Caution
We don't recommend defining the same DNS zone in DNS Resolution Zones and DNS Domain Suffix fields.
The Configuration: Advanced VPN page provides advanced settings to configure routing and security settings. Consider it an extension of Configuration: VPN Settings.
OpenVPN data channel offloading
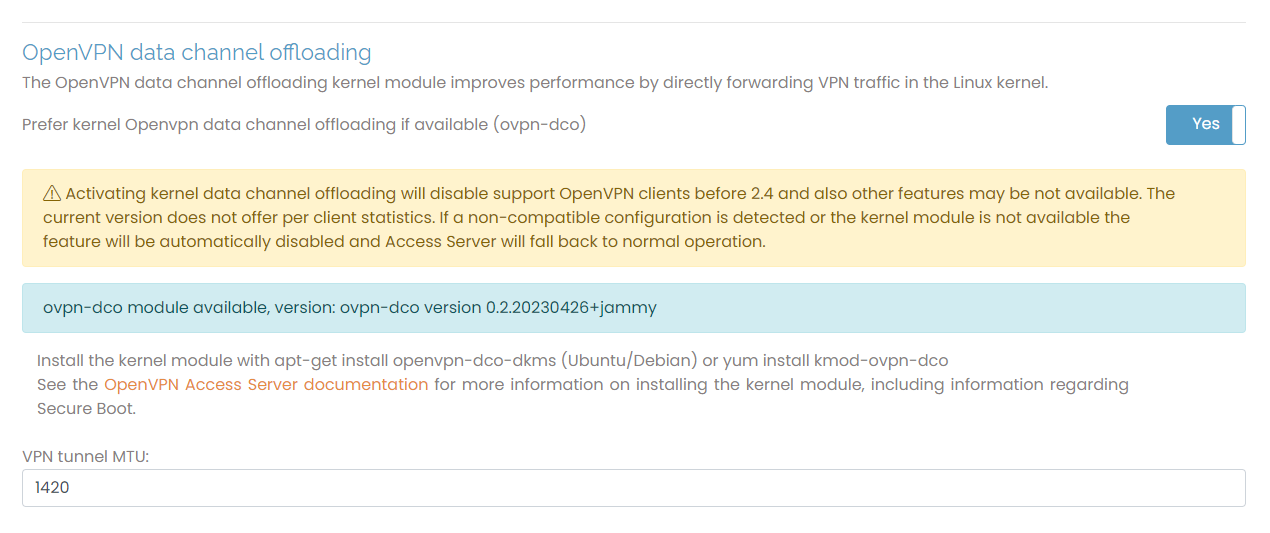
OpenVPN data channel offloading (DCO) improves performance when enabled on the VPN server and clients. DCO offloads the data channel encryption and decryption to the kernel space. Handling encryption in the kernel space rather than the user space improves performance.
Prefer kernel OpenVPN data channel offloading if available (ovpn-dco) | This setting enables DCO for Access Server when the kernel module, openvpn-dco-dkms, is installed on the server. |
VPN tunnel MTU | Set the maximum transmission unit (MTU) for Access Server. NoteFor VPN tunnel MTU, the minimum allowable value is 576, and the maximum is 65536. We recommend setting it to 1420 when you enable DCO. |
Inter-client Communication

This setting determines if users can connect with each other.
Should clients be able to communicate with each other on the VPN IP Network? If allowed, VPN clients can exchange packets with each other on the VPN virtual subnet.
Allow VPN Users with administrator privilege to access all VPN client IP addresses: This gives the administrator privileges to access all client VPN IP addresses. You configure admin users on the user permissions page.
Multiple Sessions per User

This setting determines if the same user can have multiple simultaneous connections to the server. Each connection is counted as a separate concurrent user in terms of user limits. If you configure a user with a static IP address, they can't have multiple concurrent VPN connections, regardless of this setting.
TLS Control Channel Security
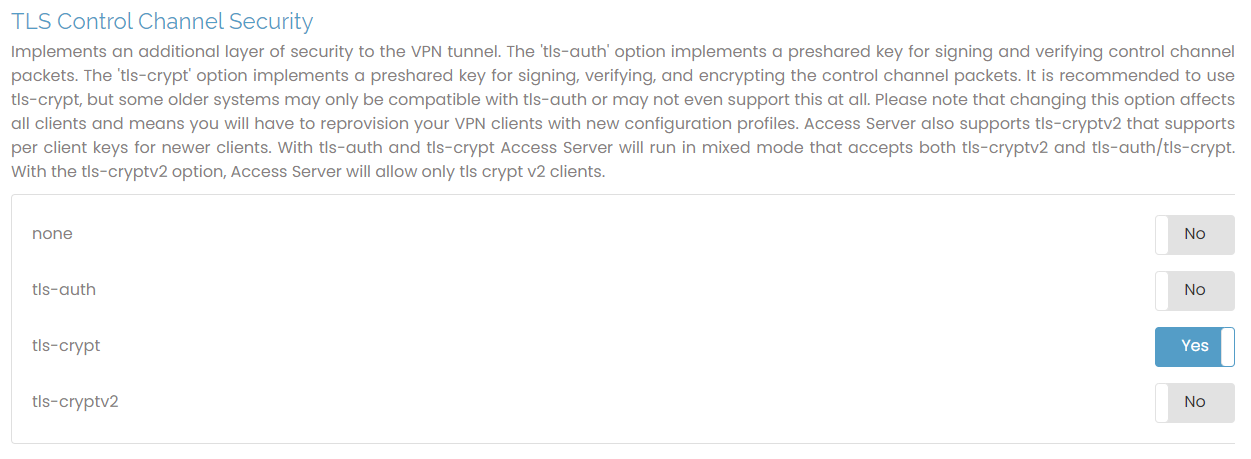
OpenVPN protocol uses two communication channels during the VPN session. One is the control channel, where key negotiation, authentication, and configuration occur. The other is the data channel where the encryption packets are. The control channel can be secured further by signing and verifying the packets with a shared key. This is called TLS Auth. With TLS Crypt for OpenVPN, we add another layer of encryption to the control channel on top of signing and verifying with a shared key as TLS Auth does. This extra layer of encryption applies even to the key exchange before the TLS session starts.
You can choose from these values:
none: no additional signing and verification is done on packets.
tls-auth: use a shared secret key to sign and verify packets.
tls-crypt: same as tls-auth but also encrypts TLS control channel (default).
tls-cryptv2: same as above but uses a per-client key instead of a shared secret key.
Access Server 2.9.0 and newer support all the above options, with tls-crypt as the default.
Data channel ciphers
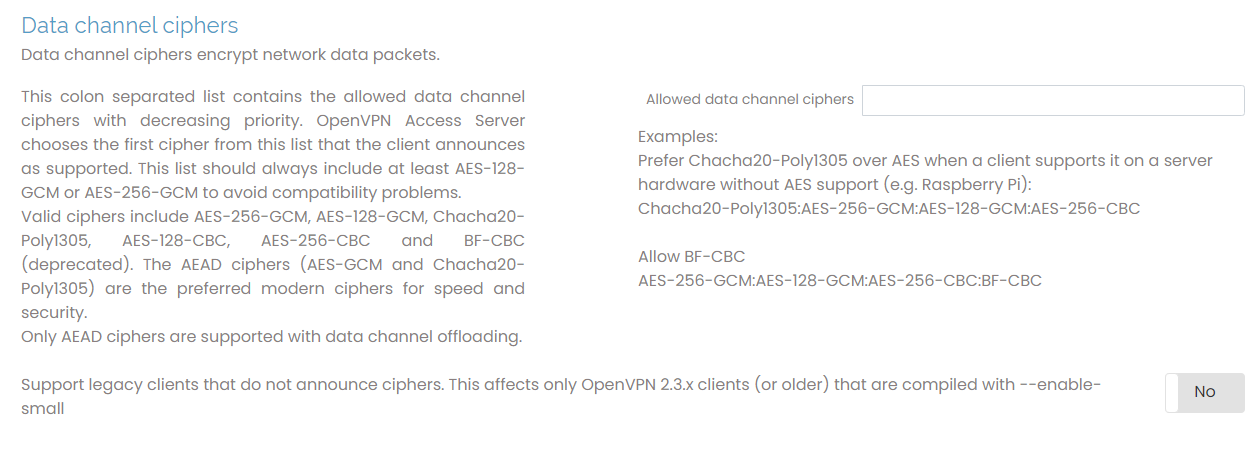
The data-channel encryption cipher encrypts and decrypts the data packets transmitted through the OpenVPN tunnel. Here, you can configure it on the server and client sides. The server and client must agree on a cipher they both support and allow. Enter the ciphers here in a string format with multiple ciphers separated by a colon, for example, AES-256-GCM:AES-128-GCM:CHACHA20-POLY1305.
Microsoft Windows Settings
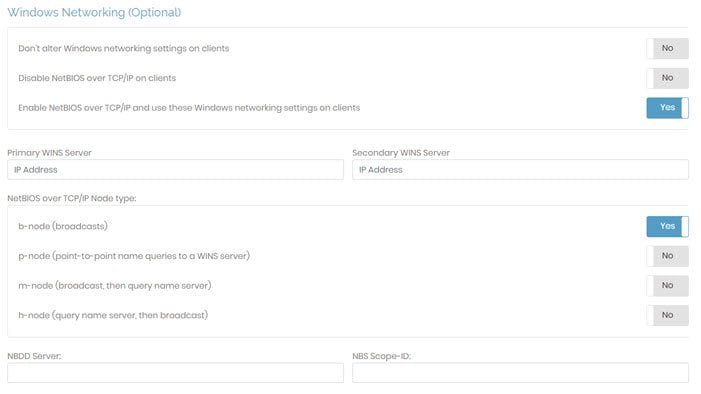
You can configure Windows-specific settings to enable/disable NetBios for connected clients. These settings don’t affect clients installed on other operating systems.
Network Basic Input/Output System (NetBIOS), is an API providing services for legacy applications to communicate with other computers within a local area network (LAN). A typical use case for NetBIOS is that a user running a page-formatting application might want to print remotely to a printer within its LAN. In the case of Windows, many of its older operating systems use Windows Internet Name Service (WINS) as a legacy name registration and resolution service. WINS maps NetBIOS names to IP addresses, hence why these settings may be important for Windows clients.
Don't alter Windows networking settings on clients | This is the default setting for Windows clients. Windows clients that use NetBIOS over TCP/IP will continue to do so. The settings configured on the client are used when connecting to the VPN. |
Disable NetBIOS over TCP/IP on clients | Disabling this protocol prevents Windows clients from using NetBIOS over TCP/IP, which can cause issues when communicating with the client. It should be noted that disabling this may also prevent Windows clients from connecting to your VPN host server. |
Enabling NetBIOS over TCP/IP and use the Windows networking settings on clients | When you enable this protocol, Windows clients using NetBIOS can communicate through TCP/IP Networks. This setting uses specified network settings for Windows clients when accessing the VPN. If enabled, NetBIOS settings appear at the bottom of this section. You are required to define the primary WINS server. This setting allows Windows VPN clients to convert NetBIOS host names into IP addresses. You can define an optional, secondary WINS server to provide fault tolerance. You also have the option to choose the NetBIOS over TCP/IP node type. Click one of the radio buttons to determine which resolution method you want Windows to use to resolve NetBIOS names. By default, the b-node (broadcasts) is chosen. Additionally, you can specify the IP address of an NBDD (NetBIOS over TCP/IP Datagram Distribution server). Since NBDD uses the UDP protocol, you must make sure that you set your VPN server protocol to Multi-daemon. Optionally, the NetBIOS over TCP/IP Scope ID can be specified as a character string (appended to a NetBIOS name). NetBIOS Scope IDs allow computers to use the same (NetBIOS) computer name as long as they have different Scope IDs. |
Connection Security Refresh

This setting determines the amount of time in minutes Access Server renegotiates each TLS session.
Private Routed Subnets (Optional)

This setting allows you to define specific subnets that should use routing instead of NAT, even when you select NAT as the default access method in VPN Settings. By adding subnets to this configuration, those networks will use routing, allowing direct communication with the VPN clients while other traffic continues to use NAT. This option provides flexibility in managing traffic flow to specific networks in your VPN setup.
Additional OpenVPN Config Directives (Advanced)
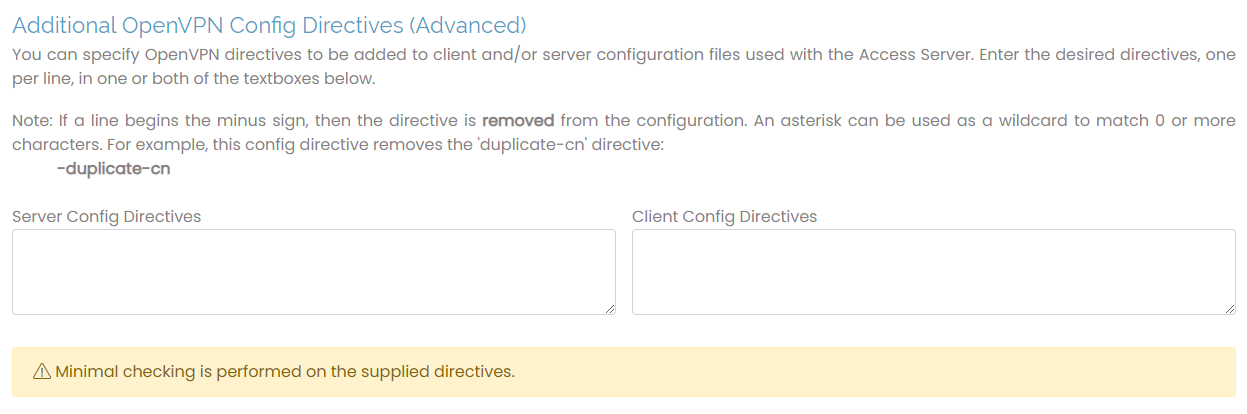
You can configure directives that aren’t covered elsewhere in the text boxes for the server and client side. For instance, to push a specific interface metric to clients, you would enter the following in the Server Directives:
push “route-metric 10”
To push a specific route to clients:
push “route 10.0.0.0 255.255.255.0”
To alter the cipher used for the VPN tunnel to AES-256-CBC, enter the following in both Server and Client Config Directives:
cipher AES-256-CBC
The Configuration: Web Server page provides general information about the SSL web server certificates and keys, and the ability to upload CA bundle files, certificates, and keys.
Active Certificate
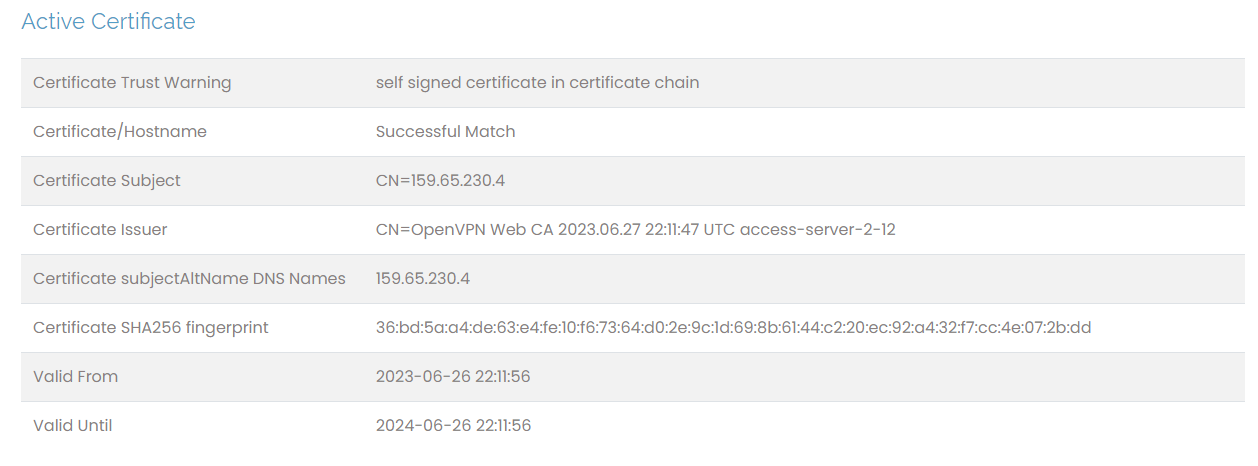
This first section details the information about the SSL web certificate. When installing Access Server, you encounter warnings about your browser not trusting the Admin Web UI's security certificate. This is because Access Server uses a self-signed certificate to start. You can replace that with a verified and trusted SSL certificate.
In order to set this up, ensure you have a Fully Qualified Domain Name (FQDN) to replace the IP address for connecting to the Admin Web UI.
Changing the Web Server Certificate
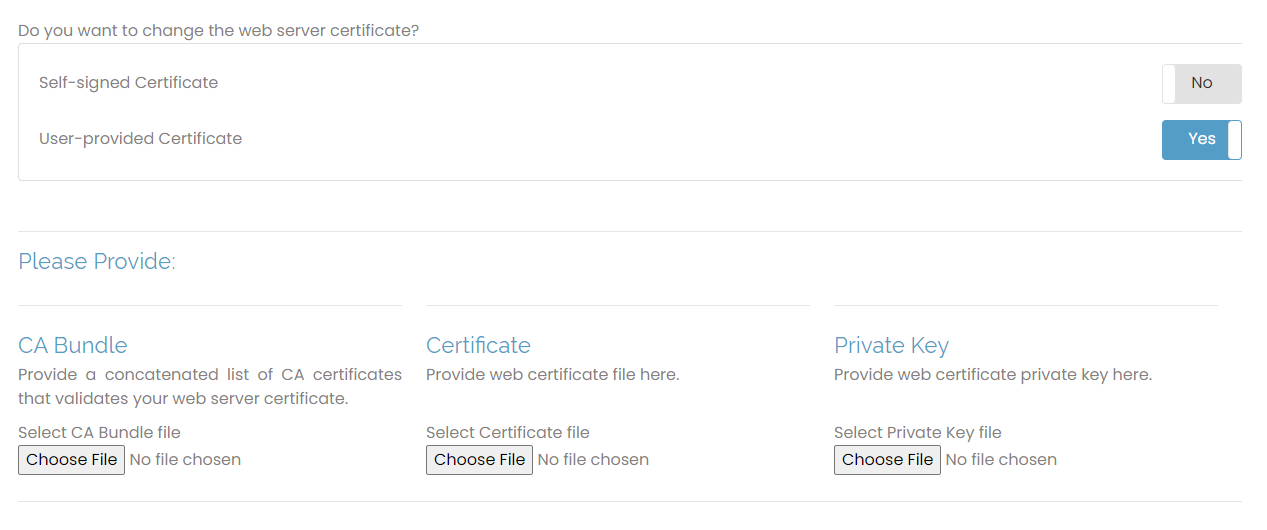
This section is where you upload your commercial SSL web certificate bundle. We recommend providing a valid web cert from a root authority to avoid the warnings associated with a self-signed certificate.
When you click the toggle for User-provided Certificate, you can provide a certification bundle.
To upload and validate your own certificate, you need three items:
A signed certificate from your certificate authority.
A CA bundle or intermediary files from your certificate authority.
A private key created when making the certificate-signing request.
Ensure the certificate file format is Apache-compatible, such as X509/Base64 or PEM/CER format. If you receive files in .p12 or .pfx format, they are suitable for Windows but not Linux. You can convert the certificates to the required format using a certificate utility.
The Configuration: CWS Settings page allows you to configure certain aspects of the Client Web UI and the limited API functionality.
Configure CWS Access

This section allows you to provide users with access to the Client Web UI, or the client web server (CWS), where they can download clients or profiles for their VPN connections. By default, Restrict Client Web Server access to Access Server Administrators is set to No. This allows users to sign into the Client Web UI and access the CWS. Change this to Yes , and only users defined as administrators have access.
Note: This doesn’t prevent access using the XML-RPC/REST API. The next section covers that.
Configure XML-RPC/REST API
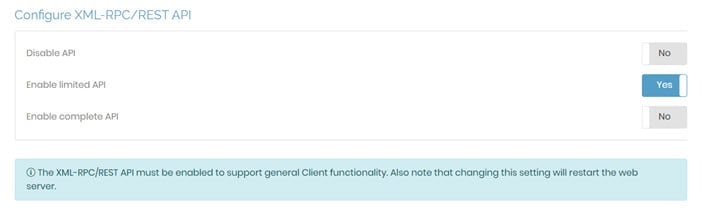
The configurations within this section allow you to control access using the API with the following options:
Disable API: Prevent users or clients from accessing the web server using the API.
Enable limited API: Allow clients to access the server with a limited API, which works for most cases requiring programmatic interaction between the CWS and other software.
Enable complete API: This setting is only necessary to fully control Access Server via a custom API client.
Customize Client Web Server UI
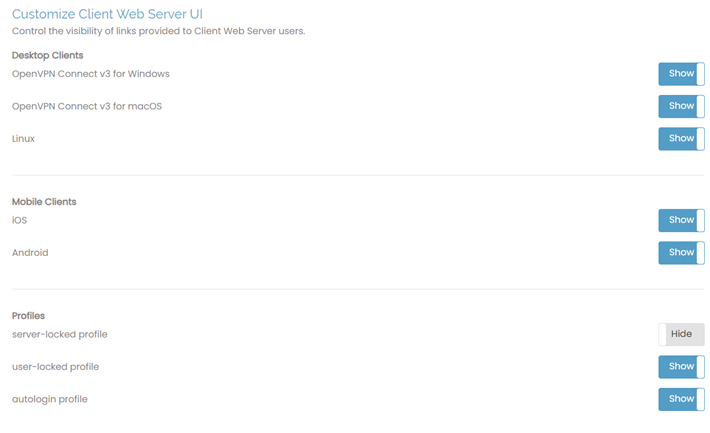
With these configuration options, you can determine what users see on the Client Web UI. You can display all options or select specific clients and profile types. For instance, hide user-locked profile if you don’t want users to download their own profiles.
OpenVPN Connect v3 desktop downloads display by default.
Note
Older Access Server versions included OpenVPN Connect v2 clients in the Desktop Clients options. However, the Admin Web UI for Access Server 2.14 and newer no longer includes them.
We recommend running the latest Access Server version.
The Configuration: Failover Settings page allows the admin to enable and configure the built-in Access Server failover features. This is a UCARP active/passive failure feature that can be enabled with a simple toggle button.
Note
UCARP failover doesn't function within AWS due to network restrictions.
Redundancy Model
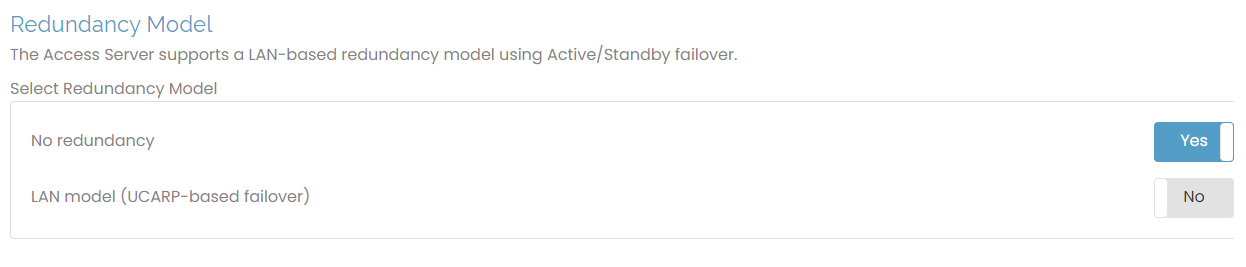
This section allows you to enable the LAN-based redundancy model in case of server failure. Select the option LAN model (UCARP-based failover) to enable this feature.
LAN model
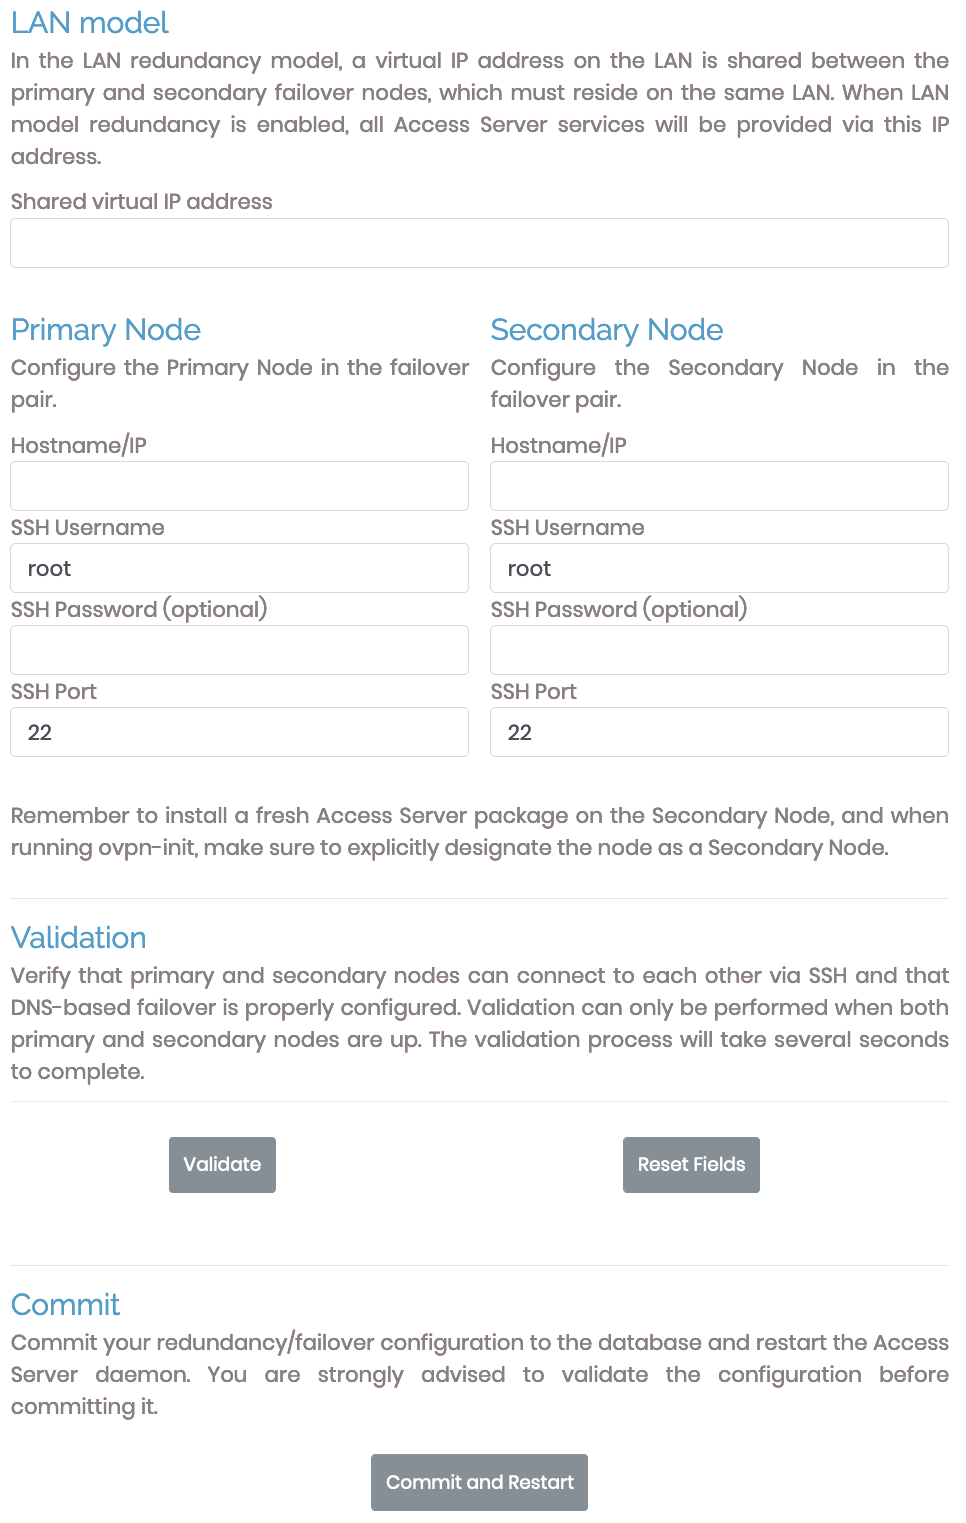
Access Server failover uses the LAN redundancy model, in which the primary and secondary nodes have IP addresses in the same subnet and share a third, virtual IP address within that same subnet.
Important
When you install Access Server on the secondary node, ensure you designate it as a secondary node by entering node when prompted, "Will this be the primary Access Server node?"
Shared virtual IP address | Enter the shared virtual IP address here, ensuring it's within the same subnet as the IP addresses of the primary and secondary nodes. |
Primary Node | Configure the details for the primary Access Server node: Hostname/IP, SSH username, SSH password (optional), and SSH port. |
Secondary Node | Configure the details for the secondary Access Server node: Hostname/IP, SSH username, SSH password (optional), and SSH port. |
Validation
When you complete the details for the primary and secondary nodes, you then validate the setup. Validation creates new log files in the var/log directory titled, openvpnas-node.log.
UCARP relies heavily on rsync to share databases. Communication and any errors are recorded in log files.
Commit
The final step after validation is to click Commit and Restart.
The Configuration: CA Management page enables you to view the certificate authority (CA) certificates for your Access Server as well as create new ones.
Access Server 2.9 and newer lets you view the details of the current and past CA certificates and, if desired, issue a new one.
Managing CA certificates
Access Server 2.9.0 and newer provides a CA Management section in the Admin Web UI where you can view your current CA certificates and generate new ones. Access Server manages and issues these certificates—clients that connect with an older certificate will continue to connect as long as the public and private keys of the certificates on your Access Server match.
Certificate lifetime cycle
By default, Access Server generates a certificate authority (CA) from which server certificates and client certificates are generated with a 10-year lifetime, although this is adjustable. For a VPN connection to succeed, both the client certificate and the CA it uses to verify against must be valid. To ensure this remains the case, if Access Server starts up and detects the current CA is older than one year, it generates a new CA and uses that for creating new client certificates. This ensures that any newly generated user profiles with their associated certificates are valid for at least 9 years.
CA overview
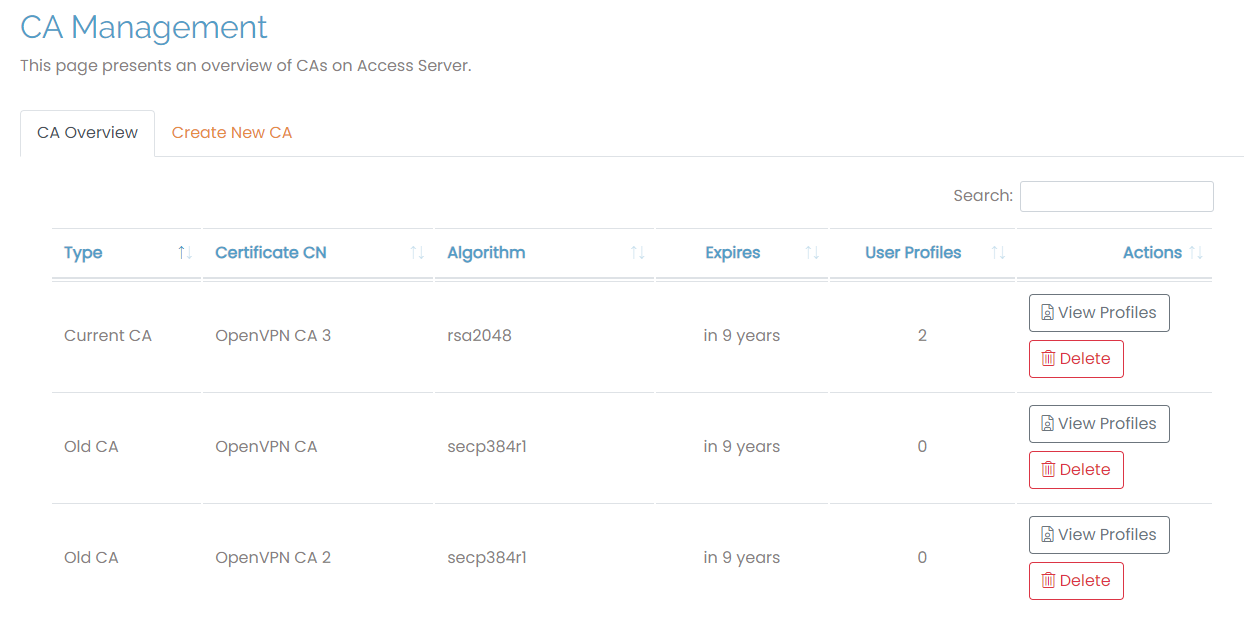
The CA Management tab displays all of the CAs on your Access Server with these details:
Type: Whether it’s the current or a previous CA. There must always be one current CA.
Certificate CN: The name of the certificate. The CA issued when you launch your Access Server is named “OpenVPN CA”. When you create new CAs, you can define their names.
Algorithm: The signing algorithm for the keys.
Expires: The time remaining until each CA expires.
User Profiles: The number of profiles associated with each CA.
Actions: Click View Profiles to view the profiles for the selected CA in the User Profile section of the Admin Web UI. Click Delete to delete the CA and any associated user profiles.
Create a new CA
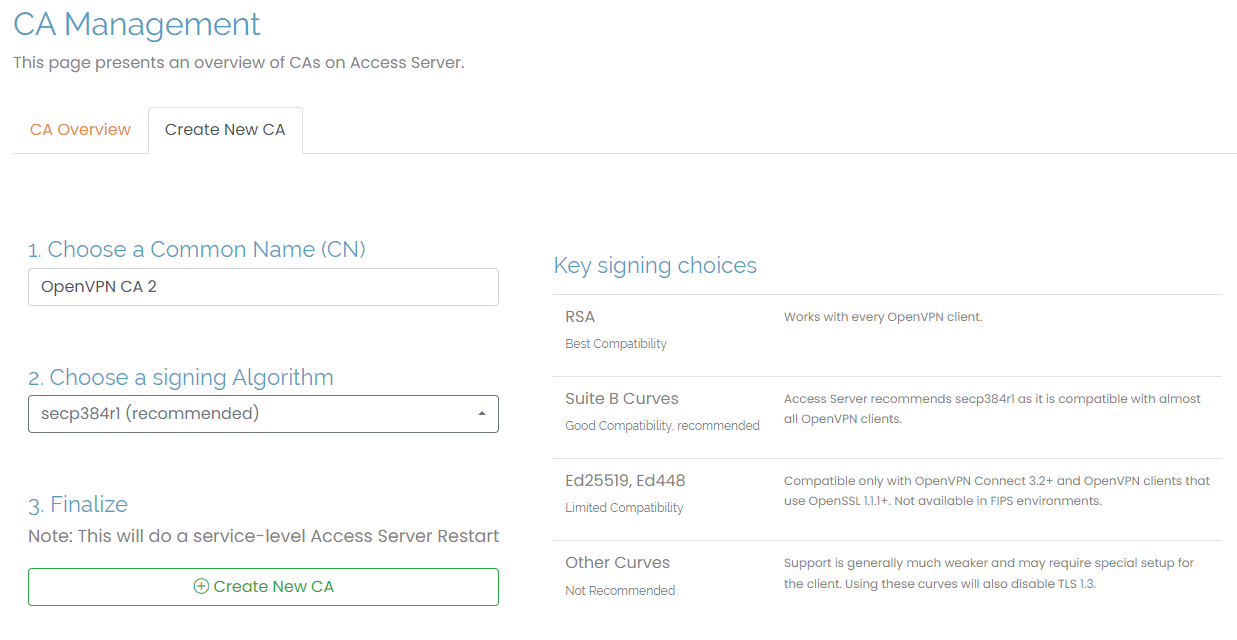
You can create a new CA by clicking on the Create New CA tab. Enter a Common Name (CN) and choose a signing algorithm. We recommend secp384rl for your algorithm and provide some inline information to help you with your key-signing choices. When you create a new CA, this forces a service-level Access Server restart.