Tutorial: How to Set Up RADIUS Group Mapping with a Post-Auth Script
How to use a custom Python script to automate group mapping with RADIUS authentication.
Overview
You can configure Access Server to use Remote Authentication Dial-in User Service (RADIUS) to provide user authentication. Access Server becomes the RADIUS client, communicating with your RADIUS server containing user credentials. RADIUS is an out-of-the-box Access Server authentication method configured in the Admin Web UI. However, you must configure user permissions and group assignments separately. You can use a Python script to automate this with your centralized authentication.
After successful authentication, the Access Server runs a post-auth (post-authentication) script written in Python3 to perform additional tasks. We provide a post-auth script sample for you to customize for your RADIUS server.
With this tutorial, you can do the following:
Translate Active Directory groups into Access Server groups so that scripts, permissions, and IP assignments correlate to a specific AD group.
Assign a static IP address to a particular user given their AD profile.
AD user/group specific controls for the Access Server 'admin', 'autologin', 'lzo', 'reroute_gw', and 'deny-web' flags.
An installed Access Server
RADIUS authentication configured
RADIUS server
For an Active Directory setup, the NPS role installed and running.
Tip
Refer to the Active Directory RADIUS tutorial for information about the Network Policy steps.
Begin by downloading the post-auth sample script:
Sign on to your Access Server via SSH and obtain root privileges.
Download the script (https://packages.openvpn.net/as/scripts/post_auth_radius_mapping.py):
wget https://packages.openvpn.net/as/scripts/post_auth_radius_mapping.py -O /root/radius.py1
This saves the script to the /root/ directory with the name radius.py.
Tip
If you have problems downloading the script this way, you may need to install/update the wget and/or ca-certificates package(s) on your system.
After downloading the script, load it into your Access Server configuration.
Load the script:
sacli --key auth.module.post_auth_script --value_file=/root/radius.py ConfigPut
sacli start
You've installed the script, and it's ready for use.
Important
If you still need to configure your Access Server to use RADIUS authentication, ensure you do so.
With the script installed, you have three use cases for it:
Add user properties automatically.
Automate group mapping.
Set static IP addresses.
Add user properties automatically
You can add user properties with the RADIUS post-auth script using the Callback-Number RADIUS reply attribute. The callback-number implementation is similar to Linux's permission mask values and consists of the following five bits:
1st (left-most) bit: prop_superuser | Add admin privileges to the connecting user? 0 = no 1 = yes |
2nd (left-most) bit: prop_autologin | Can this user download an autologin profile and have autologin privileges? 0 = no 1 = yes |
3rd (middle) bit: prop_lzo | Turn on LZO compression? 0 = no 1 = yes |
4th (left-most) bit: prop_reroute_gw_override | If redirecting the user's internet traffic over the VPN is turned on globally, the behavior should be modified so that 0 = disable internet routing, 1 = only route DNS servers. NoteThis option has no effect when the redirection isn't turned on globally and thus can't be used to turn on redirection specifically for individual users when the option is turned off globally. |
5th (left-most) bit: prop_deny_web | Deny user access to the web interfaces? 0 = no 1 = yes |
Caution
The processing script ignores any values above not set to zero (0) or one (1) and uses your Access Server's default values. In this article, we use the letter F to indicate default values. The script requires exactly five characters specified to process the callback-number reply attribute. If you don't want to override a specific option, mask it with a letter F, e.g., 11FFF.
Examples
Indicate that a user/group is an admin, with autologin enabled, without overriding any other options: Set callback-number to 11FFF.
Turn off LZO compression for a specific user/group: Set callback-number to FF0FF.
Where to set the callback number
You have two options for where you set the callback number: at the user level or the policy level. For example, here's where to set that with Active Directory:
Set the callback at the user level 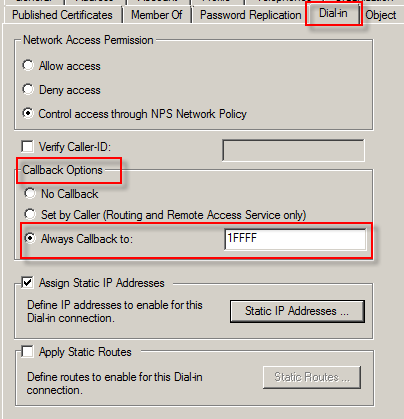 |
|
Set the callback at the policy level 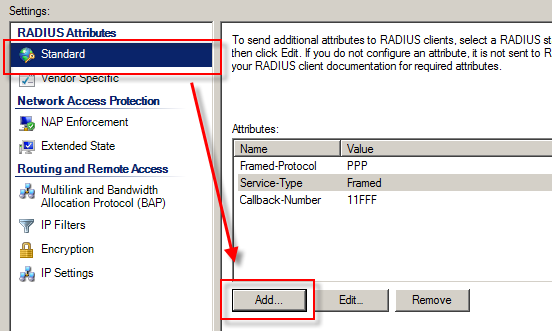 |
|
You can set the callback at both the user and policy levels concurrently. With this configuration, the user level overrides the policy level.
Automate group mapping
You can dynamically map your Active Directory groups to your Access Server groups. Once mapped, groups inherit appropriate group permissions, scripts, and access controls.
To map groups:
Create multiple policies in the Active Directory Network Policies folder inside the NPS snap-in. Each policy corresponds to a single Access Server group.
Example: The different Active Directory groups, Administrators and Sales, need separate policies granting RADIUS access.
For each policy, add the Framed-Pool reply attribute containing the Access Server group name for the policy (e.g., Admin).
You can map multiple Active Directory groups to a single Access Server group.
Active Directory and Access Server groups don't have to have the same corresponding names.
Example
Suppose we want to map the following Active Directory Groups to Access Server groups:
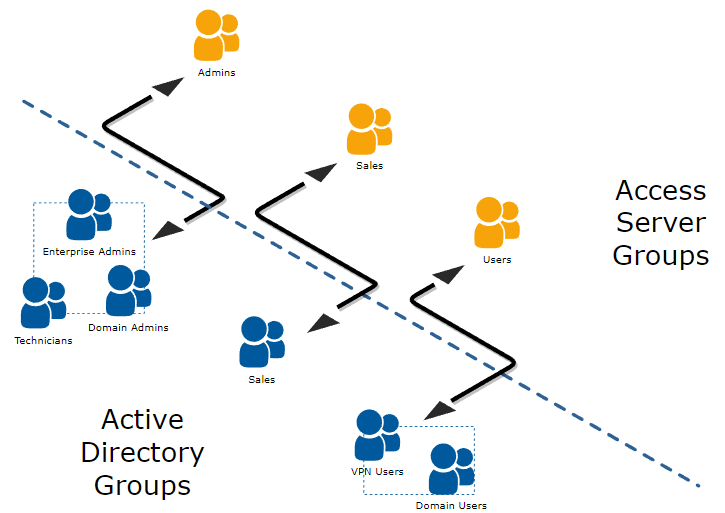
To create these mappings, you create three NPS policies as such:
Policy | Conditions | Settings |
|---|---|---|
NPS Policy 1 | Enterprise Admins OR Domain Admins OR Technicians | Add Framed-Pool reply attribute = Admins |
NPS Policy 2 | Sales | Add Framed-Pool reply attribute = Sales |
NPS Policy 3 | Domain Users OR VPN Users | Add Framed-Pool reply attribute = Users |
Caution
The processing script doesn't run error checking for typos or misspelled group names. We recommend that you test these policies after creating them. A typo prevents your users from signing into your server.
Set static IP address within Active Directory and NPS
You can configure Access Server to accept static IP assignments from Active Directory. This uses the Dial-in tab for the user's properties, similar to the setup for automating user properties.
Ensure you satisfy the following requirements first:
The user in question belongs to an Access Server group (set manually in the Admin Web UI under User Permissions or automatically with the post-auth script).
You've defined a group-specific subnet for the user's group.
The static IP address the user gets assigned resides in the group-specific subnet.
Important
You can't use global dynamic/static pools.
If you've met these three criteria, you can assign the specific, static IP address for the user in Active Directory:
From the user's properties, click the Dial-in tab.
Check Assign Static IP Addresses.
Click Static IP Addresses to define the IP address for the user.
Important
If you have typos or a misconfiguration, the user won't be able to connect to your VPN server. If this happens, sign in to the Admin Web UI and review the Log Reports for error details.
You have the option to assign static IPv6 addresses to VPN users based on their group membership via RADIUS. Ensure you have familiarity with IPv6 addressing for adding this.
Note
The IPv6 address 2001:db8 used in our examples is reserved for documentation use.
Replace it with a valid IPv6 address for your network.
Configure IPv6 on Access Server. Refer to the detailed steps here:
Create a backup of the current user configuration. Run the following command to get the current user properties and save it as a JSON file:
sacli userpropget > userpropconfig.json
Open the
userpropconfig.jsonfile with your preferred text editor.Add the group configuration for (
VPN_USERS) and specify the desired subnet. For example, add the following JSON structure to define thegroup_subnets6.0:"VPN_USERS": { "c2s_dest_s": "false", "c2s_dest_v": "false", "group_declare": "true", "prop_autologin": "true", "prop_deny": "false", "prop_superuser": "false", "group_subnets6.0": "2001:db8:2:fed5:22::/80", "type": "group" }Save your changes to the
userpropconfig.jsonfile.Upload the updated configuration. This command will apply the updated configuration to the user properties:
cd /usr/local/openvpn_as/scripts/
./confdba -ulf userpropconfig.json
Ensure the configuration has been applied correctly by checking the updated properties. This command will show the current configuration for user properties, including the group and subnet settings you've just added:
sacli userpropget
Ensure you've already set up group mapping as outlined in the main steps above.
Follow the steps for your directory provider. We have some outlined here, but not all:
Understand that IPv6 addresses consist of:
Prefix (e.g.,
2001:3b8:2::).Subnet ID (e.g.,
fed5:22).Interface ID (e.g.,
aaaa).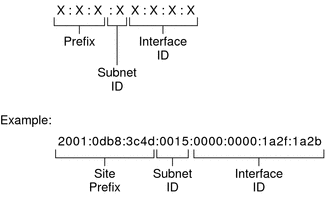
Tip
Access Directory allows assigning the Previx and Interface ID with length restrictions on both fields.
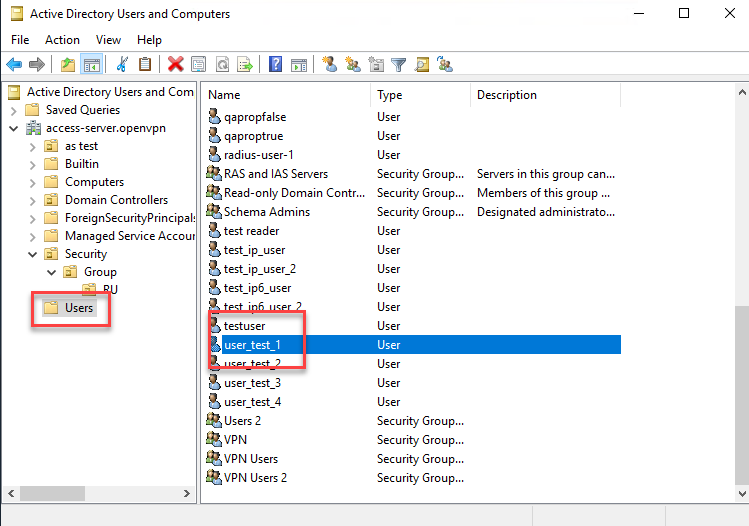
Open Active Directory Users and Computers.
Click Users and double-click on the user account.
Click the Dial-in tab and turn on Assign Static IP Addresses.
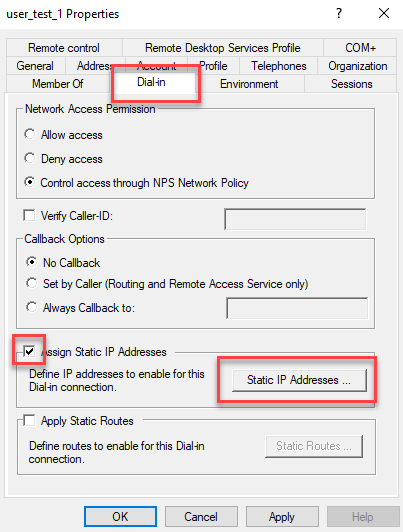
The Static IP Addresses window pops up.
Check Assign a static IPv6 address.
Check the boxes, enter Prefix and Interface ID values, and click OK.
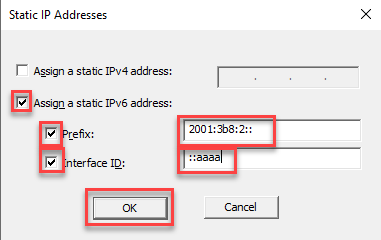
Click OK.
Sign in at the Access Server (SSH or console) with root privileges.
Edit the radius.py file in a text editor (for example, nano):
nano /root/radius.py
Scroll down to the static IPv6 sections fo the script. For example, this section for Active Directory:
        # Assignment of a Static IPv6 using Framed-IPv6-Prefix (97) and Framed-Interface-Id (96) RADIUS Attributes
        # Works with Windows AD RADIUS
        # If Framed-IPv6-Prefix (97) and Framed-Interface-Id (96) are set to build an IPv6 address, use it,
        # unless the group is not explicitly defined
Make the necessary changes for your IPv6 prefix and interface ID and group membership details, then save.
Enable the script in Access Server:
sudo /usr/local/openvpn_as/scripts/sacli --key "auth.module.post_auth_script" --value_file "/root/radius.py" ConfigPut
sudo /usr/local/openvpn_as/scripts/sacli start
Each time you make changes to the radius.py file, you must use the above commands to load the new version of the script into the configuration database and reload the Access Server configuration.
Test VPN connections by ensuring users are assigned the correct IPv6 address when connecting via VPN.
Review the logs for any script execution errors or assignment issues.
Tips
Ensure the IPv6 subnet in the JSON configuration matches your network's routing setup.
The
Subnet IDis currently hardcoded in the script. Future enhancements could include fetching this value dynamically from RADIUS attributes.