Tutorial: How To Set Up Failover Mode
Access Server has a built-in failover that can be deployed on a local area network. Learn more about setting this mode up here.
Overview
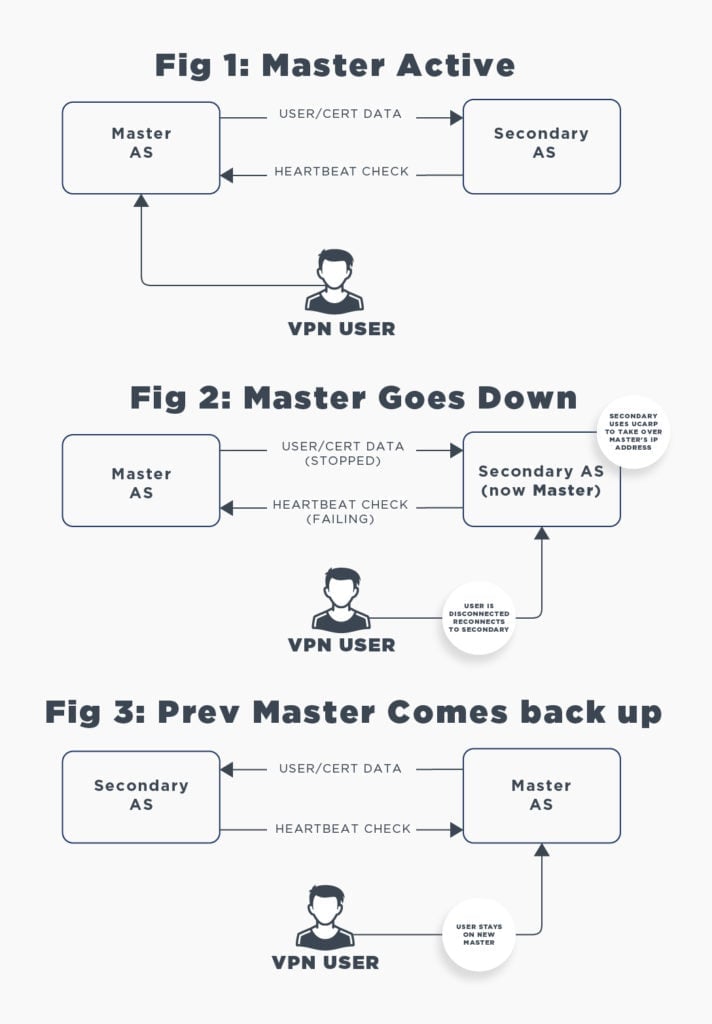
This tutorial shows you how to set up Access Server's failover mode. The setup consists of a primary Access Server and a secondary Access Server running as a backup in case the primary server fails.
For details about the failover feature, refer to Access Server's Failover Setup.
A compatible network environment (see the note below).
Important
Not all platforms support Access Server's failover feature. For example, Amazon AWS filters away broadcast UCARP/VRRP traffic, so failover isn't supported there. Instead, you can set up a cluster for high availability.
Failover is compatible with the following platforms:
Physical servers on physical networks.
Microsoft Hyper-V and VMWare ESXi, but you may need MAC spoofing or Promiscuous mode.
Virtualized platforms as long as they're a local network where broadcast UCARP/VRRP is possible.
If you create multiple UCARP/VRRP failover pairs in the same network, adjust the VHID to be unique.*
* The VHID is a number sent in the heartbeat signal onto the local network. The secondary node monitors this heartbeat signal. Multiple such heartbeat signals can be seen if multiple UCARP/VRRP systems are online simultaneously in the same network. The heartbeat signal is given a unique identifier number to know which one the secondary need has to monitor. By default, an Access Server failover pair sets up the UID to be 94. You can adjust the VHID on the command line to ensure that each failover pair running in the same LAN network recognizes its partner node correctly.
Failover is incompatible with the following platforms:
Amazon AWS
Most major cloud networks because they don't support UCARP/VRRP traffic.
Nodes deployed in separate networks.
Start by launching Access Server on a private network:
Choose a supported Linux operating system with a private static IP address.
Tip
For help assigning an IP address on Ubuntu, follow these steps: Tutorial: Set a Static IP Address on an Ubuntu System.
Optionally, if your network uses a DHCP server with a static IP address assignment for DHCP clients, configure that for your server.
Launch Access Server on your platform. For the detailed steps, refer to our installation guides.
Set up port forwarding in the gateway system on your network that leads to the internet.
Tip
This step provides internet access for anyone outside of the private network where you set up the failover pair.
For initial testing, you can forward ports TCP 443, TCP 943, and UDP 1194 to your primary node's static IP address. At a later step, you'll redirect them to the virtual IP address.
We recommend setting up a custom hostname after launching your primary Access Server. Follow this tutorial: Tutorial: Setting up your Access Server Hostname.)
Connect to the console of your primary node with root privileges.
Run these commands to install rsync:
apt-get update
apt-get install rsync
Tip
The rsync utility can transfer configuration backups, user certificates, and user properties from the primary node to the secondary node. In the event of a failover, the secondary node loads these backups, goes online, and takes over the tasks from the failed node with this up-to-date information.
Deploy another new Access Server.
Note
You can deploy it as an appliance, virtual image, or manual installation on Linux.
Set up a static IP address for the node.
Important
Ensure it's an IP address different from the primary node.
You don't need to set up any Access Server configuration or port forwarding for this node.
Sign on to the failover node's console and get root privileges.
Run the following destructive command to clear all Access Server settings and prepare it for use as a secondary node:
ovpn-init --secondary
When prompted, confirm the step by typing DELETE.
Caution
Running this command wipes the node's settings. If you're running this on a production node containing data you want to keep, use a different node.
(Optional) You can automate this command so it doesn't prompt you for confirmation by adding the parameters --batch and --force.
While connected to the failover node's console and get root privileges, run this command to install rsync:
apt-get update
apt-get install rsync
Currently, the Access Server needs root-level access to the partner node to configure things and keep the settings updated. There are two ways to go about this. One way is to use passwordless SSH keys, which are automated and fairly secure. Another is to enable root user login directly through SSH with a password, but this is not considered secure. Therefore, we will focus here on the passwordless SSH key setup.
We use the following in this section, and you should adjust according to your network setup:
We assume you can't sign in with the username root via an SSH connection.
We assume you can't sign in through SSH with a user other than root and that you can gain root privileges by using the command sudo su.
We assign our non-root user the username, sshuser.
Our primary node's IP address is 192.0.2.1.
Our secondary node's IP address is 192.0.2.2.
Our shared virtual IP address is 192.0.2.222.
Note
In our documentation, we use example IPv4 addresses and subnets reserved for documentation, such as 192.0.2.0/24, 198.51.100.0/24, and 203.0.113.0/24.
Ensure you replace them with valid IPv4 addresses and subnets for your network(s).
Sign in to your primary node with root access and run these commands:
mkdir ~/.ssh
cd ~/.ssh
ssh-keygen -t rsa -f id_rsa -P ""
cat id_rsa.pub >> authorized_keys
chmod 600 authorized_keys
Sign in to your failover node with root access and run the same commands as above.
These commands create SSH access keys that don't require passwords. But they need to be transferred to their partner node and put into the correct place so the nodes know when and how to use them for direct SSH access without the need to sign in with credentials.
On the primary node, copy the key to the failover node:
/usr/bin/ssh-copy-id -i ~/.ssh/id_rsa.pub sshuser@192.0.2.2
When prompted, confirm that you want to make a connection for the purpose of copying the SSH access key to the primary node and enter the sshuser password.
On the failover node, copy the key to the primary node:
/usr/bin/ssh-copy-id -i ~/.ssh/id_rsa.pub sshuser@192.0.2.1
When prompted, confirm that you want to make a connection for the purpose of copying the SSH access key to the failover node and enter the sshuser password.
Run this command on both nodes to move the SSH access keys to the correct directories for root access:
cat /home/sshuser/.ssh/authorized_keys >> /root/.ssh/authorized_keys
Test that the setup works by establishing an SSH connection from the primary node to the failover node:
ssh root@192.0.2.2
If the connection works, the passwordless SSH key setup is successful.
Test the setup in the other direction, from the failover node to the primary node:
ssh root@192.0.2.1
Sign in to the primary node's Admin Web UI.
Click Configuration > Failover.
Turn on LAN model (UCARP-based failover).
The LAN model section expands with configuration fields.
Enter the shared virtual IP address both nodes will share. For our example, this is 192.0.2.222.
Enter the primary node's IP address in the Primary Node Hostname/IP field.
Enter the failover node's IP address in the Secondary Node Hostname/IP field.
If you use the passwordless SSH key setup described in the section above, you don't need to alter any other values.
Click Validate.
Access Server checks the connection. If all goes well, you should see a good result.
Click Commit and Restart to commit the changes.
Once the changes have been committed, the primary node's Access Server service will automatically restart itself, goes online as the primary node in failover mode, and brings the virtual shared IP address (192.0.2.222) online.
Sign in to the failover node's console and get root privileges.
Restart the Access Server service:
systemctl restart openvpnas
The secondary node will go into a standby node and no longer offer a web service or VPN service at its configured static IP address. It will simply standby, wait for a failure of the primary node, and if the primary node has failed, it will take over the role of the primary node automatically and go online and offer a web service and VPN service and handle incoming connections just like the failed node would have.
Update your port forwarding settings to ensure they go to the shared virtual IP address (192.0.2.222 for our example).
Your failover setup should now be functional, and you can test it:
Shut down the primary node.
Check if your failover node becomes the primary node.
To observe the state changes, you can check the /var/log/openvpnas.log and /var/log/openvpnas-node.log files.
You can also open the public address for your Admin Web UI and check to see if it responds when you shut down the primary node.
Activate your subscription with the Admin Web UI
Purchase a subscription license key for your desired number of connections.
Copy the activation key.
Sign in to the Admin Web UI for your primary node.
Click Configuration > Activation.
Paste the key and click Activate.
Activate your subscription from the command-line interface (CLI)
Note
If you prefer to use the CLI, you have to connect to the primary node's console. You can find this out fairly easily by trying to open the web interface of the Access Server, not on the shared virtual IP, but on the direct IP of the node in question. Only the current master node will respond. The node on standby will just not respond. You can also check the log file /var/log/openvpnas.log to see the current node's status.
Connect to the primary node's console and get root privileges.
Activate a subscription:
cd /usr/local/openvpn_as/scripts/
./sacli -v "InsertTheSubscriptionActivationKeyHere" LoadSubscription
Verify that it works:
./sacli SubscriptionStatus
After a failover event, the configuration data, including the subscription activation data, is automatically loaded onto the secondary node.
Issue: Both nodes simultaneously try to be the primary node.
Resolution: This is usually caused by a communication issue. Your nodes can't communicate with each other using VRRP heartbeat signals. An active primary node will send VRRP packets onto the network, but the secondary node in standby mode will not. If the failover node's Access Server service is stopped, the primary node will continue to send out VRRP packets that will be visible to the secondary node. To determine if the failover node does not receive the VRRP packets, we can stop the Access Server service on the failover node and use tcpdump to see if the packets arrived.
Sign in to the failover node's console and get root privileges.
Stop the Access Server service:
systemctl stop openvpnas
Install tcpdump on the failover node:
apt-get update
apt-get install tcpdump
Use tcpdump to look for VRRP packets:
tcpdump -eni any vrrp
Example output:
18:15:53.000605 M 00:00:5e:00:00:5f ethertype IPv4 (0x0800), length 72: 192.168.70.1 > 224.0.0.18: VRRPv2, Advertisement, vrid 94, prio 0, authtype none, intvl 1s, length 36
18:15:54.000718 M 00:00:5e:00:00:5f ethertype IPv4 (0x0800), length 72: 192.168.70.1 > 224.0.0.18: VRRPv2, Advertisement, vrid 94, prio 0, authtype none, intvl 1s, length 36
18:15:55.000802 M 00:00:5e:00:00:5f ethertype IPv4 (0x0800), length 72: 192.168.70.1 > 224.0.0.18: VRRPv2, Advertisement, vrid 94, prio 0, authtype none, intvl 1s, length 36
If you don't see VRRP packets arriving there's a good chance your network equipment is blocking them. In that case you should try to find a way to resolve that. If your network cannot pass these VRRP packets, you cannot use the LAN model UCARP-based failover model.