Tutorial: Using AWS Transit Gateway with Access Server
Use Access Server to establish seamless communication between AWS VPCs with Transit Gateway.
Overview
This tutorial will demonstrate how to effectively use a single Access Server to establish seamless communication between two Virtual Private Clouds (VPCs) in AWS, enabling access to resources in both. Instead of deploying multiple Access Servers in each VPC, you can utilize a single Access Server by creating a Transit Gateway to facilitate communication between your VPCs.
By default, communication between two VPCs in AWS isn't possible, but you can establish connectivity between them by creating an appropriate configuration for a Transit Gateway.
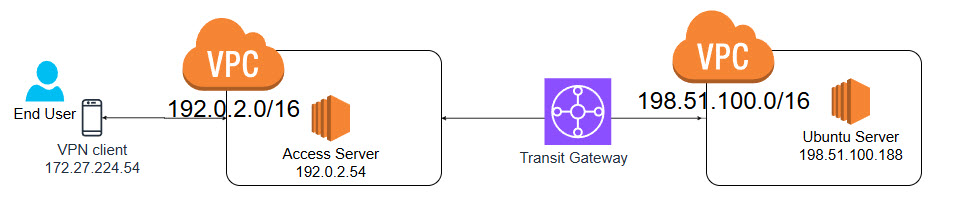
In this tutorial, we will connect my-first-vpc and my-second-vpc using a Transit Gateway. The goal is to reach the Ubuntu instance (198.51.100.188) in my-second-vpc when a client connects to the Access Server in my-first-vpc.
Note
In our documentation, we use example IPv4 addresses and subnets reserved for documentation, such as 192.0.2.0/24, 198.51.100.0/24, and 203.0.113.0/24.
Ensure you replace them with valid IPv4 addresses and subnets for your network(s).
An AWS account with VPCs and resources set up.
Access Server deployed on an EC2 instance.
Two VPCs set up in AWS (e.g.,
my-first-vpcandmy-second-vpc).Ubuntu EC2 instance (
ubuntu) in the second VPC.
Here is an example of the setup:
Sign in to your AWS portal and go to VPC.
Under Transig gateways, click Transit gateways.
Click Create transit gateway.
Enter a name for the transit gateway.
Leave the settings as default and click Create transit gateway.
Under Transit gateways, click Transit gateways attachments.
Click Create transit gateway attachment.
Enter a name for the attachment.
Under Transit gateway ID, select the transit gateway created in step 1.
Under Attachment type, select VPC.
Under VPC attachment - VPC ID, select
my-first-vpc.Click Create transit gateway attachment.
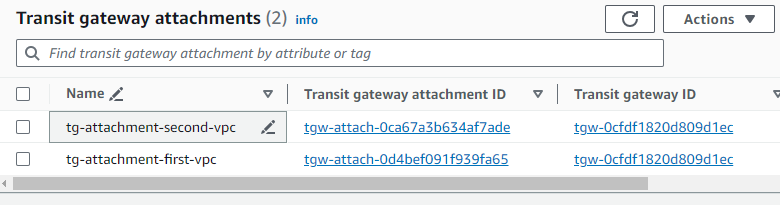
Repeat for
my-second-vpc.You should have two transit gateway attachments as seen in this screenshot:
Under Transit gateways, click Transit gateways route tables.
Click on the transit gateway route table.
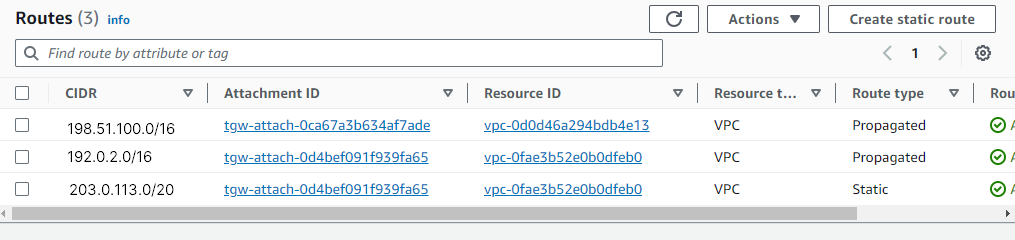
Click Routes and Create static route.
Under CIDR, enter the client subnet for VPN clients in Access Server. We will use
203.0.113.0/20for this example.Under Choose attachment, select the
my-first-vpcattachment.Click Create static route.
Click on Create transit gateway attachment.
Repeat for the
my-second-vpcattachment.Here's an example routing table setup:
For my-first-vpc:
Navigate to the routing table for
my-first-vpc.Add two routes:
For traffic destined to
198.51.100.0/16, use the transit gateway as the target.For traffic destined to
203.0.113.0/20, use the Access Server instance as the target.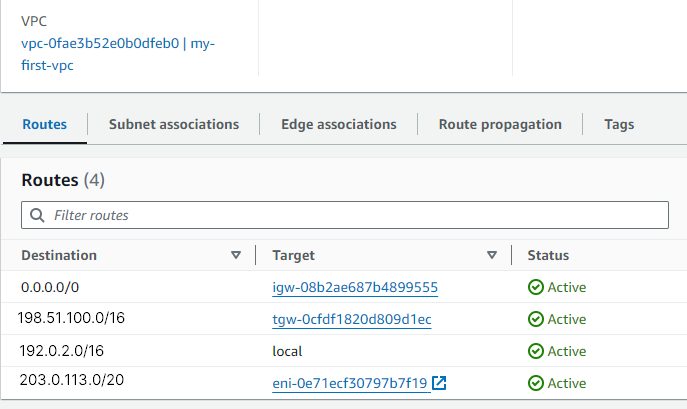
For my-second-vpc:
Navigate to the routing table for
my-second-vpc.Add one route:
For traffic destined to
203.0.113.0/20, use the transit gateway as the target.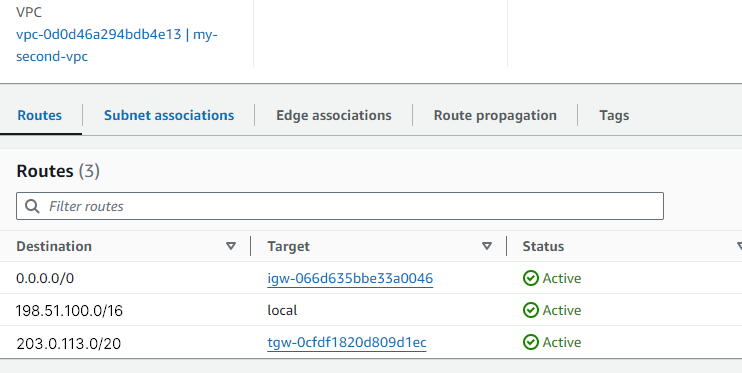
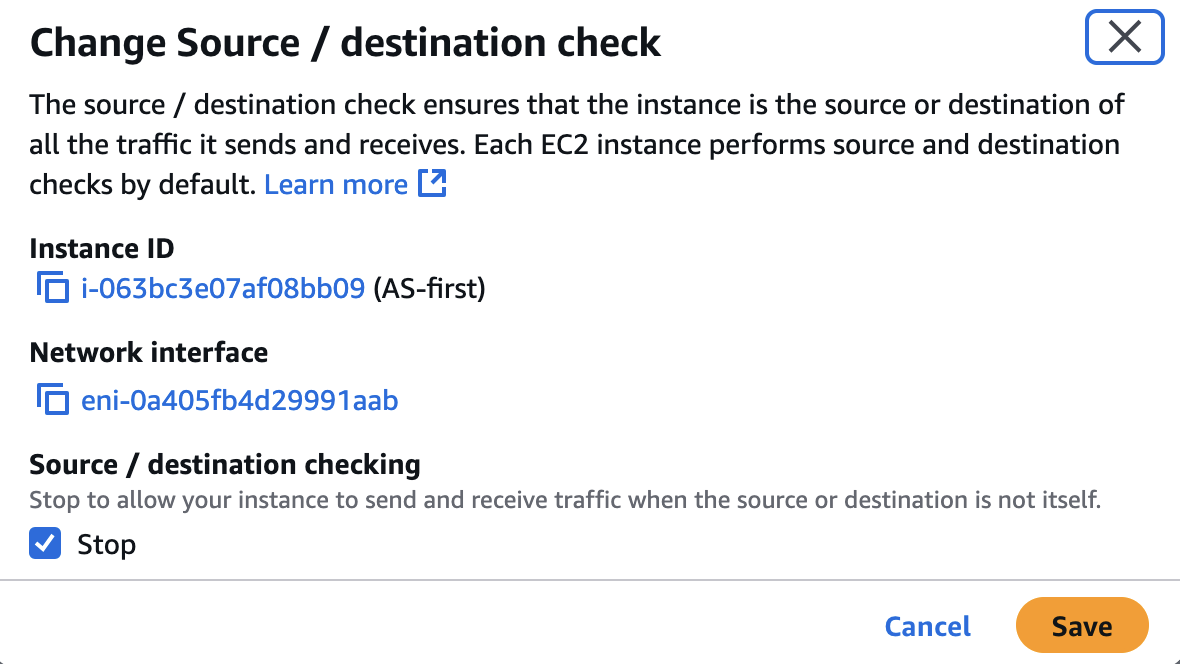
Navigate to your EC2 instance with Access Server installed.
Click Actions > Networking > Change source/destination check.
Set Stop and click Save to disable the check.
This prevents AWS from dropping traffic to or from VPN subnets that are not part of your defined infrastructure.
Sign in to the Access Server Admin Web UI.
Click Configuration > VPN Settings.
In the Routing section, configure the VPC subnets for both VPCs.
Enable Routing by selecting Yes, using Routing (this is required for transit gateway).

After the configuration, test the connection by pinging the Ubuntu machine in
my-second-vpcfrom a VPN client connected to Access Server:ping 198.51.100.188
Example output:
Pinging 198.51.100.188 with 32 bytes of data:
Reply from 198.51.100.188: bytes=32 time=30ms TTL=63
Reply from 198.51.100.188: bytes=32 time=30ms TTL=63
Reply from 198.51.100.188: bytes=32 time=29ms TTL=63
Reply from 198.51.100.188: bytes=32 time=30ms TTL=63
Ping statistics for 198.51.100.188:
Packets: Sent = 5, Received = 5, Lost = 0 (0% loss)
A TCPdump on the Access Server should show the communication between the VPN client and the Ubuntu machine:
tcpdump -eni any icmp
Output example:
tcpdump: verbose output suppressed, use -v[v]... for full protocol decode
listening on any, link-type LINUX_SLL2 (Linux cooked v2), snapshot length 262144 bytes
16:52:27.347551 as0t0 In ifindex 3 ethertype IPv4 (0x0800), length 80: 203.0.113.4 > 198.51.100.154: ICMP echo request, id 1, seq 54, length 40
16:52:27.347564 ens5 Out ifindex 2 06:e5:c6:b5:4a:64 ethertype IPv4 (0x0800), length 80: 203.0.113.4 > 198.51.100.154: ICMP echo request, id 1, seq 54, length 40
...