Tutorial: Communicate Between Two VPCs in AWS Using a Single Access Server
Learn how to use Access Server to enable communication between two AWS VPCs with VPC peering, simplifying access to resources in both VPCs without multiple servers.
Overview
This tutorial will guide you through using a single Access Server to establish seamless communication between two Virtual Private Clouds (VPCs) in AWS, allowing access to resources on both. Instead of deploying multiple Access Servers in each VPC, you can use a single Access Server to connect to both VPCs by creating a VPC peering connection.
By default, communication between two VPCs in AWS is not possible. However, establishing a VPC peering connection and configuring Access Server enables traffic to flow between the two VPCs.
Key points:
Single Access Server: Use one Access Server to manage connections to both VPCs.
VPC peering: Establish a VPC peering connection to allow communication between two VPCs.
No need for multiple servers: This method eliminates deploying a separate Access Server in each VPC.
By following the steps in this tutorial, you can simplify your network architecture while maintaining secure, centralized access to resources in both VPCs.
Note
In our documentation, we use example IPv4 addresses and subnets reserved for documentation, such as 192.0.2.0/24, 198.51.100.0/24, and 203.0.113.0/24.
Ensure you replace them with valid IPv4 addresses and subnets for your network(s).
Ensure the following resources are set up in AWS:
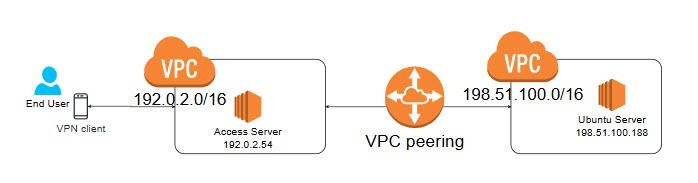
VPC 1: my-first-vpc (Access Server's VPC)
VPC 2: my-second-vpc (VPC hosting the Ubuntu machine)
Here is an example of the setup:
Sign in to your AWS portal and navigate to VPC.
Under Virtual private cloud, click Peering connections.
Click Create peering connection.
Create a name for the peering connection.
Select the local VPC to peer with (for this example, my-first-vpc).
Select the second VPC to peer with (for this example, my-second-vpc).
Review the information and click Create peering connection.
A new window shows that the VPC peering connection has been requested, and we need to accept it.
Click Actions.
Click Accept request.
In the pop-up window, click Accept request to finalize the peering connection.
Under Virtual private cloud, click Route tables.
Click the routing table ID associated with my-first-vpc under the VPC column.
Click Edit routes.
Add a route to forward the traffic from my-first-vpc to my-second-vpc through the peering connection. The configuration should look like this:
Destination: 198.51.100.0/16
Target: Peering Connection and ID (e.g., pcx-123abc)
Repeat the steps for my-second-vpc to ensure it can route traffic back to my-first-vpc:
Destination: 192.0.2.0/16
Target: Peering Connection and ID (e.g., pcx-123abc)
Sign in to your Access Server Admin Web UI.
Click Configuration> VPN Settings.
Set routing to Yes, using NAT.
Specify the private subnets. Example configuration:
192.0.2.0/16
198.51.100.0/16
Note
You must use NAT because routing mode is incompatible with VPC peering due to AWS internal restrictions. Consider using a Transit Gateway instead of VPC peering if you need routing.
After completing this step, the Ubuntu machine in my-second-vpc should be reachable from a VPN client through the peering connection between the two VPCs.
Once the configuration is complete, you can test connectivity by pinging the Ubuntu machine's private IP from your connected VPN client.
Example:
PS C:\Users\Kevin> ping 198.51.100.188

Pinging 198.51.100.188 with 32 bytes of data:
Reply from 198.51.100.188: bytes=32 time=30ms TTL=63
Reply from 198.51.100.188: bytes=32 time=30ms TTL=63
Reply from 198.51.100.188: bytes=32 time=29ms TTL=63
Reply from 198.51.100.188: bytes=32 time=30ms TTL=63
Reply from 198.51.100.188: bytes=32 time=31ms TTL=63

Ping statistics for 198.51.100.188:
    Packets: Sent = 5, Received = 5, Lost = 0 (0% loss)
If you encounter any issues or need further assistance, contact our support team or submit a ticket.