Tutorial: Set Up 2FA for Your OpenVPN Account and Access Server Portal — Two-Factor Authentication Guide
How to turn on two-factor authentication for your Access Server portal account on OpenVPN.
Overview
Welcome to this step-by-step tutorial on turning on two-factor authentication (2FA) in the Access Server Portal. Follow these instructions to add an extra layer of security to your account.
This tutorial covers setting up 2FA, saving rescue codes, and switching between 2FA authentication methods. We also include security best practices.
Tip
Your Access Server Portal account is separate from your Admin Web UI administrator account for Access Server.
You must have an existing account on the Access Server Portal.
Open your web browser and go to the following URL: OpenVPN Access Server Portal.
Enter your login credentials to sign in.
Click Security & Privacy to switch tabs.
Click Enable 2FA under Two-Factor Authentication.
In the modal window, enter your password and click Confirm.
The message displays, "Success! Email Authentication enabled"
Select email authentication or authenticator app as your 2FA method.By default, email authentication is selected. We recommend using an authenticator app as it's more secure.
When you select the authenticator app, enter your password and click Confirm.
Enter the verification code sent to your email.
Scan the QR code for your authenticator app that displays on the next screen.
After the screen saves in the app, click Next.
Enter the code from the authenticator app and click Verify.
Rescue codes are displayed on the next screen. Save these codes. Refer to the next section for details.
After saving your rescue codes, click I have saved the rescue codes and click Confirm.
Note
When you switch from the email (the default selection when you first enable 2FA) to an authenticator app, you are prompted to enter a verification code from your email.
When you set up 2FA for a TOTP app, such as Google Authenticator, on your phone, we provide you with rescue codes after you’ve saved the secret to your app.
Save your rescue codes by printing or writing them down. You can use one of the codes if you can’t sign in with your authenticator app. Save them with one of these two methods:
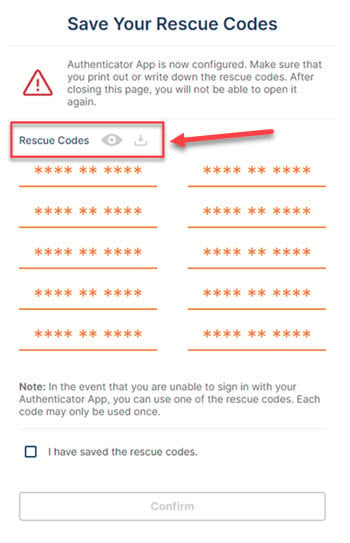
Click on the eye icon to view the codes and write them down.
Click on the download icon to save your codes to your device.
We require you to acknowledge that you’ve saved your codes to click Confirm and complete your 2FA authenticator app setup.
Important
Rescue codes are single-use only.
If you’ve lost your rescue codes, you can regenerate new codes by turning 2FA off and then back on:
Note
This process requires access to your authenticator app to enter a code to turn off 2FA.
From the Access Server Portal, click your account icon in the corner.
Click My Account.
Click Security & Privacy.
Turn off two-factor authentication.
Enter your password and verification code.
This turns off 2FA, so click the toggle again to turn it back on.
Go through the process to turn on 2FA again.
Ensure you carefully save your new rescue codes when you reach that step.
You can switch between the available 2FA methods, email or authenticator app, by following these general steps:
From the Security & Privacy tab, click the radio button to change your 2FA method (selecting either Email Authentication or authenticator App).
Reenter your password.
Enter your 2FA code from your current authentication method. (If you are switching from email to authenticator, enter the code sent to your email. If you switch from authenticator to email, enter the code from your authenticator app.)
Alternatively, you can enter a rescue code here if you can’t access your email or authenticator app.
You’ve successfully switched 2FA authentication methods.
We recommend following these security best practices:
Store your rescue codes somewhere safe and separate from your phone.
Print and store the codes safely, such as where you keep your important belongings.
Share your codes with another trusted person within your company (if possible).
Remember to set a PIN for your phone where you’ve installed your authenticator app.
Suppose you need to switch a phone or other device where you’ve saved your secret for 2FA. In that case, you need the time-based one-time password (TOTP) seed. Depending on your app, you can follow the steps to extract that. For instance, Google can export this as a QR code: Get verification codes with Google Authenticator.
Refer to the documentation for your authenticator app for instructions on exporting the TOTP seed.