Tutorial (Legacy): Site-to-Site Layer 2 Bridging Using Access Server and a Linux Gateway Client
Layer 2 bridging is no longer supported, but this tutorial shows how to use this deprecated feature.
Overview
Important word of caution:
This setup is deprecated, and we don't support it. We recommend using layer 3 routing mode but provide this documentation for legacy layer 2 bridging mode setups.
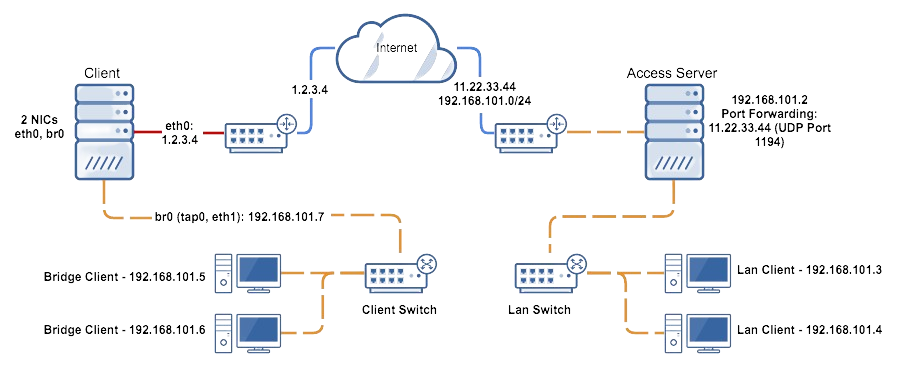
The diagram above depicts a typical site-to-site layer 2 bridging setup.
This tutorial guides you through setting up a site-to-site layer 2 bridging configuration using Access Server and a Linux gateway client. This setup allows you to bridge two sites transparently, making them appear as part of the same local network.
Important
This functionality is deprecated, and we recommend using site-to-site VPN routing for new implementations. This setup may still be useful in certain legacy environments.
Two sites: each site connected to the internet with one hosting Access Server and the other hosting an OpenVPN client.
Access Server requirements:
Accessible from the internet with the necessary ports forwarded.
Configured in Layer 2 Ethernet Bridging Mode.
Admin Web UI and console access.
OpenVPN client requirements:
At least two ethernet interfaces (one for internet, one for private LAN).
IP forwarding enabled.
Installed with
bridge-utils,net-tools, andopenvpn.Running a Linux operating system with administrative access.
Ability to upload files and SSH/SFTP access.
Private LAN isolation: The LAN segment should be isolated from other networks.
Sign in to the Admin Web UI.
Click User Management > User Permissions.
Enter a new username for the bridging client.
Check the box Allow Auto-login.
Your new user is displayed in the list of users.
Click User Profiles.
Find your new user under Username and click New Profile.
Create Profile for [user] pops up.
Select Autologin and click Create Profile.
The .ovpn connection profile downloads.
Download two scripts to your computer:
Use an SFTP client like FileZilla or Cyberduck to upload the two scripts, plus the .ovpn connection profile download to the /etc/openvpn/client/ folder on the Linux OpenVPN client machine.
Ensure
bridge-utilsandnet-toolsare installed:brctl show ifconfig -a
If not installed, use the following command (for Debian/Ubuntu):
apt install bridge-utils
apt install net-tools
Use
ifconfig -ato list network interfaces and determine the private interface you want to bridge.Note the interface name (e.g.,
eth2).
Edit
bridge-up.shusing a text editor likenano:nano /etc/openvpn/bridge-up.sh
Change
eth="eth1"to your identified private interface, e.g.,eth="eth2".Save and exit the file.
Edit the connection profile to include bridging commands:
nano /etc/openvpn/client/client.conf
Add the following lines at the top:
up "/bin/bash /etc/openvpn/bridge-up.sh"
down "/bin/bash /etc/openvpn/bridge-down.sh"
script-security 2
route-nopull
Restart the OpenVPN service to apply changes and connect:
systemctl restart openvpn-client@client
Verify the bridge:
ifconfig vpn0
The
vpn0interface should display the IP address configured in thebridge-up.shfile. If successful, clients on the bridged site should now obtain an IP address from the remote site via DHCP or manual configuration.