Failover Setup Guide for Access Server
Access Server has a failover feature you can deploy on a local area network. This built-in failover mode allows one primary node to handle all tasks with a secondary node as a standby. If the primary node fails, the secondary node comes online automatically and takes over the tasks from the failed node.
Set up failover mode
To set up a primary and standby failover configuration, follow this tutorial:
How Access Server's failover mode works
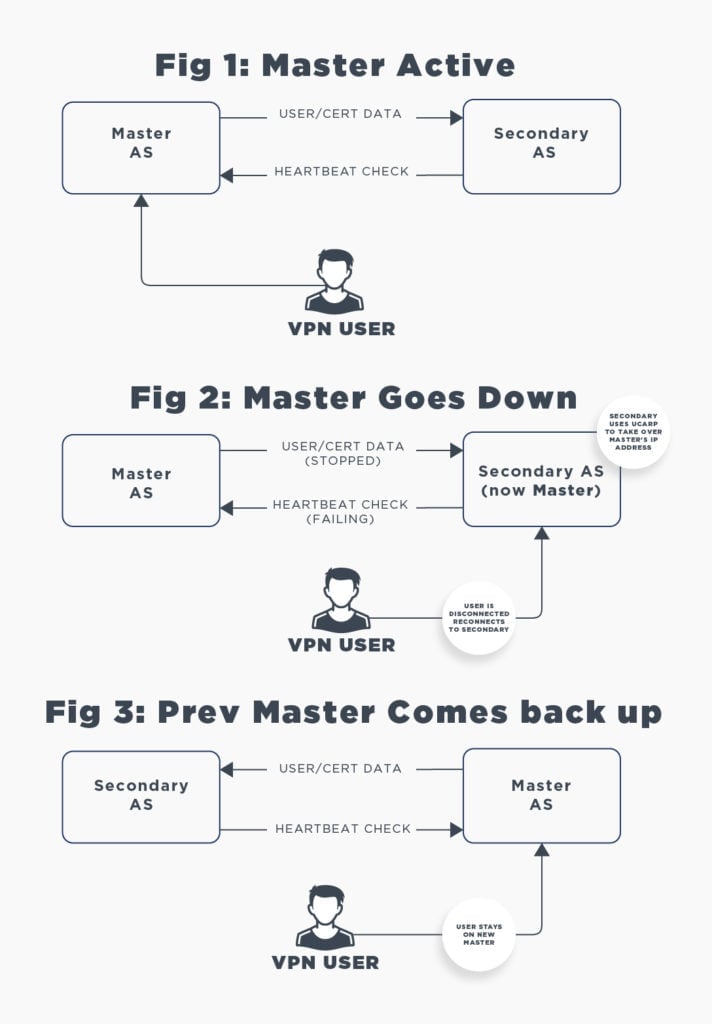
An Access Server failover setup consists of two Access Servers. One runs as the primary node and the other as the backup. Both keep a single virtual IP address online. If the primary node fails, the secondary node takes over. This is done with a method called UCARP using VRRP heartbeat network packets.
If the primary node goes down, users experience a short disruption. The previous OpenVPN server (the failed server) and the VPN clients negotiated TLS encryption keys that aren't valid on the new server. VPN clients will timeout their connection after 30-60 seconds, reconnect automatically, complete their authentication with session tokens when possible, and negotiate new TLS keys with the new server.
Typically, you'd run a private network with two servers, each with a unique private IP address. The UCARP/VRRP method works by setting up a third shared virtual private IP address where the currently active node handles all services. For example, node A could be on 192.0.2.1 and node B on 192.0.2.2, while the shared virtual IP where the services are offered is at 192.0.2.222. You can configure your router to forward internet requests to the last IP address.
While the active node is online, it handles all traffic to the shared virtual IP address. It sends configuration changes to the standby node. The standby node remains dormant until it detects that the VRRP/UCARP heartbeat signal sent by the primary node on the network has ceased. If this lasts more than a few seconds, the standby node will take over and become the active node. At this point, the configuration changes sent to this node are loaded, and it now takes over the shared virtual IP address. This process occurs quickly, typically within 5 to 10 seconds, possibly a bit longer, depending on the speed at which your server starts the Access Server service and the size of the configuration, certificates, and user properties databases.
Clients will be momentarily interrupted by the failure of the primary node. Their current encryption sessions use TLS encryption keys that were agreed upon with the previous server node, which the newly activated node is not aware of. After a timeout, usually 30 to 60 seconds, the client decides that the connection has failed and will reconnect. It will attempt to use the previous session's authentication token for authentication. The failover node will validate this session token and allow the client to reconnect automatically. Auto-login profiles don't need the session token logic since their authentication is by the certificate alone. In a failover event, an interruption of about a minute is expected, and in almost all cases, connectivity should automatically be restored. The client connection profiles on one node will be accepted by the other. That data is synchronized.
If an active node stops functioning while the other node is on standby, the standby node will now become the active node. If the previously active node were to crash and reboot, it would see an active node on the network and go into standby mode. So, the logic in effect is that if a node is currently online, handling requests, and sending out a heartbeat signal on the network, and the other node starts up, it will not force a failover. We intentionally perform this behavior because if the primary node fails in a way that causes it to go online and crash again shortly after, potentially due to a hardware failure, we want to avoid triggering failover events in that scenario. So, when a failover event has occurred, you will have to manually intervene if you want the primary node to be the active master node again. To do so, simply ensure the primary node is running normally, and then restart the Access Server service on the secondary node or reboot it. The primary will see this as a failure of the active secondary node and then take over again.