Managing Access Control in Access Server

Introduction

Access control is an important security tool. You use it to grant access to users or groups for the services and tools they need to do their job. You also use it to keep other services and tools available to other users without granting full access to everyone in your network.

Access Server grants access to your network in an encrypted manner over the insecure internet. And it has the functionality to define that access in a way that specifies this user can access this resource but not that resource.

Access Server's access control operates on three levels:

  1. Global
  2. Group
  3. User

This document shows how access control works at the three levels.

Access control example

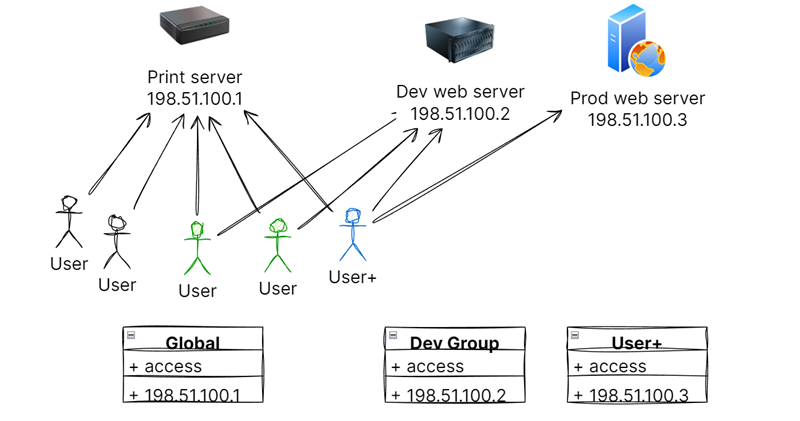
Suppose we want to grant access for the scenario diagrammed above:

  1. All VPN users need access to the print servers (10.0.0.1).
  2. Only the web team must access the dev web server (10.0.0.2).
  3. Only one ops team member needs access to the prod web server (10.0.0.3).

You could create access in this way:

  1. Grant global access to all VPN users to the print server, 10.0.0.1.
  2. Group the "dev group" access to the dev web server, 10.0.0.2.
  3. Grant "User+" access to the prod web server, 10.0.0.3.

Access control inheritance rules

Access Server provides access control at the user, group, and global levels. The following rules apply:

  • A user can belong to one or no group.
  • A user inherits access from the group and the global level.
  • A user can have additional access when defined for the user account.
  • A group inherits access from the global level.
  • A group can have additional access when defined for the group account.
  • Global access propagates to all groups and users.

By granting access to servers, subnets, and IP addresses at the user, group, and global levels, you can create access control policies for Access Server.

How to configure global access control

These steps explain how you can grant access to all VPN users for a specific resource based on the subnet:

  1. Sign in to the Admin Web UI.
  2. Click Configuration > VPN Settings.
  3. Under Routing, allow access by setting it to Yes, using NAT.
  4. For the private subnets, enter the subnet for your resource (for our example of a print server, we would enter "10.0.0.1/32").

Note: For a subnet, when you want the reference to represent that single IP address, you enter /32, per CIDR address formatting.

How to configure group access control

These steps explain how you can grant access to a specific group of VPN users to a specific resource based on the subnet.

  1. Sign in to the Admin Web UI.
  2. Click User Management > Group Permissions.
  3. For the group you want to grant access, click More Settings.
  4. In the Access Control section of the group settings, set Use Access Control to Yes.
  5. Configure access control for the three sections (detailed below):
    1. Networks and services.
    2. Groups.
    3. Users.

Configure access to networks and services

You can grant access to specific networks and services at the group level:

  1. Click More Settings for the group you're giving access privileges.
  2. Set Use Access Control to Yes.
  3. Under Allow Access To networks and services, enter subnets as network/nbits or services as network/nbits:services.
  4. Click Save Settings and Update Running Server.

Note: For a subnet, when you want the reference to represent that single IP address, you enter /32, per CIDR address formatting.

Configure access to groups

By default, groups are isolated from each other as well as users within a group. You can grant communication access by configuring it here. 

To allow users within a group to reach other users in the same group:

  1. Click More Settings for the group.
  2. Set Use Access Control to Yes.
  3. Under Allow Access To groups, select the group's name from the list.
  4. Click Save Settings and Update Running Server.

You would follow these steps to grant access for users in Group 1 to reach other users in Group 1.

To allow a group access to reach users in another group:

  1. Click More Settings for the group you're giving access privileges.
  2. Set Use Access Control to Yes.
  3. Under Allow Access To groups, select the group you want to grant access to reach users in the group.
  4. Click Save Settings and Update Running Server.

For example, if you have an admin group and want to grant access to reach all users in a user group, you set the admin group to Allow Access To groups with the user group selected in that list.

You would follow these steps to grant access for users in Group 1 to reach users in Group 2.

Note: You can select more than one group by pressing ctrl+click.

Configure access to users

You can grant group access to specific users.

  1. Click More Settings for the group you're giving access privileges.
  2. Set Use Access Control to Yes.
  3. Under Allow Access To users, select the user you want to grant access to reach users in the group.
  4. Click Save Settings and Update Running Server.

Note: You can select more than one user by pressing ctrl+click.

How to configure user access control

These steps explain how you can grant access to a specific group of VPN users to a specific resource based on the subnet.

  1. Sign in to the Admin Web UI.
  2. Click User Management > User Permissions.
  3. For the user you want to grant access, click More Settings.
  4. In the Access Control section of the user settings, select Use NAT for the addressing method.
  5. For Allow Access To these Networks, enter the subnet for your resource (for our example of a prod web server, we would enter "10.0.0.3/32").

Note: For a subnet, when you want the reference to represent that single IP address, you enter /32, per CIDR address formatting.

How to clear all global access control rules

If you need to remove access control for global rules, follow these steps. If you configure all of your access at the group and user levels, you also want to clear all global access control rules.

  1. Sign in to the Admin Web UI.
  2. Click Configuration > VPN Settings.
  3. Under Routing, set the first option to No.

Watch a primer on Access Server's Access Control