Tutorial: Secure IoT Networking
This document provides steps to secure your IoT communications across multiple networks, using the example of a network of video monitoring services.
Overview
A security services company provides video monitoring services to small, independently owned stores. Their solution consists of installing one to four cameras in the store. The cameras store videos locally but must communicate events, such as after-hours motion detection, etc., over the store’s internet connection to the security company’s monitoring server.
Owen is in charge of IT and Networking for this company. He has been tasked to find a solution that:
Provides the cameras with secure remote access to the monitoring server.
The cameras use the customer’s Network for access to the internet and, therefore, should not require any changes to the customer’s router or firewall.
Restrict communication between different customer networks.
This secure communications solution should not require additional servers to install or maintain.
Owen is aware that, unlike IPsec, CloudConnexa protocol is firewall-friendly and will not require changes to the customer’s internet equipment. He has decided to use a router supplied by Ubiquiti to create a small private Network for the cameras at the store premises. The router connects to the store’s Network for internet access. The Ubiquiti router also has native support for OpenVPN protocol. Now that the networking solution compatible with CloudConnexa has been found for the monitoring site, it comes down to having the camera network securely access the monitoring server on Azure.
Owen decided to use CloudConnexa to build a WPC that provides secure communications from the camera Networks at different stores to the monitoring server. He completed the signup process, as shown here. During the signup process, Owen selects a Cloud ID for his WPC. This [company-name].openvpn.com domain uniquely identifies the WPC that Owen has set up.
Setup
A high-level illustration of the WPC is shown below. The OpenVPN Client in the Ubiquiti router acts as a CloudConnexa Network Connector for the camera Network in the store, and the Monitoring Server on Azure acts as a CloudConnexa Host because the Connector is running on the same server as the monitoring application.
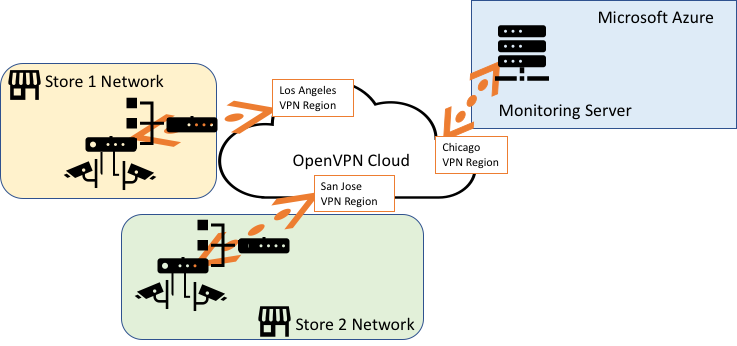
Owen signs in to the CloudConnexa Administration portal at https://cloud.openvpn.com/ and configures a Host (named Monitoring Server) and a Connector to represent the monitoring server running on Azure. The IP address that is assigned to the Connector is displayed. In this case, the Connector is assigned IP address 100.64.1.3. This IP address remains static and is not dependent on the Region selected for the Connector. This WPC IP address can be used to reach the monitoring server. Refer to Adding a Host.
Note
Optionally, a hostname can be used. The hostname automatically maps to the tunnel IP addresses of the Connectors.
Owen then downloaded the Connector app for Windows and installed it on the Windows Server instance, running the monitoring application and acting as the Monitoring Server. Refer to Running Connect Client as a system service
Owen checked the Status screen and saw that the Host had come online.
Next, Owen created two Networks to represent the camera Network in Store 1 (10.0.0.0/30) and the camera Network in Store 2 (10.0.0.4/30). He chose the closest CloudConnexa Region for each Network’s Connector to use. See, How to add a Network
Owen chose to download the Connector’s Profile in .ovpn format and used the downloaded Profile to configure the CloudConnexa client in the Ubiquiti router. Refer to Tutorial: Configure a Ubiquiti (EdgeMAX) Router To Connect to CloudConnexa.
He then configured the cameras to use 100.64.1.3 as the IP address of the monitoring server.
To prevent communications between the private camera Networks installed in each store via the WPC, Owen set up an Access Group to allow the Networks to communicate only with the Host and not with each other. See, Add Access Group