Tutorial: Connect a Network to CloudConnexa Using a Windows Server 2016 as a Router
This tutorial shows the steps involved in installing a Connector on Windows Server 2016 and making the necessary configuration changes to configure it as a router.
Overview
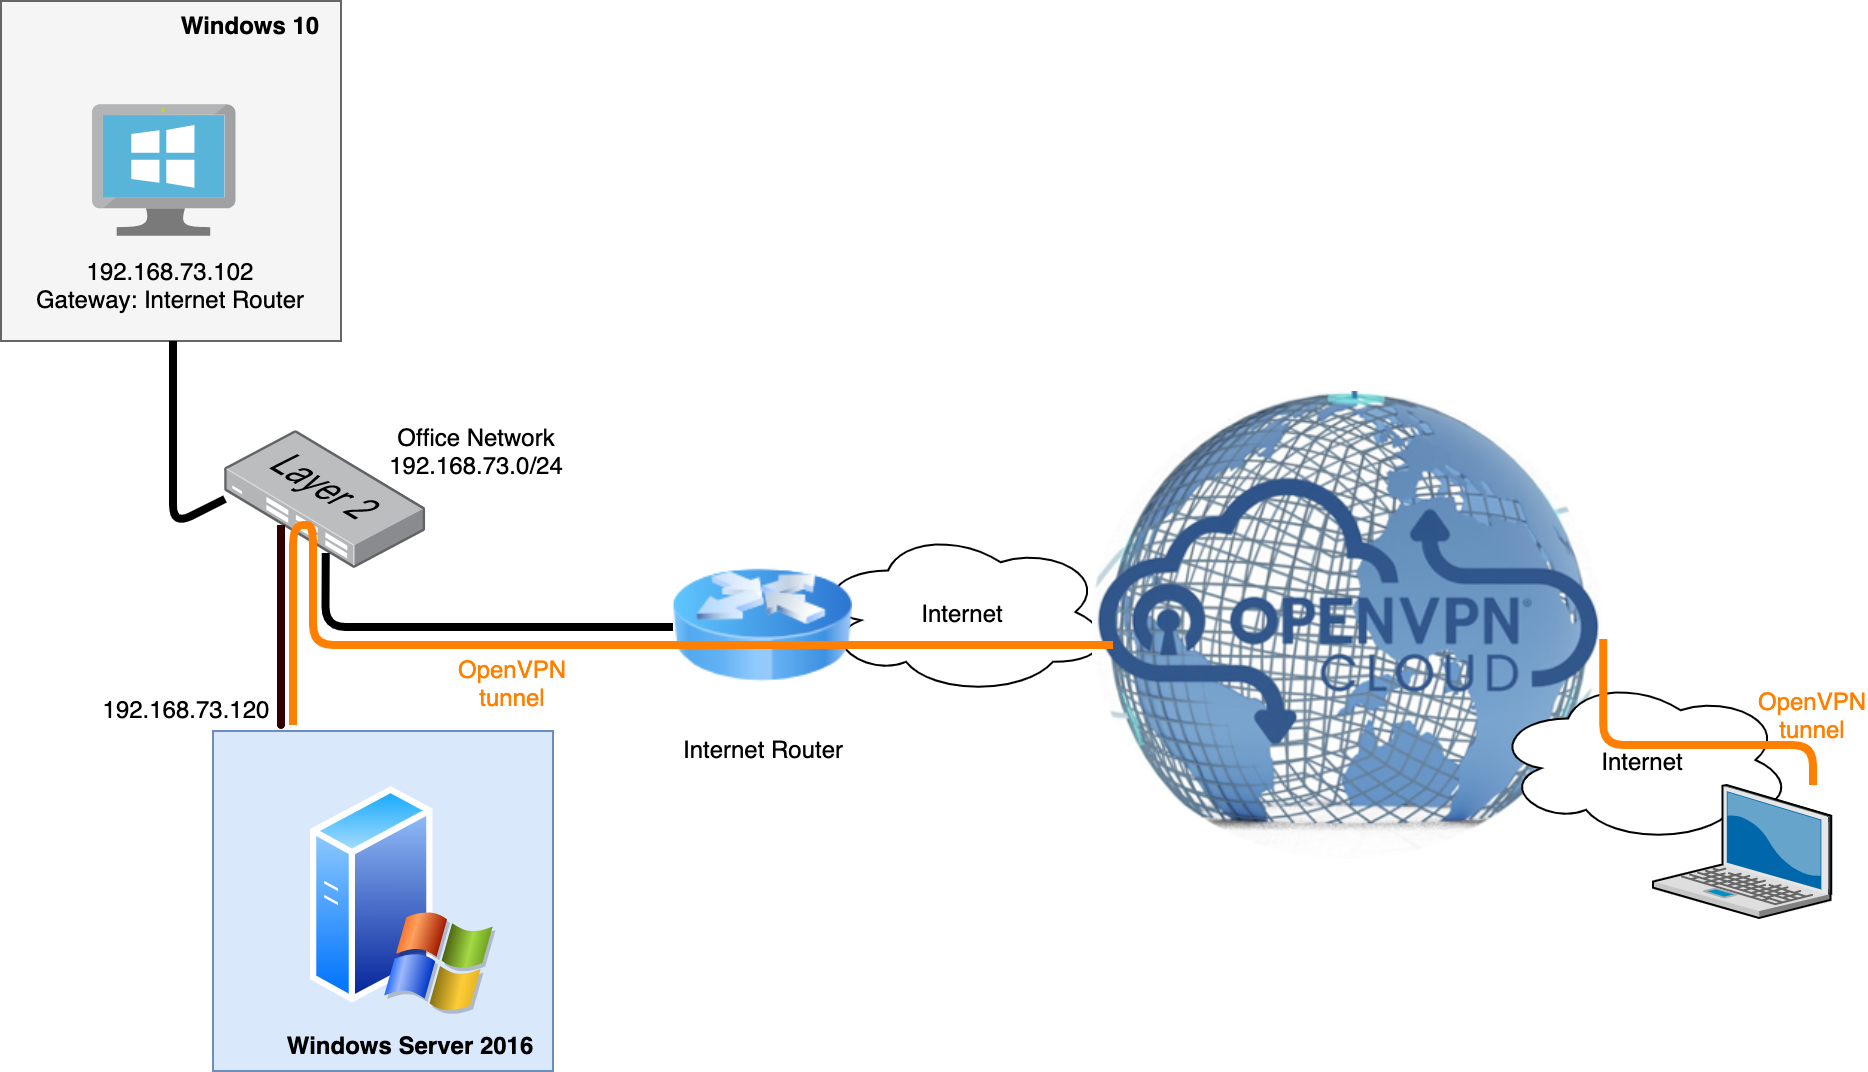
This is a how-to guide to show the steps involved in networking a Windows-based office Network to CloudConnexa. The diagram below illustrates an office LAN with an assigned subnet of 192.168.73.0/24 connecting Windows computers together. These computers get access to the Internet via a router. The Windows Server has two ethernet interfaces: one for access to the LAN subnet and another for access to the Internet via the router.
The Windows Server will be used to route traffic to CloudConnexa. In order to connect this office Network to CloudConnexa, Windows Server needs to create a tunnel (which results in creating a new virtual interface) to one of the CloudConnexa Regions and then route packets between the three interfaces: office LAN, Internet, and CloudConnexa. For the Server to establish a tunnel to the Region, Connector software needs to be installed on it. For the Server to route between all three LAN interfaces, routing needs to be enabled on it.
The key steps that need to be undertaken are:
Configure a Network with the office Network subnet of 192.168.73.0/24 to CloudConnexa using the Administration portal. This enables routing from the WPC to that subnet and creates a Connector for the office Network.
Install the Connector on Windows Server and connect to CloudConnexa.
Add Remote Access Role and Features to Windows Server 2016.
Configure LAN routing on Windows Server 2016.
Take the needed actions to ensure proper routing. See, Connecting Networks to OpenVPN Cloud Using Connectors.
Implementation
In order to make the office Network reachable from CloudConnexa, follow these steps:
Add the office subnet as a Network using CloudConnexa Administration portal
Navigate to Networks and click on the + icon on the upper right-hand corner to add a new Network.
Give the Network and Connector a name, add the office subnet (in this example, 192.168.73.0/24) as the subnet for the Network, select a Region for the Connector that is geographically closest to the office location, and click on the checkmark icon to complete configuration.
Click on the download icon next to the Connector to show the various download options.
Click on Download Connector App for Windows option.
You can click on the Download button if you want to download and install the Connector on the computer that you are working on or you can click on Copy URL button to open the URL in the browser of the target Windows computer so that the software gets downloaded directly on that computer.
Install the Connector on Windows Server 2016
Go to the Windows Server 16 computer and paste the URL in the browser to start downloading the OpenVPN Connect Client and its bundled Profile. This has to be done within 15 minutes of URL generation.
Click on the downloaded installer to start the installation process.
Click on the Run button of the security warning. Note that some versions of Windows may also display a warning that the driver is not signed. Continue the installation in spite of the warning.
Click on the Next button to start the OpenVPN Connect set up Wizard.
Accept the terms in the License Agreement by clicking on the checkbox and click on the Next button.
Click on the Install button to begin the installation.
Installation progress will be shown, click on the Finish button to exit the set up Wizard.
You will see the OpenVPN Connect icon in the system tray. Launch OpenVPN Connect from your application menu.
Dismiss the Onboarding Tour by clicking on the x.
Review and agree to the data collection and use policy by clicking on the Agree button.
Acknowledge the settings update by clicking on the OK button.
Click on the Profile that is already present to connect to CloudConnexa Region.
Add the Remote Access Role and Features to Windows Server 2016
On the Windows Server 16 computer, open Server Manager, click Manage and select Add Roles and Features.
When Add Roles and Features Wizard opens click on the Next button.
Select Role-based or feature-based for the type of installation and click on the Next button.
Select the server to install the role. Then click on the Next button.
On Server roles screen, check the box beside Remote Access. Then click on the Next button.
When Features screen opens click on the Next button.
Then read the information about Remote Access role and click on the Next button.
On Role Services screen, check the box beside Routing which will start the Add Roles and Features Wizard, just click on the Add Features button.
Note that Direct Access and WPC (RAS) role service is also checked along with the Routing role service The two role services are installed together. Click on the Next button.
Finally, at the Confirmation screen, click on the Install button.
When Remote Access role installation is completed, click on the Close button.
Configure LAN routing on Windows Server 2016
From Server Manager, click Tools and select Routing and Remote Access.
From the Routing and Remote Access window, right-click the server, and select Configure and Enable Routing and Remote Access.
On the first page of the set up wizard, click on the Next button.
Select Custom configuration and click on the Next button.
Select LAN routing and click on the Next button.
On the summary page, click on the Finish button.
Finally, to start the service, click on the Start service button and wait for the service to start. The dot on the server will turn the color green from the color red.
Now, expand the server and expand IPv4 entry to click on the General node. The computer is now acting as a router between the interfaces shown.
Note
You must take the necessary actions to ensure proper routing. For further information, refer to: Connecting Networks to OpenVPN Cloud Using Connectors.