Tutorial: Connect Your AWS VPC to CloudConnexa by Deploying a Connector
This tutorial shows you the steps to take to deploy a Connector on your AWS VPC. Once deployed, the Connector attempts to establish an outbound OpenVPN tunnel to the configured CloudConnexa Region. On a successful connection, the AWS VPC can be accessed by your CloudConnexa Users.
Launch Connector on AWS
To configure a Network that represents your AWS Virtual Private Cloud (VPC) and install an AWS instance with a Connector that uses AWS CloudFormation, follow these steps:
Sign in to the CloudConnexa Administration portal at https://cloud.openvpn.com
Navigate to Networks and click Networks.
Select the Scenario(s) that apply to your use case.
Provide a Network Name and enter an optional Description.
Provide a Connector name, select a Region, and click Next.
Select an AWS Region.
Click Launch ad log into AWS.
On the Quick create stack web page, specify the stack details:
Stack name,KeyName,SubnetId,VpcId, and then click Next.Note
Use the existing VPC and IP subnet.
Click the I acknowledge that AWS CloudFormation might create IAM resources checkbox to allow CloudFormation to create
RouteManagerRole IAM::Roleresources. This role configures routes in the VPC Route table to use the Connector. Click Create stack.Monitor the stack creation as it goes from
CREATE_IN_PROGRESSstate toCREATE_COMPLETE.On completion, open the Resources tab to view the created resources. Check that the
RouteManagerRolewas created along with anInstancSecurityGroup,InstanceProfile, and theEC2Instance.Click on the Physical ID of the EC2 instance to check its details.
Note
The EC2 instance uses Ubuntu. If you want to connect to it with SSH, use
ubuntuas the username.The Connector EC2 automatically connects to the Region and the Network will show up as
Onlineon the Status page of CloudConnexa Admin portal.
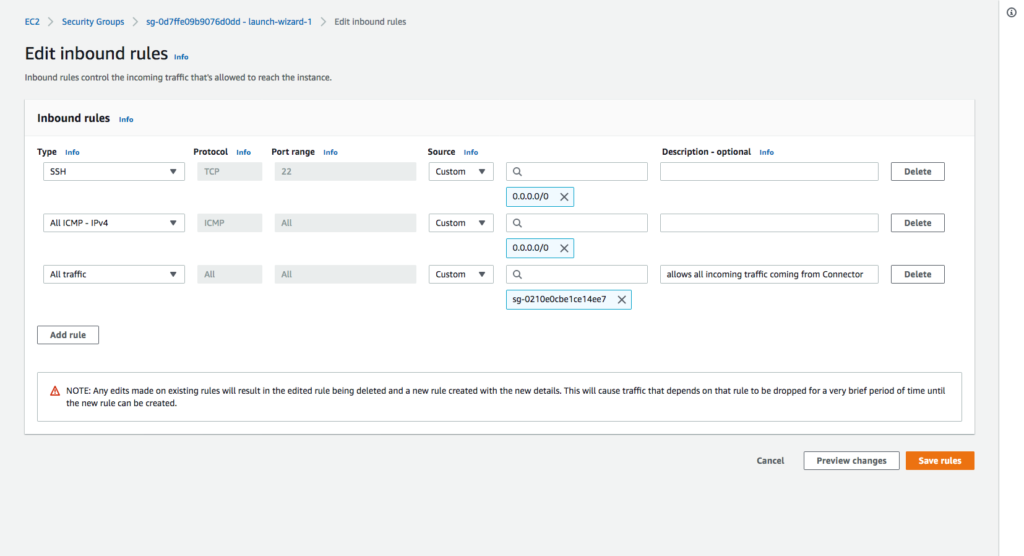
A new EC2 instance Security Group is automatically created after the Network Connector deployment through CloudFormation. This Security Group contains only one Inbound Rule to allow SSH connections (Protocol: TCP; Port: 22; Source: 0.0.0.0/0).
Modify existing Security Groups
If you are using Security Groups to protect any instances that need their traffic to be routed through the Connector instance, you need to add the Security Group of the Connector instance to their inbound rules.
This screenshot shows the inbound rules of sg-0d7ffe09b9076d0dd – launch-wizard-1 Security Group are being edited to add the last rule, which accepts all incoming traffic coming from the Security Group sg-0210e0cbe1ce14ee7 that is associated with the Connector instance.
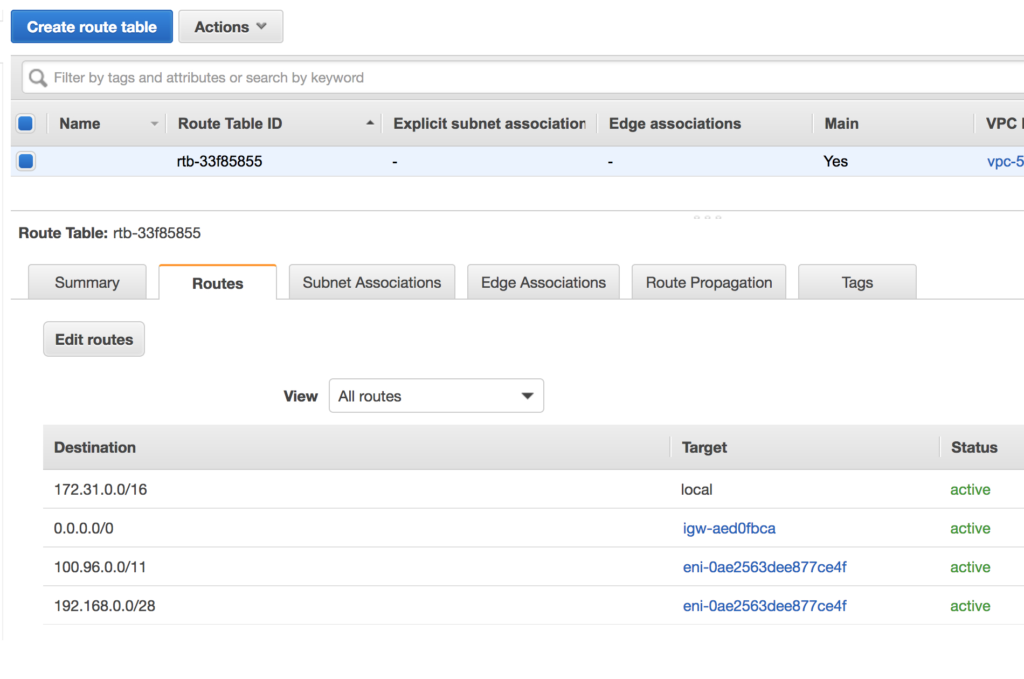
Optional: Check and add routes to the VPC Route Table associated with the subnet
Check that a route exists in the route table for the WPC Subnet IP address range configured in Network Settings of CloudConnexa. The default WPC IPv4 subnet address range for CloudConnexa is 100.96.0.0/11. If a route to destination 100.96.0.0/11 using the Connector instance as a target is absent, add it. If other CloudConnexa Networks need to be reached from the VPC, add a route with those Network subnets as the destination and the Connector instance as the target.
The screenshot below shows how the route table should look with an entry for the CloudConnexa WPC IP address subnet (100.96.0.0/11) and an entry for subnet 192.168.0.0/28 which is another Network (for example, office Network) that is reachable via CloudConnexa. Both entries have target as the instance running the Connector.
Note: If you allow CloudFormation to create RouteManagerRole IAM::Role resources, this role will configure routes in the VPC Route table to use the Connector automatically and update the route table as new Networks are added to the WPC.