Tutorial: Configure External PKI with Microsoft Active Directory Certificate Services (AD CS)
How to set up the Access Server External PKI (Public Key Infrastructure) feature using Microsoft Active Directory Certificate Services.
Overview
The Access Server external public key infrastructure (PKI) feature integrates Access Server with third-party tools for X509 PKI management instead of using the built-in certificate management capabilities.
When configured for external PKI usage, Access Server doesn't manage client certificates directly; instead, the customer's third-party PKI software generates and distributes client certificate/key pairs to client machines and a server certificate/key pair to the OpenVPN server.
This tutorial shows you how to set up external PKI using Microsoft Active Directory Certificate Services (AD CS).
At a high level, these are the steps for your configuration:
Create the server CA using Certificate Authority via AD CS.
Create certificate templates for the server and clients.
Generate the server certificate and key via MMC (Microsoft Management Console).
Generate the client certificate and key via MMC (Microsoft Management Console).
Create the TLS_auth key.
Generate Diffie Hellman parameters.
Import the necessary certificate and key files from your Windows Server to Access Server.
Provide the VPN client certificate/key pairs in a P12/PFX File.
Generate and download a server-locked profile for the client.
Prerequisites
An installed Access Server.
A Windows Server with Active Directory Certificate Services, Active Directory Certificate Services, Certificate Authority, and Certificate Authority Web Enrollment roles.
Console access and the ability to get root access.
An OpenVPN client that supports the macOS Keychain and Windows certificate store.
Note
We used Windows Server 2019 in this guide.
Connect to the Access Server console and get root privileges.
Edit as.conf for external PKI usage:
nano /usr/local/openvpn_as/etc/as.conf
Comment out certs_db:
# certificates database
# certs_db=sqlite:///~/db/certs.db
Save and exit the file — Ctrl-X, Y, then Enter.
Access Server no longer uses the certificate database. Instead, an external system must handle this.
When setting up your AD CS Configuration on Windows Server, you're prompted to specify the setup type of the CA. Ensure you select Enterprise CA and follow these next steps:
For Setup Type, select Enterprise CA.
Under CA Type, select Root CA.
Under Private Key, select Create a new private key.
Under Cryptography, select:
Key length = 2048
Select the hash algorithm > SHA256
Under CA Name, enter the common name of the CA.
Under Validity Period, select the validity of your CA.
Under Confirmation, select Configure.
Open Server Manager.
Select Tools and select Certificate Authority.
Right-click on your CA, and select Properties.
On the Details tab, select Copy to File...
On the Export File Format tab, select DER Encoded Binary X.509 (.CER).
On File to export, enter the CA certificate file name (for example,
ca.cer).Select Finish.
Type Windows + R and type mmc.
Select OK.
Select File and select Add/Remove Snap-in...
Select Certificates.
Select Add.
Select Computer account, select Finish, and select OK.
Right-click Personal → All Tasks → Request New Certificate.
Select the
OpenVPN Servertemplate you created and select Click here to configure settings:On the Subject tab, go to Subject name, change Type to Common name, set the name of your server certificate (e.g.,
OpenVPN Server, and select Add.On the Extensions tab, select Extended Key Usage and ensure that Server Authentication and Client Authentication are selected under Selected options.
On the Private Key tab, select Key options, and ensure Make private key exportable is selected.
Select Apply, then OK, and Enroll.
After the certificate is issued, export it:
In MMC, right-click your certiicate in Personal → Certificates→ All Tasks → Export.
Choose Yes, export the private key.
On Security, select Password, and configure a password for the server PFX file.
On File to export, set the name of the server PFX file (e.g.,
server.pfx).Select Finish.
Type Windows + R and type mmc.
Select OK.
Select File and select Add/Remove Snap-in...
Select Certificates.
Select Add.
Select Computer account, select Finish, and select OK.
Right-click Personal → All Tasks → Request New Certificate.
Select the
OpenVPN Clienttemplate you created and select Click here to configure settings:On the Subject tab, go to Subject name, change Type to Common name, set the common name of your client certificate (e.g.,
etest, and select Add.(Optional, for environments using auto-login profiles.) On the Subject tab, go to Subject name, change Type to Organization unit, type
autologinrole, and select Add.On the Extensions tab, select Extended Key Usage and ensure that Server Authentication and Client Authentication are selected under Selected options.
On the Private Key tab, select Key options, and ensure Make private key exportable is selected.
Select Apply, then OK, and Enroll.
After the certificate is issued, export it:
In MMC, right-click your certiicate in Personal → Certificates→ All Tasks → Export.
Choose Yes, export the private key.
On Security, select Password, and configure a password for the client PFX file.
On File to export, set the name of the server PFX file (e.g.,
client.pfx).Select Finish.
At this point, we now have three files:
CA certificate (ca.cer)
Server PFX file (server.pfx)
Client PFX files (client.pfx)
Now, we need to transfer the CA certificate and server PFX files to the Access Server. You can do this via WinSCP or SCP.
The client PFX file (client.pfx) will be transferred to the client machine.
Connect to the Access Server console and get root privileges.
Create a directory:
mkdir epki && cd epki
Place the CA certificate and server PFX file from the Windows Server via WinSCP or SCP in this new "epki" directory.
Extract the server cert and key from the server PFX file with the below commands, then decript the server key:
openssl pkcs12 -in server.pfx -clcerts -nokeys -out server.crt
openssl pkcs12 -in server.pfx -nocerts -out server_password.key
openssl rsa -in server_password.key -out server.key
Important
When running these commands, you'll be prompted for a password. Use the password configured for the server PFX file in step 5.
Convert CA.cer to PEM format:
openssl x509 -inform der -in CA.cer -out CA.pem
Create a tls_auth key for the OpenVPN server:
/usr/local/openvpn_as/scripts/certool --tls_auth
Generate Diffie Hellman parameters for the OpenVPN server:
openssl dhparam -out dh.pem 2048
For Access Server 2.7 and newer, you must also generate your auth token and add the generated file:
/usr/local/openvpn_as/scripts/certool --auth_token
Configure X509 explicit/extended key usage based on RFC3280 TLS rules:
/usr/local/openvpn_as/scripts/sacli --key "external_pki.remote_cert_usage" --value eku ConfigPut
Configure the use of the X509 “OU” attribute for the declaration of auto-login permission:
/usr/local/openvpn_as/scripts/sacli --key "external_pki.autologin_x509_spec" --value "OU,,autologinrole" ConfigPut
Generate the tls-crypt-v2 key (for Access Server 2.9.0 and higher only):
/usr/local/openvpn_as/scripts/certool --tls_crypt2_server
Load the newly generated files into the Access Server config database:
/usr/local/openvpn_as/scripts/sacli --key "external_pki.ta_key" --value_file ta.key ConfigPut
/usr/local/openvpn_as/scripts/sacli --key "external_pki.ca_crt" --value_file CA.pem ConfigPut
/usr/local/openvpn_as/scripts/sacli --key "external_pki.server_crt" --value_file server.crt ConfigPut
/usr/local/openvpn_as/scripts/sacli --key "external_pki.server_key" --value_file server.key ConfigPut
/usr/local/openvpn_as/scripts/sacli --key "external_pki.dh_pem" --value_file dh.pem ConfigPut
/usr/local/openvpn_as/scripts/sacli --key "external_pki.auth_token_key" --value_file auth_token.key ConfigPut
/usr/local/openvpn_as/scripts/sacli --key "external_pki.tls_cryptv2_server" --value_file tls_crypt2.key ConfigPut
Start Access Server:
systemctl restart openvpnas
To test our example, we generate a test client, etest.
Sign in to the Admin Web UI.
Select User Management → User Permissions.
Create the new user, etest, and select More Settings to enter a password.
(Optional, for environments using auto-login profiles.) Check Allow Auto-login for the user.
Generate a server-locked profile. The profile will be stored in etest.ovpn:
/usr/local/openvpn_as/scripts/sacli GetGeneric >etest.ovpn
For generating an auto-login profile:
/usr/local/openvpn_as/scripts/sacli --user etest GetAutologin >etest.ovpn
Copy these two files to the client machine:
Client PFX file (client.pfx)
Client profile (etest.ovpn)
Launch OpenVPN Connect v3.
Import the connection profile, etest.ovpn.
Select Menu → Certificate & Tokens.
Under PKCS#12, Select the Add icon.
Select your client P12 file (etest.p12).
Enter the password for this file that you previously configured, then select OK.
Go back to the Home.
Select Menu → My Profiles.
Select the Edit icon for the profile.
Under Certificates, use the Select button to add the external certificate to the profile.
Select the P12 file.
Select Save Changes.
Select Connect to start the profile's connection.
With the release of Access Server 2.14.2, we've made configuring client connection profiles for ePKI easier. Previously, creating these profiles required using the command line, as noted in the tutorial. However, in version 2.14.2 and later, you can now create and manage ePKI client connection profiles directly from Access Server's Client Web UI.
There are two types of ePKI profiles available:
Generic ePKI profile:
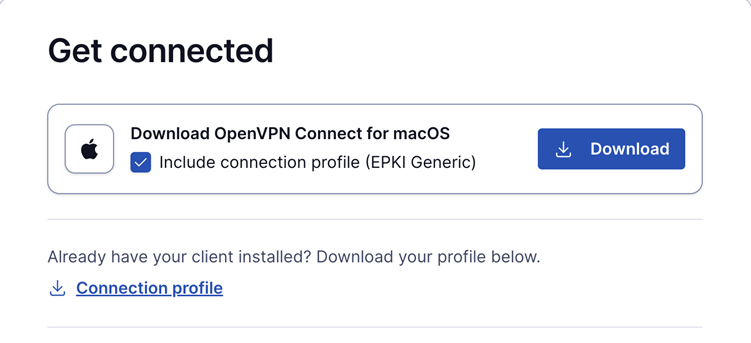
This profile requires the user to authenticate with a password when connecting.
Ideal for environments where a password-based security layer is needed in addition to certificate-based authentication.
Auto-login ePKI profile;
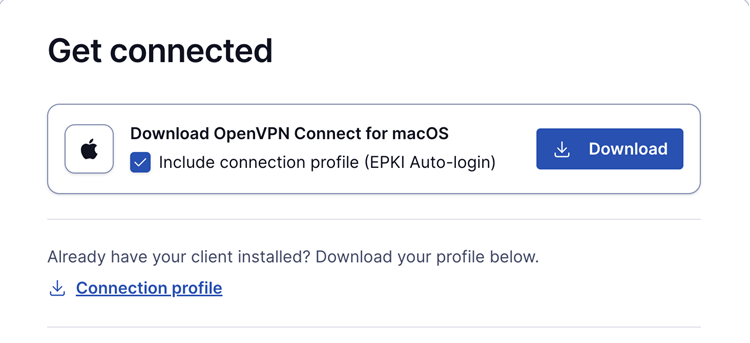
This profile automatically uses the certificate for authentication without requiring a password.
Suitable for unattended devices or systems where automatic, certificate-based login is needed.
In addition, the Import Profile from URL functionality in OpenVPN Connect allows users to import these connection profiles directly, making the configuration process faster and more seamless.
This update simplifies the ePKI setup, providing more flexibility and reducing the reliance on the command line.