Tutorial: Configure External PKI with Futurex CryptoHub for Access Server
Learn how to integrate Access Server with a Futurex CryptoHub using PKCS #11 to protect TLS private keys and strengthen your external PKI security.
Overview
This tutorial explains how to integrate Access Server with a Futurex CryptoHub to use an external public key infrastructure (PKI) for TLS authentication. Access Server supports external keys stored on PKCS #11–compliant hardware security modules. By storing the TLS server private key and the CA signing key on the CryptoHub rather than on the Access Server host, you keep the most sensitive cryptographic material protected. The private keys never leave the CryptoHub, reducing the risk of compromise even if the Access Server system is breached.
Prerequisites
Access Server host requirements
Minimum 4 GB RAM.
Supported Linux OS:
Ubuntu 24.04 LTS.
Debian 13.
Debian 12.
RHEL 9 (And RHEL 9 Clones).
Console (root) access
CryptoHub requirements
A Futurex CryptoHub appliance (version 7.0.2.x or later) with initial setup completed, including:
Platform Master Key loaded.
Network configuration in place.
Administrator access to the CryptoHub
Network requirements
Network connectivity from the Access Server host to the CryptoHub:
Outbound TCP port 2001 (default host API port) allowed.
Destination allowed by FQDN (e.g.,
cryptohub.example.com) or CIDR range.CryptoHub FQDN exempt from TLS/SSL inspection or proxy filtering.
Required tools on the Access Server host
OpenSSL (version 3.x or newer).
pkcs11-tool(available via theopenscpackage).Python 3.6+.
uri2pem.pyutility.Python library
asn1crypto.
Sign in to the CryptoHub under dual control using your administrator identities.
In the left navigation panel, select Services, and find the service called OpenVPN Access Server.
Tip
You can also find OpenVPN Access Server using the search bar.
Select Deploy.
Configure the following Service Setup settings:
Service Name: Leave as default (application name).
Service Category: Leave as default.
Select Next.
Configure the following Access Control settings:
Authorized Resources: Your role has access to this service by default.
Add Additional Resources: Optional.
Select Next.
Configure the following Service Info setting:
Authentication Mechanisms: Leave as default.
Select Deploy.
This endpoint is a device authorized to access the OpenVPN service you deployed in the previous step.
In the left navigation panel, select Home.
Under Deployed Services, locate and select OpenVPN Access Server.
Select ENDPOINTS.
Under Manage Endpoints, select Add New.
In the Add Endpoint dialog:
Endpoint Identifier: Enter an identifier or leave it empty for auto-generation.
CryptoHub Hostname: Leave as default.
Platform: Select the Platform for the endpoint.
Select Add Endpoint.
The browser prompts you to download a ZIP file containing the Futurex PKCS #11 module, TLS certificates, and a preconfigured configuration file to connect to your CryptoHub instance.
Tip
If you want to change an endpoint's PIN/password, go to Identity and Access → Applications & Partitions. Find the application you deployed, and under Manage, select Authentication. This opens a dialog where you can change the endpoint's PIN or password.
Download the FXPKCS11 package from your CryptoHub deployment (the ZIP file downloaded in the previous step).
Move the FXPKCS11 package to the Access Server host. (This system must have access to CryptoHub to use external keys.)
Install FXPKCS11 on the Access Server host
Important
CryptoHub uses ECC certificates by default. If you configure CryptoHub to use RSA instead, update the commands used in this section to reference Futurex Test Root SSL CA.cer instead of Futurex Test Root CA (ECC).cer.
Perform the following steps to install and configure FXPKCS11 on your Access Server Linux host.
Step 1: Extract the CryptoHub package and create the FXPKCS11 directory
Connect to the Access Server console and get root privileges.
Transfer the ZIP file downloaded from CryptoHub to the server.
Extract the ZIP file. The ZIP contains:
CryptoHub 1234567890.cerFuturex Test Root CA (ECC).cerPKCS11Managerca-chain.pemclient-cert.pemclient.p12configTestfxpkcs11.cfglibfxpkcs11.so
Tip
In this example, files are stored in the
rootdirectory.Important
The number in
CryptoHub 1234567890.cerwill vary. Replace it with your file's value in the commands below.Create the following directory:
mkdir /usr/local/lib/fxpkcs11
Step 2: Move the extracted files
Move the extracted files to
/usr/local/lib/fxpkcs11:cp 'CryptoHub 1234567890.cer' 'Futurex Test Root CA (ECC).cer' PKCS11Manager ca-chain.pem client-cert.pem client.p12 configTest fxpkcs11.cfg libfxpkcs11.so /usr/local/lib/fxpkcs11
After this, move the following files to
/etc(default expected location):CryptoHub 1234567890.cerFuturex Test Root CA (ECC).cerclient.p12fxpkcs11.cfg
cp 'CryptoHub 1234567890.cer' 'Futurex Test Root CA (ECC).cer' client.p12 fxpkcs11.cfg /etc
Optional: Use a custom configuration location
If you prefer to store the configuration file elsewhere, define the environment variable:
export FXPKCS11_CFG=/path/to/your/fxpkcs11.cfg
Step 3: Enable automatic PIN loading (recommended)
Automatic PIN loading allows the PKCS#11 library to authenticate without manual PIN entry.
Extract the PIN value from
fxpkcs11.cfg(between<CRYPTO-OPR-PASS>and</CRYPTO-OPR-PASS>) and write it to a file:grep CRYPTO-OPR-PASS /etc/fxpkcs11.cfg | sed 's/.*<CRYPTO-OPR-PASS>\s*\(.*\)\s*<\/CRYPTO-OPR-PASS>.*/\1/' > /root/pkcs11-pin.txt
Confirm the file contains only the PIN value:
cat /root/pkcs11-pin.txt
For security, remove the
<CRYPTO-OPR-PASS>entry from/etc/fxpkcs11.cfg.
Step 4: Configure secrets (PKCS #12 password)
Extract the password from
fxpkcs11.cfg(between<PROD-TLS-KEY-PASS>and</PROD-TLS-KEY-PASS>) and write it to a file:echo "export PKCS11_P12=$(grep PROD-TLS-KEY-PASS /etc/fxpkcs11.cfg | sed 's/.*<PROD-TLS-KEY-PASS>\s*\(.*\)\s*<\/PROD-TLS-KEY-PASS>.*/\1/')" > /etc/profile.d/fxpkcs11.sh
Confirm the file contains
export PKCS11_P12=passwordwhere password is the password value between<PROD-TLS-KEY-PASS>and</PROD-TLS-KEY-PASS>:cat /etc/profile.d/fxpkcs11.sh
This takes effect for new login shells. Sign out and back in, or start a new shell session before validating or running applications that rely on
PKCS11_P12.
Step 5: Validate with configTest (recommended)
Run the configuration test tool:
/usr/local/lib/fxpkcs11/configTest
Confirm the connection test succeeds.
If you see:
-bash: /usr/local/lib/fxpkcs11/configTest: Permission denied
Make the file executable:
chmod +x /usr/local/lib/fxpkcs11/configTest
Then run the test again.
Step 6: Troubleshoot validation issues
If ConfigTest fails:
Check the FxPKCS11 log file:
Default location: same directory as
fxpkcs11.cfg.To customize, modify the
LOG-FILEsetting infxpkcs11.cfg.
Verify:
fxpkcs11.cfgis located at/etc/fxpkcs11.cfg(or confirmFXPKCS11_CFGis set correctly)client.p12is in the same directory asfxpkcs11.cfgPKCS11_P12is set correctly:echo "$PKCS11_P12"
Install the pkcs11-provider module from Latchset. This module allows OpenSSL 3.x to use PKCS #11 tokens through a provider interface. Follow the steps for your Linux version.
Install on Ubuntu / Debian
Install the required packages:
sudo apt update && sudo apt upgrade -y
sudo apt install -y git build-essential meson libssl-dev pkg-config python3-asn1crypto opensc libnss3 libnss3-dev libnss3-tools p11-kit libp11-kit-dev
Create a source directory and change into it:
mkdir -p ~/src
cd ~/src
Clone the pkcs11-provider repository:
git clone https://github.com/latchset/pkcs11-provider.git
cd pkcs11-provider
Build the provider:
meson setup builddir
meson compile -C builddir
Install the provider:
sudo meson install -C builddir
Note
During installation, the
pkcs11.somodule is copied to the OpenSSL modules directory. You'll need this path when updating the OpenSSL configuration file.Example output:
Installing src/pkcs11.so to /usr/lib/x86_64-linux-gnu/ossl-modules
In this example,
pkcs11.sois installed in/usr/lib/x86_64-linux-gnu/ossl-modules.
Install on RHEL
Important
This step includes enabling the EPEL and CodeReady Builder (CRB) repository, so ensure you have a valid RHEL subscription.
Enable EPEL and CodeReady Builder (CRB):
RHEL 9:
subscription-manager repos --enable codeready-builder-for-rhel-9-$(arch)-rpms
dnf install https://dl.fedoraproject.org/pub/epel/epel-release-latest-9.noarch.rpm
Alma and Rocky Linux 9:
dnf config-manager --set-enabled crb
dnf install https://dl.fedoraproject.org/pub/epel/epel-release-latest-9.noarch.rpm
Refresh metadata:
sudo dnf makecache
Install the prerequisites:
sudo dnf check-update
sudo dnf install -y git gcc gcc-c++ meson ninja-build pkgconfig openssl-devel nss-devel p11-kit-devel opensc python3-asn1crypto
Tip
Use
yumifdnfisn't available.Change to a source directory:
cd /usr/local/src
Clone the repository:
git clone https://github.com/latchset/pkcs11-provider.git
cd pkcs11-provider
Build the provider:
meson setup builddir
meson compile -C builddir
Install the provider:
sudo meson install -C builddir
Note
During installation, the
pkcs11.somodule is copied to the OpenSSL modules directory. You'll need this path when updating the OpenSSL configuration file.Example output:
Installing src/pkcs11.so to /usr/lib64/ossl-modules
In this example,
pkcs11.sois installed in/usr/lib64/ossl-modules.
Configure OpenSSL to load the provider
Locate the OpenSSL configuration file. You can verify it with the following command
openssl version -d. For instance:For Ubuntu/Debian:
root@openvpnas:~# openssl version -d
OPENSSLDIR: "/usr/lib/ssl"
For RHEL:
root@openvpnas:~# openssl version -d
OPENSSLDIR: "/etc/pki/tls"
Important
This tutorial assumes
openssl.cnfis located in/usr/lib/ssl/. Update the path in the following commands accordingly.Create a backup of the OpenSSL configuration file before making changes:
cp /usr/lib/ssl/openssl.cnf /usr/lib/ssl/openssl-backup.cnf
Open the OpenSSL configuration file for editing:
nano /usr/lib/ssl/openssl.cnf
At the top of the file, add the following line if it's not already present:
openssl_conf = openssl_init
At the bottom of the file, add the following configuration block. Update the paths as needed for your system:
[openssl_init]
providers = provider_init

[provider_init]
default = default_init
pkcs11 = pkcs11_init

[default_init]
activate = 1

[pkcs11_init]
module = /path/to/pkcs11-provider/pkcs11.so1
pkcs11-module-path = /usr/local/lib/fxpkcs11/libfxpkcs11.so
pkcs11-module-token-pin = file:/path/to/file_with_pin.txt
activate = 1
Update the paths accordingly. In our example:
Replace
/path/to/pkcs11-provider/pkcs11.sowith/usr/lib/x86_64-linux-gnu/ossl-modules/pkcs11.soReplace
/path/to/file_with_pin.txtwith/root/pkcs11-pin.txt
Tip
If you're not sure where
pkcs11.sois on your system, run this command:find / -type f -path '*/ossl-modules/pkcs11.so' 2>/dev/null
Save the file and exit — Ctrl-X, Y, then Enter.
Verify that the PKCS#11 provider loads correctly:
openssl list -providers
You should see both
defaultandpkcs11listed.Example output:
root@openvpnas:~# openssl list -providers
Providers:
  default
    name: OpenSSL Default Provider
    version: 3.0.13
    status: active
  pkcs11
    name: PKCS#11 Provider
    version: 1.1
    status: active
Reboot the Access Server host:
reboot
Validate with PKCS11Manager (recommended)
Run
PKCS11Managerand confirm that the connection test succeeds:/usr/local/lib/fxpkcs11/PKCS11Manager
If you see a permission error, such as:
-bash: /usr/local/lib/fxpkcs11/PKCS11Manager: Permission denied
This indicates that the file may not be executable. To fix this, run:
chmod +x /usr/local/lib/fxpkcs11/PKCS11Manager
Then run the test again. You can perform a simple action (for example, select option 8
Generate Random Data).
Troubleshoot the validation with PKCS11Manager
Check the FxPKCS11 log file:
Default location: same directory as
fxpkcs11.cfg.To customize, modify the
LOG-FILEsetting infxpkcs11.cfg.
Verify that the PKCS #11 PIN is correct.
To update the PKCS #11 PIN:
Sign in to the CryptoHub dashboard.
Navigate to Identity and Access.
Select the Applications & Partitions tab.
Locate your deployed application.
In the Manage section, select Authentication.
Update the PIN/password for the endpoint in the dialog.
This step prepares the keys and certificates used by Access Server and securely stores them in the CryptoHub. You generate the CA, server, and client certificates using PKCS #11 operations, so that private keys never leave the hardware module.
Important
If you use an external CA, this tutorial doesn't cover how to apply the Access Server's required v3 extensions during certificate signing. Follow your CA’s documentation for extension handling.
Note
VPN clients rely on the CA certificate to validate the server. If the CA certificate expires, client connections will fail until it's replaced.
Important
Futurex can't provide support for issues arising from the use of an external CA; refer to your CA's documentation for guidance on extension handling and certificate issuance.
Set FXPKCS11 environment variables
Configure Access Server for external PKI
Connect to the Access Server console and get root privileges.
Edit as.conf for external PKI usage:
nano /usr/local/openvpn_as/etc/as.conf
Comment out certs_db:
# certificates database
# certs_db=sqlite:///~/db/certs.db
Save and exit the file — Ctrl-X, Y, then Enter.
Access Server no longer uses the certificate database. Instead, an external system must handle this.
Generate the CA key on CryptoHub
Tip
We use OpenSSL to generate the files. Skip this section if you're using an external CA.
Note
We're storing the files in the root directory.
Generate the private key:
pkcs11-tool --module $FXPKCS11_MODULE --login --key-type rsa:2048 --pin "$(cat /root/pkcs11-pin.txt)" --label "OpenVPN-CA-Key" --id 01 --keypairgen --usage-sign
Generate the PKCS #11 URI reference file for the CA key:
For Ubuntu/Debian:
python3 ~/src/pkcs11-provider/tools/uri2pem.py "pkcs11:type=private;object=OpenVPN-CA-Key" > /root/ca.key
For RHEL:
python3 /usr/local/src/pkcs11-provider/tools/uri2pem.py "pkcs11:type=private;object=OpenVPN-CA-Key" > /root/ca.key
Generate the CA certificate:
openssl req -new -x509 -provider pkcs11 -provider-path $FXPKCS11_MODULE -key ca.key -out ca.crt -days 3650 -subj "/CN=OpenVPN_CA"
The above commands output two files:
CA key (ca.key)
CA certificate (ca.crt)
Create OpenSSL configuration for the server certificate
Copy the default OpenSSL configuration file to a new file named
openssl-server.cnf:OUT="/usr/lib/ssl/openssl-server.cnf" cp /usr/lib/ssl/openssl.cnf "$OUT"
Update the
[ req ]section:sed -i '/^\[ req \]/,/^\[/{/req_extensions/ d}' "$OUT" sed -i '/^\[ req \]/,/^\[/{/x509_extensions/ a\ req_extensions = v3_req }' "$OUT"Update the
[ v3_req ]section:sed -i '/^\[ v3_req \]/,/^\[/{s/basicConstraints.*/basicConstraints = critical, CA:FALSE/}' "$OUT" sed -i '/^\[ v3_req \]/,/^\[/{s/keyUsage.*/keyUsage = critical, digitalSignature, keyEncipherment/}' "$OUT" sed -i '/^\[ v3_req \]/,/^\[/{/extendedKeyUsage/ d}' "$OUT" sed -i '/keyUsage = critical, digitalSignature, keyEncipherment/ a\ extendedKeyUsage = serverAuth ' "$OUT"
Create OpenSSL configuration for the client certificate
Copy the default OpenSSL configuration file to a new file named
openssl-client.cnf:OUT="/usr/lib/ssl/openssl-client.cnf" cp /usr/lib/ssl/openssl.cnf "$OUT"
Update the
[ req ]section:sed -i '/^\[ req \]/,/^\[/{/req_extensions/ d}' "$OUT" sed -i '/^\[ req \]/,/^\[/{/x509_extensions/ a\ req_extensions = v3_req }' "$OUT"Update the
[ v3_req ]section:sed -i '/^\[ v3_req \]/,/^\[/{s/basicConstraints.*/basicConstraints = critical, CA:FALSE/}' "$OUT" sed -i '/^\[ v3_req \]/,/^\[/{s/keyUsage.*/keyUsage = critical, digitalSignature/}' "$OUT" sed -i '/^\[ v3_req \]/,/^\[/{/extendedKeyUsage/ d}' "$OUT" sed -i '/^\[ v3_req \]/,/^\[/{/nsCertType/ d}' "$OUT" sed -i '/keyUsage = critical, digitalSignature/ a\ extendedKeyUsage = clientAuth ' "$OUT" sed -i '/extendedKeyUsage = clientAuth/ a\ nsCertType = client ' "$OUT"
Generate the server key and certificate
Tip
We're storing the files in the root directory.
Important
This tutorial assumes openssl.cnf is located in /usr/lib/ssl/. Update the path in the following commands accordingly.
Generate the server private key on CryptoHub:
pkcs11-tool --module $FXPKCS11_MODULE --login --key-type rsa:2048 --pin "$(cat /root/pkcs11-pin.txt)" --label "OpenVPN-Server-Key" --id 02 --keypairgen --usage-sign
Generate the PKCS #11 URI reference file for the server key:
For Ubuntu/Debian:
python3 ~/src/pkcs11-provider/tools/uri2pem.py "pkcs11:type=private;object=OpenVPN-Server-Key" > server.key
For RHEL:
python3 /usr/local/src/pkcs11-provider/tools/uri2pem.py "pkcs11:type=private;object=OpenVPN-Server-Key" > server.key
Generate the server CSR:
openssl req -new -key server.key -out server.csr -subj "/CN=OpenVPN Server" -config /usr/lib/ssl/openssl-server.cnf
Sign the server certificate:
openssl x509 -req -in server.csr -CA ca.crt -CAkey ca.key -CAcreateserial -out server.crt -days 365 -extfile /usr/lib/ssl/openssl-server.cnf -extensions v3_req
From the above commands, you get three files:
Server key (server.key)
Server certificate (server.crt)
Server CSR (server.csr)
Generate the client certificate and package
Tip
We're storing the files in the root directory.
Important
This tutorial assumes openssl.cnf is located in /usr/lib/ssl/. Update the path in the following commands accordingly.
Generate the client private key:
openssl genpkey -algorithm RSA -out client.key -pkeyopt rsa_keygen_bits:2048
Generate the client CSR:
openssl req -new -key client.key -out client.csr -subj "/CN=etest" -config /usr/lib/ssl/openssl-client.cnf
(Optional) Generate the client CSR compatible with auto-login:
openssl req -new -key client.key -out client.csr -subj "/role=AUTOLOGIN/CN=etest" -config /usr/lib/ssl/openssl-client.cnf
Sign the client certificate:
openssl x509 -req -in client.csr -CA ca.crt -CAkey ca.key -CAcreateserial -out client.crt -days 365 -extfile /usr/lib/ssl/openssl-client.cnf -extensions v3_req
Create the P12 bundle:
openssl pkcs12 -export -inkey client.key -in client.crt -out etest.p12 -name "etest"
Enter the P12 password when prompted.
From the above commands, you get four files:
Client key (client.key)
Client certificate (client.crt)
Client CSR (client.csr)
Client P12 file (etest.p12)
This step integrates the certificates and keys generated earlier into Access Server. The server uses the PKCS #11-backed keys stored in the CryptoHub, while Access Server reads the associated certificate and parameter files from its configuration database. You’ll then configure a test user and connect with a server-locked profile.
Prepare the Access Server key directory
Connect to the Access Server console and get root privileges.
Create a directory for your external PKI files:
mkdir epki && cd epki
Copy the required files into the directory:
cp ../ca.crt ./
cp ../server.crt ./
cp ../server.key ./
Generate required OpenVPN keys and parameters
Generate a
tls_authkey:/usr/local/openvpn_as/scripts/certool --tls_auth
Generate Diffie-Hellman parameters for the OpenVPN server:
openssl dhparam -out dh.pem 2048
For Access Server 2.7 and newer, you must also generate your auth token and add the generated file:
/usr/local/openvpn_as/scripts/certool --auth_token
Configure X509 explicit/extended key usage based on RFC3280 TLS rules:
/usr/local/openvpn_as/scripts/sacli --key "external_pki.remote_cert_usage" --value eku ConfigPut
Configure the use of the X509 “role” attribute for the declaration of auto-login permission:
/usr/local/openvpn_as/scripts/sacli --key "external_pki.autologin_x509_spec" --value "role,,AUTOLOGIN" ConfigPut
Generate the tls-crypt-v2 key (for Access Server 2.9.0 and higher only):
/usr/local/openvpn_as/scripts/certool --tls_crypt2_server
Import certificates and keys into Access Server
Load the files into the Access Server configuration database:
/usr/local/openvpn_as/scripts/sacli --key "external_pki.ta_key" --value_file ta.key ConfigPut
/usr/local/openvpn_as/scripts/sacli --key "external_pki.ca_crt" --value_file ca.crt ConfigPut
/usr/local/openvpn_as/scripts/sacli --key "external_pki.server_crt" --value_file server.crt ConfigPut
/usr/local/openvpn_as/scripts/sacli --key "external_pki.server_key" --value_file server.key ConfigPut
/usr/local/openvpn_as/scripts/sacli --key "external_pki.dh_pem" --value_file dh.pem ConfigPut
/usr/local/openvpn_as/scripts/sacli --key "external_pki.auth_token_key" --value_file auth_token.key ConfigPut
/usr/local/openvpn_as/scripts/sacli --key "external_pki.tls_cryptv2_server" --value_file tls_crypt2.key ConfigPut
Restart Access Server:
systemctl restart openvpnas
Create and configure a test client
To test our example, we generate a test client, etest.
Sign in to the Admin Web UI.
Select User Management → User Permissions.
Create the new user, etest, and select More Settings to enter a password.
(Optional, for environments using auto-login profiles). Select Allow Auto-login for the user.
Generate a server-locked profile. The profile will be stored in etest.ovpn:
/usr/local/openvpn_as/scripts/sacli GetGeneric >etest.ovpn
For generating an auto-login profile:
/usr/local/openvpn_as/scripts/sacli --user etest GetAutologin >etest.ovpn
Copy these two files to the client machine:
Client P12 file (etest.p12)
Client profile (etest.ovpn)
Install the profile and certificate in OpenVPN Connect v3
Launch OpenVPN Connect v3.
Import the connection profile, etest.ovpn.
Select Menu → Certificate & Tokens.
Under PKCS#12, Select the Add icon.
Select your client P12 file (etest.p12).
Enter the password for this file that you previously configured, then select OK.
Go back to the Home.
Select Menu → My Profiles.
Select the Edit icon for the profile.
Under Certificates, use the Select button to add the external certificate to the profile.
Select the P12 file.
Select Save Changes.
Select Connect to start the profile's connection.
With the release of Access Server 2.14.2, we've made configuring client connection profiles for ePKI easier. Previously, creating these profiles required using the command line, as noted in the tutorial. However, in version 2.14.2 and later, you can now create and manage ePKI client connection profiles directly from Access Server's Client Web UI.
There are two types of ePKI profiles available:
Generic ePKI profile:
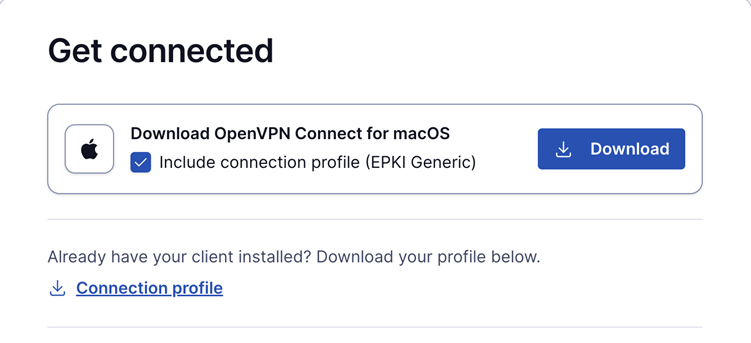
This profile requires the user to authenticate with a password when connecting.
Ideal for environments where a password-based security layer is needed in addition to certificate-based authentication.
Auto-login ePKI profile;
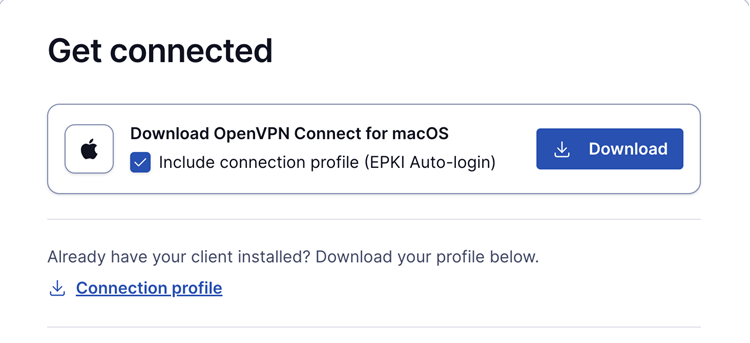
This profile automatically uses the certificate for authentication without requiring a password.
Suitable for unattended devices or systems where automatic, certificate-based login is needed.
In addition, the Import Profile from URL functionality in OpenVPN Connect allows users to import these connection profiles directly, making the configuration process faster and more seamless.
This update simplifies the ePKI setup, providing more flexibility and reducing the reliance on the command line.