Tutorial: Set Up an IP Allowlist Using Access Server's Split Tunneling Functionality for Enhanced SaaS Security
Secure access to your SaaS applications and protect your business data effectively with an IP allowlist and Access Server.
Overview
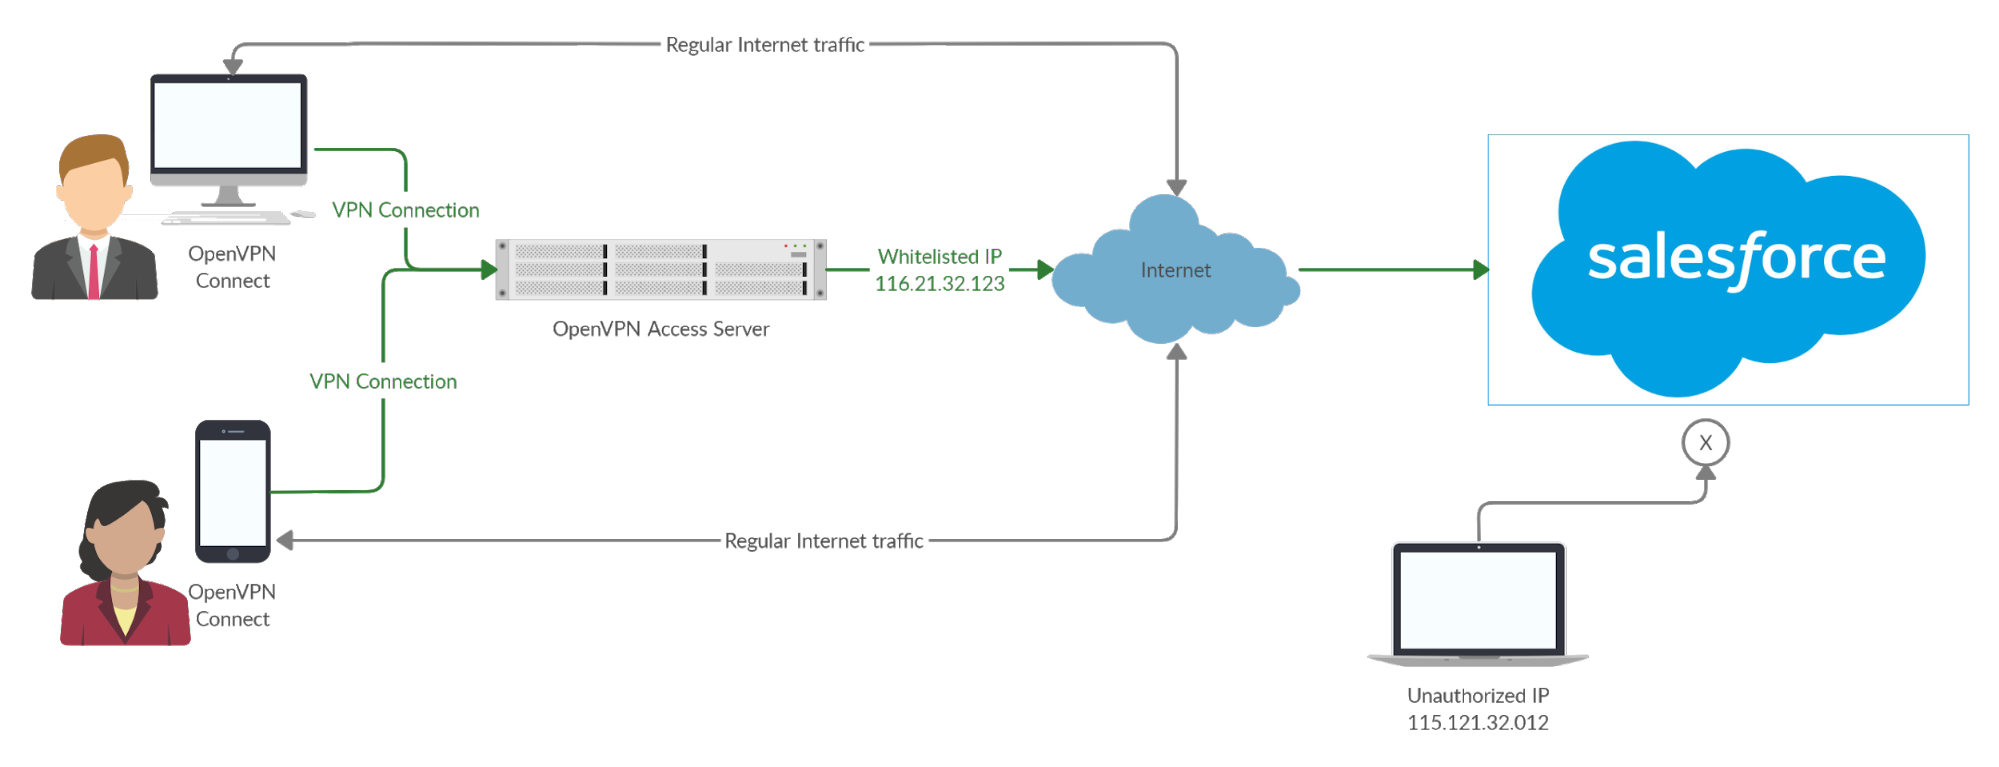
This tutorial guides you through setting up an IP allowlist using Access Server's split tunneling feature to enhance the security of your SaaS applications. By configuring Access Server to allow traffic only to specified IP addresses, you can ensure that users connect securely through your VPN without exposing sensitive business data. This setup is particularly useful when users connect from various locations, allowing them to maintain a consistent IP address for SaaS access while still using their regular internet connection for other browsing activities.
Prerequisites
An installed Access Server.
A public static IP address.
Access to SaaS application(s).
Basic networking knowledge (familiarity with NAT and IP addressing).
Admin Web UI access.
Follow the steps here to achieve two main objectives:
Ensure only traffic to specific SaaS applications traverses the VPN while all other internet traffic remains unaffected.
Set up an allowlist of source IP addresses at the SaaS provider, allowing access through Access Server's public IP address using NAT.
To configure NAT for Access Server:
Sign in to the Admin Web UI.
Select Configuration → VPN Settings.
In the routing section, select Yes, using NAT.
Specify the IP address or range for your SaaS application in the Specify the private subnets to which all clients should be given access field.
For example, enter the IP range provided by Salesforce when setting this up with Salesforce. Check regularly for updates.
Select No for Should client Internet traffic be routed through the VPN? This ensures a split-tunnel VPN configuration.
Set Do not alter clients' DNS server settings to Yes to prevent pushing DNS settings.
Follow these steps for the SaaS account you want to secure (using Salesforce as an example):
Sign in with an administrator account.
Select the Setup icon.
Select Users → Profiles.
Select the profile for access (e.g., "End Users").
Select Login IP Range(s).
Select New to define the IP address.
In both the Start IP Address and End IP Address fields, enter the public IP address of your Access Server.
Provide a description and select Save.
Repeat for any additional profiles as needed.
Now, when a user attempts to sign in from an IP address that isn’t connected to Access Server, they will receive an error message indicating access is denied. Conversely, users connected to Access Server will successfully sign in as their traffic appears to come from the allowlisted IP.
Enhancing security layers for your business’s SaaS solutions can significantly mitigate risks, particularly those stemming from human error. By implementing IP allowlisting as outlined in this guide, you can ensure that VPN clients connect securely to your SaaS solution from anywhere.
The encrypted VPN connection safeguards users on public Wi-Fi, and using NAT allows you to allowlist Access Server’s IP address easily. This setup means users can connect securely from any location, as long as they are connected to your Access Server. For more information on using NAT with Access Server, refer to this resource: