TOTP MFA: Multi-Factor Authentication for Access Server
Access Server supports TOTP MFA configured in the Admin Web UI. This provides an additional security step for authenticating users you can easily turn on by clicking a toggle.
To enable TOTP MFA, follow our tutorial:
To manage TOTP MFA from the command line, follow our tutorial:
What are time-based one-time passwords?
Apps such as Google Authenticator and Microsoft Authenticator use Time-based One-Time Passwords (TOTP). When enabled for Access Server, your users enter their username and password first; then, they must enter a six-digit code that is valid during a short timeframe and changes afterward.
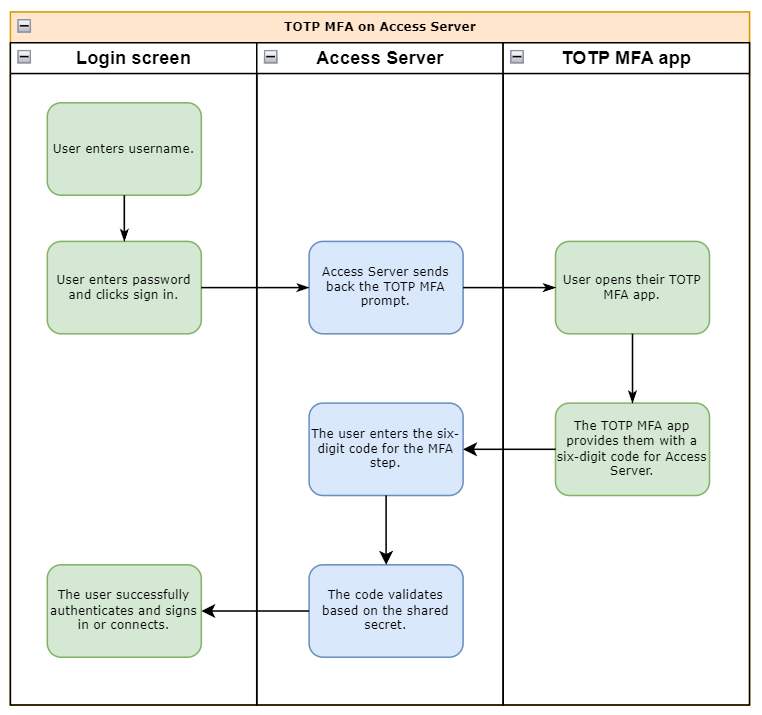
Google Authenticator is an example of an application to manage your shared secrets — shared keys agreed upon between the server and a device on the user's side. A calculation based on the shared key and current date and time yields a six-digit code. The server and the user's device both do this calculation. During login, the user sends the result from its own device to the server, and the user successfully signs in when the results match. To accommodate minor deviations in time drift, we allow codes immediately preceding and following the current code to authenticate with Access Server successfully.
Important
Both the shared key and the date and time must match on the server and the device that generates the six-digit codes on the user's side. Thus, if either the server or device has the date or time wrong or the shared key is not the same, then the authentication fails. Our prepared installation images include an NTP client program to synchronize time automatically via the internet to ensure Access Server has the correct time and date. You must ensure that client devices also keep accurate time.
Transferring the shared key from the server to the client takes place by scanning a QR code or entering the shared key manually during the enrollment process. Access Server provides this to the user upon signing in to the Client Web UI when they are not yet enrolled. They are then required to complete the enrollment process by scanning or entering the shared key on their device that generated the TOTP MFA codes and then confirming that enrollment was completed successfully by entering a valid six-digit code generated on their device. Once enrolled, a user will need to enter their credentials, followed by a valid six-digit code, in order to authenticate for future login sessions.
Bootstrap user accounts and MFA
Access Server 2.10 and newer
Access Server 2.10 and newer creates the openvpn account as an administrative user in the local user database. This account adheres to global account settings, such as an MFA requirement and the password lockout policy. We recommend that you set your own strong password and enable MFA on this account.
Access Server 2.9 and older
Access Server 2.9 and older use a bootstrap administrative user account, openvpn, as defined in as.conf. The MFA security layer doesn’t apply to bootstrap users, and the password lockout policy isn’t triggered for them.
We recommend you avoid using bootstrap users for your administrative accounts and instead create a user in Access Server with admin privileges, enrolled with TOTP MFA. If you upgrade to Access Server 2.10 or newer, you can set this administrative account up as a local user with the MFA requirement, even if you’re using another authentication system for your users. You can then disable or remove bootstrap user accounts so they can’t sign in. Refer to this tutorial to replace the legacy openvpn administrative account.