How to Fix IP Overlap with CloudConnexa
Multi-cloud networking is the new reality for businesses — and issues that arise from overlapping IP addresses can hold companies back. Thankfully, a feature in CloudConnexa solves the problem by creating unique domain names that are used as routes to the different networks instead of the IP address subnets.
What Are Overlapping IP Addresses and Why Are They a Problem?
Put simply, if devices on one network have all or some of their IP addresses in common with devices in another network, the IP address ranges for those two networks are said to ‘overlap.’ One common scenario is: many routers that provide internet access for a small network — such as a home network or a network of a few IoT devices — have a default configuration to use the 192.168.0.0/16 address range for their connected devices. When you want to mesh together multiple networks that have the above default setup, there’s a problem: the devices in each of those networks are using the same IP address range of 192.168.1.0/24 (i.e. the IP addresses overlap). It’s impossible to identify and route traffic to a specific device by its IP address if that same IP address is being used in your other networks.
Common Use Cases with Overlapping IP Addresses
There are several common use cases that require private networks with overlapping IP address ranges to be networked or meshed together:
- Out-of-the-box networks that use the manufacturer's default IP address subnet ranges.
- Networks that are created under different IaaS accounts belonging to the same business.
- Mergers and acquisitions.
- Connecting on-premises and IaaS networks.
- Multi-cloud network interconnections.
Routing between networks that have overlapping IP addresses is a difficult problem to solve. Most solutions typically use complex network address translation (NAT) methods.
How does CloudConnexa help?
With CloudConnexa, unique domain names can be used to route traffic to the various networks. When domain names are configured to uniquely identify each network, CloudConnexa can map the IP addresses within each network to a fully qualified domain name (FQDN) by creating DNS records. CloudConnexa can route traffic to the correct device even if its IP address overlaps with another network, because the FQDN signifies the destination.
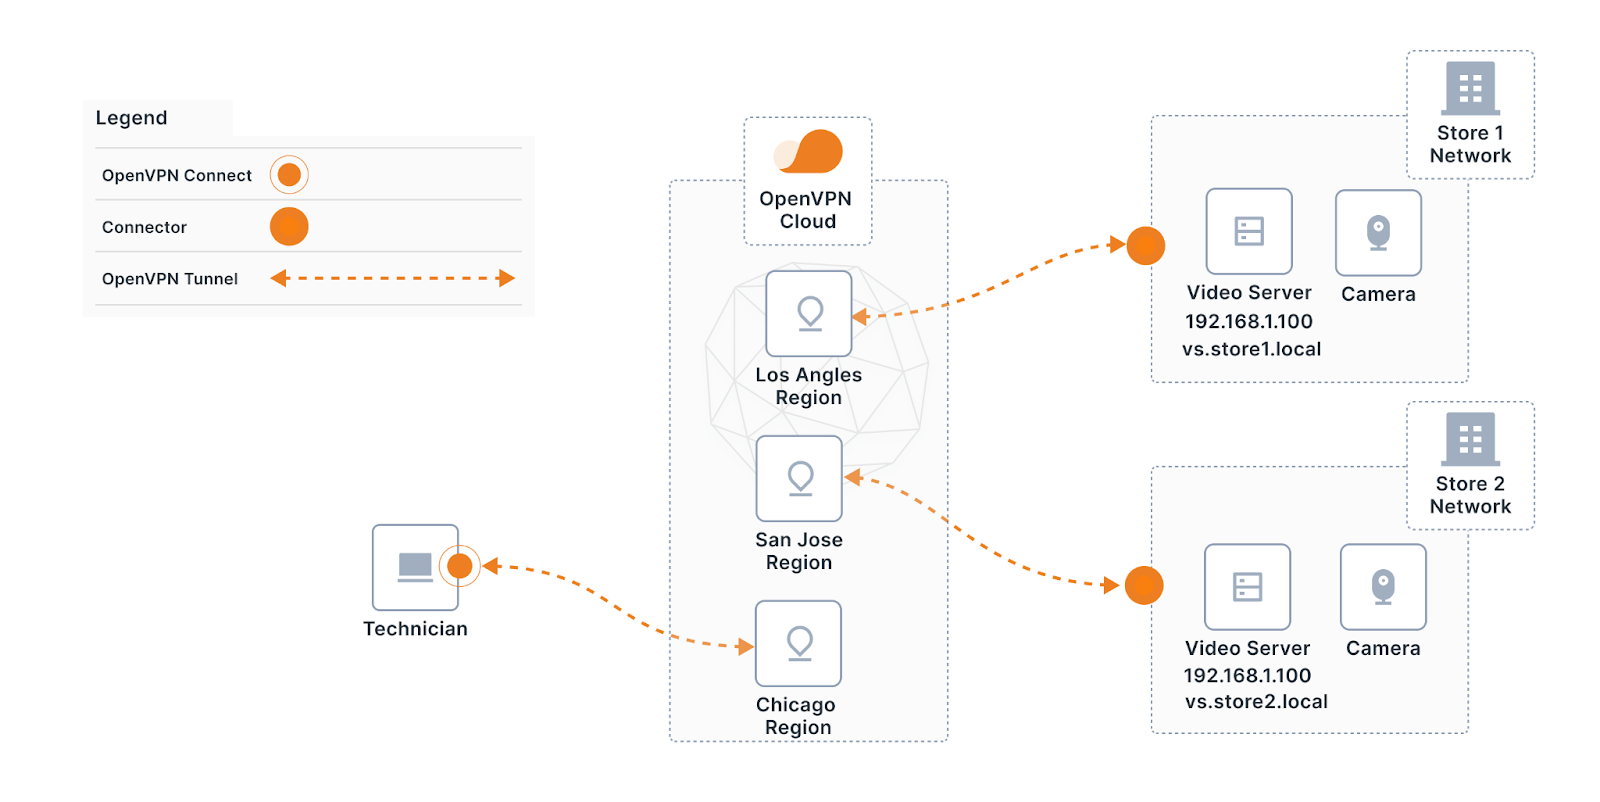
A Use Case: Setting Up Remote Access
In this example use case, a security company provides video monitoring services to small, independently owned stores. The planned solution consists of installing one to four cameras in each store, as well as monitoring devices and video storage servers. The cameras will store videos locally, but the security company needs to be able to remotely connect to the cameras, servers, and other equipment to update firmware, carry out diagnostics, and perform maintenance. The company's technicians need to remotely access the embedded web servers running on the various connected devices to administer them.
Your VPN solution should work for your specific needs.
The security company needs to find a solution that meets several requirements:
- Remote access to the cameras and other monitoring equipment at each store.
- Access to devices on the customer's LAN despite overlapping IP address ranges.
- The monitoring equipment uses the customer's network for access to the internet. The IP addresses configured for the cameras and other equipment are assigned from the customer's LAN IP address range. Therefore, it won’t be possible to prevent IP address range overlap among customer sites. For example, two cameras installed in different customer stores might have the same IP address of 192.168.1.100.
- Communication between the various networks must be restricted.
Using CloudConnexa, an administrator can quickly connect two or more networks with overlapping IP address ranges. In this example we have Store 1 and Store 2:
- A network is created for Store 1, and a domain route to the network is also created (vs.store1.local).
- A connector is installed for the Store 1 network.
- A network is created for Store 2, and a domain route to the network is also created (vs.store2.local).
- A connector is installed for the Store 2 network.
- DNS records are added for the devices on the Store 1 network. For example, vs.store1.local is mapped to 192.168.1.100.
- DNS records are added for the devices on the Store 2 network. For example, vs.store2.local is mapped to 192.168.1.100.
You can see in the above example that the FQDNs of vs.store1.local and vs.store2.local can now be used to route traffic to the specified devices that have duplicate local IP addresses on separate networks.
For further information and configuration resources, take a look at these guides on the CloudConnexa documentation page: