Troubleshoot Reaching Destinations over the VPN Tunnel
Having trouble reaching systems over the VPN tunnel? Use this troubleshooting guide to fix issues reaching destinations on your business VPN.
This page covers troubleshooting issues related to reaching a destination through an OpenVPN tunnel. For problems establishing the VPN tunnel, refer to Client-Server Connectivity. Specifically, we address connection path problems here, meaning the issues encountered between the OpenVPN client and the target server you're trying to reach.
This is distinct from problems related to establishing the OpenVPN tunnel itself. Connectivity issues along this path can be challenging, especially if they impact your business operations. Multiple variables and the invisible nature of network traffic can make these problems seem insurmountable. However, with the right diagnostic tools, troubleshooting is manageable.
Most issues aren't rooted in the Access Server or OpenVPN Connect configurations but are typically found in the target network or the target system itself. This topic will guide you through tests that help eliminate possibilities until you find the cause of the issue.
Note
Amazon AWS-specific settings:
NAT mode: If using NAT in Access Server, traffic from VPN clients will appear as if it's coming from the Access Server itself, requiring no special configuration.
Routing mode: If using routing mode, where the source IP of VPN client packets remains unchanged, AWS security features may block this traffic. Special steps are needed, including implementing a static route that directs replies to VPN client traffic back through the Access Server instance.
In Amazon AWS, set up a routing table in your VPC to contain a static route that points the VPN client subnet to the Access Server instance. To configure this, navigate to the VPC Dashboard and Route Tables in the AWS console.
Source/Destination check: This EC2 instance security setting filters traffic unless it matches the EC2 instance's network interface address. Disable this setting to allow traffic through.
Note
Microsoft Azure-specific settings:
In Azure, implement routes in the virtual network routing table to route traffic directly to the VPN client subnet. Avoid using a static route on a virtual instance, as this traffic might be filtered away due to security features.
Tools for diagnosing connection problems
To diagnose connectivity issues between the VPN client and the target system, use the following tools:
TCPdump: Linux command-line tool for visualizing network packets.
WireShark: Windows GUI tool for visualizing network packets.
ping: Testing tool to check message exchange between source and destination.
traceroute: Determines every hop between the source and target destination.
These tools help visualize traffic paths and identify where traffic flow stops.
Tip
If you have problems connecting the VPN tunnel, check Client-Server Connectivity.
Before you begin
Check these common issues:
Ensure proper access is delegated in Access Server:
Ensure local subnets are listed under Configuration > VPN Settings > Routing.
If you're using routing, add static routes on your local router.
If you're using NAT, ensure you are not listing subnets in Advanced VPN > Private Routed Subnets.
Verify that the dynamic IP address range in Layer 3 operating mode does not conflict with the remote network.
On ESXi platforms, use VMXNET3 as the NIC type instead of Flexible. To change, you must shut down the virtual machine, remove the NIC, and add a new one.
Disable Jumbo Frames on all network nodes.
Configure firewalls to allow ICMP Destination Unreachable: Fragmentation Needed (ICMP Type 3, Code 4). Windows Firewall configures this rule by default.
Use UDP or multi-daemon mode over TCP for VPN connections.
Ensure reliable internet connections for VPN clients.
Test and replace any defective Ethernet cables.
Keep firewall software/firmware up to date.
Turn off antivirus and internet security products during testing.
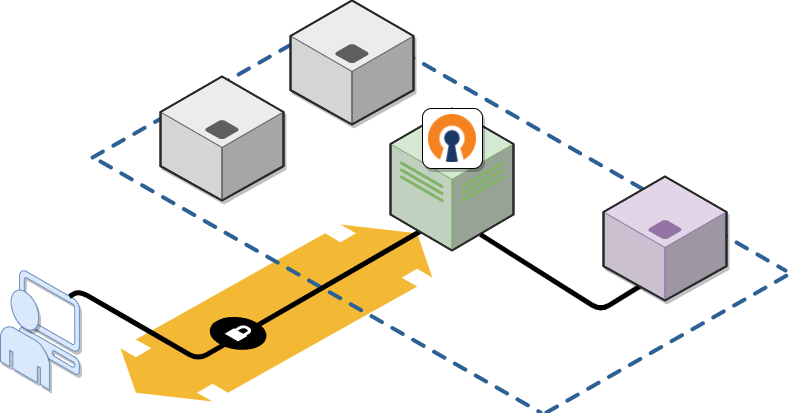
Assume an OpenVPN client (blue) is connected to the Access Server (green) but unable to reach a target server (purple). Here's how to troubleshoot with this setup:
Device | IP Address |
|---|---|
OpenVPN client | 198.51.100.4 |
Access Server | 192.0.2.133 |
Target server | 192.0.2.252 |
Enter the following from the VPN client computer (assuming a Windows computer for this example) command prompt:
tracert -d 192.0.2.252
Analyze the results:
Ensure traffic passes through the VPN tunnel and the Access Server.
Missing routes, administrative privileges, subnet conflicts, or permissions might cause issues if the traffic doesn't reach the VPN server's internal subnet.
Sample traceroute output:
C:\Windows\System32>tracert -d 192.0.2.252
Tracing route to 192.0.2.252 over a maximum of 30 hops
 1 20 ms 21 ms 17 ms 198.51.100.1
 2 21 ms 18 ms 18 ms 192.0.2.133
 3 22 ms 23 ms 21 ms 192.0.2.252
Trace complete.
Connect to the Access Server console and get root privileges.
Install TCPdump:
apt-get install tcpdump
Run TCPdump:
tcpdump -eni any icmp
From the VPN client computer, open the command and use ping:
ping 192.0.2.252
Analyze the tcpdump output from the Access Server console:
Confirm packets from the VPN client are forwarded to the target network by the Access Server.
Check for firewall issues or security settings if packets don't arrive at the target system.
Ensure a static route is set up on the default gateway system to direct traffic to the VPN client subnet through the Access Server.
Sample tcpdump output:
15:35:18.509365 In ethertype IPv4 (0x0800), length 76: 198.51.100.4 > 192.0.2.252: ICMP echo request, id 1, seq 28, length 40
15:35:18.509379 Out 00:0c:29:c7:60:e9 ethertype IPv4 (0x0800), length 76: 198.51.100.4 > 192.0.2.252: ICMP echo request, id 1, seq 28, length 40
Tip
You can check the ifconfig output on Access Server and match the network interface. From our example, we would find eth0 in the ifconfig output, showing that Access Server sent the packet to the target network.
Note that the tcpdump output above doesn't have an echo reply showing the traffic going the other way, from the target server back to the VPN client device. If the target server is a Linux system, you can run tcpdump there as well and examine the results.