Tutorial: How to Set Up an Access Server Cluster
Create a cluster of Access Servers and provide high availability and increased load capacity for your VPN clients and servers.
Overview
This tutorial shows you how to set up a cluster of Access Servers to scale horizontally and provide active-active redundancy. A typical setup consists of multiple Access Servers that store configuration files on a shared database, clients connecting to nodes based on a round-robin DNS record, and VPN connections accessed from one global subscription licensing pool.
For details about the cluster feature, refer to Access Server's Cluster Setup.

Important
Clustering enables high availability and automatic client failover in the event of node downtime. However, some features are limited or unavailable in clustering mode, including:
Per-group VPN client subnets.
Static IP addressing for VPN clients.
VPN client gateway functionality (may cause routing challenges to the correct node).
DMZ functionality isn't supported.
Prerequisites
At least one installed Access Server.
A subscription license key.
A DNS hostname for the round-robin DNS.
Recommended: a configuration backup if you're converting an existing Access Server.
Caution
The steps outlined here are applicable to Ubuntu/Debian. If you're using a different Linux distribution, ensure you adjust them.
Important
Ensure that all cluster nodes run the same Access Server version.
With a single subscription license key, you can handle the licensing needs for all your cluster's Access Server nodes. The nodes share the available connections from the subscription license as needed. You can adjust your subscription license anytime from the Access Server billing portal.
To purchase a subscription license key, follow the steps here: How to purchase.
Note
We provide example information here for using Amazon RDS and DigitalOcean MySQL. Most other MySQL or MariaDB systems work except for MariaDB 10.4.13, which has a known issue due to a bug in the MariaDB code causing connectivity issues.
Tip
The term cluster applies to fault-tolerant database systems and an active-active setup of multiple Access Servers. To set up a fully fault-tolerant system, you must have both a cluster database setup and an Access Server cluster setup with multiple nodes.
Start by creating a new database server. We provide some brief steps, but for further information, refer to AWS or DigitalOcean for their documentation.
AWS
Create a new managed relational database service (RDS) from the AWS service.
Follow the configuration steps to select options, specify the instance size and fault-tolerance settings, define the DB instance identifier, and Master username and Master password.
Take note of the username and password because you will need them later.
Select your VPN and subnet, public accessibility, optional settings, and complete the launch.
DigitalOcean
Create a new database cluster.
Choose your required cluster configuration, datacenter, and VPC network.
Enter a unique name and select a project.
Once your database server is up and running, you need connection details to set up your first Access Server in the cluster. Get the following information to connect your Access Server nodes to your database server(s):
AWS
Endpoint
Master username
Master password
DigitalOcean
Username
Password
Host
Port
Database
Open the following ports on your Access Server node:
TCP 22: SSH access.
TCP 443: Web interface access and OpenVPN TCP connections.
TCP 943: Web interface access and cluster control channel (as of version 3.0.0).
UDP 1194: OpenVPN UDP connections.
Caution
These ports reflect a standard configuration. If you've customized your port settings, adjust accordingly. Current OpenVPN appliances on Amazon AWS have a default security group that opens up the standard ports.
Adjust the security of your database server as needed.
Important
If you skip this step, you won’t be able to test any connections to the database server.
AWS
Note that Amazon RDS databases are protected by security groups, an Amazon-specific security system that functions like a firewall. Therefore, you must adjust the security group settings so your Access Server nodes can access the Amazon RDS database.
DigitalOcean
For DigitalOcean, you must adjust the trusted sources to improve the database security and allow incoming connections from each node.
Sign in to your Access Server console and get root privileges.
Install the MySQL and client library packages:
apt-get update
apt-get install mysql-client libmysqlclient-dev
Connect to your database instance using the MySQL command-line tool, replacing the values with those from your database connection information when you set up your database instance:
AWS:
mysql -h [Endpoint] -u [Master username] -p
DigitalOcean:
mysql -h [Host] -u [username] -P [port] -D [database] -p
When prompted, provide the Master password (AWS) or password (DigitalOcean).
Tip
For your DigitalOcean user, you may need to edit the password encryption to support Legacy, MySQL 5.x.
Upon successful connection, a message similar to this displays:
Welcome to the MySQL monitor. Commands end with ; or \g.
Your MySQL connection id is 13
Type 'help;' or '\h' for help. Type '\c' to clear the current input statement.
You can now exit with the exit command.
Sign in to the Access Server Admin Web UI using the server's IP address or the custom hostname, if you have configured it, along with /admin. (For example, https://192.0.2.10/admin.)
Click VPN Server.
The Network Settings tab displays.
Click the Clustering & Failover tab.
Click New Cluster.
The Create a new cluster page displays.
Convert the Access Server default SQLite3 database to a MySQL-type database
Enter the Node Name.
This unique name displays on the Status Overview page after you complete your cluster configuration — it automatically populates with the existing node name of your Access Server.
Enter your database connection information into the MySQL Settings fields.
The MySQL Hostname or IP Address is the endpoint (AWS) or host (DigitalOcean).
The MySQL Port is set to 3306 by default. Change it to the port noted above for DigitalOcean.
The MySQL Username is the Master username (AWS) or username (DigitalOcean).
The MySQL Password is the Master password (AWS) or password (DigitalOcean).
(Optional) Adjust the Inter-node communication settings with the hostname or IP address for the VPN server.
Define the Cluster round-robin DNS hostname, e.g., https://vpn.mybusiness.com.
Click Save and Restart.
The local SQLite3 databases are converted to the new MySQL-type databases. Access Server takes a few minutes or more for this conversion. If your user base is large, the conversion will take longer.
Once completed, Access Server restarts automatically.
Once the Access Server is restarted, sign back into your Admin Web UI.
The Cluster View notification is displayed. With a cluster setup, some Admin Web UI pages are modifiable for the entire cluster, while others require changes to be made on individual nodes. For example, a node-specific setting is the software license for that node.
Click Confirm.
Important
When you convert your Access Server to a cluster configuration, any existing user certificates and settings are converted and stored in the new database. You can only do this conversion once — you can’t repeat this to combine multiple different Access Servers with users and settings into one cluster. The first Access Server you use to create your cluster is the master data set. Any additional Access Server nodes use that data set. Any changes you make after creating your cluster architecture are applied to the central database used by all cluster nodes.
Important
When adding new Access Server nodes to the cluster, you must ensure that security is in place to connect to the database. For example, you’ll need to set up security groups in AWS or add each new DigitalOcean droplet as a trusted source to your database server.
Sign in to the Admin Web UI of the new node.
Click VPN Server.
The Network Settings tab displays.
Click the Clustering & Failover tab.
Click Join A Cluster.
Enter the database connection details and click Save and Restart to join the cluster.
Once the node restarts, you can sign in, and the Cluster View message displays.
Click Confirm.
You can create DNS A records for each Access Server node that resolve to a single hostname. Another option is to use a more intelligent DNS service, such as Route 53, which can manage DNS records based on health checks or geolocation data.
However, a DNS round-robin is the simplest solution, giving your users a single address to use for connections. Each VPN client tries each IP address in the DNS round-robin record in sequential order until it successfully connects. Should a server fail, a temporary connection failure occurs for any clients connected to that server until they automatically connect to another server in the cluster.
To set up DNS A records:
Add a new DNS record with your web hosting provider.
Select Type A.
Enter the Hostname (For example, “VPN” or “cluster”).
Enter the IP address of the first node in the cluster.
Change the TTL if desired.
Click Save.
Repeat these steps to add each Access Server node as an IP address assigned to the same Hostname. Multiple A records on the same subdomain automatically become a round-robin DNS record in almost all DNS management systems.
Example DNS round-robin setup
A setup with four nodes might look like this:
Hostname | IP Address |
|---|---|
cluster(.yourcompany.com) | 192.0.2.10 |
cluster(.yourcompany.com) | 192.0.2.20 |
cluster(.yourcompany.com) | 192.0.2.30 |
cluster(.yourcompany.com) | 192.0.2.40 |
Note
In our documentation, we use example IPv4 addresses and subnets reserved for documentation, such as 192.0.2.0/24, 198.51.100.0/24, and 203.0.113.0/24.
Ensure you replace them with valid IPv4 addresses and subnets for your network(s).
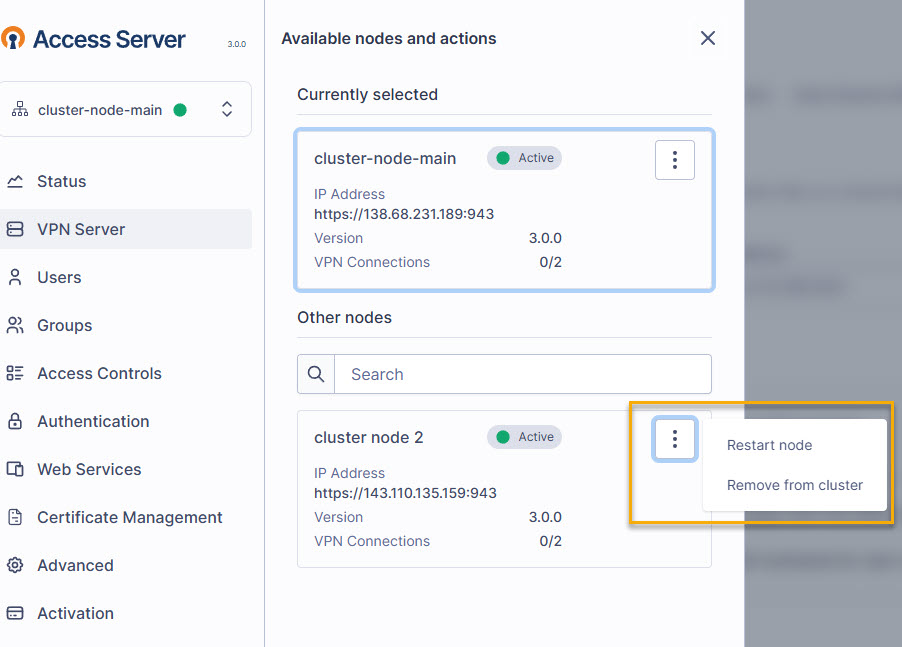
The Admin Web UI displays differently when your Access Servers run in a cluster.
Sign in to the Admin Web UI for any node.
The Cluster View notification displays until you check to dismiss it.
From each page in the Admin Web UI, the node name and status display above the navigation pane.
Click the cluster drop-down to switch between nodes.
Pages and sections specific to the node are labeled with the node name.
From the cluster node drop-down, you can click on the node details to restart or remove it.