Tutorial: Restrict SaaS Login Access Using Domain Routing and an IP Allowlist
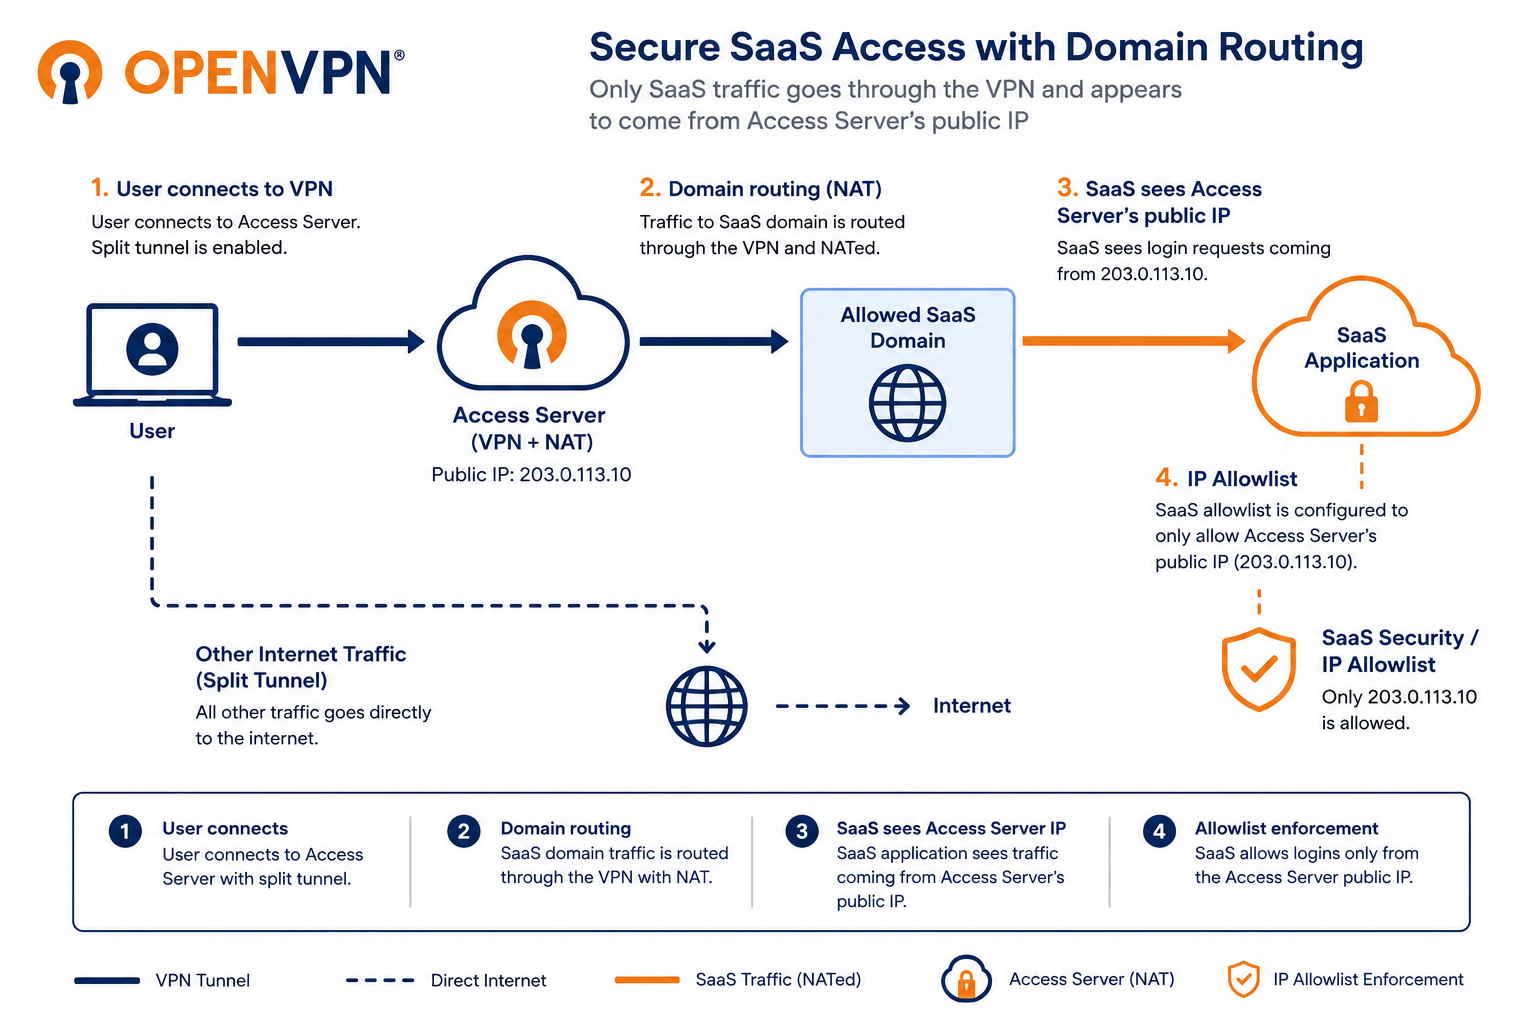
Use Access Server's domain routing feature to route SaaS application traffic through the VPN tunnel without backhauling all internet traffic, then restrict SaaS login access to your Access Server's public IP address using an allowlist.
Overview
Many organizations use SaaS applications, such as Salesforce, Zendesk, or Microsoft 365, and want to ensure that employees can sign in only from known, controlled IP addresses. Requiring VPN connectivity before accessing these tools reduces the risk of credential theft and unauthorized access from unmanaged devices or networks.
This tutorial shows you how to use Access Server's domain routing feature to route only SaaS application traffic through the VPN, while leaving all other internet traffic on the user's local connection. By routing SaaS traffic through Access Server using NAT, all login attempts to your SaaS applications appear to come from Access Server's public IP address, which you can then allowlist in your SaaS provider's security settings.
You can apply domain routing rules globally, per group, or per user. This allows you to enforce role-based access controls and restrict access to specific SaaS applications based on user or group membership. For example, the Sales group can access Salesforce, while only the Support group can access Zendesk.
How this differs from IP-based SaaS allowlisting
If your SaaS provider has stable, published IP ranges, you can use Access Server's split tunnel feature to route those IP ranges through the VPN. Refer to Tutorial: Set Up an IP Allowlist Using Access Server's Split Tunneling Functionality for Enhanced SaaS Security.
Domain routing is the better choice when:
Your SaaS provider uses dynamic IPs or CDN-backed infrastructure where IP ranges change frequently.
You want to route by domain name rather than maintain IP lists.
You want per-group access control at the domain level.
Prerequisites
Access Server 3.1.0 or newer.
Admin Web UI access.
DNS server proxy enabled globally.
Tip
In Access Server 3.1.0 and newer, DNS proxy is enabled by default (
auto). To verify or change this, refer to Tutorial: Configure Domain Routing Settings Using the Access Server CLI.Split tunnel access configured for the users who will access the SaaS application.
The domain names used by your SaaS application. For example,
salesforce.comorzendesk.com. Check your SaaS provider's documentation for the full list of domains. You can also use wildcard domains, such as*.salesforce.com.Your Access Server's public IP address. You'll use this address when configuring the IP allowlist in your SaaS provider.
You can apply domain routing rules globally (all users) or per group (recommended for role-based access control). Use per-group rules if different teams should only access specific SaaS applications.
For all users (global rules)
Sign in to the Admin Web UI.
Select Access Controls.
Select the Global Access Rules tab.
Under Domains, set the routing mode to NAT so the SaaS traffic appears to originate from Access Server's public IP address.
Enter the domain for your SaaS application in the Domains field. For example,
salesforce.com. Add wildcard entries if needed, such as*.salesforce.comto include all Salesforce subdomains.Select Save and Restart.
For a specific group (per-group rules)
Use this approach to enforce role-based access, such as only allowing the Sales group to access Salesforce.
Sign in to the Admin Web UI.
Select Groups, and open the group you want to configure.
Select the Access Rules tab.
Select New Access Rule.
In the Address field, enter the domain for your SaaS application. For example,
salesforce.comor*.salesforce.com.Set Reachable via to NAT.
Select Save rule and Restart.
Repeat for any additional groups and their respective SaaS applications.
Note
When a domain is entered as the destination, the Protocol and Port fields are disabled. This is expected behavior. Protocol and port filtering aren't supported for domain routing rules.
Before configuring the SaaS allowlist, confirm that traffic to your SaaS domain is correctly routed through the VPN.
Connect a test user to the VPN.
While connected, navigate to your SaaS application's login page.
In the SaaS application, verify that the source IP of the login attempt matches Access Server's public IP address.
If traffic isn't going through the VPN, check the following:
DNS proxy is enabled — refer to Tutorial: Configure Domain Routing Settings Using the Access Server CLI.
The user has reconnected since the domain rule was added.
The domain is spelled correctly, and wildcard entries are used where needed.
Once you've confirmed that SaaS traffic is routing through Access Server, restrict login access in your SaaS provider so that only login attempts from Access Server's public IP address are accepted.
The exact steps vary by provider. Below is an example using Salesforce.
Important
The IP address you add to the SaaS allowlist should be a static public IP address used by Access Server.
If your Access Server uses an ephemeral public IP address that changes when the cloud instance is stopped, restarted, or recreated, update the SaaS allowlist whenever the public IP changes.
For production deployments, we recommend using a static public IP address whenever possible.
Salesforce example
Sign in to Salesforce with an administrator account.
Select the Setup icon.
Select Users → Profiles.
Select the profile you want to restrict. For example, "End Users."
Select Login IP Ranges.
Select New to define the allowed IP address.
Enter Access Server's public IP address in both the Start IP Address and End IP Address fields.
Enter a description and select Save.
Repeat for any additional profiles as needed.
Once configured, users who aren't connected to Access Server will receive an access denied error when attempting to sign in. Users connected to Access Server will sign in successfully because their traffic appears to originate from the allowlisted IP.
Tip
Some SaaS providers publish documentation on configuring login IP restrictions. Refer to your provider's help documentation for specific instructions. For Salesforce, refer to Salesforce login IP restriction documentation.
Disconnect a test user from the VPN.
Attempt to sign in to the SaaS application. The login should be denied.
Connect the test user to the VPN.
Attempt to sign in to the SaaS application again. The login should succeed.
If you configured per-group rules, test with a user in a group that shouldn't have access and confirm they can't reach the SaaS application through the VPN.